はじめに
XRジャム2019にて使用したラジコンのポジショントラッキングにARKitを使ってみました。
Azure Spatial Anchorsが発表されているので今後使うことはないような気もしますが折角作ったので備忘録として置いておきます。
この1ヶ月間コツコツと作ってたARラジコンでARサッカー!!漸く形になった!!
— メガネ (@mClCln1) 2019年6月1日
現実世界でゲームみたいなことできてめちゃくちゃ楽しい💪💪
ポジトラには #ARKit を使ったんですけど、お手軽なのに高精度でめちゃくちゃ良いですね
respect for mechpil0t#HoloLens #MR #AR #XR pic.twitter.com/nWdcFRZVA0
開発環境
- Unity2017.4.17f1
- HoloToolkit-Unity-2017.4.3.0
- websocket-sharp
- websocket-sharp-UWP
- Visual Studio 2017 Community
- Xcode 10.2.1
- Swift 5.0.1
- starscream
- Node-red v0.20.5
機能
- HoloLensでiPhoneの位置追従
- MR空間上のオブジェクト位置修正
構成
- ARKitを利用してiPhoneの座標を取得
- 取得した座標をwebsocketサーバ経由でHololensに送信
- 座標を元にHoloLensでMR空間上にオブジェクトを表示
- MR空間上のオブジェクトと実際のiPhoneの位置に誤差がある場合, マーカーの認識で修正
iOS側
iOS側ではwebsocketでの座標送信とvuforia用のマーカー表示を行います。
以下はViewController.swift内で座標を取得する部分です。sessionでカメラ情報から位置座標を取得し、それをwebsocketで送っています。
func session(_ session: ARSession, didUpdate frame: ARFrame) {

        // カメラの位置と回転を取得
        let currentCamera = session.currentFrame?.camera
        let transform = currentCamera?.transform
        let cameraAngles = currentCamera?.eulerAngles

        var jsonDic = Dictionary<String, Any>()
        jsonDic["x"] = NSString(format: "%.6f", (transform?.columns.3[0])!) as String
        jsonDic["y"] = NSString(format: "%.6f", (transform?.columns.3[1])!) as String
        jsonDic["z"] = NSString(format: "%.6f", (transform?.columns.3[2])!) as String
        jsonDic["rotx"] = NSString(format: "%.6f", (cameraAngles?[0])!) as String
        jsonDic["roty"] = NSString(format: "%.6f", (cameraAngles?[1])!) as String
        jsonDic["rotz"] = NSString(format: "%.6f", (cameraAngles?[2])!) as String


        do {
            let jsonData = try JSONSerialization.data(withJSONObject: jsonDic, options: [])
            let jsonStr = String(bytes: jsonData, encoding: .utf8)!
            socket.write(string: jsonStr)
        } catch let error {
            print(error)
        }

    }
冒頭のTwitterの動画のように、「表示」ボタンを押すとVuforiaでの認識用マーカーを表示します。
ここでの注意なのですが、画面を遷移させるとsessionがpauseして座標を取れなくなるので、viewを最前面にもってくる形にしてます。
画面遷移した後にsessionを再開させたりすることはできますが、再開した瞬間のズレが大きいためsessionは止めない方が良いかなって感じですね。

サーバ側(Node-red)
websocketで受信したデータをそのままwebsocketで送信。受信したデータを全ての端末に送信するために、間にfunctionを挟んでセッション情報を削除しています。

delete msg._session;
return msg;
HoloLens側
HoloLens側では現実世界のiPhoneの座標を元にしたオブジェクトの位置の変更、vuforiaを利用してのオブジェクトの位置の再設定をしています。
オブジェクト位置再設定の原理
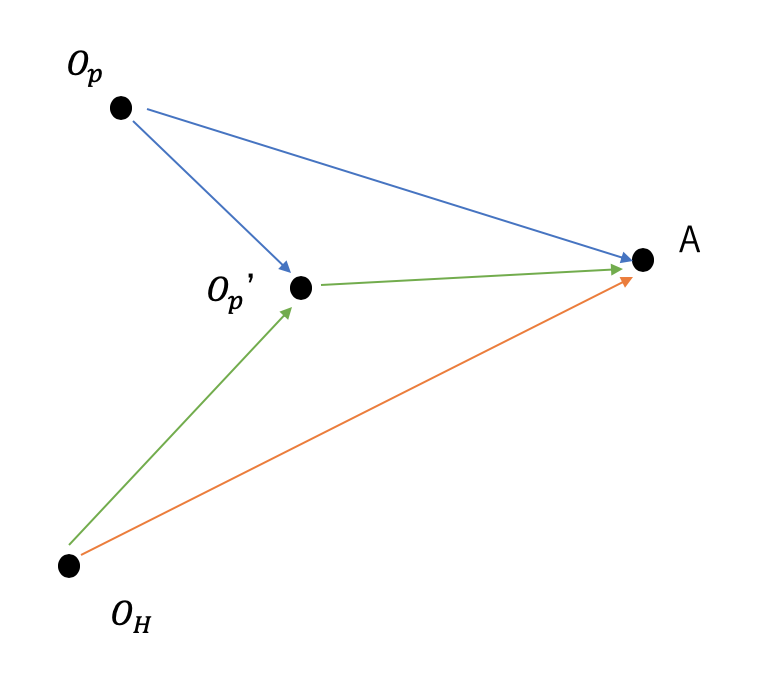
HoloLens空間の座標系とiPhone空間の座標系は互いに独立しています。よって以下のような感じでiPhone空間の座標系をHoloLens空間の座標系で認識させています。
- アプリ起動時、iPhoneとHoloLensで同じ方向を向くとしておく(座標軸の共有)
- HoloLens空間の座標系でのiPhoneの原点はVuforiaでマーカー認識した点とする
簡単に図解します。iPhone座標系の原点を$O_p$, HoloLens座標系の原点を$O_H$, HoloLens座標系でのiPhone原点(vuforiaでマーカー認識した点)を$O_p'$, iPhoneの現在座標を$A$とします。青がiPhoneで観測可能なベクトル、緑がHoloLensで観測可能なベクトル、赤色が求めたいベクトルです。

iPhoneの画面上にVuforiaマーカーをおき、それをHoloLensで認識させるとそれぞれの座標系で点$O_p'$の座標が取得できます。そこから点$A$までiPhoneを移動させた時、$O_p'$からの差分ベクトルを使って以下のように$\vec{O_H A}$を求めます。
\vec{O_H A} = \vec{O_p' A} + \vec{O_p' A} \\
            = \vec{O_p' A} + (\vec{O_p A} - \vec{O_p O_p'})
実装
websocketの送受信を管理するWebSocketManager.csを空のGameObjectにアタッチします。
websocketでデータを受信するとOnMessageによって、iPhoneタグのオブジェクトのlocateAndRotateCursorがiPhoneの回転と座標を引数として実行されます。
using System.Collections;
using System.Collections.Generic;
using UnityEngine;
using WebSocketSharp;
using System.Threading;
using MiniJSON;
using UnityEngine.UI;
using System.Linq;


public class WebSocketManager : MonoBehaviour
{

    WebSocket ws;
    // websocketのurl
    public string uri = "ws://192.168.11.20:1880/testws";
    private GameObject objectTextPanel;

    // Use this for initialization
    void Start()
    {
        objectiPhone = GameObject.FindGameObjectWithTag("iPhone");
        var context = SynchronizationContext.Current;
        Connect();

        ws.OnMessage += (sender, e) =>
        {
            context.Post(state =>
            {

            var json = Json.Deserialize(state.ToString()) as Dictionary<string, object>;

            float x = float.Parse((string)json["x"]);
            float y = float.Parse((string)json["y"]);
            float z = float.Parse((string)json["z"]);
            float roty = float.Parse((string)json["roty"]);

            float[] position_and_rot = { x, y, z, roty };

            objectiPhone.SendMessage("locateAndRotateCursor", position_and_rot);

            }, e.Data);
        };

        ws.OnError += (sender, e) => {
            Debug.Log("error: " + e.ToString());
        };

    }

    public void Connect()
    {
        Debug.Log("attempt to connect");
        ws = new WebSocket(uri);
        ws.ConnectAsync();
    }

    public void Disconnect()
    {
        ws.Close();
    }

    public void SendCommand(string msg)
    {
        if (ws != null && ws.IsAlive)
        {
            ws.Send(msg);
        }
    }

    // Update is called once per frame
    void Update()
    {
    }

}
次に、 iPhoneの位置を反映させたい方のオブジェクトにiPhoneタグをつけ、下記のCursorManager.csをアタッチします。
using System.Collections;
using System.Collections.Generic;
using UnityEngine;
using UnityEngine.UI;
using MiniJSON;
using System.Threading;

public class CursorManager : MonoBehaviour
{
    // 初期位置、初期回転
    public float start_x = 0;
    public float start_y = 0;
    public float start_z = 0;
    public float start_rotx = 0;
    public float start_roty = 0;
    public float start_rotz = 0;

    // カーソル位置更新時のrotation
    private Quaternion startRotation;


    // カーソル位置更新前のiPhoneの位置
    private Quaternion previousRotation;
    private Vector3 previousPosition;
    // カーソル位置更新時の前iPhoneの位置保存用
    private Quaternion tempRotation;
    private Vector3 tempPosition;


    void Start()
    {
        this.gameObject.transform.position = new Vector3(start_x, start_y, start_z);

        startRotation = Quaternion.Euler(start_rotx, start_roty, start_rotz);
        this.gameObject.transform.rotation = startRotation;

        previousPosition = new Vector3(0, 0, 0);
        previousRotation = new Quaternion(0, 0, 0, 0);

    }


    // Update is called once per frame
    void Update()
    {


    }

    // WebSocketManagerに呼ばれる
    void locateAndRotateCursor(float[] position_and_rot)
    {
        tempPosition.x = position_and_rot[0];
        tempPosition.y = position_and_rot[1];
        tempPosition.z = position_and_rot[2];

        //                                    相対距離
        // カーソル位置 = Holo座標でのカーソル原点 + (現在のiPhoneの位置 - 再設定iPhone原点)
        this.gameObject.GetComponent<Rigidbody>().MovePosition(new Vector3(start_x + (position_and_rot[0] - previousPosition[0]), start_y + (position_and_rot[1] - previousPosition[1]), start_z - (position_and_rot[2] - previousPosition[2])));

        tempRotation = Quaternion.AngleAxis(position_and_rot[3] * Mathf.Rad2Deg, new Vector3(0, -1, 0));
        this.gameObject.GetComponent<Rigidbody>().MoveRotation(tempRotation);

    }

    public void updateOrigin(Vector3 position, Quaternion rotation)
    {
        start_x = position[0];
        start_y = position[1];
        start_z = position[2];

        startRotation = rotation;

        previousPosition = tempPosition;
        previousRotation = tempRotation;
    }
}
locateAndRotateCursorで上述の計算をして2つの座標系の違いを吸収しています。
updateOriginはVuforiaで画像を認識した際に呼び出されます。
次はVuforia側の処理です。VuforiaのImageTarget配下にCanvasを、さらにその配下にUI>Buttonを置き、ButtonにFocusedButtonManager.csをアタッチします
using System.Collections;
using System.Collections.Generic;
using UnityEngine;
using UnityEngine.UI;
using HoloToolkit.Unity.InputModule;

public class FocusedButtonManager : MonoBehaviour, IFocusable
{

    public Image image;
    private float waitTime = 2.0f;
    private bool progress;
    public GameObject cursor;


    // Use this for initialization
    void Start()
    {
        image.fillAmount = 0.0f;
        progress = false;
    }

    // Update is called once per frame
    void Update()
    {
        if (progress == true)
        {
            image.fillAmount += 1.0f / waitTime * Time.deltaTime;
            if (image.fillAmount >= 1.0f)
            {
                /*--- Do Something Here ---*/
                // cursol.SetActive(true);
                cursor.transform.position = image.transform.position;
                cursor.transform.rotation = image.transform.rotation;

                cursor.GetComponent<CursorManager>().updateOrigin(image.transform.position, image.transform.rotation);
                /*--- Do Something End ---*/
                image.fillAmount = 0.0f;
                progress = false;
            }
        }
        else
        {
            image.fillAmount = 0.0f;
        }
    }

    public void OnFocusEnter()
    {
        progress = true;
    }

    public void OnFocusExit()
    {
        progress = false;
    }
}
マーカーを認識した瞬間にオブジェクト位置が更新されるのは不便+マーカーがカメラから外れてもオブジェクトを表示し続けたいので注視ボタンを使いました。
(HoloLens 注視入力ボタンをつくーる)
マーカーを注視し続けるとCursorManager.csのupdateOriginが呼び出されてオブジェクトの位置が設定される、という感じです。
まとめ
何としてでもスマホの位置をHoloLensで取りたくてこんな感じになりました。ARKitの自己位置推定の精度がなかなか良いので結構うまくいくのですが、僕のようなラジコンに乗せるといった使い方だと床の模様や照明に左右されやすいって感じですかね。
Azure Spatial Anchorsで本記事の内容は無に帰しそうですが、誰かの役に立てば幸いです。