はじめに
SwiftUIでRelativeDateTimeFormatterクラスを用いて、経過時間を取得できるようにすることと、取得した経過時間を表示することを目的とする。
UIのデザインはcakesのnote風のデザインを参考にカード型のViewを作ります。
今後は今回作成したカードに前回までに実装した地図と都道府県市町村名を表示できるようにし、Firebaseで更新できるようにすることが目的です。
前回までの記事は以下を参考ください。
参考記事
【SwiftUI】Mapkitから取得した情報をFirebaseに保存する
開発環境
OSX 10.15.7 (Catalina)
Xcode 12.2.0
CocoaPods 1.10.0
RelativeDateTimeFormatterの実装
基準日時からの経過時間を出力するクラスです。Twitterなどの○秒前や○日前などを表示をすることができます。
ロケーションを設定することで英語表記や日本語表記に変更が可能になります。
以下では○秒前、○分前、○時間前、○日前、○年前をそれぞれ記載しています。
参考記事
How to show a relative date and time using RelativeDateTimeFormatter
Relative date time formatting in SwiftUI
import SwiftUI

let nowTime = Date()

print(nowTime)

let formatter = RelativeDateTimeFormatter()
formatter.locale = Locale(identifier: "ja_JP")

let fmt = ISO8601DateFormatter()

// ○秒前
let createdDate = "2020-11-19T16:12:30+0000"
print(createdDate)

let date1 = fmt.date(from: createdDate)!
let components = Calendar.current.dateComponents(
    [.day, .year, .month, .minute, .second],
    from: Date(),
    to: date1
)
let timeAgo1 = formatter.localizedString(from: components)

print(timeAgo1)

// ○分前
let createdDate2 = "2020-11-19T16:00:00+0000"
print(createdDate2)

let date2 = fmt.date(from: createdDate2)!
let components2 = Calendar.current.dateComponents(
    [.day, .year, .month, .minute, .second],
    from: Date(),
    to: date2
)
let timeAgo2 = formatter.localizedString(from: components2)

print(timeAgo2)


// ○時間前
let createdDate3 = "2020-11-19T11:00:00+0000"
print(createdDate3)

let date3 = fmt.date(from: createdDate3)!
let components3 = Calendar.current.dateComponents(
    [.day, .year, .month,.hour ,.minute, .second],
    from: Date(),
    to: date3
)
let timeAgo3 = formatter.localizedString(from: components3)

print(timeAgo3)

// ○日前
let createdDate4 = "2020-11-15T11:00:00+0000"
print(createdDate4)

let date4 = fmt.date(from: createdDate4)!
let components4 = Calendar.current.dateComponents(
    [.year, .month, .day, .hour , .minute, .second],
    from: Date(),
    to: date4
)
let timeAgo4 = formatter.localizedString(from: components4)

print(timeAgo4)

// ○年前
let createdDate5 = "2000-11-15T11:00:00+0000"
print(createdDate4)

let date5 = fmt.date(from: createdDate5)!
let components5 = Calendar.current.dateComponents(
    [.year, .month, .day, .hour , .minute, .second],
    from: Date(),
    to: date5
)
let timeAgo5 = formatter.localizedString(from: components5)

print(timeAgo5)
playgroundで出力した結果は以下のとおりです。
2020-11-19 16:12:35 +0000
2020-11-19T16:12:30+0000
5 秒前
2020-11-19T16:00:00+0000
12 分前
2020-11-19T11:00:00+0000
5 時間前
2020-11-15T11:00:00+0000
4 日前
2020-11-15T11:00:00+0000
20 年前
経過時間は自動で切り替えて表示されます。
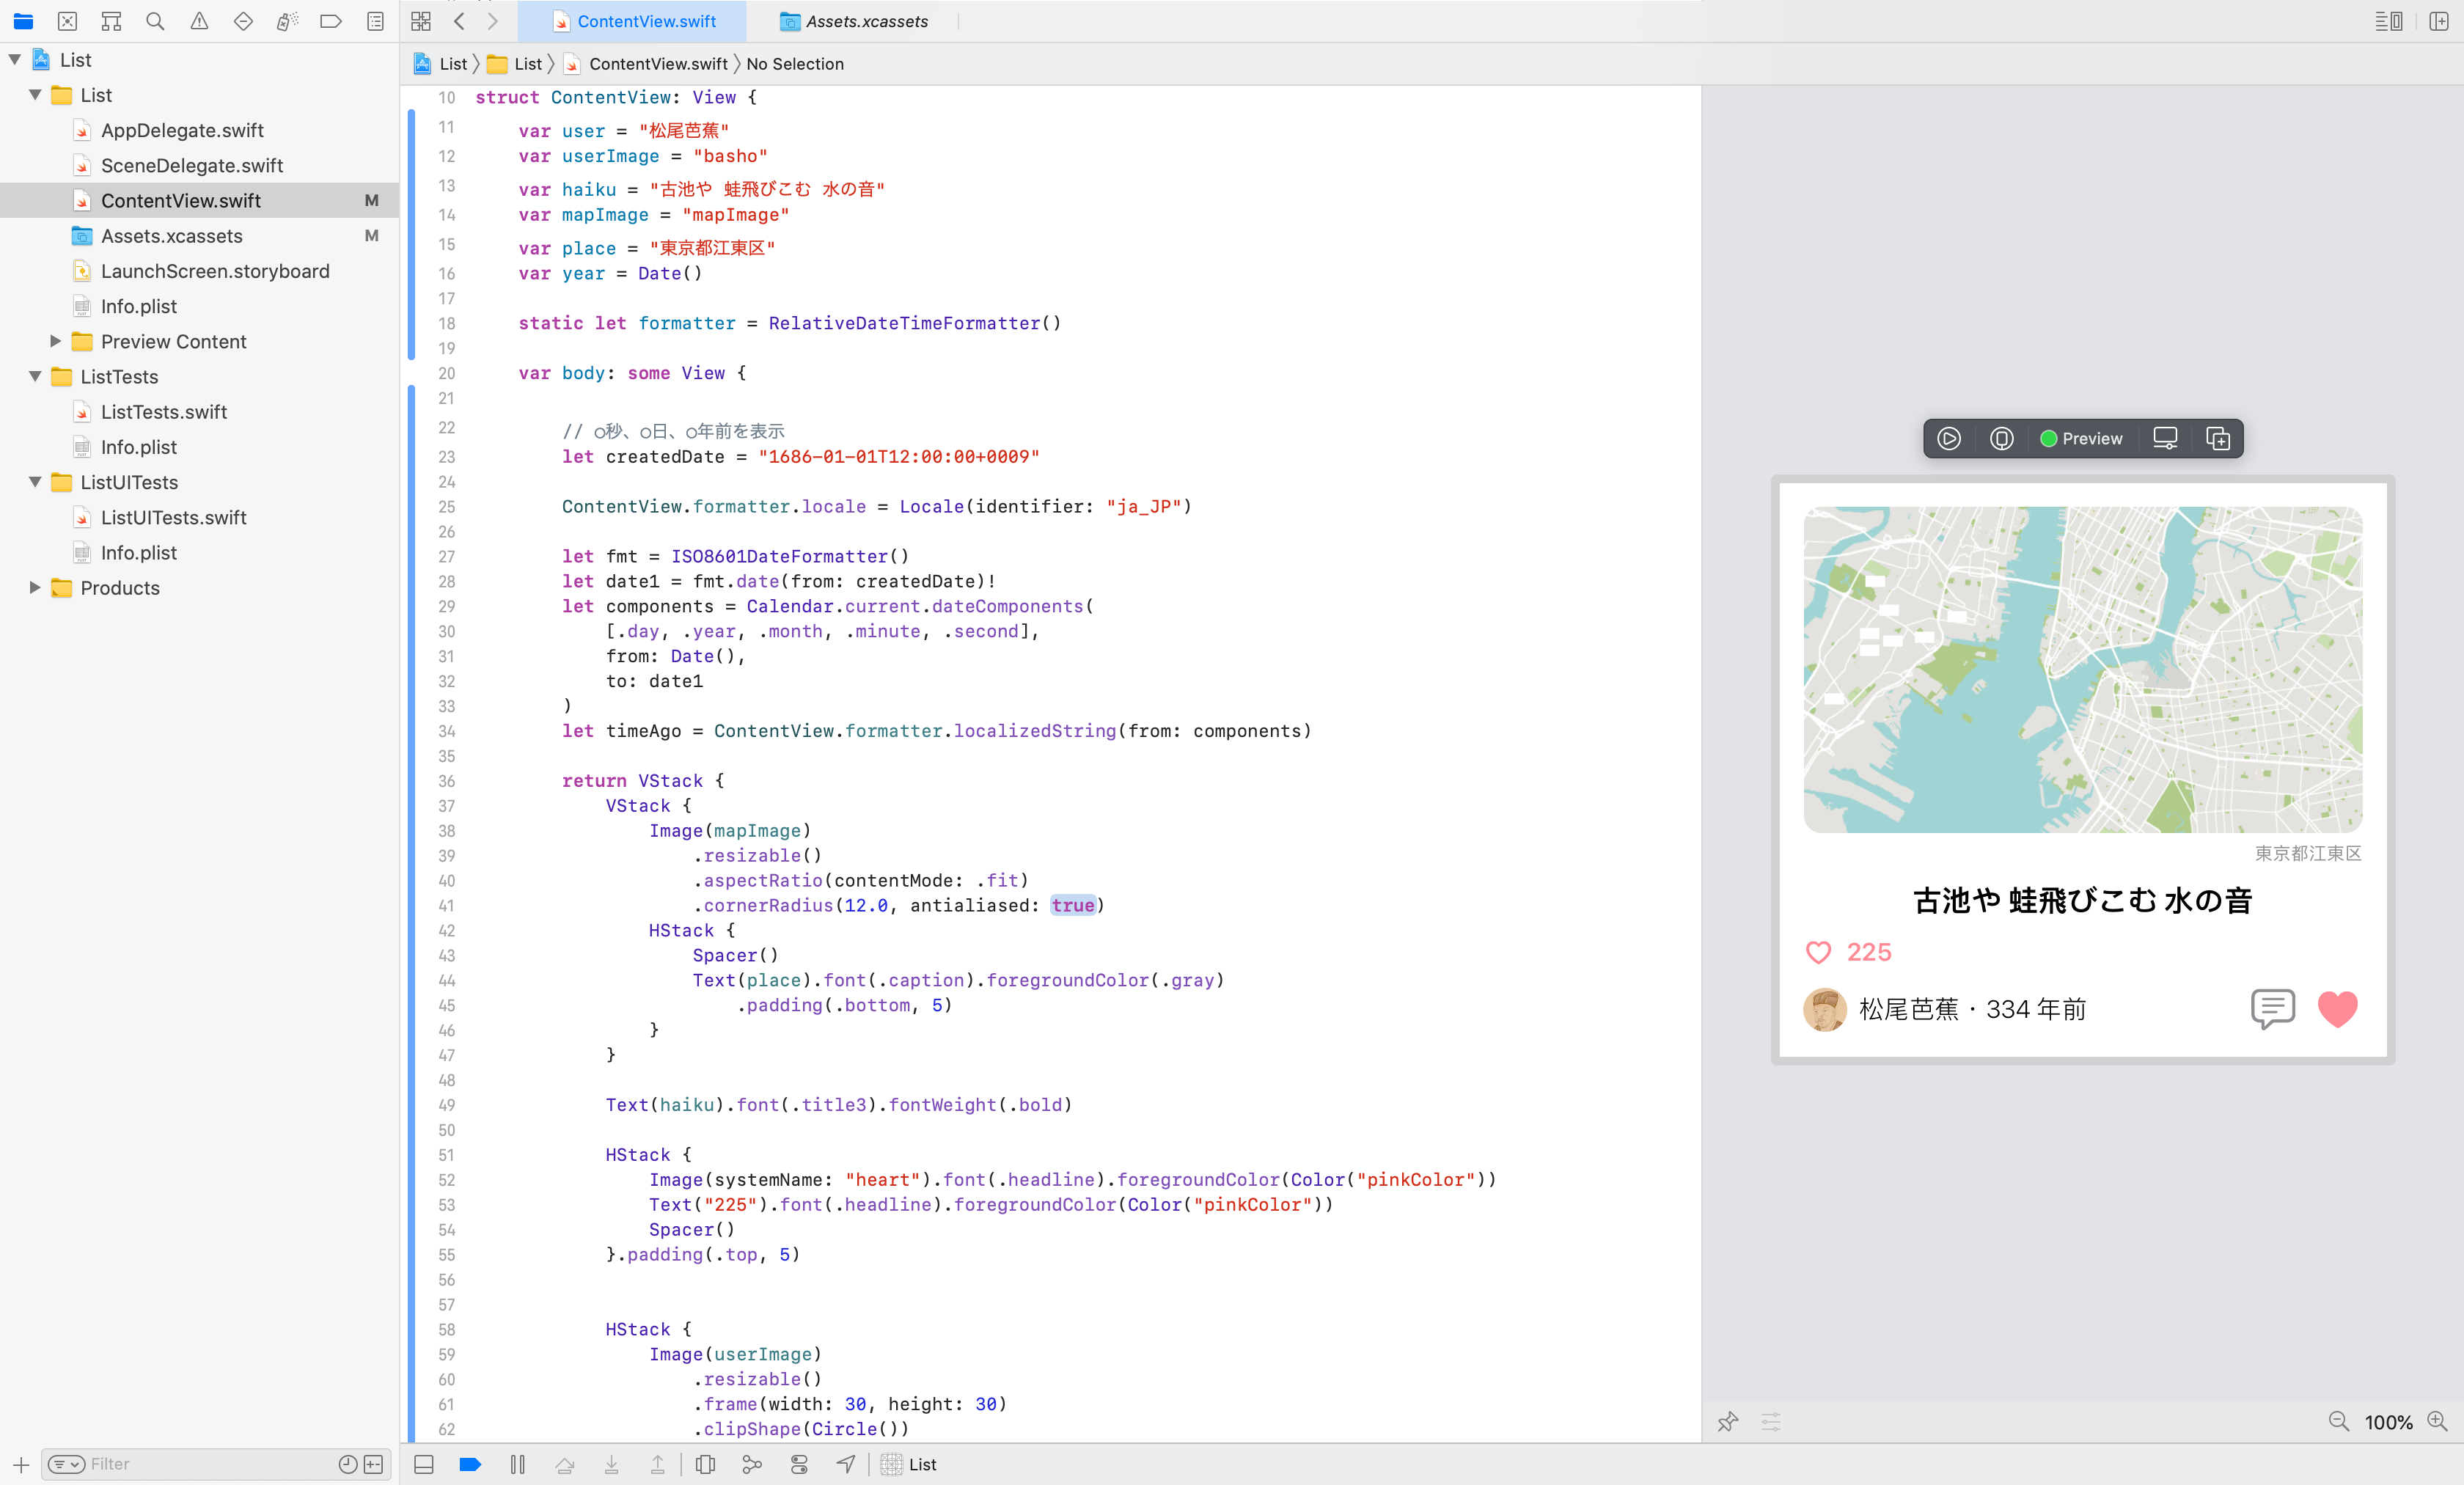
RelativeDateTimeFormatterを実装し、経過時間を表示したカードを作る。
手順は以下のとおりです。
- 地図、タイトル、作者、日時などを表示したカード型のViewをつくる
- リストに先ほど作成したカードを表示
import SwiftUI

struct ContentView: View {
    var user = "松尾芭蕉"
    var userImage = "basho"
    var haiku = "古池や 蛙飛びこむ 水の音"
    var mapImage = "mapImage"
    var place = "東京都江東区"

    static let formatter = RelativeDateTimeFormatter()

    var body: some View {

        // ○秒、○日、○年前を表示
        let createdDate = "1686-01-01T12:00:00+0009"

        ContentView.formatter.locale = Locale(identifier: "ja_JP")

        let fmt = ISO8601DateFormatter()
        let date1 = fmt.date(from: createdDate)!
        let components = Calendar.current.dateComponents(
            [.day, .year, .month, .minute, .second],
            from: Date(),
            to: date1
        )
        let timeAgo = ContentView.formatter.localizedString(from: components)

        return VStack {
            VStack {
                Image(mapImage)
                    .resizable()
                    .aspectRatio(contentMode: .fit)
                    .cornerRadius(12.0, antialiased: /*@START_MENU_TOKEN@*/true/*@END_MENU_TOKEN@*/)
                HStack {
                    Spacer()
                    Text(place).font(.caption).foregroundColor(.gray)
                        .padding(.bottom, 5)
                }
            }

            Text(haiku).font(.title3).fontWeight(.bold)

            HStack {
                Image(systemName: "heart").font(.headline).foregroundColor(Color("pinkColor"))
                Text("225").font(.headline).foregroundColor(Color("pinkColor"))
                Spacer()
            }.padding(.top, 5)


            HStack {
                Image(userImage)
                    .resizable()
                    .frame(width: 30, height: 30)
                    .clipShape(Circle())

                HStack {
                    Text(user).font(.headline).fontWeight(.light)
                    + Text("・").font(.headline).fontWeight(.light)
                    + Text(timeAgo).font(.headline).fontWeight(.light)
                }
                Spacer()
                HStack {

                    Image(systemName: "text.bubble").font(.title).foregroundColor(.gray)
                    Image(systemName: "heart.fill").font(.title).foregroundColor(Color("pinkColor"))
                }
            }
        }.padding()
    }
}

struct ContentView_Previews: PreviewProvider {
    static var previews: some View {
        ContentView()
            .previewLayout(.fixed(width: 414, height: 391))
    }
}
今後は今回作成したカードをリストにし、表示できるようにします。
以上です。
