Java EE Security API 1.0
Java EE 8の新機能。現状はサードパーティーのフレームワークやアプリケーションサーバーで行っているセキュリティ周りについて標準化しましたよ、ってことみたい。
OAuth 2.0やOpenID Connectに対応!というのを見かけた気がするので飛びついてみたのだけれど…対応はまだのようで。それでもJASPICを使うよりは親切になっている印象。
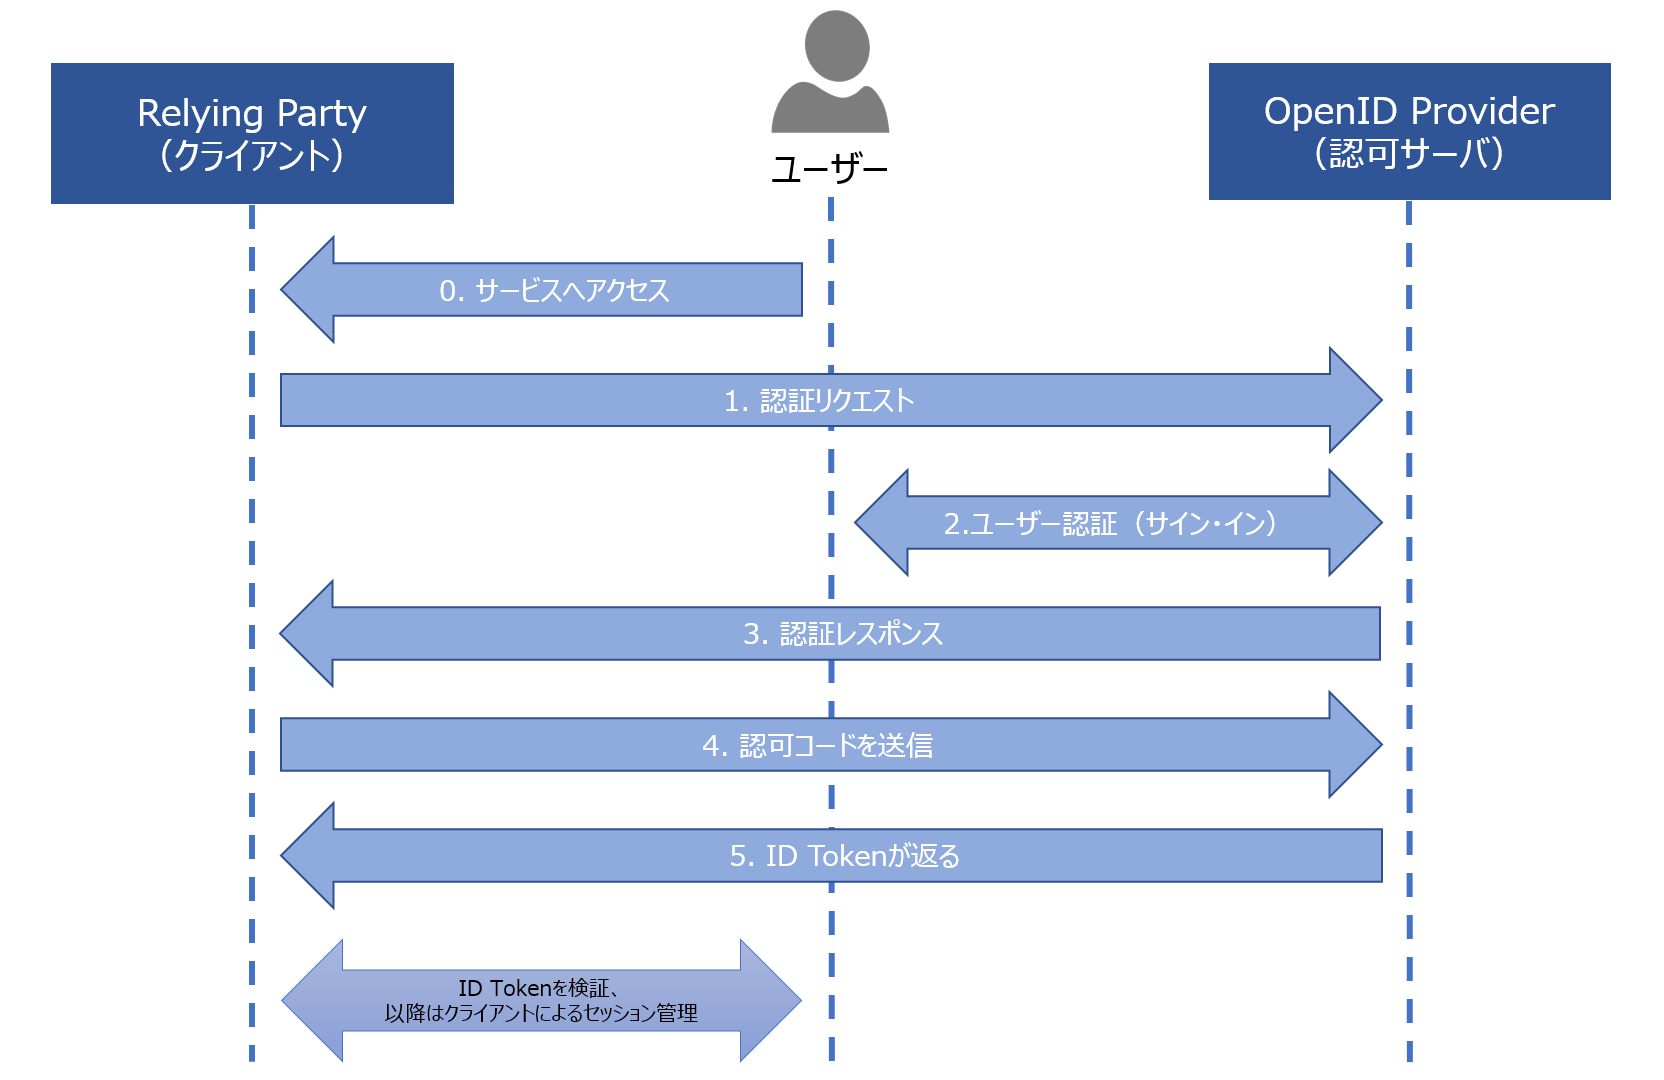
アプリの動作フロー概要
- OpenID Connectの「Authorization Code Flow」を利用
- OpenID Providerは認証のみの利用、認証された後はクライアント独自のセッション管理を行う
- エンタープライズ利用なのでユーザーはSCIMなりで登録済み、という設定
動作環境
- GlassFish 5.0 (Full Platform)
- Oracle JDK 8 (Update 144)
- Google Identity Platform
Azure ADを利用するとエンタープライズ感が出そうだけど、用意の容易さで今回はGoogle認証を![]()
実装していく
サービスへのアクセスがきた
まずユーザーがサービスへアクセスしたところから考える。リクエストを受け取ったところでOpenID Connectのフローを開始して認証したい。
ということで、カスタマイズの認証処理を作成すべくHttpAuthenticationMechanismインターフェイスを実装していく。具体的な認証の処理はvalidateRequest()メソッドへ記述していけばよい。これはサーブレット・フィルタやサーブレットのService()メソッドより前に呼ばれるんだそうだ。
@ApplicationScoped
public class TestAuthenticationMechanism implements HttpAuthenticationMechanism {

    @Override
    public AuthenticationStatus validateRequest(HttpServletRequest req, HttpServletResponse res, HttpMessageContext context) throws AuthenticationException {
        throw new UnsupportedOperationException("Not supported yet."); //To change body of generated methods, choose Tools | Templates.
    }

}
あと、そもそもの保護すべきコンテンツも用意しておく。「foo」ロールを持ってるユーザーだけが見られるページを作成。
@WebServlet("/servlet")
@DeclareRoles({"foo", "bar", "baz"})
@ServletSecurity(
        @HttpConstraint(rolesAllowed = "foo")
)
public class Servlet extends HttpServlet {

    @Override
    public void doGet(HttpServletRequest req, HttpServletResponse res) throws ServletException, IOException {

        res.setContentType("text/plain; charset=utf-8");

        String webName = null;
        if (req.getUserPrincipal() != null) {
            webName = req.getUserPrincipal().getName();
        }

        res.getWriter().write("web username: " + webName);
    }

}
認証リクエスト(Authentication Request)を送る
OpenID Providerへ認証リクエストを送る。validateRequest()メソッドより必要なパラメーターをつけてAuthorization Endpointへリダイレクトすればいいね。
@ApplicationScoped
public class TestAuthenticationMechanism implements HttpAuthenticationMechanism {

    @Override
    public AuthenticationStatus validateRequest(HttpServletRequest req, HttpServletResponse res, HttpMessageContext context) throws AuthenticationException {
        StringBuilder url = new StringBuilder();
        url.append("https://accounts.google.com/o/oauth2/v2/auth");
        url.append("?response_type=").append("code");
        url.append("&scope=").append("openid");
        url.append("&client_id=").append("<YOUR_CLIENT_ID>");
        url.append("&state=").append("123456798"); // TODO CSRF対策する
        url.append("&redirect_uri=").append("http://localhost:8080/learn-securityapi-tutorial/cb");

        return context.redirect(url.toString());
    }

}
認証レスポンス(Authentication Response)を受け取る
認証リクエストに対するレスポンスを受け取るためのエンドポイントをvalidateRequest()メソッド内に用意。
    @Override
    public AuthenticationStatus validateRequest(HttpServletRequest req, HttpServletResponse res, HttpMessageContext context) throws AuthenticationException {

        // 設定したリダイレクトURIにリクエストがきた
        if("http://localhost:8080/learn-securityapi-tutorial/cb".equals(req.getRequestURL().toString())){
            return context.doNothing();
        }

        StringBuilder url = new StringBuilder();
        /* (省略)リダイレクト関連の処理 */
        return context.redirect(url.toString());
    }
認可コードを送信(Token Request)する
ID Tokenをもらうべく、認証レスポンスでもらった認可コードをトークンエンドポイントへ送信。JAX-RS clientを利用した。
    @Override
    public AuthenticationStatus validateRequest(HttpServletRequest req, HttpServletResponse res, HttpMessageContext context) throws AuthenticationException {

        // 設定したリダイレクトURIへのリクエストがきた
        if ("http://localhost:8080/learn-securityapi-tutorial/cb".equals(req.getRequestURL().toString())) {

            Client client = ClientBuilder.newClient();

            try {
                // 認可コードを送信
                Form form = new Form();
                form.param("client_id", "<YOUR_CLIENT_ID>");
                form.param("client_secret", "<YOUR_CLIENT_SECRET>");
                form.param("grant_type", "authorization_code");
                form.param("code", req.getParameter("code")); // 受け取った認可コード
                form.param("redirect_uri", "http://localhost:8080/learn-securityapi-tutorial/cb");

                WebTarget webTarget = client.target("https://www.googleapis.com/oauth2/v4/token");

                // Token Responseを取得
                Response tokenResponse = webTarget.request().post(Entity.entity(form, MediaType.APPLICATION_FORM_URLENCODED), Response.class);
                tokenResponse.close();
            } finally {
                client.close();
            }

            return context.doNothing();
        }

        StringBuilder url = new StringBuilder();
        /* (省略)リダイレクト関連の処理 */
        return context.redirect(url.toString());
    }
ID Tokenが返る(Token Response)
Token RequestのレスポンスからID Tokenを受け取り、そこからユーザー情報を取得。JSONで渡されるのでJSON-Bを利用しJavaのオブジェクトに変換していく。
    @Override
    public AuthenticationStatus validateRequest(HttpServletRequest req, HttpServletResponse res, HttpMessageContext context) throws AuthenticationException {

        // 設定したリダイレクトURIへのリクエストがきた
        if ("http://localhost:8080/learn-securityapi-tutorial/cb".equals(req.getRequestURL().toString())) {

            Client client = ClientBuilder.newClient();

            try {
                // 認可コードを送信
                Form form = new Form();
                /* (省略) */
                WebTarget webTarget = client.target("https://www.googleapis.com/oauth2/v4/token");

                // Token Responseを取得
                try (Response tokenResponse = webTarget.request().post(Entity.entity(form, MediaType.APPLICATION_FORM_URLENCODED), Response.class)) {

                    // Token Responseのオブジェクトにマッピング
                    TokenResponse responseObj = tokenResponse.readEntity(TokenResponse.class);

                    // ID Tokenからペイロードを取り出して、ID Tokenオブジェクトへマッピング
                    String[] idTokenValues = responseObj.getIdToken().split("\\.");
                    String payload = new String(Base64.getUrlDecoder().decode(idTokenValues[1]), StandardCharsets.UTF_8);
                    IdToken idToken = JsonbBuilder.create().fromJson(payload, IdToken.class);
                }
            } finally {
                client.close();
            }

            return context.doNothing();
        }

        StringBuilder url = new StringBuilder();
        /* (省略)リダイレクト関連の処理 */
        return context.redirect(url.toString());
    }
マッピングされるクラスはこんな感じ。
public class TokenResponse {

    @JsonbProperty(value = "access_token")
    private String accessToken;

    @JsonbProperty(value = "token_type")
    private String tokenType;

    /* (省略) */

    public String getAccessToken() {
        return accessToken;
    }

    public void setAccessToken(String accessToken) {
        this.accessToken = accessToken;
    }

    public String getTokenType() {
        return tokenType;
    }

    public void setTokenType(String tokenType) {
        this.tokenType = tokenType;
    }

    /* (省略) */

}
あとは取得したユーザー情報がサービスに登録されているか確認し、有効であれば認証されたセッションが開始されるようにする。
@ApplicationScoped
public class TestAuthenticationMechanism implements HttpAuthenticationMechanism {

    @Inject
    private IdentityStoreHandler identityStoreHandler;

    @Override
    public AuthenticationStatus validateRequest(HttpServletRequest req, HttpServletResponse res, HttpMessageContext context) throws AuthenticationException {

        // 設定したリダイレクトURIへのリクエストがきた
        if ("http://localhost:8080/learn-securityapi-tutorial/cb".equals(req.getRequestURL().toString())) {

            Client client = ClientBuilder.newClient();

            try {
                // 認可コードを送信
                Form form = new Form();
                /* (省略) */
                WebTarget webTarget = client.target("https://www.googleapis.com/oauth2/v4/token");

                // Token Responseを取得
                try (Response tokenResponse = webTarget.request().post(Entity.entity(form, MediaType.APPLICATION_FORM_URLENCODED), Response.class)) {

                    /* (省略) */

                    // TODO ID Tokenを検証
                    // このissuerのsubjectがユーザーとして登録されているか確認
                    CredentialValidationResult result = identityStoreHandler.validate(new UsernamePasswordCredential(idToken.getIss(), idToken.getSub()));
                    return context.notifyContainerAboutLogin(result.getCallerPrincipal(), result.getCallerGroups());

                }
            } finally {
                client.close();
            }
        }

        StringBuilder url = new StringBuilder();
        /* (省略)リダイレクト関連の処理 */
        return context.redirect(url.toString());
    }

}
合わせて、ユーザーが登録されているアイデンティティストアを表現するクラスも用意。登録確認の具体的な処理もそこへ書いていく。
確認処理については「トークンの発行者(iss)がどのユーザー(sub)に対して認証したか」を確認することでサービス側の認証可否を判定することにした。今回であればユーザーがGoogleに認証されていたならばOKという形。
@ApplicationScoped
public class TestIdentityStore implements IdentityStore {

    public CredentialValidationResult validate(UsernamePasswordCredential usernamePasswordCredential) {

        // 「iss/sub」を「user/password」に見立てて判定を実施
        if (usernamePasswordCredential.compareTo("https://accounts.google.com", "<YOUR_SUBJECT>")) {
            return new CredentialValidationResult("YOU!", new HashSet<>(asList("foo")));
        }

        return INVALID_RESULT;
    }
}
Security APIではLDAPまたはデータベースの設定をアノテーションで書けるが…横着してユーザーをハードコードしちゃいます![]()
![]()
最後に、一度認証が通ってしまえばvalidateRequest()メソッド一連の処理はスキップしていいので@AutoApplySessionを付与。
@AutoApplySession
@ApplicationScoped
public class TestAuthenticationMechanism implements HttpAuthenticationMechanism {

/* ...以下略 */
認証後は元々アクセスしようとしていたURLへ転送したい
validateRequest()メソッドで認証レスポンスを受け取った後、ブラウザになにも返していないので白い画面が表示されたまま。じゃあ、と固定でトップページ的なところへ飛ばすのもちょっとねぇ…元々アクセスしようとしていたURLが表示されて欲しくない?
というわけで@LoginToContinueアノテーションを使うことになった。これはFORM認証のフローと同じことを実現してくれるよ、というもの。つまりこういう感じ。
- サービスへアクセスがきた
- ログイン画面へ転送、と同時にアクセスされたURLを記憶する
- 認証処理…
- 問題なければ記憶しておいたURLへ転送する
なのでこれを使うにはログイン画面の用意が必要になってくる。そこで、validateRequest()メソッドにて行っていたAuthorization Endpointへのリダイレクト処理をログイン画面に見立て以下のような形へ。
- サービスへアクセスがきた
- ログイン画面(Authorization Endpointへリダイレクトするサーブレット)へ転送
- OpenID Providerでのユーザー認証
- validateRequest()メソッドでリダイレクトURIをキャッチ
- ID Tokenを取得し検証、ユーザー存在確認を行う
- 問題なければセッション開始
@LoginToContinueアノテーションでログイン画面を指定。
@AutoApplySession
@LoginToContinue(
        loginPage = "/redirect"
)
@ApplicationScoped
public class TestAuthenticationMechanism implements HttpAuthenticationMechanism {

    @Inject
    private IdentityStoreHandler identityStoreHandler;

    @Override
    public AuthenticationStatus validateRequest(HttpServletRequest req, HttpServletResponse res, HttpMessageContext context) throws AuthenticationException {

        // 設定したリダイレクトURIへのリクエストがきた
        if ("http://localhost:8080/learn-securityapi-tutorial/cb".equals(req.getRequestURL().toString())) {
            /* (省略) */
        }

        return context.doNothing();
    }

}
ログイン画面という名のリダイレクトサーブレットを用意。
@WebServlet("/redirect")
public class Redirect extends HttpServlet {

    @Override
    protected void doGet(HttpServletRequest req, HttpServletResponse res) throws ServletException, IOException {
        StringBuilder url = new StringBuilder();
        url.append("https://accounts.google.com/o/oauth2/v2/auth");
        url.append("?response_type=").append("code");
        url.append("&scope=").append("openid");
        url.append("&client_id=").append("<YOUR_CLIENT_ID>");
        url.append("&state=").append("123456798"); // TODO CSRF対策する
        url.append("&redirect_uri=").append("http://localhost:8080/learn-securityapi-tutorial/cb");

        res.sendRedirect(res.encodeRedirectURL(url.toString()));
    }
}
これで動くところまでは出来たかな。あとは、ID Tokenの検証、stateのチェック処理を最低限実装して…
できました
【余談】JSON Web Keyから公開鍵を生成する
JWTがX.509証明書で署名されているパターンなら以前にやったことがある、pem形式の鍵をder形式にして…え?JWK?
やり方を調べていくとシフト演算とか出てきたりして、雰囲気でプログラムを書いているとこういうときに詰むんだなーって思いながら実装しました。![]()
おわりに
作り終わったところでアプリの依存関係を眺めたら外部ライブラリをまったく使っていなくて、Java EEすごいなーと思ったって話。こうなるとOAuth対応もして欲しいってなる。やっぱり自分で作りたくはないわけで。
    <dependencies>
        <dependency>
            <groupId>javax</groupId>
            <artifactId>javaee-api</artifactId>
            <version>8.0</version>
            <scope>provided</scope>
        </dependency>
    </dependencies>
お世話になったリンク集
Security API 関連
Soteriaのサンプルには感謝しかない。
OpenID Connect 関連
- OpenID Connect と SCIM のエンタープライズ実装ガイドライン(pdf)
- OpenID Connectユースケース、OAuth 2.0の違い・共通点まとめ
- OpenID Connect Core 1.0 日本語訳
日本語訳に感謝しかない。
Google認証関連
「Obtain OAuth 2.0 credentials」や「Validating an ID token」を主に。
