ZabbixをCentOS7環境にインストールする手順を纏めます。実行環境は次の通りです。
続いてElasticsearch
・Zabbix 3.4
・CentOS 7.5
・PHP 5.4.16
・PostgreSQL 9.2.23
CentOS7で、yum -y updateを実行
# yum -y update
# reboot
Firewallの設定 (10051:Zabbixエージェントからサーバ
10050:サーバからエージェント)
# firewall-cmd --add-port=10051/tcp --zone=public --permanent
# firewall-cmd --add-service=http --zone=public --permanent
# firewall-cmd --add-port=10050/tcp --zone=public --permanent
# systemctl restart firewalld
SELinuxの設定
# vi /etc/selinux/config
SELINUX=permissive
Zabbixのインストール
Zabbix3.4 の yum リポジトリの登録
# rpm -ivh http://repo.zabbix.com/zabbix/3.4/rhel/7/x86_64/zabbix-release-3.4-1.el7.centos.noarch.rpm
Zabbixのインストール(Zabbixサーバ、Webインターフェース、Zabbixエージェント:ローカル監視用、PostgreSQL利用)
# yum -y install zabbix-agent zabbix-server-pgsql zabbix-web-pgsql zabbix-web-japanese
PostgreSQLのインストール
# yum -y install postgresql-server
DBの初期化とサービス起動
# postgresql-setup initdb
# systemctl start postgresql
# systemctl enable postgresql
OS上のpostgresユーザからPostgreSQL上のpostgresユーザーのパスワードを変更する
# su - postgres
$ psql -c "alter user postgres with password 'password'"
postgresユーザーのまま、Zabbix用データベース接続用アカウントzabbixを作成し、パスワードを設定する
$ createuser zabbix -P -S -R -D
新しいロールのためのパスワード:
もう一度入力してください:
$
zabbixユーザにて、zabbix DBを作成
$ createdb -O zabbix -E UTF8 zabbix
rootユーザーに戻り、/var/lib/pgsql/data/pg_hba.conf内の認証設定(local/IPv4/IPv6)を、trustに変更
PostgreSQLを再起動
# systemctl restart postgresql
初期データベースの作成
初期データベース作成用のスクリプトを解凍して利用する
# zcat /usr/share/doc/zabbix-server-pgsql-3.4.12/create.sql.gz | psql -U zabbix zabbix -W
ユーザ zabbix のパスワード:
NOTICE:  CREATE TABLE / PRIMARY KEYはテーブル"maintenances"に暗黙的なインデック ス"maintenances_pkey"を作成します
CREATE TABLE
.....
INSERT 0 1
INSERT 0 1
COMMIT
#
Zabbix設定ファイルの編集
Zabbix DB用アカウントzabbixのパスワードをDBPasswordに設定し、
DBPortにPostgreSQLサーバーのデフォルトのポート番号5432を設定する
# vi /etc/zabbix/zabbix_server.conf
DBPassword=password
DBPort=5432
Zabbix Webインターフェース用の設定
TimezoneをAsia/Tokyoに設定
# vi /etc/httpd/conf.d/zabbix.conf
php_value date.timezone Asia/Tokyo
Zabbixサービスの起動
# systemctl start zabbix-server
# systemctl start zabbix-agent
# systemctl start httpd
# systemctl enable zabbix-server
# systemctl enable zabbix-agent
# systemctl enable httpd
Webインターフェースへのアクセス
初期設定(DB接続時のパスワード等)が終わるとログイン画面になり、
アカウント「Admin」、パスワード「zabbix」でログインする
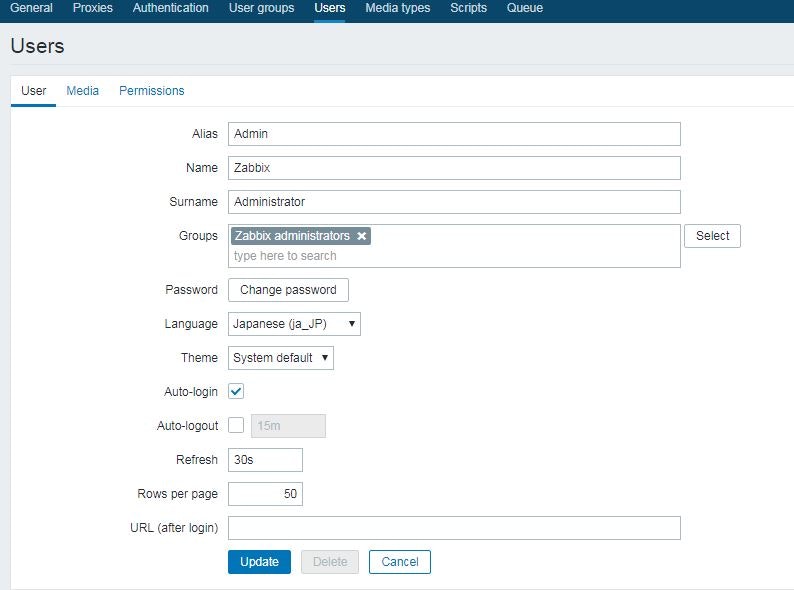
Web UI を日本語化する
Administration > Users > Admin > LanguageでJapanese(ja_JP)を選択


