OCI(Oracle Cloud Infrastructure)で、簡単にNginxのDockerイメージを利用できます。今回は、以下のことをご紹介します。
目次
- 1. OCI Computeインスタンスに、Dockerをインストールする
- 2. Nginx Dockerの使用
- 3. 実行中のコンテナーよりDockerイメージを作成
- 4. DockerイメージをOCI Registryにプッシュ
- 付録

事前準備
Computeインスタンスを用意しておきます。(Oracle Linux 7.9を例に)
今回の例は、インターネットからのアクセスは必要で、Computeインスタンスをパブリック・サブネットに配置し、Internet GWを設定します。
セキュリティ・リストのIngress Ruleに、TCP 8080/8081ポートを許可します。
OCI Registryを利用するため、認証トークン(Auth Token)を事前に用意してください。作成方法は、ドキュメントをご参考ください。ここで省略します。
1. Dockerのインストール
Computeインスタンスにログインした後、以下のコマンドでDockerをインストールします。
[opc@linux7-9 ~]$ sudo yum -y update
<省略>
[opc@linux7-9 ~]$ sudo yum install -y docker-engine
<省略>
Oracle Linux 8, 9 にインストールする場合
コマンドは、Oracle Linux 7と違います。
sudo dnf install -y dnf-utils zip unzip
sudo dnf config-manager --add-repo=https://download.docker.com/linux/centos/docker-ce.repo
sudo dnf install -y docker-ce --nobest
Dockerの起動
[opc@linux7-9 ~]$ sudo systemctl start docker
[opc@linux7-9 ~]$ sudo systemctl enable docker
Created symlink from /etc/systemd/system/multi-user.target.wants/docker.service to /usr/lib/systemd/system/docker.service.
Docker情報の確認
sudo docker info
sudo docker version
2. Nginx Dockerの使用
2-1. HTTP用
Nginxのイメージをダウンロードする
コマンド例:docker pull nginx
[opc@linux7-9 ~]$ sudo docker pull nginx
Using default tag: latest
Trying to pull repository docker.io/library/nginx ...
latest: Pulling from docker.io/library/nginx
75646c2fb410: Pull complete
6128033c842f: Pull complete
71a81b5270eb: Pull complete
b5fc821c48a1: Pull complete
da3f514a6428: Pull complete
3be359fed358: Pull complete
Digest: sha256:bae781e7f518e0fb02245140c97e6ddc9f5fcf6aecc043dd9d17e33aec81c832
Status: Downloaded newer image for nginx:latest
nginx:latest
[opc@linux7-9 ~]$ sudo docker images
REPOSITORY          TAG                 IMAGE ID            CREATED             SIZE
nginx               latest              7ce4f91ef623        2 days ago          133MB
[opc@linux7-9 ~]$
Nginxの起動 (HTTP)
コマンド例:docker run --rm -d -p 8080:80 --name web nginx
パラメータの意味:
--rm 終了時にコンテナーを自動的に削除
-d バックグラウンド実行
-p ホストに対してコンテナーのポートを公開 (外部から8080ポートを利用)
--name コンテナーに名前を割り当てる
[opc@linux7-9 ~]$ sudo docker run --rm -d -p 8080:80 --name web nginx
90c2d54d7522af4e8be268640eccd1da65fa1be93210327c885b02bad9c226bc
[opc@linux7-9 ~]$ sudo docker ps -a
CONTAINER ID        IMAGE               COMMAND                  CREATED             STATUS              PORTS                  NAMES
90c2d54d7522        nginx               "/docker-entrypoint.…"   4 seconds ago       Up 3 seconds        0.0.0.0:8080->80/tcp   web
[opc@linux7-9 ~]$
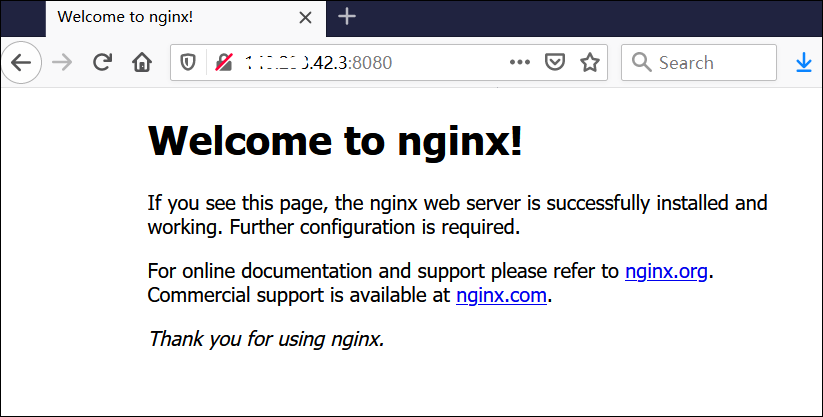
WEBブラウザでComputeインスタンスのURLを入力し、Nginxの動作を確認します。
http://<IP Address>:8080

Nginxの停止
コマンド例:docker stop <docker_name> (停止後、コンテナーが削除されます。)
[opc@linux7-9 ~]$ sudo docker stop web
web
[opc@linux7-9 ~]$ sudo docker ps -a
CONTAINER ID        IMAGE               COMMAND             CREATED             STATUS              PORTS               NAMES
[opc@linux7-9 ~]$
デモ用ページの作成
[opc@linux7-9 ~]$ pwd
/home/opc
[opc@linux7-9 ~]$ mkdir -p nginx-demo/html
[opc@linux7-9 ~]$ echo "<h1>Hello Nginx</h1>" > nginx-demo/html/index.html
[opc@linux7-9 ~]$
Nginxを起動する時、"-v"のパラメータを利用し、ローカルのデモページをマウントします。
[opc@linux7-9 ~]$ sudo docker run --rm -d -p 8080:80 -v /home/opc/nginx-demo/html:/usr/share/nginx/html --name web nginx
416decd04916337009b030dbaaf67c749a86a4c5dafa62003901774abc2a2c1d
[opc@linux7-9 ~]$ sudo docker ps -a
CONTAINER ID        IMAGE               COMMAND                  CREATED             STATUS              PORTS                  NAMES
416decd04916        nginx               "/docker-entrypoint.…"   10 seconds ago      Up 8 seconds        0.0.0.0:8080->80/tcp   web
[opc@linux7-9 ~]$
curlコマンドでの確認
[opc@linux7-9 ~]$ curl localhost:8080
<h1>Hello Nginx</h1>
[opc@linux7-9 ~]$
2-2. HTTPS用
Nginxの設定をコンテナーからコピーします。
[opc@linux7-9 ~]$ pwd
/home/opc
[opc@linux7-9 ~]$ sudo docker cp web:/etc/nginx .
[opc@linux7-9 ~]$ ll
total 4
drwxr-xr-x. 3 root root 4096 Mar 31 05:24 nginx
drwxrwxr-x. 3 opc  opc    18 Apr  7 08:37 nginx-demo
[opc@linux7-9 ~]$
コピー後、Nginxを停止します。
[opc@linux7-9 ~]$ sudo docker stop web
web
[opc@linux7-9 ~]$
HTTPSを利用するため、OpenSSLで証明書を作成します。
-keyout: 秘密鍵ファイル
-out: 証明書ファイル
下記OpenSSLコマンドを実施した後、nginx.keyとnginx.crtが作成されます。
[opc@linux7-9 nginx]$ pwd
/home/opc/nginx
[opc@linux7-9 nginx]$ sudo mkdir cert
[opc@linux7-9 nginx]$ cd cert
[opc@linux7-9 cert]$ sudo openssl req  -x509 -nodes -newkey rsa:2048 -keyout nginx.key -out nginx.crt
Generating a 2048 bit RSA private key
.........................................................................+++
....+++
writing new private key to 'nginx.key'
-----
You are about to be asked to enter information that will be incorporated
into your certificate request.
What you are about to enter is what is called a Distinguished Name or a DN.
There are quite a few fields but you can leave some blank
For some fields there will be a default value,
If you enter '.', the field will be left blank.
-----
Country Name (2 letter code) [XX]:
State or Province Name (full name) []:
Locality Name (eg, city) [Default City]:
Organization Name (eg, company) [Default Company Ltd]:
Organizational Unit Name (eg, section) []:
Common Name (eg, your name or your server's hostname) []:
Email Address []:
[opc@linux7-9 cert]$ pwd
/home/opc/nginx/cert
[opc@linux7-9 cert]$ ll
total 8
-rw-r--r--. 1 root root 1281 Apr  7 09:37 nginx.crt
-rw-r--r--. 1 root root 1704 Apr  7 09:37 nginx.key
[opc@linux7-9 cert]$
設定ファイル(nginx/conf.d/default.conf)を編集します。
[opc@linux7-9 conf.d]$ pwd
/home/opc/nginx/conf.d
[opc@linux7-9 conf.d]$ sudo vi default.conf
以下の内容を最後に追加します。
server {
    listen 443 ssl;
    server_name  localhost;
    ssl                      on;
    ssl_certificate          /etc/nginx/cert/nginx.crt;
    ssl_certificate_key      /etc/nginx/cert/nginx.key;
    ssl_session_timeout  3m;
    ssl_ciphers HIGH:!aNULL:!MD5;
    ssl_protocols SSLv3 TLSv1 TLSv1.1 TLSv1.2;
    ssl_prefer_server_ciphers   on;
    location / {
        root   /usr/share/nginx/html;
        index  index.html index.htm;
    }
}
新しいコンテナーでNginxを再起動します。
追加したパラメータの意味:
HTTPSポートを公開 (8081->443)
ローカルのファイルをマウント
[opc@linux7-9 conf.d]$ sudo docker run --rm -d -p 8080:80 -p 8081:443 \
\>    -v /home/opc/nginx-demo/html:/usr/share/nginx/html -v /home/opc/nginx:/etc/nginx \
\>   --name web nginx
e7024bb33c29f1fd99f77586b443d4597eb4784d569f43b5cc83a7fcb60d41da
[opc@linux7-9 conf.d]$ sudo docker ps -a
CONTAINER ID        IMAGE               COMMAND                  CREATED             STATUS              PORTS                                         NAMES
e7024bb33c29        nginx               "/docker-entrypoint.…"   12 seconds ago      Up 11 seconds       0.0.0.0:8080->80/tcp, 0.0.0.0:8081->443/tcp   web
[opc@linux7-9 conf.d]$
HTTPSのURLを入力し、Nginxの動作を確認します。警告のメッセージが表示されたら、"Advanced"をクリックし、進んでください。
https://<IP Address>:8081

デモ用ページが表示されます。

curlコマンドでの確認
[opc@linux7-9 ~]$ curl https://localhost:8081 -k
<h1>Hello Nginx</h1>
[opc@linux7-9 ~]$
3. 実行中のコンテナーよりDockerイメージを作成
上記の例で利用したコンテナーを停止し、新しいコンテナーを作成します。
[opc@linux7-9 ~]$ sudo docker stop web
web
[opc@linux7-9 ~]$ sudo docker ps -a
CONTAINER ID        IMAGE               COMMAND             CREATED             STATUS              PORTS               NAMES
[opc@linux7-9 ~]$
今回、新しいコンテナーを作成する時、"-v"(マウント)を利用しません。(HTTP/HTTPSポートの公開は上記と同様。)
[opc@linux7-9 ~]$ sudo docker run --name web --rm -d -p 8080:80 -p 8081:443 nginx
210f4ef2decf4460ab882e20136ade6d1c2aa962e8350fd1a86afa702cea4890
[opc@linux7-9 ~]$ sudo docker ps -a
CONTAINER ID        IMAGE               COMMAND                  CREATED             STATUS              PORTS                                         NAMES
210f4ef2decf        nginx               "/docker-entrypoint.…"   11 seconds ago      Up 10 seconds       0.0.0.0:8080->80/tcp, 0.0.0.0:8081->443/tcp   web
[opc@linux7-9 ~]$
新しいイメージを作成するのに、以下のファイルをコピーします。
- コンテナー内のファイルをローカルのindex.htmlに置き換えます。
[opc@linux7-9 ~]$ cat /home/opc/nginx-demo/html/index.html
<h1>Hello Nginx</h1>
[opc@linux7-9 ~]$ sudo docker cp /home/opc/nginx-demo/html/index.html web:/usr/share/nginx/html/index.html
[opc@linux7-9 ~]$
- default.confと証明書ファイルをコンテナーにコピーします。
[opc@linux7-9 ~]$ sudo docker cp /home/opc/nginx/conf.d/default.conf  web:/etc/nginx/conf.d/default.conf
[opc@linux7-9 ~]$ sudo docker cp /home/opc/nginx/cert  web:/etc/nginx/cert
[opc@linux7-9 ~]$
コピー後、コンテナーを再起動します。
(注意:再起動しないと、HTTPSの修正箇所が反映されません。)
[opc@linux7-9 ~]$ sudo docker restart web
web
[opc@linux7-9 ~]$
新しいイメージを作成
コマンド例:docker commit <CONTAINER> <REPOSITORY>:<TAG>
例:docker commit web nginx_demo:latest
[opc@linux7-9 ~]$ sudo docker commit web nginx_demo:latest
sha256:1a6774abd5a84528de51462acbd7ebc58d0e17e3048a24f46f5909cdeaceed7b
[opc@linux7-9 ~]$ sudo docker images
REPOSITORY          TAG                 IMAGE ID            CREATED             SIZE
nginx_demo          latest              1a6774abd5a8        10 seconds ago      133MB
nginx               latest              7ce4f91ef623        5 weeks ago         133MB
[opc@linux7-9 ~]$
実行中のコンテナーを停止し、新しいイメージ(nginx_demo)よりコンテナーを作成します。
[opc@linux7-9 ~]$ sudo docker stop web
web
[opc@linux7-9 ~]$ sudo docker ps -a
CONTAINER ID        IMAGE               COMMAND             CREATED             STATUS              PORTS               NAMES
[opc@linux7-9 ~]$ sudo docker run --name web --rm -d -p 8080:80 -p 8081:443 nginx_demo
c50b3c43f45c96e7a5429eebda2d05042e293051a5693ae8978d982412da3a1a
[opc@linux7-9 ~]$ sudo docker ps -a
CONTAINER ID        IMAGE               COMMAND                  CREATED             STATUS              PORTS                                         NAMES
c50b3c43f45c        nginx_demo          "/docker-entrypoint.…"   25 seconds ago      Up 23 seconds       0.0.0.0:8080->80/tcp, 0.0.0.0:8081->443/tcp   web
[opc@linux7-9 ~]$
curlコマンドで確認します。 (Webブラウザでもよい)
[opc@linux7-9 ~]$ curl localhost:8080
<h1>Hello Nginx</h1>
[opc@linux7-9 ~]$ curl https://localhost:8081 -k
<h1>Hello Nginx</h1>
[opc@linux7-9 ~]$
ここまで、新しいイメージの作成は完了です。
Tips: 不要なコンテナーイメージを削除したい場合は、sudo docker rmi <IMAGE_ID> コマンドを使用してください。ただし、実行中のコンテナーである場合は削除できないため、事前に該当コンテナーを停止する必要があります。
4. DockerイメージをOCI Registryにプッシュ
レポジトリの作成
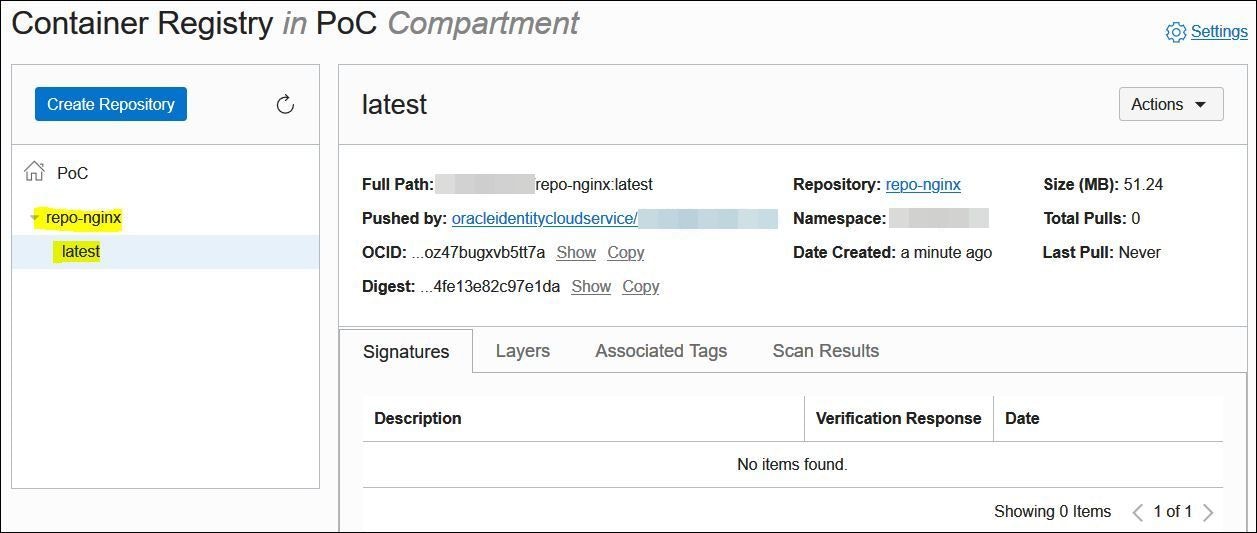
OCI Registryに、レポジトリを作成します。
MENU->Developer Services->Containers->Container Registry

レポジトリの名前には、大文字の入力ができません。

作成後:

ポリシーの作成
管理者以外のユーザで実施した場合、以下のようなポリシーを作成します。
ポリシー名:任意
Compartment: root/PoC (例)
ステートメント:
Allow group OCIR-Repo-Group to use repos in compartment PoC
(実施ユーザは、OCIR-Repo-Groupに追加)
OCI Registryにログイン
コマンド:docker login <region-key>.ocir.io
<region-key>: 東京リージョンの場合、nrtとなります。
確認方法は、一覧表をご参照ください。
コマンド実施後、ユーザ名とパスワードの入力が要求されます。
ユーザ名: <tenancy-namespace>/<user-name>
<tenancy-namespace>は、上記の"Container Registry"画面に表示された値です。
<user-name>は、IDCSユーザかOCIユーザの名前です。
IDCSユーザの場合、"oracleidentitycloudservice/xxxxxx"という形式で入力してください。
パスワード: 事前に作成した認証トークン(Auth Token)の値です。
注意:一部の古いテナンシーの場合、Namepspaceの名前とテナンシーの名前は同じですけど、そもそも別物なので、間違いようにNamespaceの値を確認してください。
[opc@linux7-9 ~]$ sudo docker login nrt.ocir.io
Username: tenancy-namespace/oracleidentitycloudservice/username
Password:
WARNING! Your password will be stored unencrypted in /root/.docker/config.json.
Configure a credential helper to remove this warning. See
https://docs.docker.com/engine/reference/commandline/login/#credentials-store

Login Succeeded
[opc@linux7-9 ~]$
イメージにタグを付ける
プッシュしようとしているイメージにタグを付けます。
コマンド:docker tag <image-identifier> <target-tag>
<target-tag>のフォーマット:
<region-key>.ocir.io/<tenancy-namespace>/<repo-name>:<tag>
例:docker tag 1a6774abd5a8 nrt.ocir.io/<tenancy-namespace>/repo-nginx:latest
[opc@linux7-9 ~]$ sudo docker images
REPOSITORY          TAG                 IMAGE ID            CREATED             SIZE
nginx_demo          latest              1a6774abd5a8        13 hours ago        133MB
nginx               latest              7ce4f91ef623        5 weeks ago         133MB
[opc@linux7-9 ~]$ sudo docker tag 1a6774abd5a8 nrt.ocir.io/namespace/repo-nginx:latest
[opc@linux7-9 ~]$ sudo docker images
REPOSITORY                            TAG                 IMAGE ID            CREATED             SIZE
nginx_demo                            latest              1a6774abd5a8        16 hours ago        133MB
nrt.ocir.io/namespace/repo-nginx      latest              1a6774abd5a8        16 hours ago        133MB
nginx                                 latest              7ce4f91ef623        5 weeks ago         133MB
[opc@linux7-9 ~]$
Dockerイメージをプッシュ
コマンド:docker push <target-tag>
例:docker push nrt.ocir.io/<namespace>/repo-nginx:latest
[opc@linux7-9 ~]$ sudo docker push nrt.ocir.io/namespace/repo-nginx
The push refers to repository [nrt.ocir.io/namespace/repo-nginx]
70a619e5ea7e: Pushed
1914a564711c: Pushed
db765d5bf9f8: Pushed
903ae422d007: Pushed
66f88fdd699b: Pushed
2ba086d0a00c: Pushed
346fddbbb0ff: Pushed
latest: digest: sha256:18984c2de84daf6e8f95f4dc40806428f6a7b2919845b90c14fe13e82c97e1da size: 1778
[opc@linux7-9 ~]$
もし、以下のエラーが発生しましたら、実施ユーザーがOCI Registryにログインしているかどうかをご確認ください。
"denied: Anonymous users are only allowed read access on public repos"
付録
Dockerfile (HTTP用)
この例は、Welcomeページを置き換え、8080ポートを公開します。
[opc@linux7-9 ~]$ cat Dockerfile
FROM nginx
RUN mkdir -p /usr/share/nginx/html
RUN echo "<h1>Hello Nginx</h1>" > /usr/share/nginx/html/index.html
VOLUME /usr/share/nginx/html
EXPOSE 8080
Dockerfileよりイメージを作成するコマンド:sudo docker build -t nginx_demo .
以上
改定歴
2021/05/11: 初版作成
2023/02/16: 付録(Dockerfile)を追加
2023/02/17: 構成図を追加
関連記事
クラウド技術ブログ一覧
OCI Compute インスタンスに Nginx をインストールする
OCI コンテナ・インスタンスでNginxコンテナを実行する
オフィシャル・ドキュメント
Pushing Images Using the Docker CLI

