(AWS App Runner Advent Calendar 2022 の記事です! (小声
この記事では、Spring Boot のアプリケーションを App Runner でデプロイする Tips をいくつか紹介するつもりでした。
いつの間にか時は2023年となり、 App Runner が SSM Parameter Store と AWS Secrets Manager での設定管理をサポートしましたので、せっかくなのでこの機能を使って ElastiCache for Redis に Spring Data Redis で接続してみようと思います。
Spring Boot アプリケーションの作成と設定
まず、Redis を参照する Spring Boot アプリケーションを作成します。せっかく App Runner を利用するので、マネージドランタイムの Java を使用しようと思います。
さて、 Spring Boot 3.0 の実行には Java 17 以上が必要ですが、現在 App Runner の Java マネージドランタイムでは Java 11 までしかサポートされていません(もちろん、コンテナイメージをApp Runnerで使用するのであれば Java 17 のベースイメージも使用できます)。
そのため、今回は Spring Boot 2.7 を使用します。アプリケーションをビルドする Gradle のファイルは以下のようになりました。
plugins {
	id 'org.springframework.boot' version '2.7.7'
}

apply plugin: 'java'
apply plugin: 'io.spring.dependency-management'

java {
    toolchain {
        languageVersion = JavaLanguageVersion.of(11)
    }
}

repositories {
    mavenCentral()
}

dependencies {
	implementation('org.springframework.boot:spring-boot-starter-web')
	implementation('org.springframework.boot:spring-boot-starter-data-redis')
    testImplementation('org.springframework.boot:spring-boot-starter-test')
}
コードでは、単に Redis にデータを書き込むだけのものとします。
import java.util.Map;

import org.springframework.boot.SpringApplication;
import org.springframework.boot.autoconfigure.SpringBootApplication;
import org.springframework.data.redis.core.RedisTemplate;
import org.springframework.data.redis.core.ValueOperations;
import org.springframework.web.bind.annotation.GetMapping;
import org.springframework.web.bind.annotation.RestController;

@SpringBootApplication
@RestController
public class ActuatorDemoApplication {

    // Redis クライアントの注入
	private final RedisTemplate<String, String> redisTemplate;

    ActuatorDemoApplication(final RedisTemplate<String, String> redisTemplate) {
        this.redisTemplate = redisTemplate;
    }

	public static void main(String[] args) {
		SpringApplication.run(ActuatorDemoApplication.class, args);
	}

	@GetMapping("/")
	public String root() {
		return "To healthy: /healthy";
	}

    // Redis にデータを書き込む
	@GetMapping("/healthy")
	public String setHealty() {
		ValueOperations<String, String> ops = redisTemplate.opsForValue();
		ops.set("health", "healthy");
		return "Status: " + ops.get("health");
	}

    // Redis にデータを書き込む
	@GetMapping("/unhealthy")
	public String setUnhealty() {
		ValueOperations<String, String> ops = redisTemplate.opsForValue();
		ops.set("health", "unhealthy");
		return "Status: " + ops.get("health");
	}
}
Spring Bootの Redis 参照設定は以下の通りです。 App Runner では環境変数として接続情報がアプリケーションに設定されるので、ここでも環境変数を使用します。
spring:
  redis:
    host: ${CACHE_HOST:localhost}
    port: ${CACHE_PORT:6379}
この Spring Boot のアプリケーションを起動し、 /healthy や unhealthy にアクセスすると、Redis へアクセスし値が書き込まれます。
./gradlew bootRun

...
curl http://localhost:8080/healthy
curl http://localhost:8080/unhealthy
ElastiCache 環境と、接続情報の管理
私は AWS CDK が大好きなので、 CDK を使って ElastiCache for Redis を構築し、さらにその接続情報を SSM Parameter Store に保存することとします。
スタックは以下のように作成してみました。
import * as cdk from 'aws-cdk-lib';
import { StackProps } from 'aws-cdk-lib';
import { Construct } from 'constructs';
import * as elasticache from 'aws-cdk-lib/aws-elasticache';
import * as ec2 from 'aws-cdk-lib/aws-ec2';
import * as ssm from 'aws-cdk-lib/aws-ssm';

export class ActuatorDemoInfraStack extends cdk.Stack {

  // 後で App Runner の Stack で使用する変数
  readonly vpc: ec2.IVpc;
  readonly cacheSecurityGroup: ec2.SecurityGroup;
  readonly cacheHostParameter: ssm.StringParameter;
  readonly cachePortParameter: ssm.StringParameter;

  constructor(scope: Construct, id: string, props?: StackProps) {
    super(scope, id, props);

    // Redis を配置する、Private な VPC を作成
    this.vpc = new ec2.Vpc(this, 'Vpc', {
      subnetConfiguration: [
        {
          name: 'cache',
          subnetType: ec2.SubnetType.PRIVATE_ISOLATED,
        },
     ],
    });

    // ElastiCache および ElastiCache へ接続するための Security Group
    const subnetGroup = new elasticache.CfnSubnetGroup(this, "CacheSubnetGroup", {
      subnetIds: this.vpc.selectSubnets({ subnetType: ec2.SubnetType.PRIVATE_ISOLATED }).subnetIds,
      description: "Group of subnets to place Cache into",
    });
    this.cacheSecurityGroup = new ec2.SecurityGroup(this, "CacheSecurityGroup", { vpc: this.vpc });
    this.cacheSecurityGroup.addIngressRule(this.cacheSecurityGroup, ec2.Port.tcp(6379), "Ingress to the cache");

    // Redis の作成
    const cacheCluster = new elasticache.CfnCacheCluster(this, "CacheCluster", {
      engine: "redis",
      cacheNodeType: "cache.t3.micro",
      numCacheNodes: 1,
      cacheSubnetGroupName: subnetGroup.ref,
      vpcSecurityGroupIds: [this.cacheSecurityGroup.securityGroupId],
    });

    // Redis のホスト名とポート番号を SSM Parameter Store に保存
    this.cacheHostParameter = new ssm.StringParameter(this, "CacheHostParameter", {
      stringValue: cacheCluster.attrRedisEndpointAddress,
    });
    this.cachePortParameter = new ssm.StringParameter(this, "CachePortParameter", {
      stringValue: cacheCluster.attrRedisEndpointPort,
    });
  }
}
このスタックをデプロイすると、 ElastiCache 環境が Private な VPC に作成されます。
さて、 App Runner で実行されているコンテナから、この VPC 内の ElastiCache に接続するには、VPC Connector を作成し、 App Runner 環境からの Outgoing なトラフィックを VPC 経由とする必要があります。
また、SSM Parameter Store からパラメーターを読み出すには、そのパラメーターの読み取り権限を Instance Role に付けてあげる必要もあります。
こうした作業も、変数で環境の情報を参照できる CDK だと楽なので、以下のようにスタックを作成してみます。
// 上記の ElastiCache 環境を構築したスタック
const infraStack = new ActuatorDemoInfraStack(app, 'ActuatorDemoInfraStack');

// 上記のスタックから接続情報を読み出しつつ、 VPC Connector や SSM への読み出し許可を作成するスタックを構築
new ActuatorDemoServiceStack(app, 'ActuatorDemoServiceStack', {
  vpc: infraStack.vpc,
  securityGroups: [infraStack.cacheSecurityGroup],
  host: infraStack.cacheHostParameter,
  port: infraStack.cachePortParameter,
});
上記で作成している ActuatorDemoServiceStack は以下の通りです。
// ElastiCache への接続に必要な情報をまとめる
export class CacheConnection {
  readonly vpc: ec2.IVpc;
  readonly securityGroups: ec2.SecurityGroup[];
  readonly host: ssm.StringParameter;
  readonly port: ssm.StringParameter;

  constructor(vpc: ec2.IVpc, securityGroups: ec2.SecurityGroup[], host: ssm.StringParameter, port: ssm.StringParameter) {
    this.securityGroups = securityGroups;
    this.host = host;
    this.port = port;
  }
}

// App Runner サービスの構築に必要なリソースを作成
export class ActuatorDemoServiceStack extends cdk.Stack {
  constructor(scope: Construct, id: string, cacheConnection: CacheConnection, props?: StackProps) {
    super(scope, id, props);

    // VPC Connector の作成
    const connector = new apprunner.CfnVpcConnector(this, 'VpcConnector', {
      subnets: cacheConnection.vpc.selectSubnets({ subnetType: ec2.SubnetType.PRIVATE_ISOLATED }).subnetIds,
      vpcConnectorName: 'CacheHostConnector',
      securityGroups: cacheConnection.securityGroups.map(s => s.securityGroupId),
    });

    // ElastiCache 接続情報が格納された SSM Parameter Store の読み出しを許可する Role を作成
    const instanceRole = new iam.Role(this, 'InstanceRole', {
      assumedBy: new iam.ServicePrincipal('tasks.apprunner.amazonaws.com'),
      inlinePolicies: {
        ssmParameter: new iam.PolicyDocument({
          statements: [
            new iam.PolicyStatement({
              effect: iam.Effect.ALLOW,
              actions: [ "ssm:GetParameters" ],
              resources: [
                cacheConnection.host.parameterArn,
                cacheConnection.port.parameterArn,
              ],
            }),
          ],
        }),
      },
    });
  }
}
本当は以下のように App Runner サービスの作成も CDK でできれば完璧なのですが、残念ながらまだ CloudFormation で SSM や Secrets Manager の設定がサポートされていないため、CDK で素直に実装することは難しそうです。
new apprunner.CfnService(this, 'Service', {
sourceConfiguration: {
authenticationConfiguration: {
connectionArn: this.node.tryGetContext('connectionArn'),
},
codeRepository: {
repositoryUrl: this.node.tryGetContext('repositoryUrl'),
sourceCodeVersion: {
type: "BRANCH",
value: "main",
},
codeConfiguration: {
configurationSource: "API",
codeConfigurationValues: {
runtime: "CORRETTO_11",
runtimeEnvironmentSecrets: [ // この設定値がまだ存在しない…
{
name: "CACHE_HOST",
value: cacheConnection.host.parameterArn,
},
{
name: "CACHE_PORT",
value: cacheConnection.port.parameterArn,
},
],
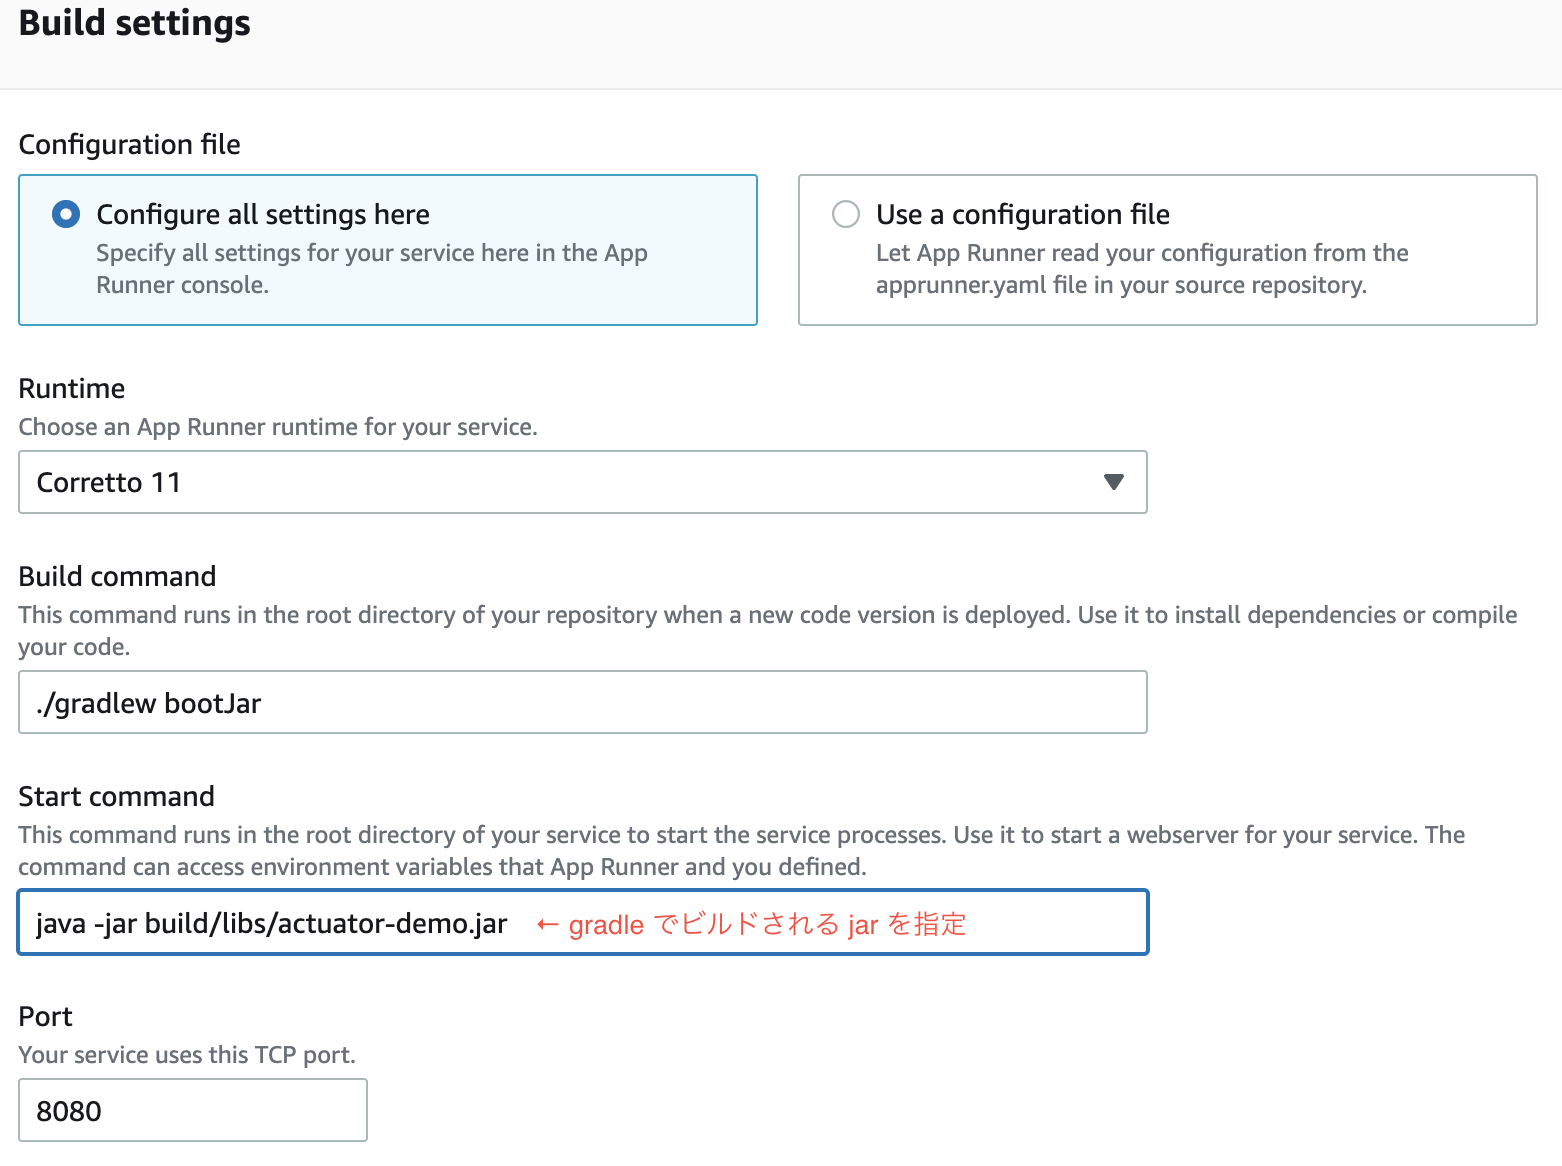
buildCommand: "cd actuator-demo && ./gradlew bootJar",
startCommand: "cd actuator-demo && java -jar build/libs/actuator-demo.jar",
}
},
},
},
instanceConfiguration: {
instanceRoleArn: instanceRole.roleArn,
},
networkConfiguration: {
egressConfiguration: {
egressType: "VPC",
vpcConnectorArn: connector.attrVpcConnectorArn,
},
},
});
そのため、 CDK で作成した VPC Connector や IAM Role を参照しつつ、コンソールで App Runner のサービスを作成します。
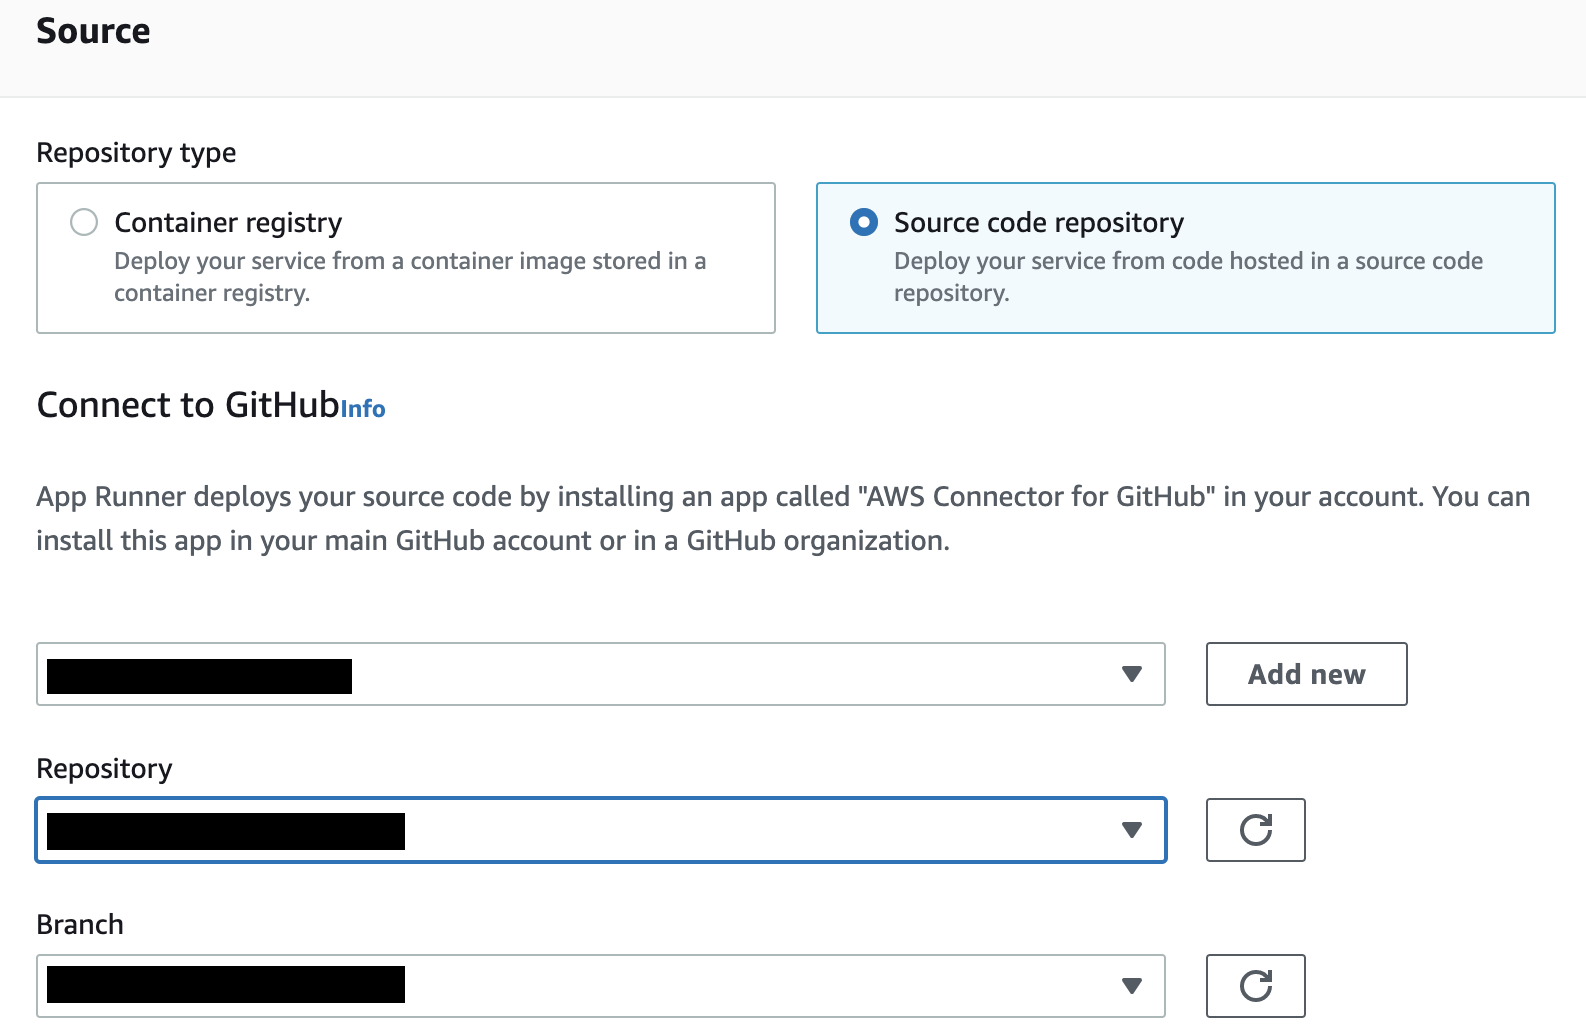
App Runner のコンソールに移動し、Create service から GitHub のリポジトリを指定します。
次で、 SSM Parameter Store のパラメーター名を入力し、上記のアプリケーションが参照する環境変数を設定しています。
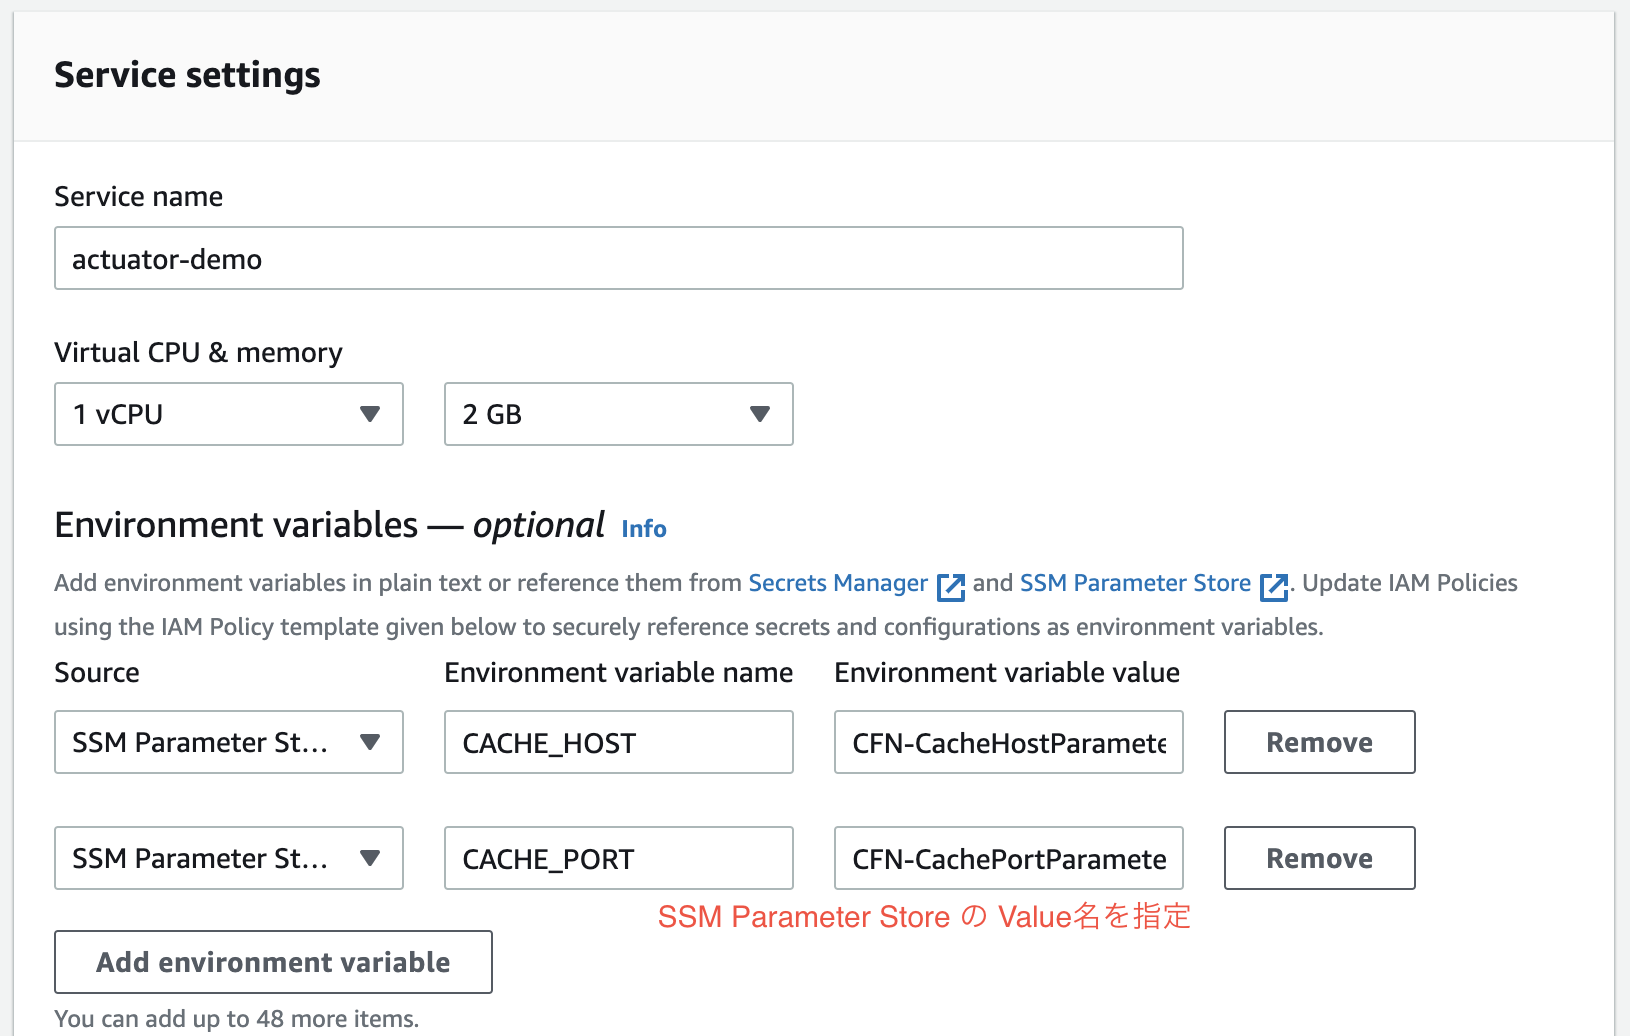
なお、SSM Parameter Store や Secrets Manager の値を参照する設定は、ソースコードのルートディレクトリに apprunner.yaml を置き、その中で設定することも可能です。個人的には、 GitHub にチェックインするファイルに Parameter Store や Secrets Manager の ARN やパラメーター名を書き込みたくないので、このようにコンソール、API 経由で設定してみました。
セキュリティ設定では、 App Runner インスタンスに設定する IAM Role を入力します。上記 CDK をデプロイ済みであれば、適切なパーミッションが設定された IAM Role がプルダウンに出てくるはずなので、それを選択します。

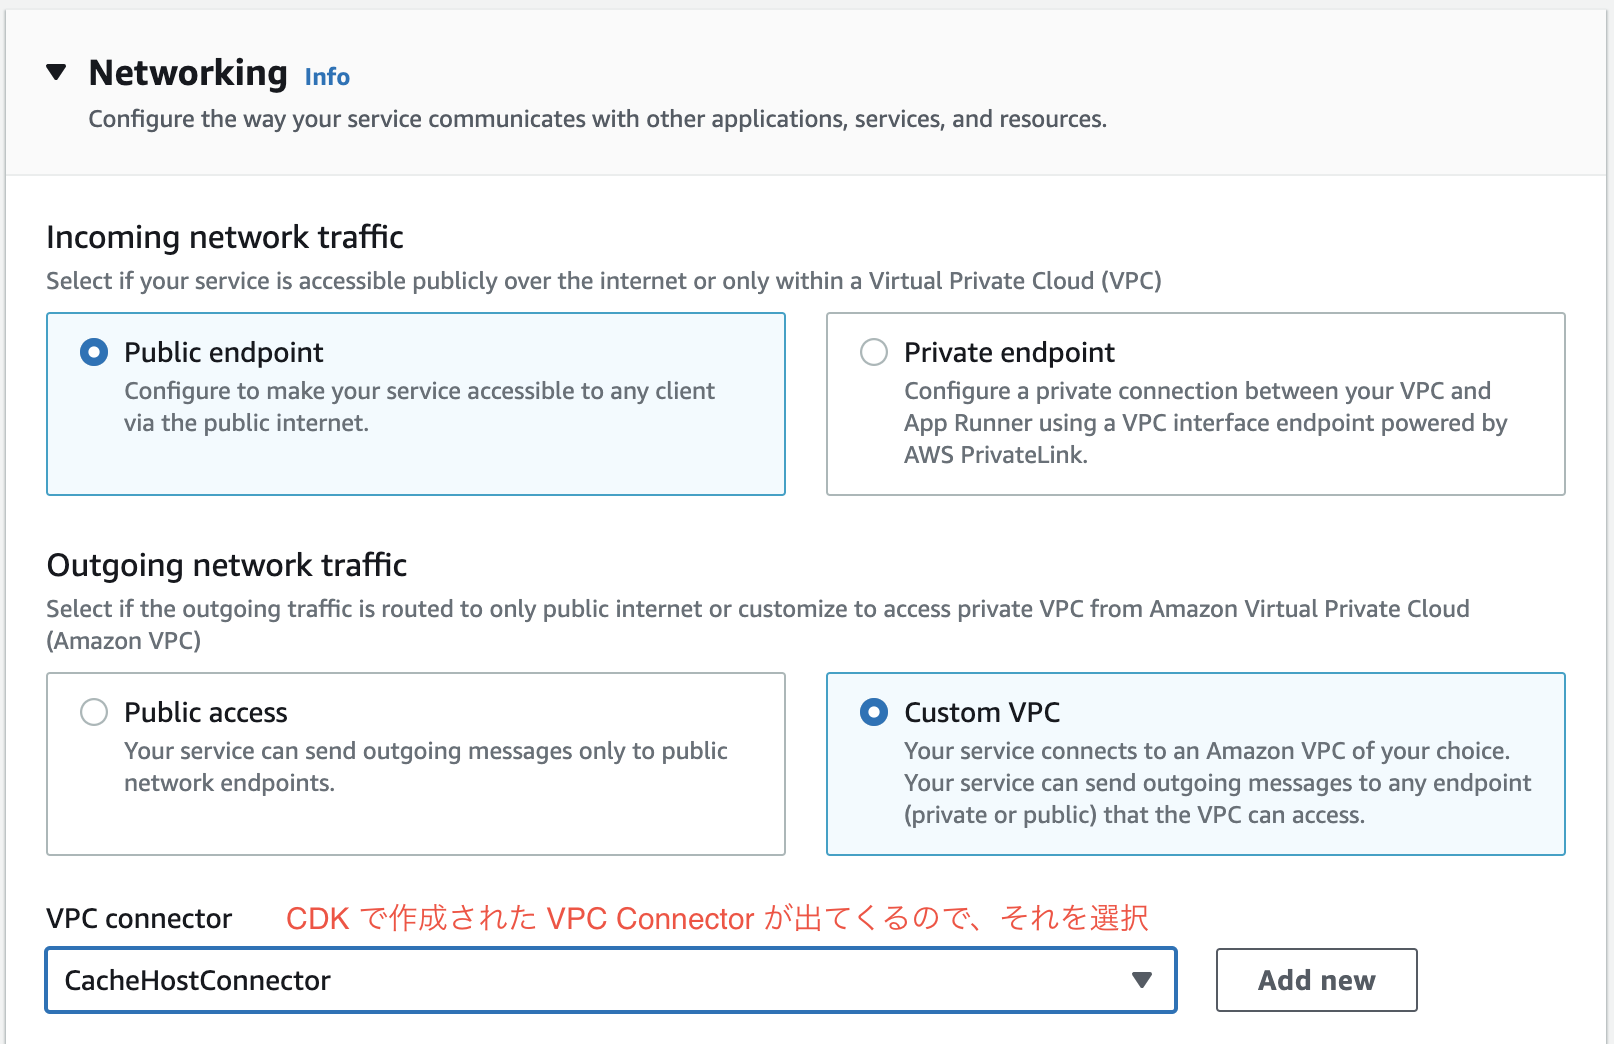
最後に、ネットワークの設定です。ElastiCache がある VPC への VPC Connector を入力しますが、上記 CDK がデプロイされていれば、プルダウンに表示されるのでその VPC Connector を選択するだけです。
この設定でデプロイすると、アプリケーションへの URL が払い出され、ElastiCacheへの参照情報を SSM Parameter Store から取得して接続するアプリケーションが起動します。
まとめ
この記事では、SSM Parameter Store および Secrets Manager で環境変数を設定できるようになったことを受け、 Spring Boot のアプリケーションで Redis への接続を App Runnerで実現する方法を確認しました。
VPC への接続、プライベートなエンドポイントのサポート、そして環境情報の外部化サポートにより、 App Runner を利用できるワークロードの選択肢はどんどん広がっています。ぜひ、お試しいただければと思います。