1. 今回やること
・前回はボタンを表示させたので、今回はListViewも表示させます。
・ListViewのItemSourceにIObservableVector型を紐付けるとほぼonewayのバインドと同じ挙動をするよというのが今回の趣旨です。
・IObservableVector型は監視可能なコレクションです。要素が追加されたり削除されたりしたときの更新通知をコントロールへ通知してくれるので、何も追加せずに楽にバインド?が出来ます。
・UWPではないプロジェクトで変更通知可能なクラス等を自分で作ろうとすると、ICustomPropertyとICustomPropertyProviderを実装する必要があるのですがそれをやるのはこんなにとかこ~~んなに大変なのでやめました。
・TextBox等の色々実装しないと行けないものにはBindしないでText()で頑張ります…
・それではListViewをバインド?させていきましょう。
2. プロジェクトの作成
・VC2019のMFCアプリでプロジェクトを開始します。名前は「MFCWinRTListView」。SDIにして、高度な機能のドッキング…は使用しません。
・プロパティーで言語標準をC++17にして、C++コマンドラインに「/await」を追加します。
・プロジェクトに「Xmlファイル」を追加し、名前を「app.manifest」にして写経します。
・InitInstance()にwinrtの初期化とxamlマネージャーの初期化を追加します。
・pch.hは前回とおなじこんなのです。
# ifndef PCH_H
# define PCH_H

// プリコンパイルするヘッダーをここに追加します
# include "framework.h"

# undef GetCurrentTime
# undef TRY

# pragma comment(lib, "windowsapp")

# include <winrt/base.h>
# include <winrt/Windows.Foundation.h>
# include <winrt/Windows.Foundation.Collections.h>
# include <winrt/Windows.UI.Popups.h>

# include <hstring.h>

# include <winrt/Windows.UI.Xaml.Controls.h>
# include <winrt/Windows.UI.Xaml.Controls.Primitives.h>
# include <winrt/Windows.UI.Xaml.Hosting.h>
# include <windows.ui.xaml.hosting.desktopwindowxamlsource.h>

# include <winrt/windows.ui.xaml.markup.h>

# endif //PCH_H
・CMFCWinRTListViewView.hにDesktopWindowXamlSourceを追加します。
class CMFCWinRTListViewView : public CView
{
	//XamlSourceの追加
	winrt::Windows::UI::Xaml::Hosting::DesktopWindowXamlSource desktopSource;

protected: // シリアル化からのみ作成します。
	CMFCWinRTListViewView() noexcept;
	DECLARE_DYNCREATE(CMFCWinRTListViewView)
・MFCWinRTListViewViewにOnCreate()を追加して、main.xamlを読み込んで、500×500の範囲に表示するコードを追加します。
int CMFCWinRTListViewView::OnCreate(LPCREATESTRUCT lpCreateStruct)
{
	if (CView::OnCreate(lpCreateStruct) == -1)
		return -1;

	auto interop = desktopSource.as<IDesktopWindowXamlSourceNative>();
	winrt::check_hresult(interop->AttachToWindow(this->m_hWnd));

	HWND hWndXamlIsland = nullptr;
	interop->get_WindowHandle(&hWndXamlIsland);

	CString line, strxaml;
	CStdioFile file;
	file.Open(_T("main.xaml"), CFile::modeRead);
	while (file.ReadString(line))
	{
		strxaml += line;
	}

	winrt::hstring xaml = strxaml.GetString();
	auto xamlContainer = winrt::Windows::UI::Xaml::Markup::XamlReader::Load(xaml).as<winrt::Windows::UI::Xaml::Controls::StackPanel>();


	desktopSource.Content(xamlContainer);
	::SetWindowPos(hWndXamlIsland, NULL, 0, 0, 500, 500, SWP_SHOWWINDOW);
	xamlContainer.UpdateLayout();

	return 0;
}
・ここまでテンプレ。
3. main.xamlの追加
・プロジェクトのフォルダに今回表示するmain.xamlを作成して、ボタンとListViewを追加します。
<StackPanel xmlns="http://schemas.microsoft.com/winfx/2006/xaml/presentation">
    <Button Name="button" Content="Button" HorizontalAlignment="left"/>
    <ListView Name="listview" Background="Aqua" Height="400" Width="300" HorizontalAlignment="left"/>
</StackPanel>
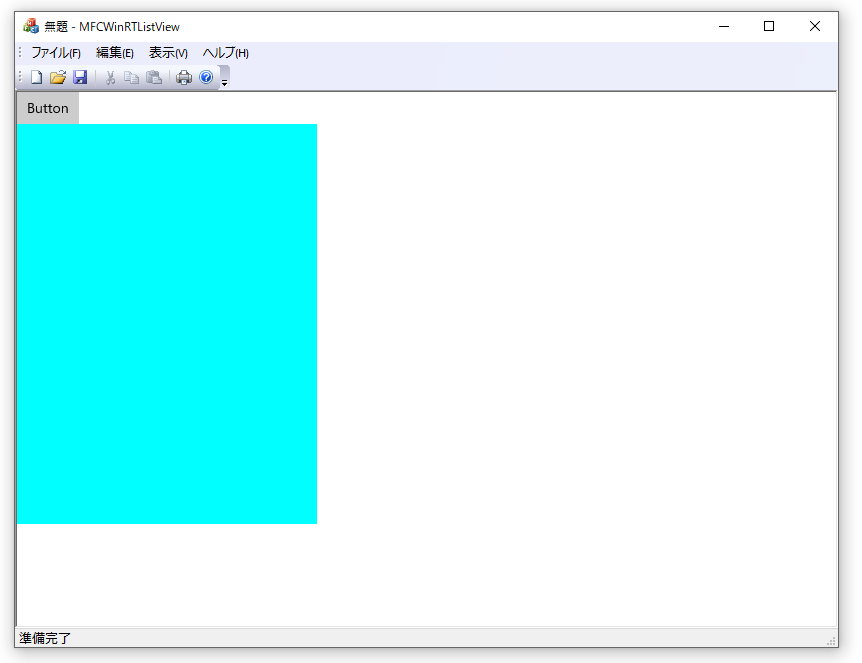
・ここで一度ビルドして、表示させるとこんな感じです。ボタンとListViewの両方表示されていますね。
4. IObservableVectorの追加
・CMFCWinRTListViewView.hにIObservableVectorを追加します。これをListViewから表示させるようにします。
# pragma once

class CMFCWinRTListViewView : public CView
{
	//XamlSourceの追加
	winrt::Windows::UI::Xaml::Hosting::DesktopWindowXamlSource desktopSource;

	//IObservableVectorの追加。ListViewに表示する情報を保持します。
	winrt::Windows::Foundation::Collections::IObservableVector<winrt::hstring> stringVec;
//後略
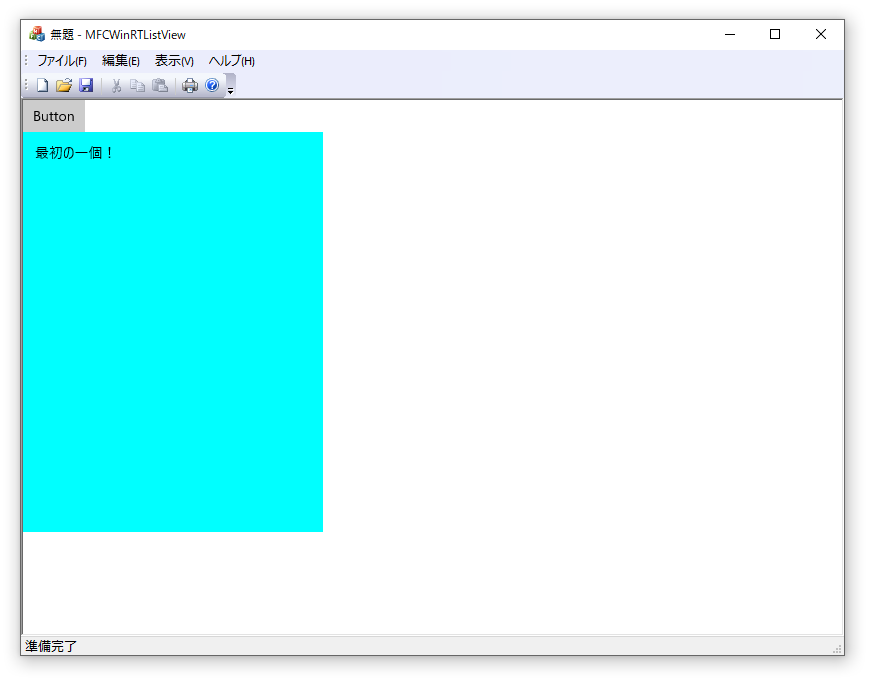
・CMFCWinRTListViewView.cppのOnCreate()へstringVecの初期化を追加し、ListViewのItemSourceへ紐付けます。
int CMFCWinRTListViewView::OnCreate(LPCREATESTRUCT lpCreateStruct)
{
	if (CView::OnCreate(lpCreateStruct) == -1)
		return -1;

	//stringVecの初期化
	stringVec = winrt::single_threaded_observable_vector<winrt::hstring>();
	//ついでに最初の一個を追加
	stringVec.Append(L"最初の一個!");


	auto interop = desktopSource.as<IDesktopWindowXamlSourceNative>();
	winrt::check_hresult(interop->AttachToWindow(this->m_hWnd));

	HWND hWndXamlIsland = nullptr;
	interop->get_WindowHandle(&hWndXamlIsland);

	CString line, strxaml;
	CStdioFile file;
	file.Open(_T("main.xaml"), CFile::modeRead);
	while (file.ReadString(line))
	{
		strxaml += line;
	}

	winrt::hstring xaml = strxaml.GetString();
	auto xamlContainer = winrt::Windows::UI::Xaml::Markup::XamlReader::Load(xaml).as<winrt::Windows::UI::Xaml::Controls::StackPanel>();


	//ListViewのItemSourceへstringVecを追加
	xamlContainer.as<winrt::Windows::UI::Xaml::Controls::StackPanel>().
		Children().GetAt(1).as<winrt::Windows::UI::Xaml::Controls::ListView>().ItemsSource(stringVec);


	desktopSource.Content(xamlContainer);
	::SetWindowPos(hWndXamlIsland, NULL, 0, 0, 500, 500, SWP_SHOWWINDOW);
	xamlContainer.UpdateLayout();

	return 0;
}
・実行すると以下となります。
・ボタンのイベントハンドラを追加して、イベントハンドラでstringVecへ追加(Append)するようにして完成です。
・CMFCWinRTListViewView.hは省略します。
int CMFCWinRTListViewView::OnCreate(LPCREATESTRUCT lpCreateStruct)
{
	if (CView::OnCreate(lpCreateStruct) == -1)
		return -1;

	//stringVecの初期化
	stringVec = winrt::single_threaded_observable_vector<winrt::hstring>();
	//ついでに最初の一個を追加
	stringVec.Append(L"最初の一個!");


	auto interop = desktopSource.as<IDesktopWindowXamlSourceNative>();
	winrt::check_hresult(interop->AttachToWindow(this->m_hWnd));

	HWND hWndXamlIsland = nullptr;
	interop->get_WindowHandle(&hWndXamlIsland);

	CString line, strxaml;
	CStdioFile file;
	file.Open(_T("main.xaml"), CFile::modeRead);
	while (file.ReadString(line))
	{
		strxaml += line;
	}

	winrt::hstring xaml = strxaml.GetString();
	auto xamlContainer = winrt::Windows::UI::Xaml::Markup::XamlReader::Load(xaml).as<winrt::Windows::UI::Xaml::Controls::StackPanel>();


	//ListViewのItemSourceへstringVecを追加
	xamlContainer.as<winrt::Windows::UI::Xaml::Controls::StackPanel>().
		Children().GetAt(1).as<winrt::Windows::UI::Xaml::Controls::ListView>().ItemsSource(stringVec);

	//イベントハンドラの登録
	buttonRevoker = xamlContainer.as<winrt::Windows::UI::Xaml::Controls::StackPanel>().Children().
		GetAt(0).as<winrt::Windows::UI::Xaml::Controls::Button>().Click(winrt::auto_revoke, { this, &CMFCWinRTListViewView::OnXamlButtonClick });


	desktopSource.Content(xamlContainer);
	::SetWindowPos(hWndXamlIsland, NULL, 0, 0, 500, 500, SWP_SHOWWINDOW);
	xamlContainer.UpdateLayout();

	return 0;
}

void CMFCWinRTListViewView::OnXamlButtonClick(winrt::Windows::Foundation::IInspectable const& sender, winrt::Windows::UI::Xaml::RoutedEventArgs const&)
{
	stringVec.Append(L"Clickで追加分!");
}
・実行して何回かボタンをクリックするとこんな感じになります。

6. 最後に
・ListViewへも簡単にバインド?出来るようになりました。文字列のリストを追加するだけならこれでも十分でしょ?
・これでMFCからWinRTを使用する基本的なことが出来るようになったので、後は頑張って見栄えの良い物を作るだけです。
・それが一番大変なのですけどね。
githubはこちら。
目次へ