1. 今回やること
・その3とその4ではxamlコントロールに直接ボタンを記述していきましたが、今回はxamlに記述してそれを表示させます。
・MSのページでは随分大変なことを書いていますが、xamlでコントロールを記述してそれを表示するだけならXamlReaderを使用すると簡単にできます。
・色々探していてXamlReader/XamlWriterでXAMLを読み書きやVSCodeでC++/WinRTを使ってネイティブなのにUIがXAMLな単体exeデスクトップアプリを作成する等を見つけて、C#で出来るのならC++でも出来るんんじゃ無いかなと思いやってみたら意外に簡単にできたよ!ありがとうございます。
・コントロールを記述する代わりに、XamlReaderにxamlファイルを解析させるだけというお手軽さで出来ます。それではやっていきましょう。
2. プロジェクトの作成
・VC2019のMFCアプリでプロジェクトを開始します。名前は「MFCWinRTXamlButton」。SDIにして、高度な機能のドッキング…は使用しません。
・プロパティーで言語標準をC++17にして、C++コマンドラインに「/await」を追加します。
・プロジェクトに「Xmlファイル」を追加し、名前を「app.manifest」にして以下のおまじないをコピペします。
<?xml version="1.0" encoding="utf-8"?>
<assembly xmlns="urn:schemas-microsoft-com:asm.v1" manifestVersion="1.0">
  <compatibility xmlns="urn:schemas-microsoft-com:compatibility.v1">
    <application>
      <!-- Windows 10 -->
      <maxversiontested Id="10.0.18362.0"/>
      <supportedOS Id="{8e0f7a12-bfb3-4fe8-b9a5-48fd50a15a9a}" />
    </application>
  </compatibility>
</assembly>
・pch.hを以下に編集します。XamlReaderを使うのでwinrt/windows.ui.xaml.markup.hを追加しています。
#ifndef PCH_H
#define PCH_H

// プリコンパイルするヘッダーをここに追加します
#include "framework.h"

#undef GetCurrentTime
#undef TRY

#pragma comment(lib, "windowsapp")

#include <winrt/base.h>
#include <winrt/Windows.Foundation.h>
#include <winrt/Windows.Foundation.Collections.h>
#include <winrt/Windows.UI.Popups.h>

#include <hstring.h>

#include <winrt/Windows.UI.Xaml.Controls.h>
#include <winrt/Windows.UI.Xaml.Controls.Primitives.h>
#include <winrt/Windows.UI.Xaml.Hosting.h>
#include <windows.ui.xaml.hosting.desktopwindowxamlsource.h>

#include <winrt/windows.ui.xaml.markup.h>

#endif //PCH_H
・CMFCWinRTXamlButtonApp::InitInstance()にwinrtの初期化とxamlマネージャーの初期化を追加します。
//前略

BOOL CMFCWinRTXamlButtonApp::InitInstance()
{
	// アプリケーション マニフェストが visual スタイルを有効にするために、
	// ComCtl32.dll Version 6 以降の使用を指定する場合は、
	// Windows XP に InitCommonControlsEx() が必要です。さもなければ、ウィンドウ作成はすべて失敗します。
	INITCOMMONCONTROLSEX InitCtrls;
	InitCtrls.dwSize = sizeof(InitCtrls);
	// アプリケーションで使用するすべてのコモン コントロール クラスを含めるには、
	// これを設定します。
	InitCtrls.dwICC = ICC_WIN95_CLASSES;
	InitCommonControlsEx(&InitCtrls);

	//winrtの初期化
	winrt::init_apartment(winrt::apartment_type::single_threaded);
	//xamlマネージャーの初期化
	winrt::Windows::UI::Xaml::Hosting::WindowsXamlManager winxamlmanager = winrt::Windows::UI::Xaml::Hosting::WindowsXamlManager::InitializeForCurrentThread();

	CWinAppEx::InitInstance();

//後略
3. xamlファイルの追加
・プロジェクトのMFCWinRTButtonフォルダ内に新しいテキストを追加します。
・この「新しいテキストドキュメント.txt」の名前を「main.xaml」へ変更し、以下へ編集します。
<StackPanel xmlns="http://schemas.microsoft.com/winfx/2006/xaml/presentation">
	<Button Name="button" Content="Button" HorizontalAlignment="left"/>
</StackPanel>
・名前を変えるとこんな感じ。この「main.xaml」を表示させます。

4. コードの追加
・CMFCWinRTXamlButtonView.hにDesktopWindowXamlSourceを追加します。
class CMFCWinRTXamlButtonView : public CView
{
	//XamlSourceの追加
	winrt::Windows::UI::Xaml::Hosting::DesktopWindowXamlSource desktopSource;

//後略
・ここまでは前回とほぼ同じです(main.xamlを作成しましたが)
・CMFCWinRTXamlButtonViewにOnCreate()を追加し、以下のコードを追加します。
・直接コントロールを追加せず、「main.xaml」を読み込んで、XamlReaderでLoadさせてそれを表示します。ではやってみましょう。
int CMFCWinRTXamlButtonView::OnCreate(LPCREATESTRUCT lpCreateStruct)
{
	if (CView::OnCreate(lpCreateStruct) == -1)
		return -1;

	// ハンドルを取得
	auto interop = desktopSource.as<IDesktopWindowXamlSourceNative>();

	// ウインドウへアタッチ
	winrt::check_hresult(interop->AttachToWindow(this->m_hWnd));

	//XAML用のHWNDを取得
	HWND hWndXamlIsland = nullptr;
	interop->get_WindowHandle(&hWndXamlIsland);

	//XAML contentの作成。ここにコントロールを追加して行きます
	winrt::Windows::UI::Xaml::Controls::StackPanel xamlContainer;

	//main.xamlを読み込む(MFCのクラスも使おうよ!!)
	CString line, strxaml;
	CStdioFile file;
	file.Open(_T("main.xaml"), CFile::modeRead);
	while (file.ReadString(line))
	{
		strxaml += line;
	}

	//CStringをhstringへ変換し、XamlReaderでControlsへ変換
	winrt::hstring xaml = strxaml.GetString();
	xamlContainer = winrt::Windows::UI::Xaml::Markup::XamlReader::Load(xaml).as<winrt::Windows::UI::Xaml::Controls::StackPanel>();

	//XamlSourceに追加して
	desktopSource.Content(xamlContainer);


	//今回はウインドウの(0,0)~(500,500)の正方形の領域にXAMLを表示しています。
	//画面全体に表示させたい場合はGetWindowRectでウインドウの大きさを取得して,それを指定してください。
	//サイズ変更に対応する場合は、OnSize()を追加して、ハンドルを取得して、StackPanelの大きさを指定してください。
	::SetWindowPos(hWndXamlIsland, NULL, 0, 0, 500, 500, SWP_SHOWWINDOW);
	xamlContainer.UpdateLayout();

	return 0;
}
・XamlReaderに読ませるときにxamlの最初のタグとwinrt::Windows::UI::Xaml::Controlsを合わせておかないと解析エラーが発生します。
・つまり、xamlファイルの最初が「<StackPanel ~」ではじまるときは「winrt::Windows::UI::Xaml::Controls::StackPanel」をしようしてXamlReaderに読ませて下さい。「Grid」等も使えます。そのときはwinrt::Windows::UI::Xaml::Controls::Gridを使用して下さい。
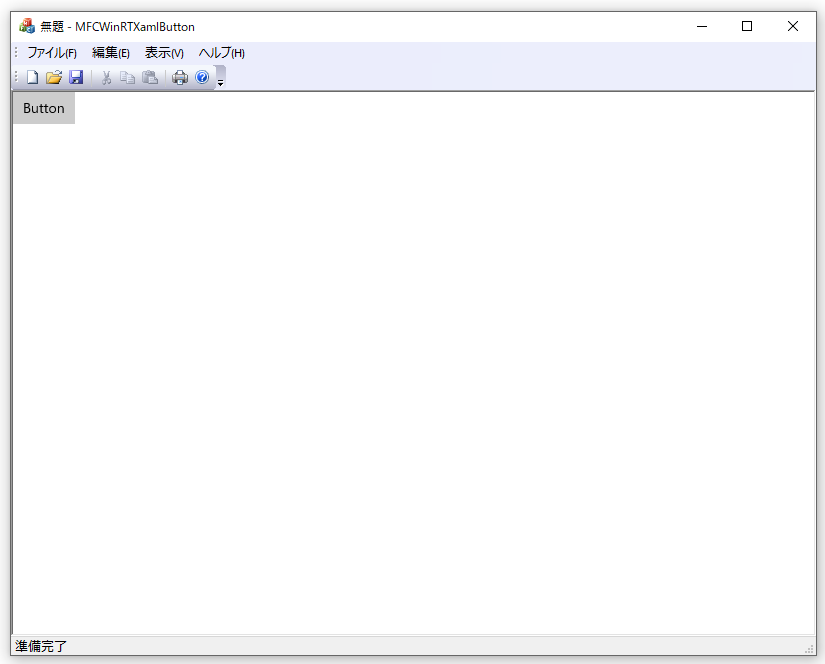
・さて、実行すると以下のようにきちんとボタンが表示できているのが確認できると思います。

・ついでなのでイベントハンドラも実装しましょう。
5. イベントハンドラの実装
・イベントハンドラはそれほど変わりません。
・まずはRevokerとハンドラ関数をMFCWinRTXamlButtonView.hへ追加します。例なのでpublicにそのまま追加します。
・そして定義を追加。
//前略
// 生成された、メッセージ割り当て関数
protected:
	afx_msg void OnFilePrintPreview();
	afx_msg void OnRButtonUp(UINT nFlags, CPoint point);
	afx_msg void OnContextMenu(CWnd* pWnd, CPoint point);
	DECLARE_MESSAGE_MAP()
public:
	afx_msg int OnCreate(LPCREATESTRUCT lpCreateStruct);

	//Revokerとイベントハンドラの追加
	winrt::Windows::UI::Xaml::Controls::Button::Click_revoker buttonRevoker;
	void OnXamlButtonClick(winrt::Windows::Foundation::IInspectable const& sender, winrt::Windows::UI::Xaml::RoutedEventArgs const&);
};
・イベントハンドラの登録とイベントハンドラ内のコードを追加します。
//前略
int CMFCWinRTXamlButtonView::OnCreate(LPCREATESTRUCT lpCreateStruct)
{
	if (CView::OnCreate(lpCreateStruct) == -1)
		return -1;

	// ハンドルを取得
	auto interop = desktopSource.as<IDesktopWindowXamlSourceNative>();

	// ウインドウへアタッチ
	winrt::check_hresult(interop->AttachToWindow(this->m_hWnd));

	//XAML用のHWNDを取得
	HWND hWndXamlIsland = nullptr;
	interop->get_WindowHandle(&hWndXamlIsland);

	//XAML contentの作成。ここにコントロールを追加して行きます
	winrt::Windows::UI::Xaml::Controls::StackPanel xamlContainer;

	//main.xamlを読み込む(MFCのクラスも使おうよ!!)
	CString line, strxaml;
	CStdioFile file;
	file.Open(_T("main.xaml"), CFile::modeRead);
	while (file.ReadString(line))
	{
		strxaml += line;
	}

	//CStringをhstringへ変換し、XamlReaderでControlsへ変換
	winrt::hstring xaml = strxaml.GetString();
	xamlContainer = winrt::Windows::UI::Xaml::Markup::XamlReader::Load(xaml).as<winrt::Windows::UI::Xaml::Controls::StackPanel>();

	//xamlContainerのStackPanelの0番目の要素のボタンのクリックをbuttonRevokerへ登録!長い!
	buttonRevoker = xamlContainer.
		as<winrt::Windows::UI::Xaml::Controls::StackPanel>().
		Children().GetAt(0).
		as<winrt::Windows::UI::Xaml::Controls::Button>().
		Click(winrt::auto_revoke, { this, &CMFCWinRTXamlButtonView::OnXamlButtonClick });


	//XamlSourceに追加して
	desktopSource.Content(xamlContainer);


	//今回はウインドウの(0,0)~(500,500)の正方形の領域にXAMLを表示しています。
	//画面全体に表示させたい場合はGetWindowRectでウインドウの大きさを取得して,それを指定してください。
	//サイズ変更に対応する場合は、OnSize()を追加して、ハンドルを取得して、StackPanelの大きさを指定してください。
	::SetWindowPos(hWndXamlIsland, NULL, 0, 0, 500, 500, SWP_SHOWWINDOW);
	xamlContainer.UpdateLayout();

	return 0;
}

void CMFCWinRTXamlButtonView::OnXamlButtonClick(winrt::Windows::Foundation::IInspectable const& sender, winrt::Windows::UI::Xaml::RoutedEventArgs const&)
{
	auto msgdlg = winrt::Windows::UI::Popups::MessageDialog(L"Button Click!!");
	msgdlg.as<IInitializeWithWindow>()->Initialize(this->m_hWnd);
	msgdlg.Content(L"Button Click!!");
	msgdlg.ShowAsync();
}
6. 最後に
・こんな感じで案外簡単にXamlを使用してMFCアプリにUWPのコントロールが配置できました。
・xamlファイルを実行ファイルの外に配置しているので、別PCで実行する場合はmain.xamlを実行ファイルと同じ場所に置いて下さい。
・リソースで追加しても大丈夫なはずなので、別ファイルにしたくない人は頑張って下さい。
・まだまだ課題があるとはいえ、これでMFCでもモダン!といえるはず。
・次回はこれをベースに違うコントロールを追加できるといいなぁ。
githubはこちら
目次へ