はじめに
2026年4月30日、AgentCore Optimization がパブリックプレビューとして公開されました。
Amazon Bedrock AgentCore Optimization は、本番トレースを分析してシステムプロンプトやツールの説明の改善案を自動生成し、A/B テストで統計的に検証するまでの流れを提供するサービスです。
この記事では AgentCore CLI でシンプルなエージェントを準備するところから、Configuration bundles → Recommendations → A/B Tests の順に一通り試してみようかなと思います。
機能概要
AgentCore Optimization は主に 3 つの機能で構成されます。
| 機能 | 役割 |
|---|---|
| Configuration bundles | システムプロンプト・Model ID・ツール説明をコードとは独立してバージョン管理する |
| Recommendations | 本番トレースと評価指標を入力に、最適化済み設定を AI が生成する |
| A/B testing | AgentCore Gateway でトラフィックを 2 バリアントに分割し、統計的有意差を計算する |
主にこの 3 つが連携して継続改善ループを形成します。
何がうれしいのか
これまで「プロンプトを書き換えてデプロイしてユーザーのフィードバックなどを得て改善していく」というサイクルを手動で回していた部分が、本番トレースに基づいてデータドリブンで改善が可能になります。
事前準備:AgentCore CLI でエージェントを作成・デプロイする
Optimization を試すには、トレースが蓄積されたエージェントの準備が必要です。AgentCore CLI を使ってサクッとセットアップしておきましょう。
最初 AgentCore CLI 1.0.0-preview.6 の Harness で作成したエージェントで試しましたが、agentcore run recommendation コマンドは deployed-state.json の runtime セクションを参照するけど、harnesses デプロイの場合、harnesses セクション内に runtime が入っているためエージェントが見つからないよーというエラーが表示されました。
そのため、preview 版ではない AgentCore CLI で通常の runtime でデプロイされるエージェントを用意してください。
Step 1: AgentCore CLI のインストール
npm install -g @aws/agentcore
agentcore --version

# 既にインストール済みの場合は最新版に更新
agentcore update
Step 2: エージェントプロジェクトの作成
--defaults フラグで Strands Agents + Bedrock の構成を非対話的に作成できます。
agentcore create --name OptAgent --defaults
cd OptAgent
Step 3: ローカル動作確認
agentcore dev
ブラウザで Agent Inspector が開きます。「AWS Lambda の料金体系を教えてください」と送ってレスポンスが返れば OK です。

Step 4: CloudWatch Transaction Search の有効化
Optimization はトレースデータを CloudWatch Logs から読み取ります。デプロイ前に Transaction Search を有効化していない場合は有効化しておきましょう。

Step 5: デプロイ
agentcore deploy
完了後、数回エージェントを呼び出してトレースを蓄積しておきます。
# トレースを生成するために数回呼び出す
agentcore invoke --prompt "AWS Lambda の料金体系を教えてください"
agentcore invoke --prompt "Lambda と ECS の違いは何ですか?"
agentcore invoke --prompt "S3 のバケットポリシーはどう設定しますか?"
以上で準備が整ったので次から本題です。
やってみた
Step 1: Configuration bundles を作成する
まずエージェントのシステムプロンプトを Configuration bundle として登録します。
Configuration bundle を使う場合、エージェントは実行時にバンドルから設定を読み取る必要があります。app/OptAgent/main.py を以下のように書き換えます。
app/OptAgent/main.py
"""Agent with Configuration Bundle integration."""
from strands import Agent, tool
from strands.models.bedrock import BedrockModel
from strands.hooks.events import BeforeModelCallEvent
from bedrock_agentcore.runtime import BedrockAgentCoreApp, BedrockAgentCoreContext

app = BedrockAgentCoreApp()
DEFAULT_MODEL_ID = "global.amazon.nova-2-lite-v1:0"
DEFAULT_SYSTEM_PROMPT = "あなたは AWS の技術的な質問に答えるアシスタントです。"


def dynamic_config_hook(event: BeforeModelCallEvent):
    """バンドルからシステムプロンプトを動的に読み込む。"""
    config = BedrockAgentCoreContext.get_config_bundle()
    if config:
        event.agent.system_prompt = config.get("system_prompt", DEFAULT_SYSTEM_PROMPT)


agent = Agent(
    model=BedrockModel(model_id=DEFAULT_MODEL_ID),
    system_prompt=DEFAULT_SYSTEM_PROMPT,
)
agent.hooks.add_callback(BeforeModelCallEvent, dynamic_config_hook)


@app.entrypoint
def invoke(payload, context):
    result = agent(payload.get("prompt", "Hello"))
    return {"response": result.message["content"][0]["text"]}


if __name__ == "__main__":
    app.run()
app/OptAgent/pyproject.toml の依存パッケージも更新します(bedrock-agentcore >= 1.8.0 と otel 系が必要です)。
app/OptAgent/pyproject.toml
dependencies = [
    "aws-opentelemetry-distro",
    "bedrock-agentcore >= 1.8.0",
    "boto3",
    "botocore[crt] >= 1.35.0",
    "strands-agents[otel] >= 1.13.0",
    "opentelemetry-distro",
    "opentelemetry-instrumentation",
]
デプロイ済みのランタイム ARN を確認します。
agentcore status
# 出力例: arn:aws:bedrock-agentcore:us-west-2:123456789012:runtime/OptAgent-abc123
Configuration bundle を作成してデプロイします。arn は一つ前の手順で確認したランタイム ARN に置き換えてください。
agentcore add config-bundle \
  --name optAgentConfig \
  --components '{
    "arn:aws:bedrock-agentcore:us-west-2:123456789012:runtime/OptAgent-abc123": {
      "configuration": {
        "system_prompt": "あなたは AWS の技術的な質問に答えるアシスタントです。",
        "model_id": "global.amazon.nova-2-lite-v1:0"
      }
    }
  }'

agentcore deploy
バージョン履歴を確認します。
agentcore config-bundle versions --bundle optAgentConfig
バージョン履歴:
Branch: mainline
└ 459980b7-6da1-4cef-b2a7-c4c5b2fc6e05 2026-05-03 08:20:00Z "Create optAgentConfig"
  by: unknown
Step 2: Recommendations で改善案を生成する
Recommendations には 2 種類あります。
| 種類 | 対象 | 用途 |
|---|---|---|
| system-prompt | システムプロンプト | 失敗パターンを分析し、より明示的な指示を追記する |
| tool-description | ツールの説明文 | ツール選択の混乱を減らすよう各ツールの説明を改善する |
トレースを見て「ツールを誤選択している」「そもそもツールが呼び出されない」と感じたら tool-description を試す価値があります。今回の OptAgent はツールを持たないため試しませんが、ツールありのエージェントでは合わせて検討する価値があります。
システムプロンプトの改善
Step 1 で作成したバンドルを参照することで、最適化済みの設定が自動的に新バージョンとして書き込まれます。--bundle-version には Step 1 で確認したバージョン ID を指定します。--system-prompt-json-path はバンドルのコンポーネント設定内のキー名です。
agentcore run recommendation \
  --type system-prompt \
  --run my-prompt-rec \
  --runtime OptAgent \
  --evaluator Builtin.GoalSuccessRate \
  --bundle-name optAgentConfig \
  --bundle-version <Step 1 で確認した version-id> \
  --system-prompt-json-path system_prompt \
  --lookback 3
出力結果:

一応 AWS マネージメントコンソールからも結果を確認してみます。

内容は LLM が生成するため当たり前ですが適用前に必ず確認しましょう。
バンドルモードの場合、承認後に最適化済み設定が新バージョンとして自動で追記されます。
バージョン履歴を確認して新しいバージョン ID を控えておきます(Step 3 の A/B test で使います)。
agentcore config-bundle versions --bundle optAgentConfig
バージョン履歴:
Branch: mainline
├ 67e2cc79-7eda-4c51-af63-4f17b9662e8d 2026-05-03 08:42:19Z "Optimized by AgentCore Recommendation"
│ by: recommendation-job (parent: 459980b7-6da1-4cef-b2a7-c4c5b2fc6e05)
└ 459980b7-6da1-4cef-b2a7-c4c5b2fc6e05 2026-05-03 08:20:00Z "Create optAgentConfig"
  by: unknown
Step 3: A/B test でライブトラフィックを使って検証する
Control(既存プロンプト)と Treatment(最適化済みプロンプト)の 2 バリアントにトラフィックを分割して、統計的有意差を確認します。
まず Online Evaluation の設定を追加します。
agentcore add online-eval \
  --name optAgentEval \
  --runtime OptAgent \
  --evaluator "Builtin.Helpfulness" \
  --sampling-rate 100.0 \
  --enable-on-create

agentcore deploy
次に A/B test を作成します。Control バンドルは初期バージョン、Treatment は Recommendations で更新したバージョンを指定します。
agentcore add ab-test \
  --mode config-bundle \
  --name optAgentPromptTest \
  --runtime OptAgent \
  --control-bundle optAgentConfig \
  --control-version <初期バージョン> \
  --treatment-bundle optAgentConfig \
  --treatment-version <更新したバージョン> \
  --online-eval optAgentEval \
  --control-weight 80 \
  --treatment-weight 20 \
  --enable

agentcore deploy
Gateway の invoke URL を取得してリクエストを送ります。
export AWS_ACCESS_KEY_ID=$(aws configure get aws_access_key_id)
export AWS_SECRET_ACCESS_KEY=$(aws configure get aws_secret_access_key)
export AWS_SESSION_TOKEN=$(aws configure get aws_session_token)

GATEWAY_URL="https://<gateway-id>.gateway.bedrock-agentcore.us-east-1.amazonaws.com/<target-name>/invocations"

# セッション ID を変えながら複数回送信する(uuidgen で毎回ランダムな ID を生成)
for i in $(seq 1 20); do
  curl -s --aws-sigv4 "aws:amz:us-east-1:bedrock-agentcore" \
    --user "$AWS_ACCESS_KEY_ID:$AWS_SECRET_ACCESS_KEY" \
    -H "x-amz-security-token: $AWS_SESSION_TOKEN" \
    -H "Content-Type: application/json" \
    -H "X-Amzn-Bedrock-AgentCore-Runtime-Session-Id: $(uuidgen)" \
    -d "{\"prompt\": \"Lambda の料金体系を教えてください\"}" \
    -X POST "$GATEWAY_URL"
  echo ""
  sleep 2
done
セッション完了後、Online Evaluation のスコアリングと統計集計に最大 15 分ほどかかります。十分なセッションが蓄積されると p 値と信頼区間が計算されます(p < 0.05 で統計的有意)。
テスト名を指定して結果を確認してみます。
agentcore ab-test optAgentPromptTest
出力結果:

一応 AWS マネージメントコンソールからも結果を確認してみます。
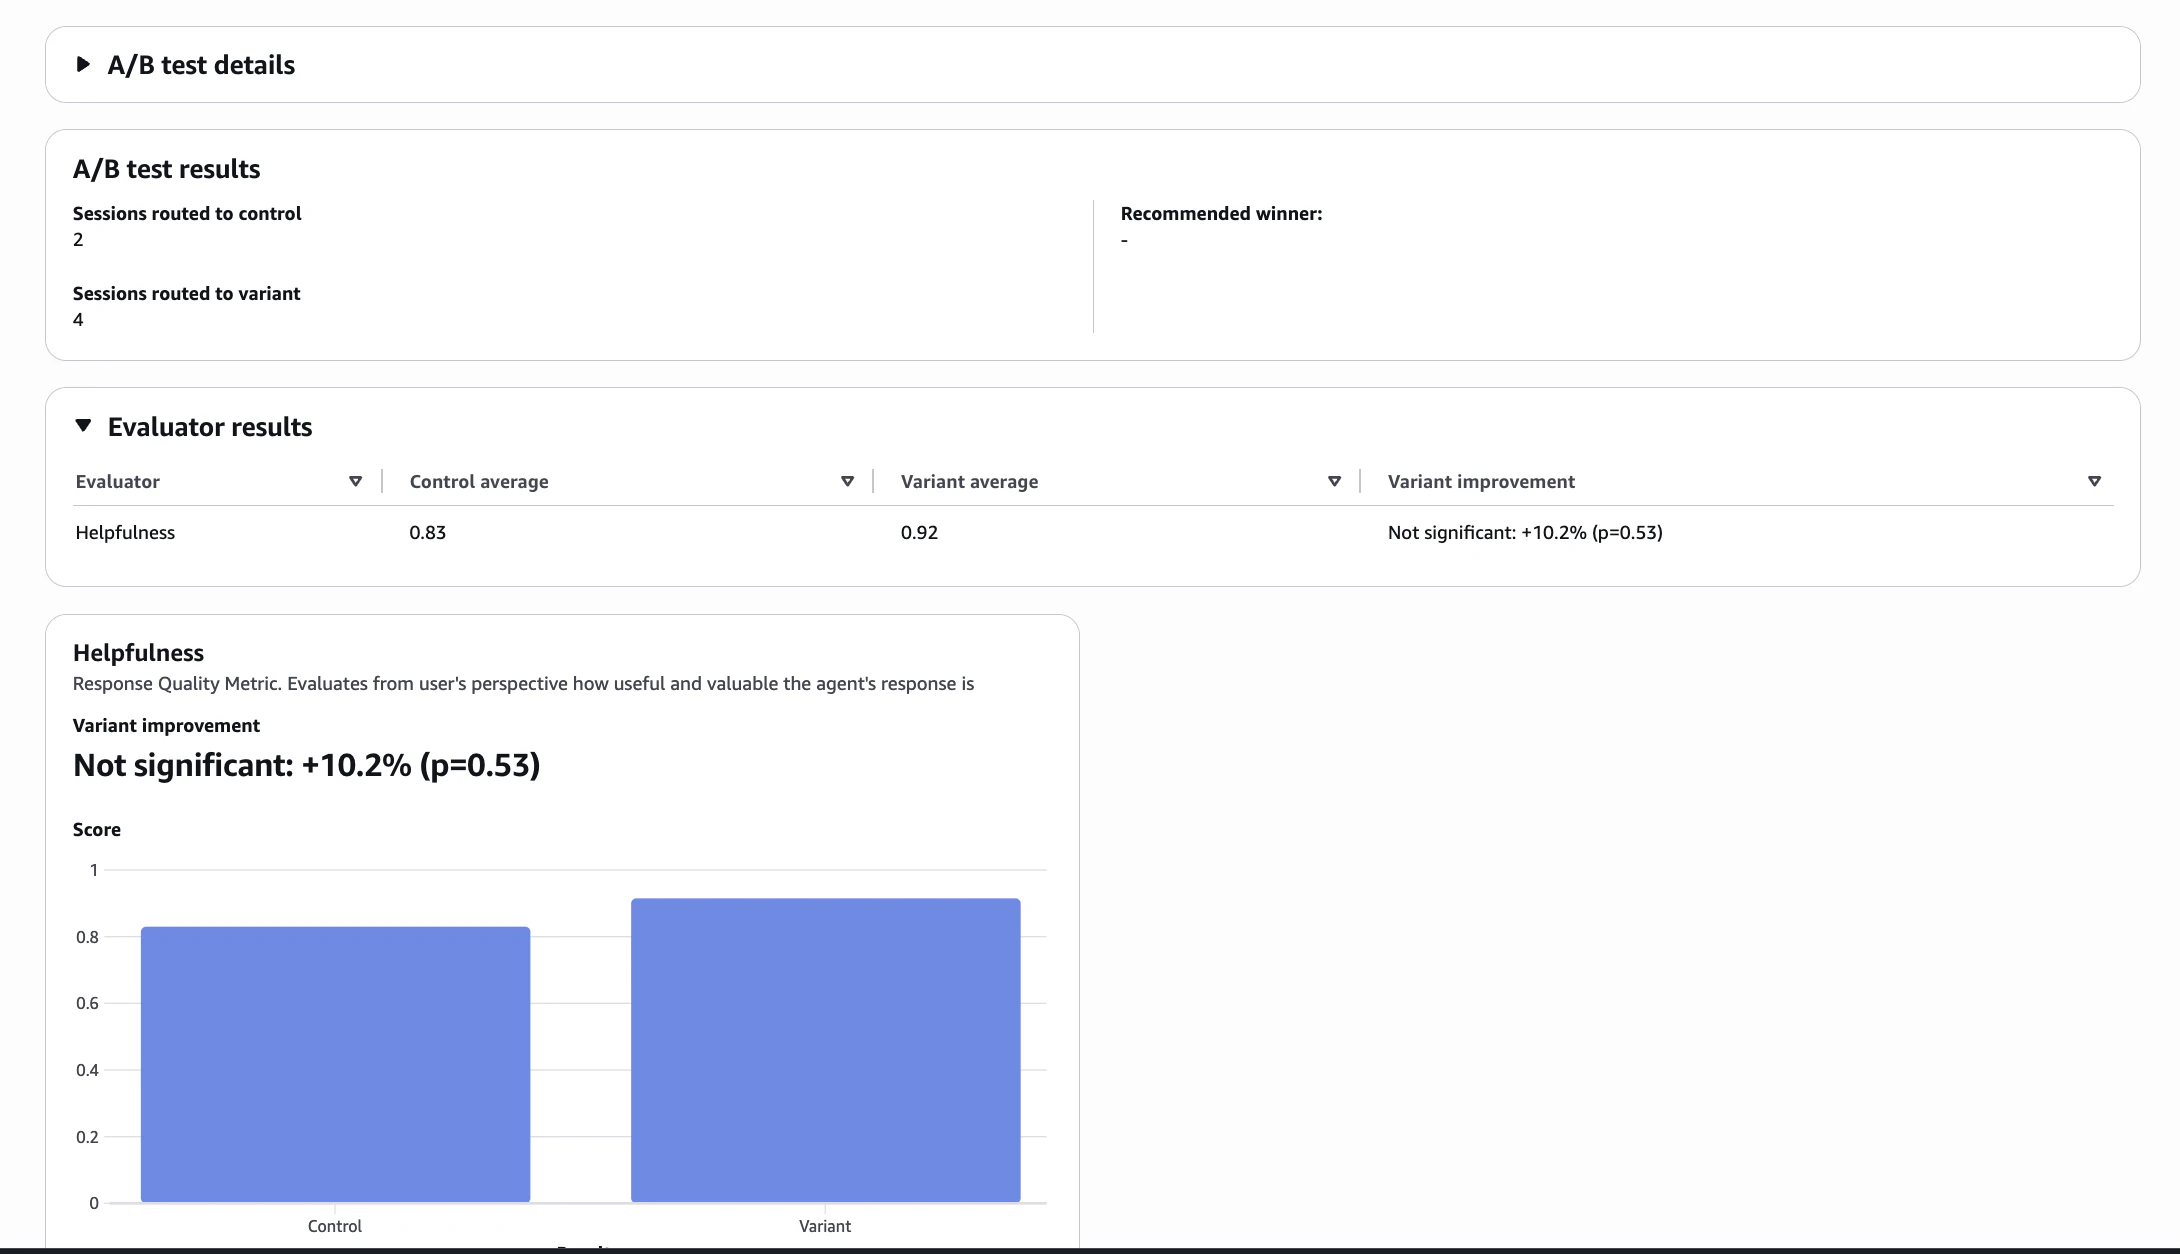
p 値の解釈:
- p < 0.05 かつ percentChange が正 → Treatment が有意に優れている。デプロイを検討
- p < 0.05 かつ percentChange が負 → Treatment が有意に劣っている。Control を維持
- p ≥ 0.05 → 有意差なし。サンプルを増やして継続
今回は以下の通りサンプル数がちょっと少ないですが、Treatment が優勢なので、Treatment へ全トラフィックを切り替えてデプロイしちゃいます。
- スコア: Treatment(0.915)> Control(0.830)で方向は良好
- p=0.534: p < 0.05 には程遠く、まだ統計的有意差なし
- n=2 / n=4: サンプルがまだ少ない
agentcore promote ab-test optAgentPromptTest
agentcore deploy
これにより、A/B testが停止され、コントロールエンドポイントが勝者となったバージョンを指すように更新されます。
まとめ
AgentCore Optimization は、本番エージェントの品質改善を感覚で修正していたものを「データドリブン」に転換する仕組みです。Configuration bundles でプロンプトをバージョン管理し、Recommendations で改善案を得て、A/B test で本番トラフィックを使って検証する流れが AgentCore CLI から一気通貫で操作できるのは良さそうですね。
参考リンク
- https://docs.aws.amazon.com/bedrock-agentcore/latest/devguide/optimization.html
- https://docs.aws.amazon.com/bedrock-agentcore/latest/devguide/runtime-get-started-cli.html
おまけ
AWS マネージメントコンソールをみて気づいたのですが、Gateway のターゲットに Agent target(Runtime) が新しくできたのは今回の Optimization で A/B test をするために追加された感じ?
