皆さんお久しぶりです。カレンダー作っといてネタがなくて結局この日になってしまいました。
ところで2年前に「DxLibで画像管理するクラスを作った件」を投稿しました。2年たって見直してみるとC++のくせになんかconst char*つかってたりといろいろ改善すべき点があるのでしました。
本編
前置きはいいのでさっさと本編行きましょう。
材料
テクスチャのパラメーターとして以下の材料を用意します。
1.大きさ
2.回転・描画中心中心
3.拡大率
4.回転角
5.反転フラグ(左右、上下)
3.ブレンド用パラメーター
7.ブレンドモード
8.描画モード
9.画像ハンドル
また画像分割にも対応するためさらに、
10.分割フラグ
11.分割数
12.分割画像のハンドル配列
実装
x,yを表現する二次元ベクトル構造体vec2を先に下に示しておきます。
template<typename t>
struct vec2 {
    t x,y;

    vec2(const t& _x, const t& _y) : x(_x), y(_y) {}

    constexpr Point operator +(const Point& other) const {
        return{ x + other.x, y + other.y };
    }

    constexpr Point operator -(const Point& other) const {
        return{ x - other.x, y - other.y };
    }

    constexpr Point operator *(const Point& other) const {
        return{ x * other.x, y * other.y };
    }

    constexpr Point operator /(const Point& other) const {
        return{ x / other.x, y / other.y };
    }
}
ではtextureクラスを実装しましょう。(変数名適当でごめんちゃい)
大きさと色・ハンドルから・画像パス・画像パスと分割する個数、それぞれを指定してテクスチャを生成します。引数なしの状態では大きさ64*64、白いテクスチャを生成するものとします。
また、各パラメータを指定する関数、描画関数をつくります。
class texture {
    vec2<int> _size;
    vec2<float> _center;
    int _handle = 0;
    std::vector<int> _divhandle;
    bool _isdiv = false;
    bool _isturn = false;
    bool _isflip = false;
    double _angle = 0.0, _rate = 1.0;
    int _param = 255;
    vec2<int> _divnum = { 1,1 };
    int _b_mode = DX_BLENDMODE_NOBLEND;
    int _d_mode = DX_DRAWMODE_NEAREST;
public:
    texture();
    texture(const vec2<int>& size, const unsigned char& r=0xff, const unsigned char& g = 0xff, const unsigned char& b = 0xff);
    texture(const int& handle);
    texture(const std::string& path);
    texture(const std::string& path, const vec2<int>& divnum);

    texture& rotated(const double& angle);
    texture& scaled(const double& rate);
    texture& parameter(const int& param);
    texture& turned(const bool& turn = true);
    texture& flipped(const bool& flip = true);
    texture& centerd(const vec2<float>& centerposition);
    texture& blendmode(const int& mode = DX_BLENDMODE_NOBLEND);
    texture& drawmode(const int& mode = DX_DRAWMODE_NEAREST);

    texture operator [](const unsigned int& i)const;

    void draw(const vec2<float>& position);
};
画像を分割した際、operator []で各画像にアクセスします。また、関数の戻り値を自身への参照にしてます。
コンストラクタの定義
texture::texture() {
    *this = texture(vec2<int>(64, 64)); // 64*64の白いテクスチャ
}

texture::texture(const vec2<int>& size, const unsigned char& r, const unsigned char& g, const unsigned char& b) {
    _handle = MakeGraph(size.x, size.y); //指定の大きさのテクスチャを作成
    _size = size;
    _center = { size.x / 2.0f, size.y / 2.0f };
    FillGraph(_handle, r, g, b); //指定の色でフィル
}

texture::texture(const int& handle) {
    if (handle < 0) { //無効なハンドルの場合
        *this = texture();
        return;
    }
    _handle = handle;
    _isdiv = false;
    float x, y;
    GetGraphSizeF(handle, &x, &y); //ハンドルから大きさを取得
    _size = { static_cast<int>(x), static_cast<int>(y) };
    _center = { _size.x / 2.0f, _size.y / 2.0f };
}

texture::texture(const std::string& path) {
    int x, y;
    _isdiv = false;
    int r = GetImageSize_File(path.c_str(), &x, &y); //ファイルから大きさを取得
    if (r < 0) { //ファイルの読み込みに失敗
        *this = texture();
        return;
    }
    _size = { static_cast<int>(x), static_cast<int>(y) };
    _center = { _size.x / 2.0f, _size.y / 2.0f };

    r = LoadGraph(path.c_str());
    if (r < 0) { //ファイルの読み込みに失敗
        *this = texture(_size);
        return;
    }
    _handle = r;
}

texture::texture(const std::string& path, const vec2<int>& divnum) {
    int x, y;
    _isdiv = true;
    _divnum = divnum;
    int r = GetImageSize_File(path.c_str(), &x, &y); //ファイルから大きさを取得
    if (r < 0) { //ファイルの読み込みに失敗
        _size = { x,y };
        int handle = texture(vec2<int>(x, y))._handle;
        for (int i = 0; i < _divnum.x * _divnum.y; i++) {
            _divhandle.push_back(handle); //すべて64*64の白のテクスチャにする
        }
        return;
    }
    _size = { static_cast<int>(x), static_cast<int>(y) };
    _size = _size / divnum;
    _center = { _size.x / 2.0f, _size.y / 2.0f };

    _divhandle.resize(divnum.x * divnum.y);
    r = LoadDivGraphF(path.c_str(), divnum.x * divnum.y, divnum.x, divnum.y, static_cast<float>(_size.x), static_cast<float>(_size.y), &_divhandle.at(0));
    if (r < 0) { //ファイルの読み込みに失敗
        int handle = texture(vec2<int>(x, y))._handle;
        _divhandle.clear();
        for (int i = 0; i < _divnum.x * _divnum.y; i++) {
            _divhandle.at(i) = handle; //すべて64*64の白のテクスチャにする
        }
        return;
    }
}
画像の大きさを指定しなくてもファイルから取得するので、引数として渡さなくてよいので楽です。
パラメータ関数など
texture& texture::rotated(const double& angle) {
    _angle = angle;
    return *this;
}
texture& texture::scaled(const double& rate) {
    _rate = rate;
    return *this;
}
texture& texture::parameter(const int& param) {
    _param = param;
    return *this;
}
texture& texture::turned(const bool& turn) {
    _isturn = turn;
    return *this;
}
texture& texture::flipped(const bool& flip) {
    _isflip = flip;
    return *this;
}
texture& texture::centerd(const vec2<float>& centerposition) {
    _center = centerposition;
    return *this;
}
texture& texture::blendmode(const int& mode) {
    _b_mode = mode;
    return *this;
}
texture& texture::drawmode(const int& mode) {
    _d_mode = mode;
    return *this;
}

texture texture::operator [](const unsigned int& i) const {
    if (!_isdiv) {
        return *this; //分割画像出ない場合は自身を返す
    }
    else if (0 <= i && i < _divhandle.size()) {
        return texture(_divhandle.at(i));
    }
    else {
        return texture(_size); //範囲外であれば64*64の白のテクスチャを返す
    }
}
自身への参照を返すことで、以下のような記述ができるようになります。
texture tex;
tex.rotate(0.5*PI).scaled(2.0).draw({64,64}); //0.5π回転させ大きさを2倍にして画像の中心を[64,64]で描画
描画関数
このライブラリにはこれらのパラメータを一つの関数で適用させることができる関数があるのでおとなしくそれを使います。
void texture::draw(const vec2<float>& position) {
    if (_isdiv) {
        return; //分割画像であれば何もしない
    }
    SetDrawBlendMode(static_cast<int>(_b_mode), _param);//ブレンドモードを適用
    SetDrawMode(static_cast<int>(_d_mode));//描画モードを適用
    DrawRotaGraph2F(static_cast<float>(position.x), static_cast<float>(position.y), static_cast<float>(_center.x), static_cast<float>(_center.y), _rate, _angle, _handle, true, _isturn, _isflip);
}
使ってみよう
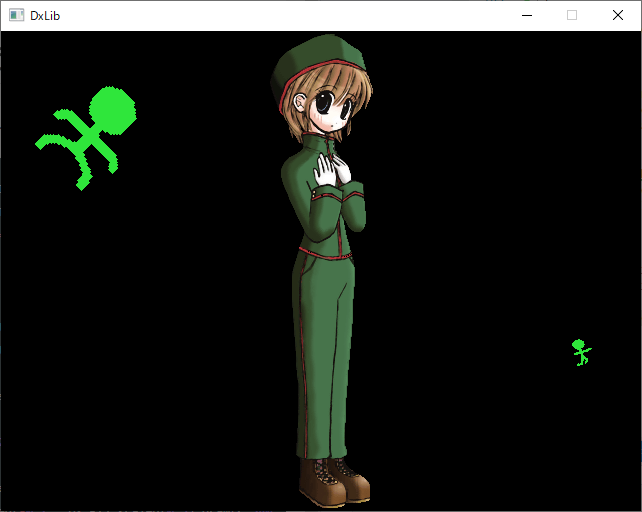
サンプルフォルダに入っている画像を使います。
int WINAPI WinMain( HINSTANCE hInstance, HINSTANCE hPrevInstance, LPSTR lpCmdLine, int nCmdShow ) {
	ChangeWindowMode(TRUE);
	if( DxLib_Init() == -1 ) {
		 return -1;
	}

	texture tex1("test1.bmp");
	texture tex2("test2.bmp", { 4,3 });

	while (ProcessMessage() == 0 && CheckHitKey(KEY_INPUT_ESCAPE) == 0) {

		tex1.draw({ 320,240 });

		tex2[0].rotated(0.25 * DX_PI).scaled(2.0).draw({ 96,96 });
		tex2[4].rotated(-0.1 * DX_PI).scaled(0.5).draw({ 580,320 });

		ScreenFlip();
	}

	return 0 ;
}
明日25日(間に合えば)の記事はこのtextureクラスを使って、アニメーションをやります。