はじめに
このご時世、私の職場でも、出勤者全員の体温計測をするようにとのお達しがありました。
しかし、出勤者約100名に対して非接触式の体温計がたった1台(!)。出勤時に行列ができるのが目に見えています。出勤前に各自体温計測してきたほうがよっぽど正確な測定ができると思うのですが、それもNGとのこと。(理由は不明。体温を測っていないのに測ったとウソをつく人が出てくるから?)
そんなわけで、Arduinoと非接触式温度センサーを使って効率的な体温計測をやろうと思いました。
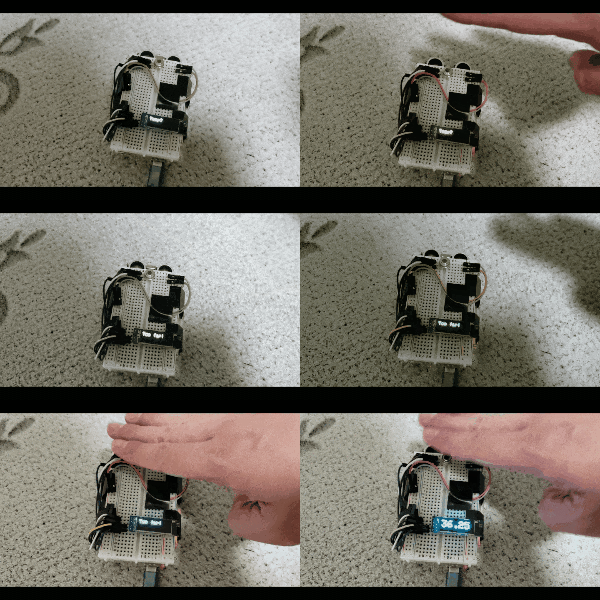
動作の概要
- 温度センサーにおでこをかざして体温を計測します。
- 測定距離まで近づいたことを超音波センサーで検知してから計測します。
- 平熱であればピピッ、発熱ありであればブーブー、と鳴り、ディスプレイに測定結果を表示します。
- おでこが遠すぎる場合は「ブブブブブ」と鳴り、もう少し近づくように促します。
- とりあえずは記録機能はありません(まだ作っていませんが、android端末を接続してのログ取得は可能と思います)
- 測定できるのはおでこの表面温度なので、数字にゲタを履かせて体温の推定値を算出します(後述)
準備するもの
- Arduino UNO R3
(https://www.amazon.co.jp/dp/B06Y5TBNQX/) - 非接触温度センサー MLX90614 (https://www.sengoku.co.jp/mod/sgk_cart/detail.php?code=EEHD-4EZP)
- OLEDディスプレイ(0.91インチ、128x32、SSD1306)(https://www.amazon.co.jp/gp/product/B07D9H83R4/)
- ブレッドボード(https://www.amazon.co.jp/dp/B009ALRR9M/)
- 圧電スピーカー(http://akizukidenshi.com/catalog/g/gP-04118/)
- 超音波センサー(http://akizukidenshi.com/catalog/g/gM-11009/)
- 10kΩ抵抗×2個
- ジャンパーワイヤ
回路図
ブレッドボードとジャンパワイヤでがんばって配線します。
コーディング
- arduino IDEを使います。
- ライブラリをいくつかダウンロードしておきます(Adafruit MLX90614、Adafruit SSD1306)
mlx90614_test.ino
# include <SPI.h>
# include <Wire.h>
# include <Adafruit_MLX90614.h>
# include <Adafruit_GFX.h>
# include <Adafruit_SSD1306.h>

// LCD初期設定
# define SCREEN_WIDTH 128 // OLED display width, in pixels
# define SCREEN_HEIGHT 32 // OLED display height, in pixels
// Declaration for an SSD1306 display connected to I2C (SDA, SCL pins)
# define OLED_RESET     4 // Reset pin # (or -1 if sharing Arduino reset pin)
Adafruit_SSD1306 display(SCREEN_WIDTH, SCREEN_HEIGHT, &Wire, OLED_RESET);

//超音波距離センサ定数設定
# define TrigPin 8 // Trig Pin定義
# define EchoPin 9 // Echo Pin定義
# define OK_DISTANCE 7.0 // 測定は7cm以内

// スピーカー定数設定
# define BEATTIME 500 //音を出している時間(msec)
# define SPEAKER 12 //スピーカーの出力ピン番号]
# define OK_SOUND 1046.502
# define NG_SOUND 500.0

// 温度センサー初期設定
# define TEMP_THRESHOLD 37.0
# define ADJUST_TEMP 3.7
Adafruit_MLX90614 mlx = Adafruit_MLX90614();


//初期設定
void setup() {
  Serial.begin(9600);
  mlx.begin();
  display.begin(SSD1306_SWITCHCAPVCC, 0x3C);
  pinMode( TrigPin, OUTPUT ); //デジタル入出力のTrigpinをOUTPUTに指定
  pinMode( EchoPin, INPUT ); //デジタル入出力のEchopinをINPUTに指定
  display.setTextColor(SSD1306_WHITE); // Draw white text
  display_text("Temp?");

}

//ループ関数
void loop() {
  float temp;

  temp = mlx.readObjectTempC();
  Serial.print("Temp, ");
  Serial.println(temp); //シリアルモニタに計算した距離を表示

  if(is_distance_ok()){
    temp = read_temp_sensor() + ADJUST_TEMP;
    display_temp(temp);
    if(temp < TEMP_THRESHOLD){
      play_sound(OK_SOUND, 100, 2);
      delay(3000);
      display_text("Temp?");
    }else{
      play_sound(NG_SOUND, 500, 2);
      delay(3000);
      display_text("Temp?");
    }
  }else if(temp > 28.0){
    play_sound(NG_SOUND, 100, 5);
    display_text("Too far!");
    delay(500);
  }
  delay(500);
}

void play_sound(float freq, int beattime, int number){
  for(int i=0; i<number; i++){
    tone(SPEAKER,freq,beattime) ; // ド
    delay(beattime);
  }
}

void display_text(char* text){
      display.clearDisplay();
      display.setTextSize(2);      // Normal 2x2 pixel scale
      display.setCursor(0, 0);     // Start at top-left corner
      display.cp437(true);         // Use full 256 char 'Code Page 437' font
      display.print(text);
      display.display();
}

void display_temp(float number){
      display.clearDisplay();
      display.setTextSize(4);      // Normal 4x4 pixel scale
      display.setCursor(0, 0);     // Start at top-left corner
      display.cp437(true);         // Use full 256 char 'Code Page 437' font
      display.print(number);
      display.display();
}

int is_distance_ok(){
  float ProDelay = 0; //Echo出力のHigh期間を格納する変数
  float Distance = 0; //計算した距離を格納する変数

  digitalWrite(TrigPin, LOW); //TrigpinからLOWを出力
  delayMicroseconds(10); //10μs待機

  //超音波を出力するためのトリガ信号生成
  digitalWrite( TrigPin, HIGH ); //トリガ信号Highパルスエッジ
  delayMicroseconds( 10 ); //トリガ信号パルス幅10μsを生成
  digitalWrite( TrigPin, LOW ); //トリガ信号Lowパルスエッジ

  ProDelay = pulseIn( EchoPin, HIGH ); //Echopinに入力されるEchoピンのHigh期間を測定
  Distance = 340*ProDelay/2/10000; // 音速340m/sとして距離の計算とcmへの換算
  Serial.print("Distance, "); //わかりやすくするため、シリアルモニタにDistance:を表示
  Serial.println(Distance); //シリアルモニタに計算した距離を表示
  if(Distance > 0 && Distance < OK_DISTANCE){
    return 1;
  }else{
    return 0;
  }
}

float read_temp_sensor(){
  float temp_old;
  float temp_new;

  temp_old = mlx.readObjectTempC();
  for(int i=0; i<8; i++){
    temp_new = mlx.readObjectTempC();
    if(temp_new > temp_old){
      temp_new = temp_old;
    }
    delay(50);
  }
  Serial.print("Temp_fixed, ");
  Serial.println(temp_new); //シリアルモニタに測定した体温を表示

  return temp_new;
}
(参考) 表面温度からの体温の推定について
- 温度センサーで測れるのは表面温度で、体温とは違う値になるので、どうにかして温度センサーで測定した表面温度から体温を推定する必要があります。
- この文献を見ると、「環境温度が比較的安定している空港などでは、アラーム設定値を検出したい体温より1.6℃程度低い値にすれば良い」とあります。
- 自宅で自分の体温で試してみると、おおよそ「表面温度+3.7℃=体温」になっていたので、とりあえずそれで設定しています。
- 何回か測定を試しましたが、おでこの距離とかいろいろな要因で±1℃くらいはぶれてしまうのであまり実用的ではないかも、という感じです。やっぱりわきに挟むタイプの体温計は正確です。最近だと予測式で測定時間もあまりかかりませんし。
参考文献
- https://qiita.com/s_fujii/items/1cc5fe6206f6dc24d8cc
- https://omoroya.com/arduino-lesson10/
- https://www.terumo-taion.jp/terumo/report/18.html
- https://jpn.nec.com/techrep/journal/g10/n03/pdf/100312.pdf
- https://deviceplus.jp/hobby/entry019/
- https://github.com/adafruit/Adafruit_SSD1306/blob/master/examples/ssd1306_128x32_i2c/ssd1306_128x32_i2c.ino

