はじめに
Nuxt.jsでライブラリ(vue2-google-mapsなど)は使わずにGoogle Mapsを表示してみます
作りたい地図はこんな感じで、マーカーをつけてみます
地図からはわからないですが、地図とマーカーにそれぞれマウスクリックイベントもつけてみます

ここに書いてあること
- Nuxt/VueでGoogle Mapsを表示する方法
- Maps JavaScript APIとPlaces APIの使い方
- 地図とマーカーのクリックイベント登録方法
- マーカーにカスタムIDをつける方法
環境
- macOS Monterey
- VS Code Version: 1.63.2
$ npm -v
6.14.15

$ node -v
v14.15.4
package.json(抜粋)
{
  "dependencies": {
    "@nuxt/types": "^2.15.8",
    "@nuxt/typescript-build": "^2.1.0",
    "@nuxtjs/axios": "^5.13.6",
    "@nuxtjs/dotenv": "^1.4.1",
    "@nuxtjs/eslint-config-typescript": "^8.0.0",
    "@nuxtjs/eslint-module": "^3.0.2",
    "@nuxtjs/proxy": "^2.1.0",
    "@types/google.maps": "^3.47.2",
    "@types/node": "^17.0.7",
    "nuxt": "^2.15.8",
    "typescript": "^4.5.4",
  },
}
事前準備
Google Maps APIキーを用意する
- Google Maps APIを使用するためのAPIキーを取得しておきます
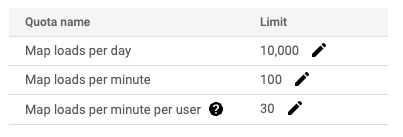
- リクエスト数が心配な時はQuotasに制限値をつけておくと安心かも
TypeScriptの型を定義する
TypeScriptの開発に必要な @nuxt/types と、
Google Mapsの開発に必要な @types/google.maps を tsconfig.json に追加する
tsconfig.json(抜粋)
{
  "compilerOptions": {
    "types": [
      "@types/node",
      "@nuxt/types",         // →追加
      "@nuxtjs/axios",
      "@types/google.maps",  // →追加
    ]
  }
}
Google Mapsを表示する(Maps JavaScript API)
手順
- Google Maps APIを読み込むため、
scriptタグを用意する- 今回はplacesAPIも使うため、
&libraries=placesをURL末尾に追加しています - APIキーはクライアント側にも見えるようになるので、APIキーごとの制限値や利用できるAPIを必要最低限にします
- 今回はplacesAPIも使うため、
- Google Mapsを表示するために用意した
<div ref="map"></div>に地図を表示します- コードでは
initMap関数とcreateMap関数によって地図が表示されます -
google.maps.Mapクラスに必要なパラメータを渡しておくことで、地図のカスタマイズができます -
google.maps.Mapクラスで作成されたgoogleオブジェクトはGMapに代入しています- 地図にマーカーをつけたりするのに
googleオブジェクトが必要になるためです
- 地図にマーカーをつけたりするのに
- コードでは
- ここまででGoogleマップの表示ができています
補足
- TypeScriptで必要なGoogle JS API等の型定義はドキュメントに記載されています
- チュートリアルはこちら
Map.vue
<template>
  <div class="map">
    <div ref="map" class="map__google-maps_embedded"></div>
  </div>
</template>

<script lang="ts">
import Vue from 'vue'

const apiKeyGoogleMaps = 'xxxxxxxxxxxxxxxxxxxxxxxxxxxxxxxxxxxxx'

export default Vue.extend({
  data() {
    return {
      GMap: {} as google.maps.Map, // window.google オブジェクト
    }
  },
  head() {
    return {
      script: [
        {
          hid: 'srcMap',
          src: `https://maps.googleapis.com/maps/api/js?key=${apiKeyGoogleMaps}&libraries=places`
        }
      ]
    }
  },
  mounted() {
    this.initMap()
  },
  methods: {

    // Create Google Map
    initMap(): void {
      const elMap = this.$refs.map
      this.GMap = this.createMap(elMap, (this as any).$mapCenterLatLng, 9, process.env.GOOGLE_MAPS_MAP_ID as string)
    },

    // Create Map
    createMap(mapEl: HTMLDivElement, center: google.maps.LatLngLiteral, zoom: number, mapId: string): google.maps.Map {
      return new window.google.maps.Map(mapEl, { center, zoom, mapId, })
    },
  }
})
</script>
地図にクリックイベントを追加する( google.maps.MapsEventListener )
- Googleマップ上でマウスクリックがあったときに、イベントを発火させてみます
手順
-
googleオブジェクトにイベントリスナーを追加します
参考
- チュートリアルはこちら
- Events | Maps JavaScript API | Google Developers
- ホバーなどほかにもイベントが用意されています
Map.vue
<template> ... </template>

<script lang="ts">
import Vue from 'vue'
const apiKeyGoogleMaps = 'xxxxxxxxxxxxxxxxxxxxxxxxxxxxxxxxxxxxx'

export default Vue.extend({
  data() { return { GMap: {} as google.maps.Map, } },
  head() { return { ... } },
  mounted() {
    this.initMap()
    this.mapClickEvents()
  },
  methods: {
    initMap(): { ... },
    createMap( ... ): { ... },

    // 地図のクリックイベント
    mapClickEvents(): void {
      /* eslint-disable @typescript-eslint/no-unused-vars */
      this.GMap.addListener('click', (event: google.maps.MapsEventListener) => {
        console.log('Map Clicked!')
      })
    },

  }
})
</script>
地図にカスタムID付きのマーカーを追加する
- 地図にマーカー(赤いピンマーク)を追加してみます
- 今回は複数のマーカーを地図に追加しています(
addAllMarkers関数 )
- 今回は複数のマーカーを地図に追加しています(
- マーカーごとにカスタムIDもつけてみます
- マーカーをクリック時に、カスタムIDでお店を検索、みたいなことができそうです
- マーカーはpngやsvgのアイコンをカスタムで指定も可能です
- マーカーの数が多いと地図のズームイン/アウトの動作がカクカクします
- 特にこだわりがなければ、デフォルトのマーカーを使うのが良さそうです
手順
- マーカーを追加する関数を用意します(
mapMarker関数のwindow.google.maps.Markerに該当 ) - マーカーのカスタム値を追加します(
mapMarker関数の(marker as google.maps.Marker).setValuesに該当 )-
customValMarkerにマーカーのカスタム値を用意していますが、複数のカスタムIDを用意できます
-
- 複数のマーカーを表示したいので、もう一つ関数を用意します(
addAllMarkers関数 ) -
addAllMarkers関数にstoreData(マーカー表示したい店の情報の配列) をわたせば地図上にマーカーを追加されます
参考
- チュートリアルはこちら
Map.vue
<template> ... </template>

<script lang="ts">
import Vue from 'vue'
const apiKeyGoogleMaps = 'xxxxxxxxxxxxxxxxxxxxxxxxxxxxxxxxxxxxx'

export default Vue.extend({
  data() { return { GMap: {} as google.maps.Map, } },
  head() { return { ... } },
  computed: {
    ...mapGetters({
      allStores: 'stores/allStores',
    })
  },
  mounted() {
    this.initMap()
    await this.addAllMarkers(this.allStores, this.GMap)
    this.mapClickEvents()
  },
  methods: {
    initMap(): { ... },
    createMap( ... ): { ... },
    mapClickEvents(): { ... },

    // add marker to Map
    mapMarker(storeId: string, storeName: string, position: google.maps.LatLngLiteral, map: google.maps.Map, icon?: google.maps.Symbol): void {
      const self = this
      let marker = {}
      const customValMarker = { storeId: storeId, name: storeName }
      if (!icon) {
        marker = new window.google.maps.Marker({ position, map })
      } else {
        marker = new window.google.maps.Marker({ position, map, icon })
      }
      ;(marker as google.maps.Marker).setValues(customValMarker)
    },

    // Add all markers to Map
    addAllMarkers(storeData: [], map: google.maps.Map, markerIcon?: google.maps.Symbol): void {
      for (let i = 0; i < storeData.length; i++) {
        const item: any = storeData[i]
        const storeName: string = item.name
        const storeId: string = item.eoGourmetId
        const latlng: mapCenterLatLng = { lat: Number(item.latitude), lng: Number(item.longitude) }
        if (!markerIcon) {
          this.mapMarker(storeId, storeName, latlng, map)
          continue
        }
        this.mapMarker(storeId, storeName, latlng, map, markerIcon)
      }
    },

  }
})
</script>
マーカーにクリックイベントを追加する
マーカーにマウスクリックがあったときに、イベントを発火させてみます
カスタムIDを指定しているので、クリックされたお店の情報をDBから取ってきて表示する、みたいなことができます
手順
-
(marker as google.maps.Marker)オブジェクトにイベントリスナーを追加します -
markerStoreIdにクリックされたマーカーのカスタムID (ここではお店のID) を取得しています - 取得したIDで表示するお店を更新する、みたいなことができそうです
- コードではVuexにあるお店の情報を更新しています (
updateSelectedStoreがVuexにアクションを実行)
- コードではVuexにあるお店の情報を更新しています (
参考
- チュートリアルはこちら
- Events | Maps JavaScript API | Google Developers
- ホバーなどほかにもイベントが用意されています
Map.vue
<template> ... </template>

<script lang="ts">
import Vue from 'vue'
const apiKeyGoogleMaps = 'xxxxxxxxxxxxxxxxxxxxxxxxxxxxxxxxxxxxx'

export default Vue.extend({
  data() { return { GMap: {} as google.maps.Map, } },
  head() { return { ... } },
  computed: {
    ...mapGetters({
      allStores: 'stores/allStores',
    })
  },
  mounted() {
    this.initMap()
    await this.addAllMarkers(this.allStores, this.GMap)
    this.mapClickEvents()
  },
  methods: {

    ...mapActions({
      updateSelectedStore: 'stores/updateSelectedStore',
    }),

    initMap(): { ... },
    createMap( ... ): { ... },
    mapClickEvents(): { ... },

    // add marker to Map
    mapMarker(storeId: string, storeName: string, position: google.maps.LatLngLiteral, map: google.maps.Map, icon?: google.maps.Symbol): void {
      let marker = {}
      const customValMarker = { storeId: storeId, name: storeName }
      if (!icon) { ... } else { ... }
      ;(marker as google.maps.Marker).setValues(customValMarker)


      /* eslint-disable @typescript-eslint/no-unused-vars */
      ;(marker as google.maps.Marker).addListener('click', async (event: google.maps.MapMouseEvent) => {
        const markerStoreId = (marker as google.maps.Marker).get('storeId')
        await this.updateSelectedStore(markerStoreId)
      })


    },

    addAllMarkers(storeData: [], map: google.maps.Map, markerIcon?: google.maps.Symbol): void { ... },

  }
})
</script>
お店等の情報を取得する(Places API)
ここまでは Maps JavaScript API を使ってきましたが、 Places API を使ってGoogle Mapsのお店の情報を取得してみます
Places APIでお店の写真( img タグで使用する写真のURL)を1つ取得してみます
手順
- マーカーのクリックイベント内に追記していきます
-
placesServiceクラスのfindPlaceFromQuery関数でお店の情報(ここではplaceId)を取得します-
findPlaceQueryのqueryは検索したいお店の情報を指定(ここではお店の名前と住所を指定) -
findPlaceQueryのfieldsは必要なお店の情報を指定(ここではplace_idを指定)
-
-
placeIdでより詳細なお店の情報をplacesServiceクラスのgetDetails関数で取得します-
place_idをクエリに指定して、1つのお店の詳細情報を取得しています
-
-
getDetails関数のresultsからお店の写真のURLが取得できますresults!.photos![0].getUrl()
-
参考
- チュートリアルはこちら
- Places Service クラスのドキュメントはこちら
Map.vue
<template> ... </template>

<script lang="ts">
import Vue from 'vue'
const apiKeyGoogleMaps = 'xxxxxxxxxxxxxxxxxxxxxxxxxxxxxxxxxxxxx'

export default Vue.extend({
  data() { return { GMap: {} as google.maps.Map, } },
  head() { return { ... } },
  computed: {
    ...mapGetters({
      allStores: 'stores/allStores',
    })
  },
  mounted() {
    this.initMap()
    await this.addAllMarkers(this.allStores, this.GMap)
    this.mapClickEvents()
  },
  methods: {

    ...mapActions({
      updateSelectedStore: 'stores/updateSelectedStore',
      addStoreImg: 'stores/addStoreImg',
    }),

    initMap(): { ... },
    createMap( ... ): { ... },
    mapClickEvents(): { ... },

    // add marker to Map
    mapMarker(storeId: string, storeName: string, position: google.maps.LatLngLiteral, map: google.maps.Map, icon?: google.maps.Symbol): void {
      const self = this
      let marker = {}
      const customValMarker = { storeId: storeId, name: storeName }
      if (!icon) { ... } else { ... }
      ;(marker as google.maps.Marker).setValues(customValMarker)


      /* eslint-disable @typescript-eslint/no-unused-vars */
      ;(marker as google.maps.Marker).addListener('click', async (event: google.maps.MapMouseEvent) => {
        const markerStoreId = (marker as google.maps.Marker).get('storeId')
        await this.updateSelectedStore(markerStoreId)


        // find store in Google Maps Places API
        const findPlaceQuery = {
          query: `${this.selectedStoreName} ${this.selectedStoreAddress}`,
          fields: ['place_id']
        }
        const placesService = new google.maps.places.PlacesService(map)
        let plusCode: {name: string, data: string}, placeId: string
        await placesService.findPlaceFromQuery(findPlaceQuery, async function (results: Array<google.maps.places.PlaceResult> | null, status: google.maps.places.PlacesServiceStatus): Promise<void> {
          // ↓ の[ 'ALL' ]の指定は本番環境では非推奨 必要なフィールドだけ指定する
          const getDetailsQuery = { placeId, fields: [ 'ALL' ] }
          await placesService.getDetails(getDetailsQuery, async function (results: google.maps.places.PlaceResult | null, status: google.maps.places.PlacesServiceStatus) {
            const isStatusOk = status === 'OK'
            if (isStatusOk) {
              const photoUrl = await results!.photos![0].getUrl()
              // photoUrlをimgタグのsrcに指定すれば写真を表示できる
              self.addStoreImg(photoUrl)
            }
          })
        })
      })


      })


    },

    addAllMarkers(storeData: [], map: google.maps.Map, markerIcon?: google.maps.Symbol): void { ... },

  }
})
</script>