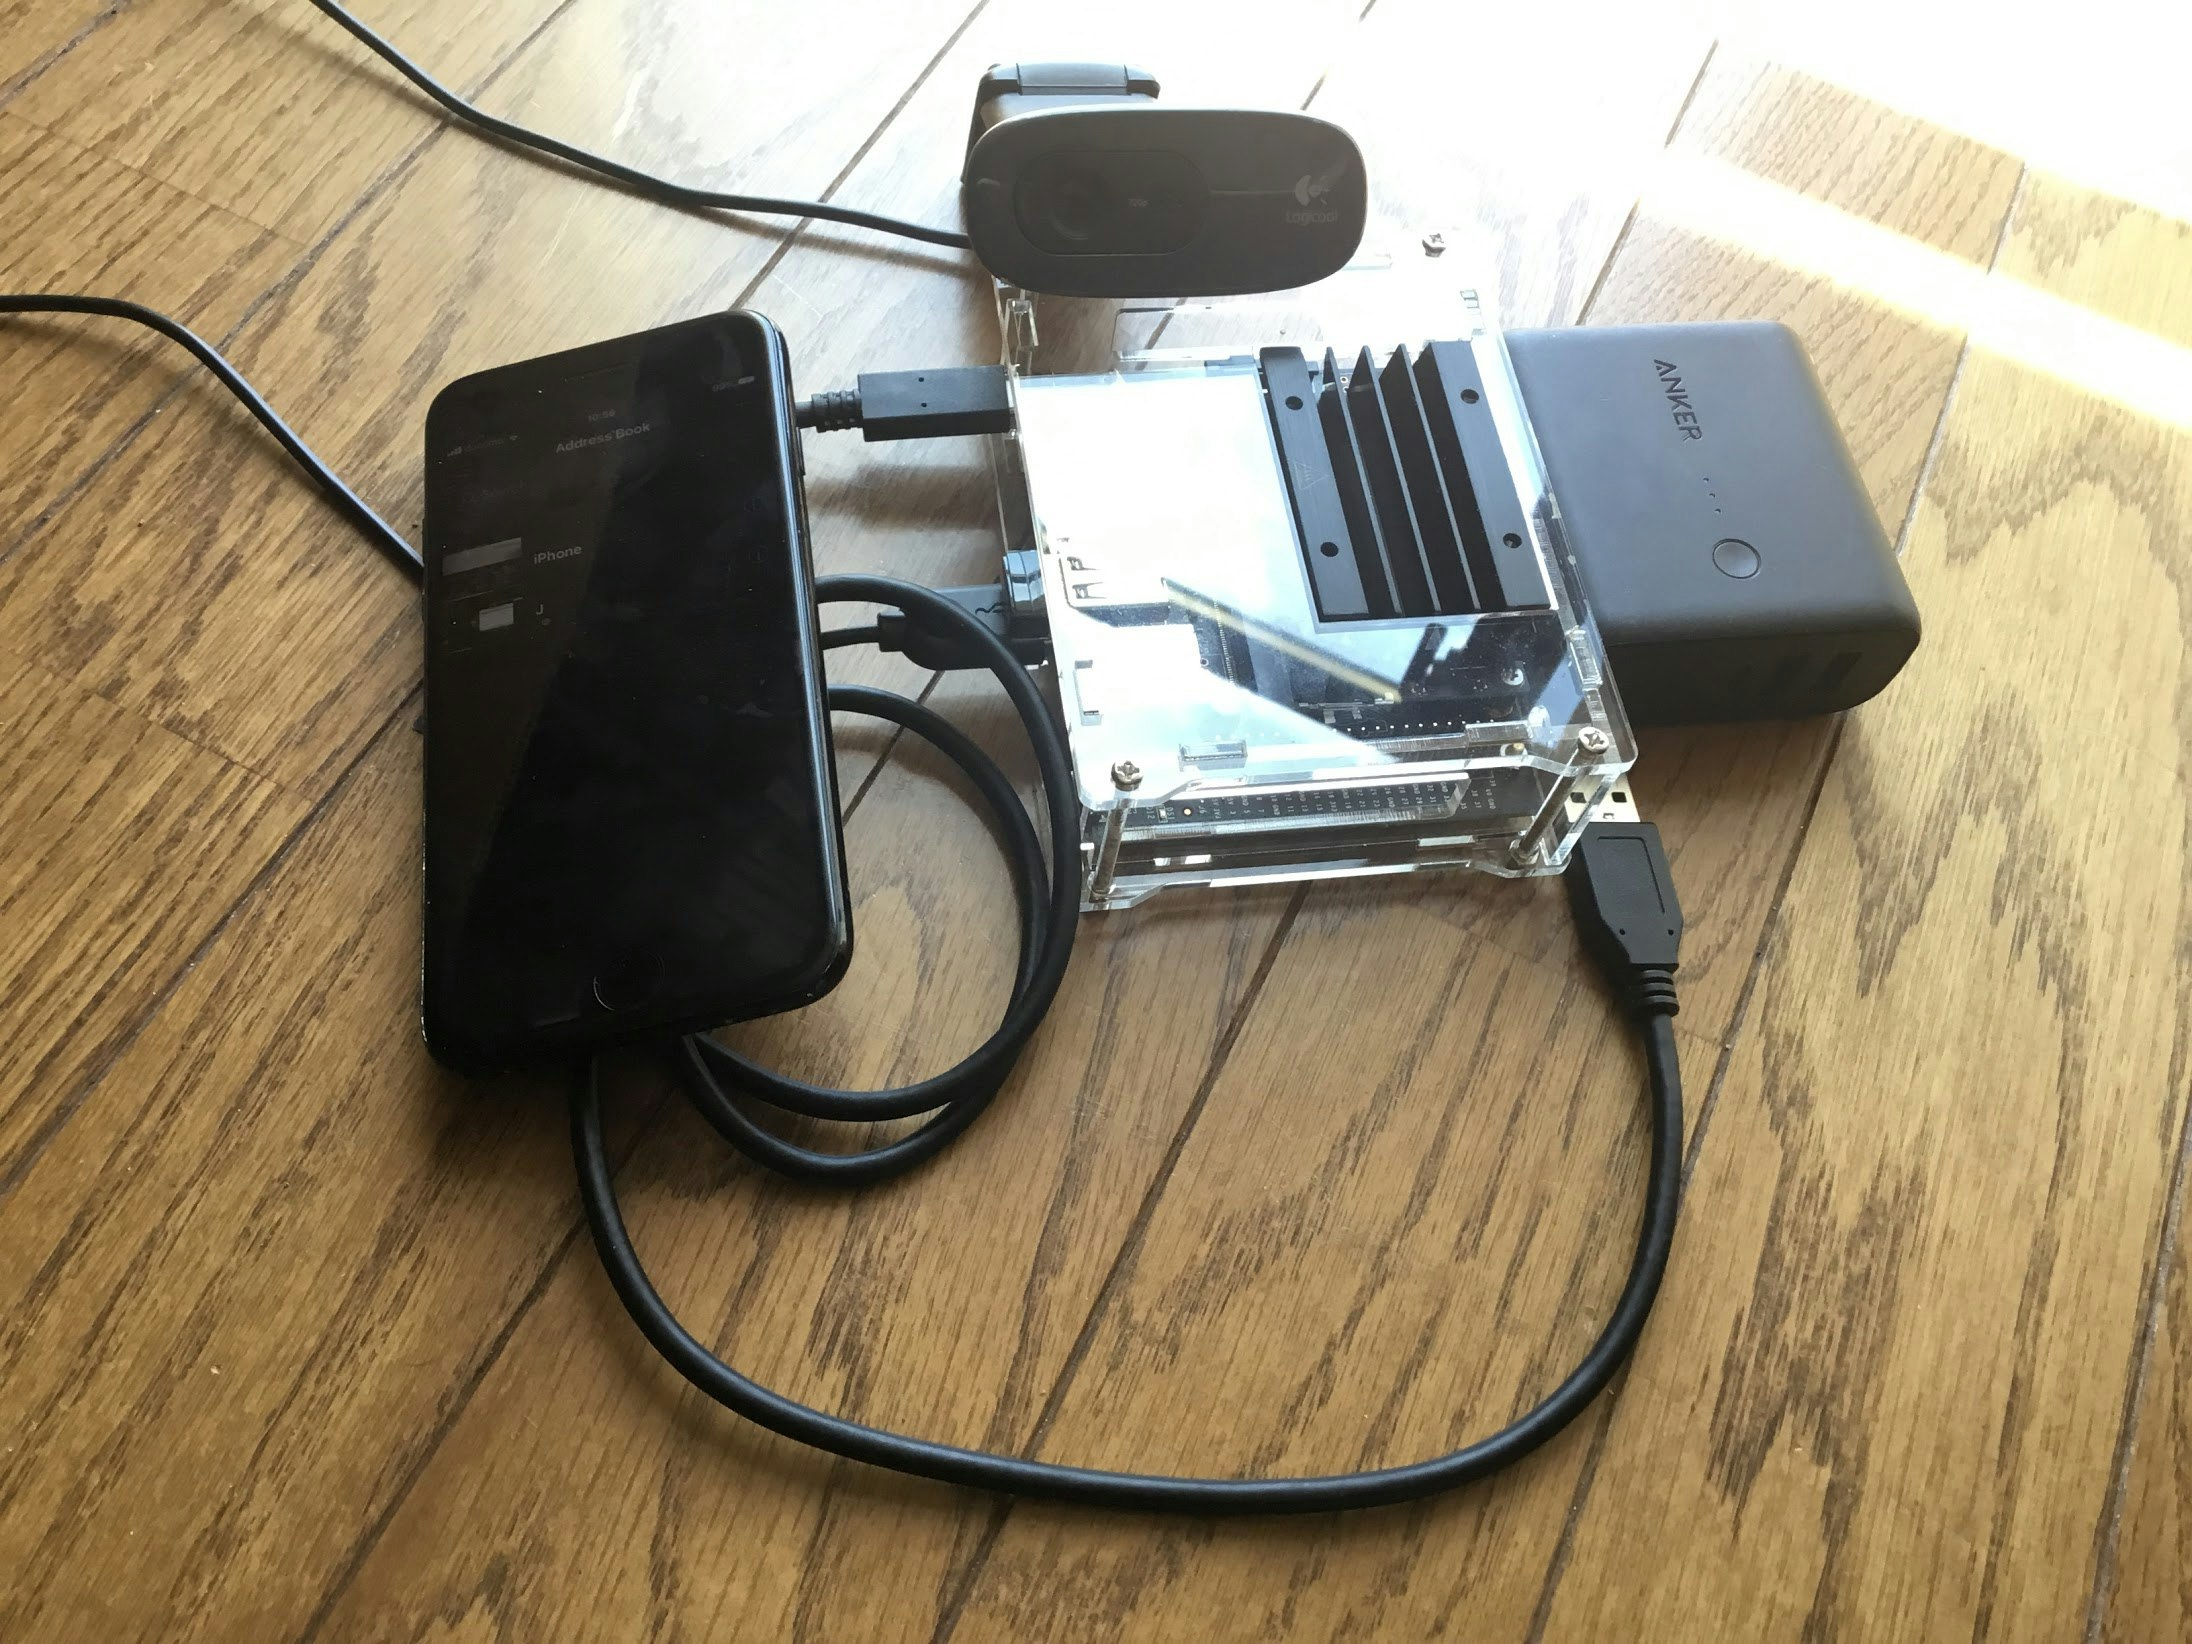
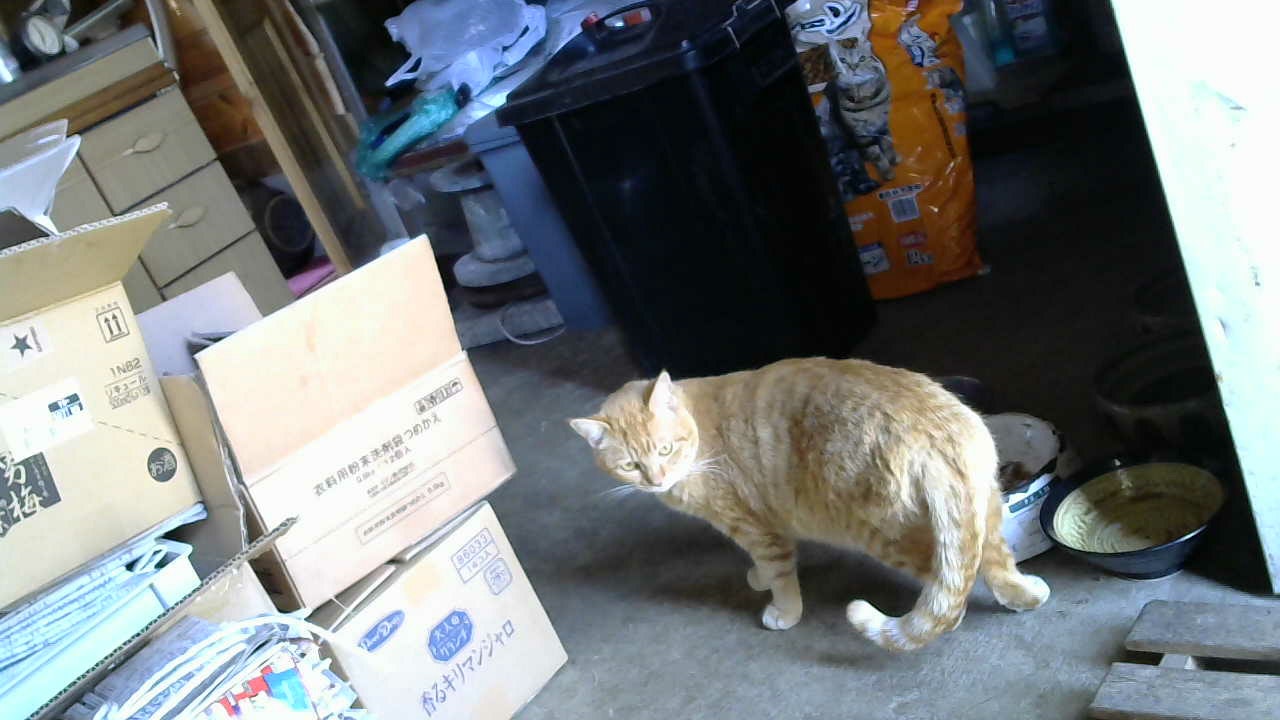
- Jeston Nano 2G を外に持ち出し、猫を識別して自動撮影した
- 環境構築と構築した環境を理解するまでは大変だったが、自分で追加したコードは数行程度
- 開発環境は Mac Mini(Late 2014) を使用
- 忘れていたが この Mac Mini は標準でSDカードの書き込みはできる
- NVIDIA の動画が参考になるのでリンクを記述しておいた
目次
システム構成
-
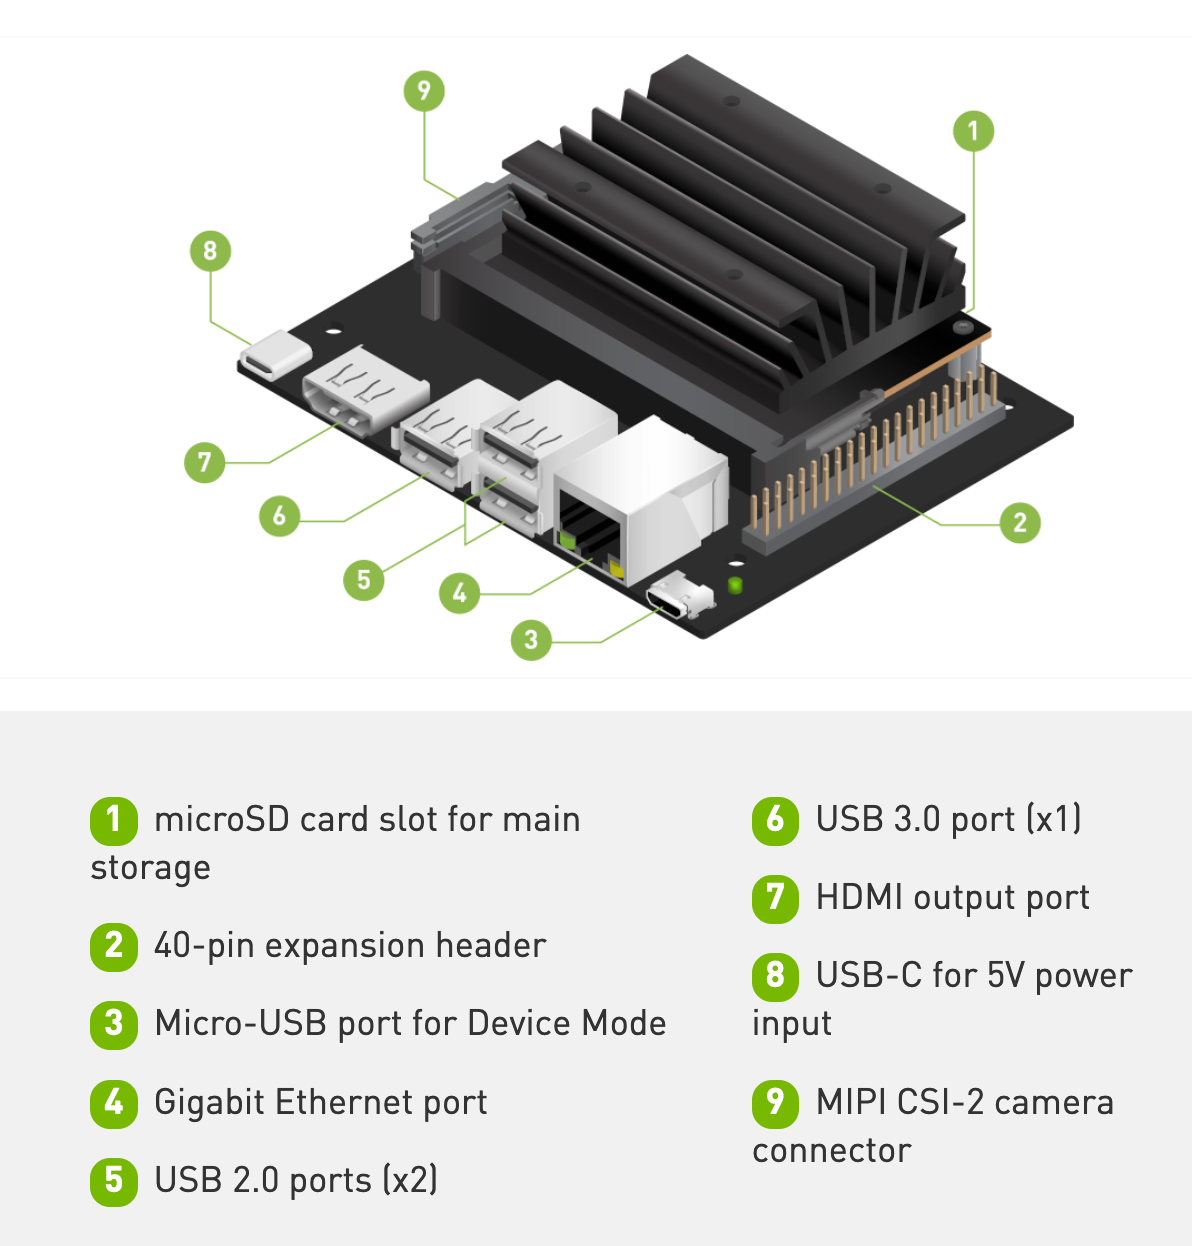
本体だけで電源もケーブル類も一切添付されていないので注意
-
有線LANの口は用意されているが、無線LAN の装備はない
-
micro SDカード
-
32GB を用意した
-
電源
-
Jetson Nano 2G の電源口は USB Type-C
-
ケーブル
-
Micro USB Type-B - USB ケーブル
-
開発作業時に Jetson NanoとMacを接続する(事実上必須)
-
Webカメラ(UVC対応のもの)
-
セットアップ時に必要なもの
-
HDMIモニター
-
キーボード(これも使えたが、なれないと使いづらい)
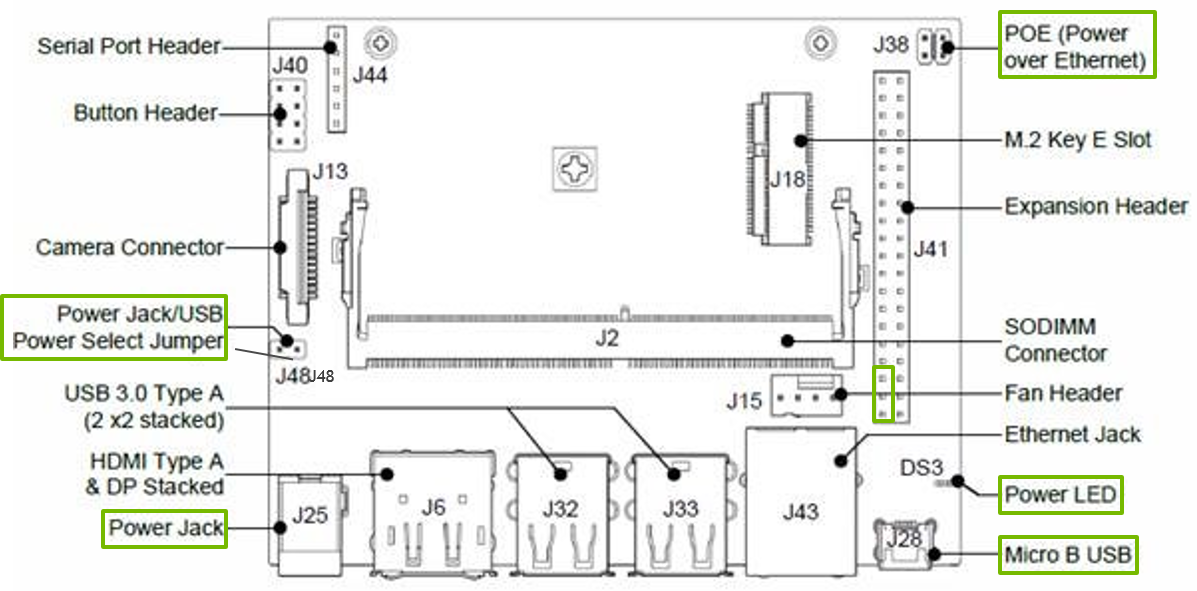
Fan Header のピンは実装されていなかった
セットアップ
JetsonPack SDK を Macでダウンロードし、SDカードに書き込み、これを Jetson Nano 2G に装着して初期設定を行う。
- 動画
- Getting started with Jetson Nano 2GB Developer Kit
- Jetson AI Fundamentals - S1E1 - First Time Setup with JetPack
6,446,862,672 jetson-nano-2gb-jp451-sd-card-image.zip
-
Mac Mini にて、上記のサイトから 約 6GB の JetPack SDK( Ubuntu OS に TensorRT などを含む)のイメージファイルをダウンロードし、micro SD カードに書き込む。
-
カードへの書き込みコマンドラインからもできるが balenaEtcher というアプリもある
-
Mac Mini の SDカードは disklutil list では external でなく internal
-
SDカードを Jetson Nano 2G に装着(背面に差し込み口)
-
HDMIモニター、キーボード、マウス を接続し、電源投入
-
初期設定を行っていく
-
言語は「日本語」でなく多少のメモリの節約のため「英語」を選択した
-
初期設定が完了したら再起動して Mac からログインし、バッケージを最新にして、スワップファイルを確認
$ ssh <ユーザー名>@192.168.55.1
 Welcome to Ubuntu ...
$ sudo apt-get update
$ sudo apt-get upgrade
$ free -m
              total        used        free      shared  buff/cache   available
Mem:           1971         578         213          31        1179        1278`
Swap:          5081           0        5081
コース1
-
動画
-
[Jetson AI Fundamentals - S1E3 - Image Classification Project]
(https://youtu.be/rSqIvLQ8Meg) -
JupypterLab を使った「Jetson NanoでAIを始める」コース。
-
Mac 側からWebブラウザを利用した操作となる。
-
カメラによる画像もブラウザ上に表示される。
-
JetSon Nano のデスクトップは利用しないので VNC などの設定も必要ない。
環境構築
$ ssh <ユーザー名>@192.168.55.1
Welcome to Ubuntu 18.04.5 LTS (GNU/Linux 4.9.201-tegra aarch64)
で Mac からJetson Nano (Ubuntu)にログインし、以下の手順で JupyterLab 環境構築済みのdocker を起動
$ mkdir -p ~/nvdli-data
$ echo "sudo docker run --runtime nvidia -it --rm --network host \
   --volume ~/nvdli-data:/nvdli-nano/data \
   --device /dev/video0 \
   nvcr.io/nvidia/dli/dli-nano-ai:v2.0.1-r32.5.0" > docker_dli_run.sh
ここ Containers: nvidia:dli:dli-nano-ai から導入したJetson Packのバージョンに対応した Container Tag を確認する
$ chmod +x docker_dli_run.sh
$ ./docker_dli_run.sh
初回は docker ファイルがダウンロードされるので起動までに時間がかかる
実行
$ ssh <ユーザー名>@192.168.55.1
$ ./docker_dli_run.sh

http://192.168.55.1:8888 (password dlinano)
JupyterLab logging location:  /var/log/jupyter.log  (inside the container)
Mac のブラウザからアクセスしてチュートリアルコースを進める
Certifications制度もあり、ガイドのサイトがあるが、アカウントの登録が必要(Humanの認証手続きが微妙に面倒だった)
https://developer.nvidia.com/embedded/learn/jetson-ai-certification-programs
トラブルシューティング
- Webカメラが動かない
-
$ ls /dev/video*で /dev/video0 があるか - Cheese は Jetson Nano 2G では動かなかった
-
dmesgを確認
$ dmesg | grep UVC
[  520.685290] uvcvideo: Found UVC 1.00 device <unnamed> (046d:0825)
[  520.749704] input: UVC Camera (046d:0825) as /devices/70090000.xusb/usb1/1-3/1-3.2/1-3.2.2/1-3.2.2:1.0/input/input4
コース2
-
動画
-
Jetson AI Fundamentals - S3E2 - Image Classification Inference
-
Jetson AI Fundamentals - S3E3 - Training Image Classification Models
-
Jetson Nano のデスクトップを利用した画像認識
-
1000 Objects が学習済みで識別できる
(GoogleNetとResNet-18はデフォルトでダウンロードされる) -
imagenet.py の defalt は GoogleNet
-
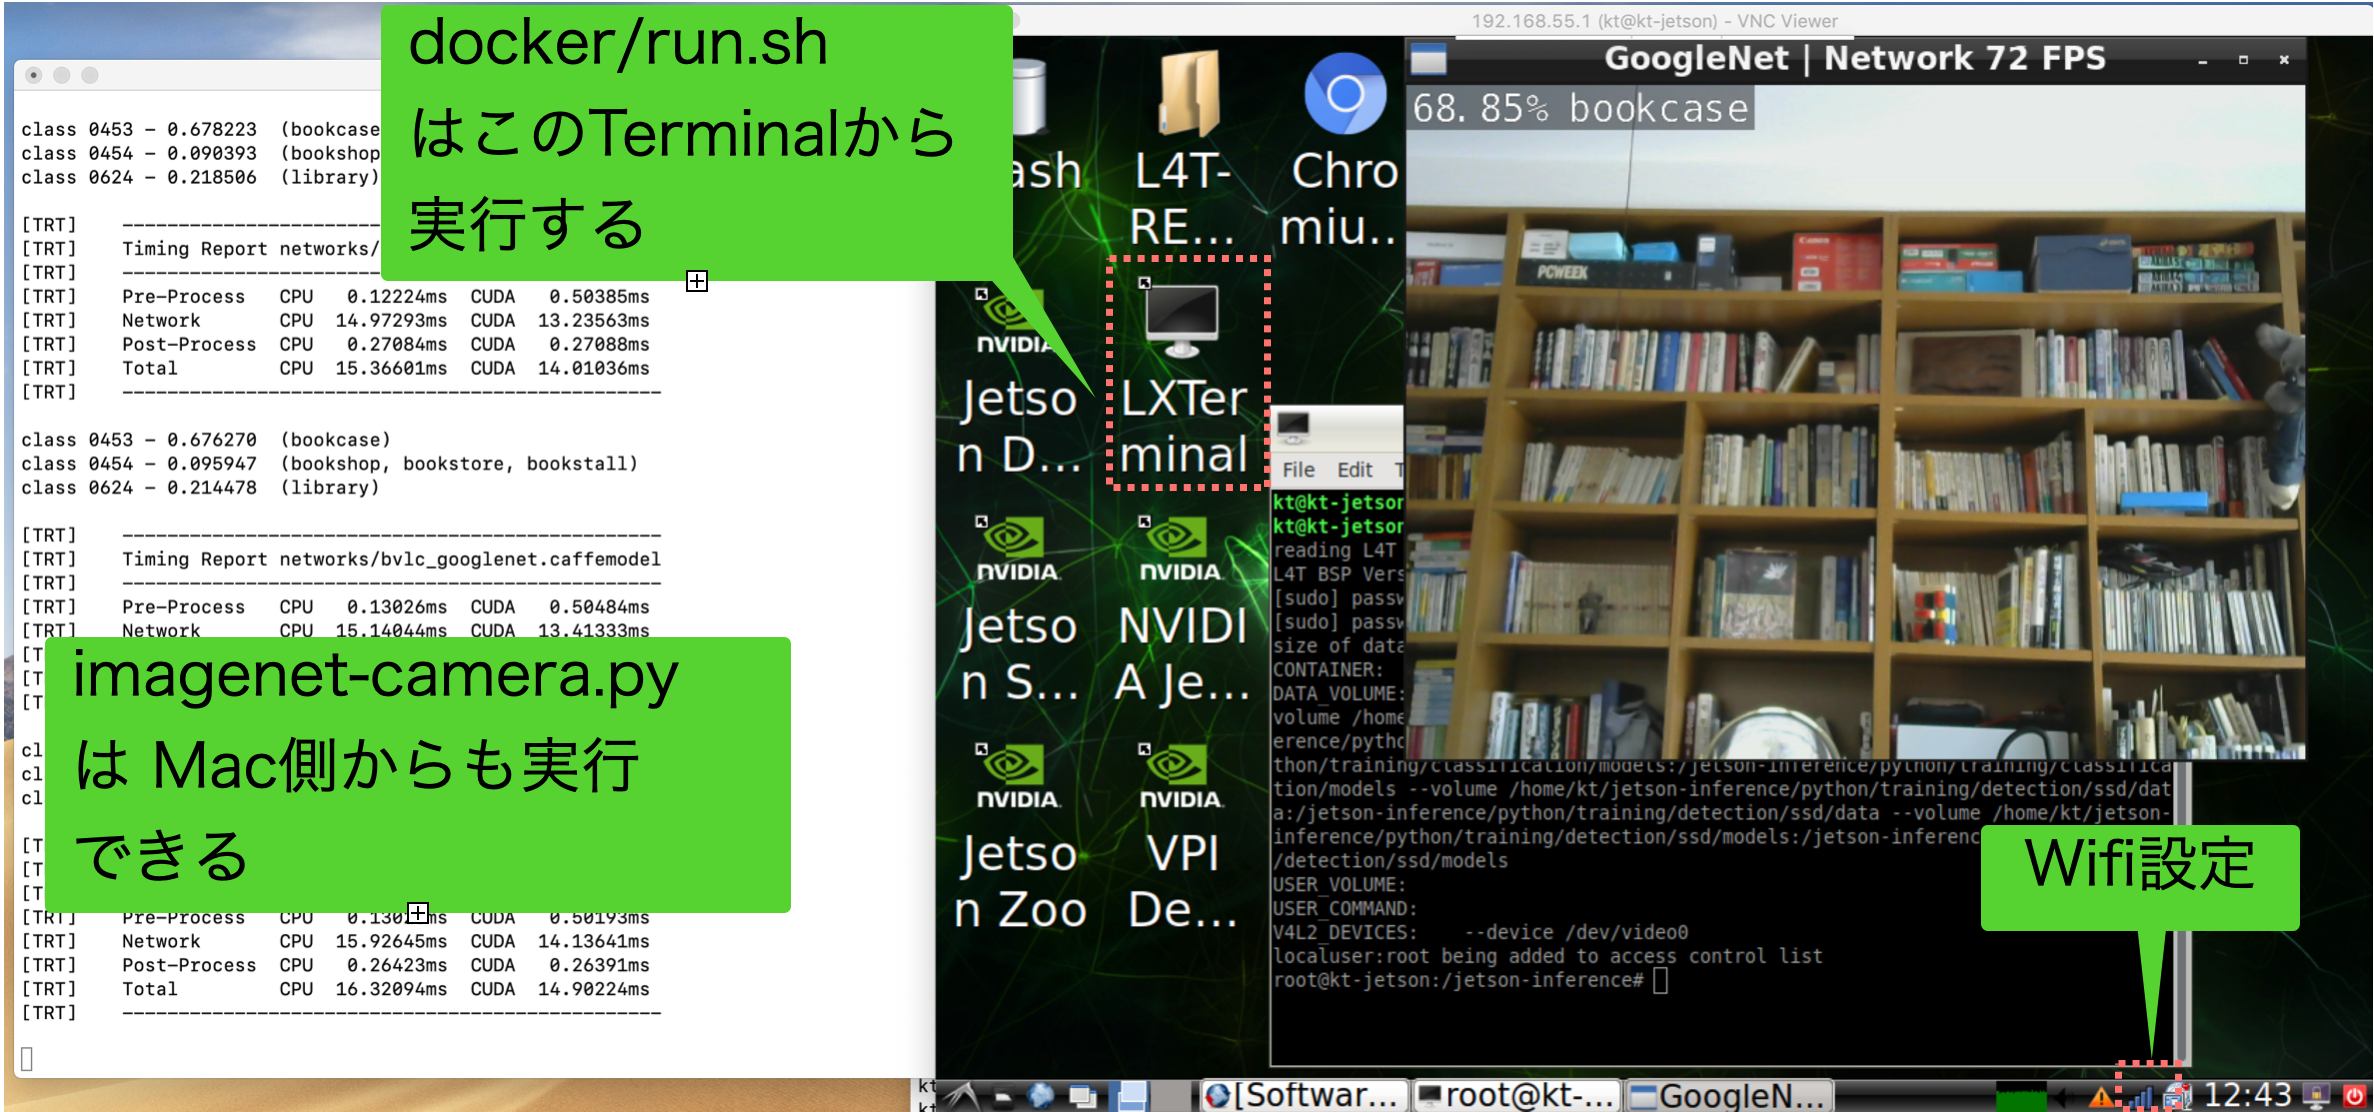
docker は Jetson Nano のデスクトップのターミナルから起動する
環境構築
- docker 環境を作成
$ ssh <ユーザー名>@192.168.55.1
$ git clone --recursive https://github.com/dusty-nv/jetson-inference
$ cd jetson-inference
$ docker/run.sh
- docker/run.sh の実行は Jetson Nanoのデスクトップのターミナルから行う必要があるため VNC 環境を構築
$ ssh <ユーザー名>@192.168.55.1
mkdir -p ~/.config/autostart
cp /usr/share/applications/vino-server.desktop ~/.config/autostart/.

cd /usr/lib/systemd/user/graphical-session.target.wants
sudo ln -s ../vino-server.service ./.

# Configure the VNC server

gsettings set org.gnome.Vino prompt-enabled false
gsettings set org.gnome.Vino require-encryption false

Set a password to access the VNC server

# Replace thepassword with your desired password
gsettings set org.gnome.Vino authentication-methods "['vnc']"
gsettings set org.gnome.Vino vnc-password $(echo -n 'thepassword'|base64)

# Reboot the system so that the settings take effect

sudo reboot
-
Mac に VNC Viewer をインストール
-
接続している HDMIモニターの解像度が高いと VNC が重くなり、使いにくいので解像度を下げた
$ cat ~/.xprofile

# xrandr --output HDMI-0 --mode 1920x1080
xrandr --output HDMI-0 --mode 1024x768
参考:
https://github.com/dusty-nv/jetson-inference/blob/master/docs/aux-docker.md
https://github.com/dusty-nv/jetson-inference
https://developer.nvidia.com/embedded/learn/tutorials/vnc-setup
エッジAI(Jetson Nano 2GB)で生田緑地の物体をリアルタイム認識してみました
実行
Mac から VNC Viewer で 192.168.55.1 に接続
デスクトップのターミナルを開いて
$ cd ~/jetson-inference
$ docker/run.sh     # run.sh に -e TZ=Asia/Tokyo を追加

$ cd build/aarch64/bin
$ ./imagenet-camera.py --camera=/dev/video0 \
--width=640 --height=480
imagenet-camera.py は ssh からでも実行できる
$ ssh <ユーザー名>@192.168.55.1
$ sudo docker ps
CONTAINER ID        IMAGE                              COMMAND             CREATED             STATUS              PORTS               NAMES
c7d796049503        dustynv/jetson-inference:r32.5.0   "/bin/bash"         40 minutes ago      Up 40 minutes                           strange_panini

$ sudo docker exec -it c7d796049503 bash
root@kt-jetson:/jetson-inference# cd build/aarch64/bin/
root@kt-jetson:/jetson-inference/build/aarch64/bin#
root@kt-jetson:/jetson-inference/build/aarch64/bin# ./imagenet-camera.py --camera=/dev/video0 --width=640 --height=480
猫を見つけたら撮影する
imagenet-camera.py に
猫をみつけたら if("cat" in class_desc ):
画像を保存するコード jetson.utils.saveImageRGBA(filename,img,img.width,img.height)
を追加した。
# !/usr/bin/python3

import jetson.inference
import jetson.utils

import argparse
import sys
import time
import datetime

# parse the command line
parser = argparse.ArgumentParser(description="Classify a live camera stream using an image recognition DNN.",
                                 formatter_class=argparse.RawTextHelpFormatter, epilog=jetson.inference.imageNet.Usage() +
                                 jetson.utils.videoSource.Usage() + jetson.utils.videoOutput.Usage() + jetson.utils.logUsage())
parser.add_argument("input_URI", type=str, default="", nargs='?', help="URI of the input stream")
parser.add_argument("output_URI", type=str, default="", nargs='?', help="URI of the output stream")
parser.add_argument("--network", type=str, default="googlenet", help="pre-trained model to load (see below for options)")
parser.add_argument("--camera", type=str, default="0", help="index of the MIPI CSI camera to use (e.g. CSI camera 0)\nor for VL42 cameras, the /dev/video device to use.\nby default, MIPI CSI camera 0 will be used.")
parser.add_argument("--width", type=int, default=1280, help="desired width of camera stream (default is 1280 pixels)")
parser.add_argument("--height", type=int, default=720, help="desired height of camera stream (default is 720 pixels)")
parser.add_argument('--headless', action='store_true', default=(), help="run without display")

is_headless = ["--headless"] if sys.argv[0].find('console.py') != -1 else [""]

try:
	opt = parser.parse_known_args()[0]
except:
	print("")
	parser.print_help()
	sys.exit(0)

# load the recognition network
net = jetson.inference.imageNet(opt.network, sys.argv)

# create video sources & outputs
input = jetson.utils.videoSource(opt.input_URI, argv=sys.argv)
output = jetson.utils.videoOutput(opt.output_URI, argv=sys.argv+is_headless)
font = jetson.utils.cudaFont()

# process frames until the user exits
while True:
	# capture the next image
	img = input.Capture()

	# classify the image
	class_id, confidence = net.Classify(img)

	# find the object description
	class_desc = net.GetClassDesc(class_id)

	if("cat" in class_desc ):
		print("\007")
		now = datetime.datetime.now()
		filename = './output/img_'+now.strftime('%Y%m%d_%H%M%S')+'.jpg'
		jetson.utils.saveImageRGBA(filename,img,img.width,img.height)
		time.sleep(3)

	# overlay the result on the image
	font.OverlayText(img, img.width, img.height, "{:05.2f}% {:s}".format(confidence * 100, class_desc), 5, 5, font.White, font.Gray40)

	# render the image
	output.Render(img)

	# update the title bar
	# output.SetStatus("{:s} | Network {:.0f} FPS".format(net.GetNetworkName(), net.GetNetworkFPS()))

	# print out performance info
	# net.PrintProfilerTimes()

	# exit on input/output EOS
	if not input.IsStreaming() or not output.IsStreaming():
		break
- jetson.utils.saveImageRGBA の情報
- マウントしている位置の確認方法
$ docker inspect 7da6c5b08642
...
  "HostConfig": {
    "Binds": [
       "/home/kt/jetson-inference/data:/jetson-inference/data",
- Jetsonのデータの位置を確認
# cd ~/jetson-inference/data/kt/output/
- Mac側で Jetsonのデータを取得して画像確認する場合 scp で複写
$ scp -r kt@192.168.55.1:/home/kt/jetson-inference/data/kt/output .
外に持ち出すための設定
- 小型のHDMIモニターがあれば一番良いのだが、iPhone や Mac, Windows PC などを HDMIモニターとして利用できないかと調べたが、特殊な装置が必要となるようだった。
- 従って iPhone の VNC Viewer をモニターとして使うことにした。
- ネットワーク接続が必要となるが、まず、USBケーブル経由でネットワーク共有しようとして ipheth-utilsなどを試してみたが、うまくいかず、あきらめ、 Wifi経由での接続とした。
- この接続の場合、 IP Address は 170.20.10.2〜14 となるようだが、私の環境では 14 になることが大半のようだった。
- Jetson Nano 起動時に HDMIモニターが接続されていないと VNC が使えない。 ソフト的に HDMIモニターの dummy を構築しようとしたが、だめなようなので、ハードウェアのdummyを購入した。
忘備録
sudo gpasswd -a $USER docker
$ sudo visudo

<username> ALL=NOPASSWD: ALL
-
Jetson Nano の USB に接続したキーボードを使用する際の設定
-
109キーボードの設定がうまくいかずに苦労した
-
192.168.55.1 に VNC で接続できれば、Mac 側のキーボードを使用するため、特に必要はない。
$ cat /etc/default/keyboard

# KEYBOARD CONFIGURATION FILE
# Consult the keyboard(5) manual page.
XKBMODEL="pc109"
XKBLAYOUT="jp"
XKBVARIANT=""
XKBOPTIONS=""
BACKSPACE="guess"
