はじめに
Azureで複数のWeb AppsやFunctionsを管理している場合、アプリケーション設定の整合性を図ることは大変だと思います。
「Web Apps 1 ではAの設定に変更したけど、Web Apps 2ではBのままだった...」みたいなことが起こる可能性が十分考えられます。何より管理が面倒くさいですよね、、、
そこで、Azure App Configurationを使うと、アプリケーション設定を一元的に管理できます。
今回は一例として、Web Appsのレイアウト設定をAzure App Configurationで管理し、動的な構成のWeb Appsを作成してみました。
Azure App Configurationとは
アプリケーション設定や機能フラグを一元的に管理するサービス。
https://docs.microsoft.com/ja-jp/azure/azure-app-configuration/overview
前提条件
- Azure サブスクリプション
- Visual Studio2019
Azure App Configurationの設定
Azureポータルから「App Configuration」を選択し、新しくリソースを作成します。
そこから、[アクセスキー] - [読み取り専用キー] に移動し、主キーの接続文字列をコピーします。(後に使用します。)

次に、[構成エクスプローラー] に移動し、Azure App Configurationで管理する「鍵」と「値」を追加します。今回は、Web Appsのレイアウト設定を管理するので、以下のような「鍵」と「値」を設定します。
| 鍵 | 値 |
|---|---|
| TestApp:Settings:BackgroundColor | white |
| TestApp:Settings:FontColor | Black |
| TestApp:Settings:FontSize | 24 |
| TestApp:Settings:Message | Azure App Configuration からのデータ |
| TestApp:Settings:Sentinel | 1 |
 |
Sentinelキーとは、Azure App Configurationの [構成エクスプローラー] で追加した「値」が変更されたときに、通知として、アプリケーション側で使用されるキーです。アプリケーションではSentinelキーを監視するように実装し、Sentinelキーの変更をトリガーとすることで、新しく設定した「値」を適用します。
例えば、「TestApp:Settings:BackgroundColor」の値を「Black」に変更するとき、Sentinelキーも適当な値に変更します。すると、アプリケーションがSentinelキーの変更を検知することで、「TestApp:Settings:BackgroundColor」の変更を適用し、バックグランドの色が黒になったWebページを表示します。
Azure App Configurationを利用するWeb Appsの作成
今回は、Visual Studio2019でASP.NET CoreのWebアプリケーションを作成し、Web Appsにデプロイします。
ASP.NET Coreアプリケーションの作成
Visual Studio2019でASP.NET Coreアプリケーションを作成します。

作成時、ASP.NET Coreのバージョンは3.1、WebアプリケーションはMVCモデルを選択してください。

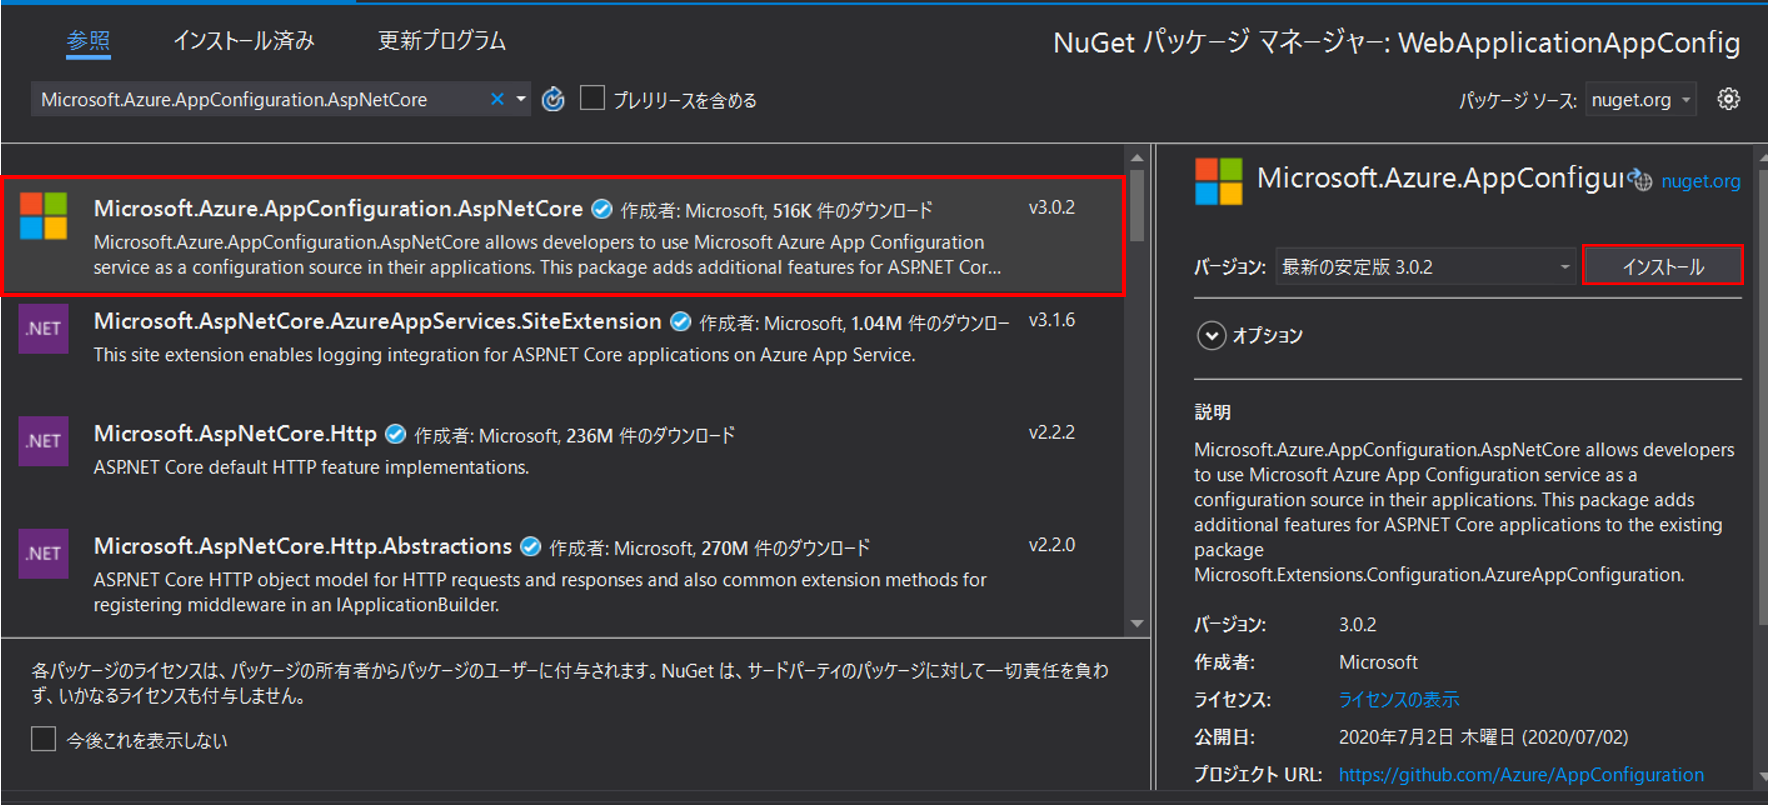
次に、NuGetパッケージのMicrosoft.Azure.AppConfiguration.AspNetCoreを取得します。
作成したプロジェクト内の [依存関係] を右クリックし、[NuGet パッケージの管理] を選択します。

そこから [参照] タブを開き、Microsoft.Azure.AppConfiguration.AspNetCoreを検索し、インストールします。
これでASP.NET Coreアプリケーションの環境が整いました。
次に、Azure App Configurationに接続し、レイアウト設定を反映させるコードを追加していきます。
Azure App Configurationへの接続
まずは、Azure App Configurationに接続するコードを追加していきます。
_Program.cs_を開き、.NET Core App Configurationプロバイダーへの参照を追加し、CreateWebHostBuilderメソッドを以下の通り更新します。
ここで、Azure App Configurationを使用することを示してます。また、先ほど説明した、Sentinelキーの変更を検知します。
using Microsoft.Extensions.Configuration.AzureAppConfiguration;
public static IHostBuilder CreateHostBuilder(string[] args) =>
    Host.CreateDefaultBuilder(args)
        .ConfigureWebHostDefaults(webBuilder =>
            webBuilder.ConfigureAppConfiguration((hostingContext, config) =>
            {
                var settings = config.Build();
                config.AddAzureAppConfiguration(options =>
                {
                    options.Connect(settings["ConnectionStrings:AppConfig"])
                           .ConfigureRefresh(refresh =>
                                {
                                    refresh.Register("TestApp:Settings:Sentinel", refreshAll: true)
                                           .SetCacheExpiration(new TimeSpan(0, 5, 0));
                                });
                });
            })
        .UseStartup<Startup>());
_Settings.cs_ファイルを新しく作成し、以下のコードを追加します。
namespace TestAppConfig
{
    public class Settings
    {
        public string BackgroundColor { get; set; }
        public long FontSize { get; set; }
        public string FontColor { get; set; }
        public string Message { get; set; }
    }
}
次に、_Startup.cs_を開き、ConfigureServicesメソッド、Configureメソッドを以下のように更新します。
ConfigureServicesメソッドでは、構成データをSettingsクラスにバインドし、Configureメソッドでは、UseAzureAppConfigurationミドルウェアを追加することで、構成設定を更新できるようにします。
public void ConfigureServices(IServiceCollection services)
{
    services.Configure<Settings>(Configuration.GetSection("TestApp:Settings"));
    services.AddControllersWithViews();
}
public void Configure(IApplicationBuilder app, IWebHostEnvironment env)
{
        if (env.IsDevelopment())
        {
            app.UseDeveloperExceptionPage();
        }
        else
        {
            app.UseExceptionHandler("/Home/Error");
            // The default HSTS value is 30 days. You may want to change this for production scenarios, see https://aka.ms/aspnetcore-hsts.
            app.UseHsts();
        }

        // Add the following line:
        app.UseAzureAppConfiguration();

        app.UseHttpsRedirection();

        app.UseStaticFiles();

        app.UseRouting();

        app.UseAuthorization();

        app.UseEndpoints(endpoints =>
        {
            endpoints.MapControllerRoute(
                name: "default",
                pattern: "{controller=Home}/{action=Index}/{id?}");
        });
}
_services.Configure(Configuration.GetSection("TestApp:Settings"));_を設定するとき、Settings_が見つからないといった、以下のエラーが出る場合があります。その場合、一度の部分だけを削除し、_を手動で書き込むことでエラーが解決されます。今後も同様のエラーが出たとき、この手法で解決できます。

Azure App Configurationのレイアウト設定
次に、Azure App Configurationで管理している、レイアウト設定を適用するコードを追加します。
Controllersディレクトリにある_HomeController.cs_を開き、Microsoft.Extensions.Options パッケージの参照、HomeControllerクラスの更新を以下の通り行います。
using Microsoft.Extensions.Options;
public class HomeController : Controller
{
    private readonly Settings _settings;
    private readonly ILogger<HomeController> _logger;

    public HomeController(ILogger<HomeController> logger, IOptionsSnapshot<Settings> settings)
    {
        _logger = logger;
        _settings = settings.Value;
    }

    public IActionResult Index()
    {
        ViewData["BackgroundColor"] = _settings.BackgroundColor;
        ViewData["FontSize"] = _settings.FontSize;
        ViewData["FontColor"] = _settings.FontColor;
        ViewData["Message"] = _settings.Message;

        return View();
    }

   [ResponseCache(Duration = 0, Location = ResponseCacheLocation.None, NoStore = true)]
   public IActionResult Error()
   {
        return View(new ErrorViewModel { RequestId = Activity.Current?.Id ?? HttpContext.TraceIdentifier });
   }
}
ViewsのHomeディレクトリにある_Index.cshtml_を開いて、以下の内容に全て書き換えます。
<!DOCTYPE html>
<html lang="en">
<style>
    body {
        background-color: @ViewData["BackgroundColor"]
    }
    h1 {
        color: @ViewData["FontColor"];
        font-size: @ViewData["FontSize"]px;
    }
</style>
<head>
    <title>Index View</title>
</head>
<body>
    <h1>@ViewData["Message"]</h1>
</body>
</html>
ViewsのSharedディレクトリにある_Layout.cshtml_を開いて、以下の内容に全て書き換えます。
<!DOCTYPE html>
<html>
<head>
    <meta charset="utf-8" />
    <meta name="viewport" content="width=device-width, initial-scale=1.0" />
    <title>@ViewData["Title"] - hello_world</title>

    <link rel="stylesheet" href="~/lib/bootstrap/dist/css/bootstrap.css" />
    <link rel="stylesheet" href="~/css/site.css" />
</head>
<body>
    <div class="container body-content">
        @RenderBody()
    </div>

    <script src="~/lib/jquery/dist/jquery.js"></script>
    <script src="~/lib/bootstrap/dist/js/bootstrap.js"></script>
    <script src="~/js/site.js" asp-append-version="true"></script>

    @RenderSection("Scripts", required: false)
</body>
</html>
以上で、Azure App Configurationに接続するASP.NET Coreアプリケーションが完成しました。
Web Appsへデプロイ
上記で作成したASP.NET CoreアプリケーションをWeb Appsにデプロイします。
Visual StudioからWeb Appsへのデプロイ方法
https://docs.microsoft.com/ja-jp/visualstudio/deployment/quickstart-deploy-to-azure?view=vs-2019#publish-to-azure-app-service
Web Appsの設定
デプロイ完了後、該当のWeb Appsを開き、[構成] - [+新しい接続文字列] を選択し、上記でコピーしたAzure App Configurationの接続文字列を追加します。

続いて、Web Appsにアクセスし、Azure App Configurationのレイアウト設定が反映された画面が表示されます。

これで、Azure App Configurationからレイアウト設定を取得するWeb Appsが作成されました。
Web Appsのレイアウトを動的に変更
続いて、Azure App Configurationのレイアウト設定を変更し、Web Appsのレイアウトが動的に変更するか確認します。
まず、Azure App Configurationの次に、[構成エクスプローラー] に移動し、「鍵」と「値」を以下の通り変更します。
| 鍵 | 値 |
|---|---|
| TestApp:Settings:BackgroundColor | green |
| TestApp:Settings:FontColor | lightGray |
| TestApp:Settings:Message | Data from Azure App Configuration - now with live updates! |
| TestApp:Settings:Sentinel | 2 |
そして、再度、先ほどのWeb Appsにアクセスします。すると、、、

Azure App Configurationで変更したレイアウト設定が反映されています。つまり、Azure App Configurationでレイアウト設定を管理する、動的な構成のWeb Appsが作成できました。
おわりに
Azure App Configuration 非常に便利ですね。アプリケーションを再デプロイ、または再起動せず、アプリケーション設定を動的に変更できるところもいい点だと思います。