本記事でやること
-
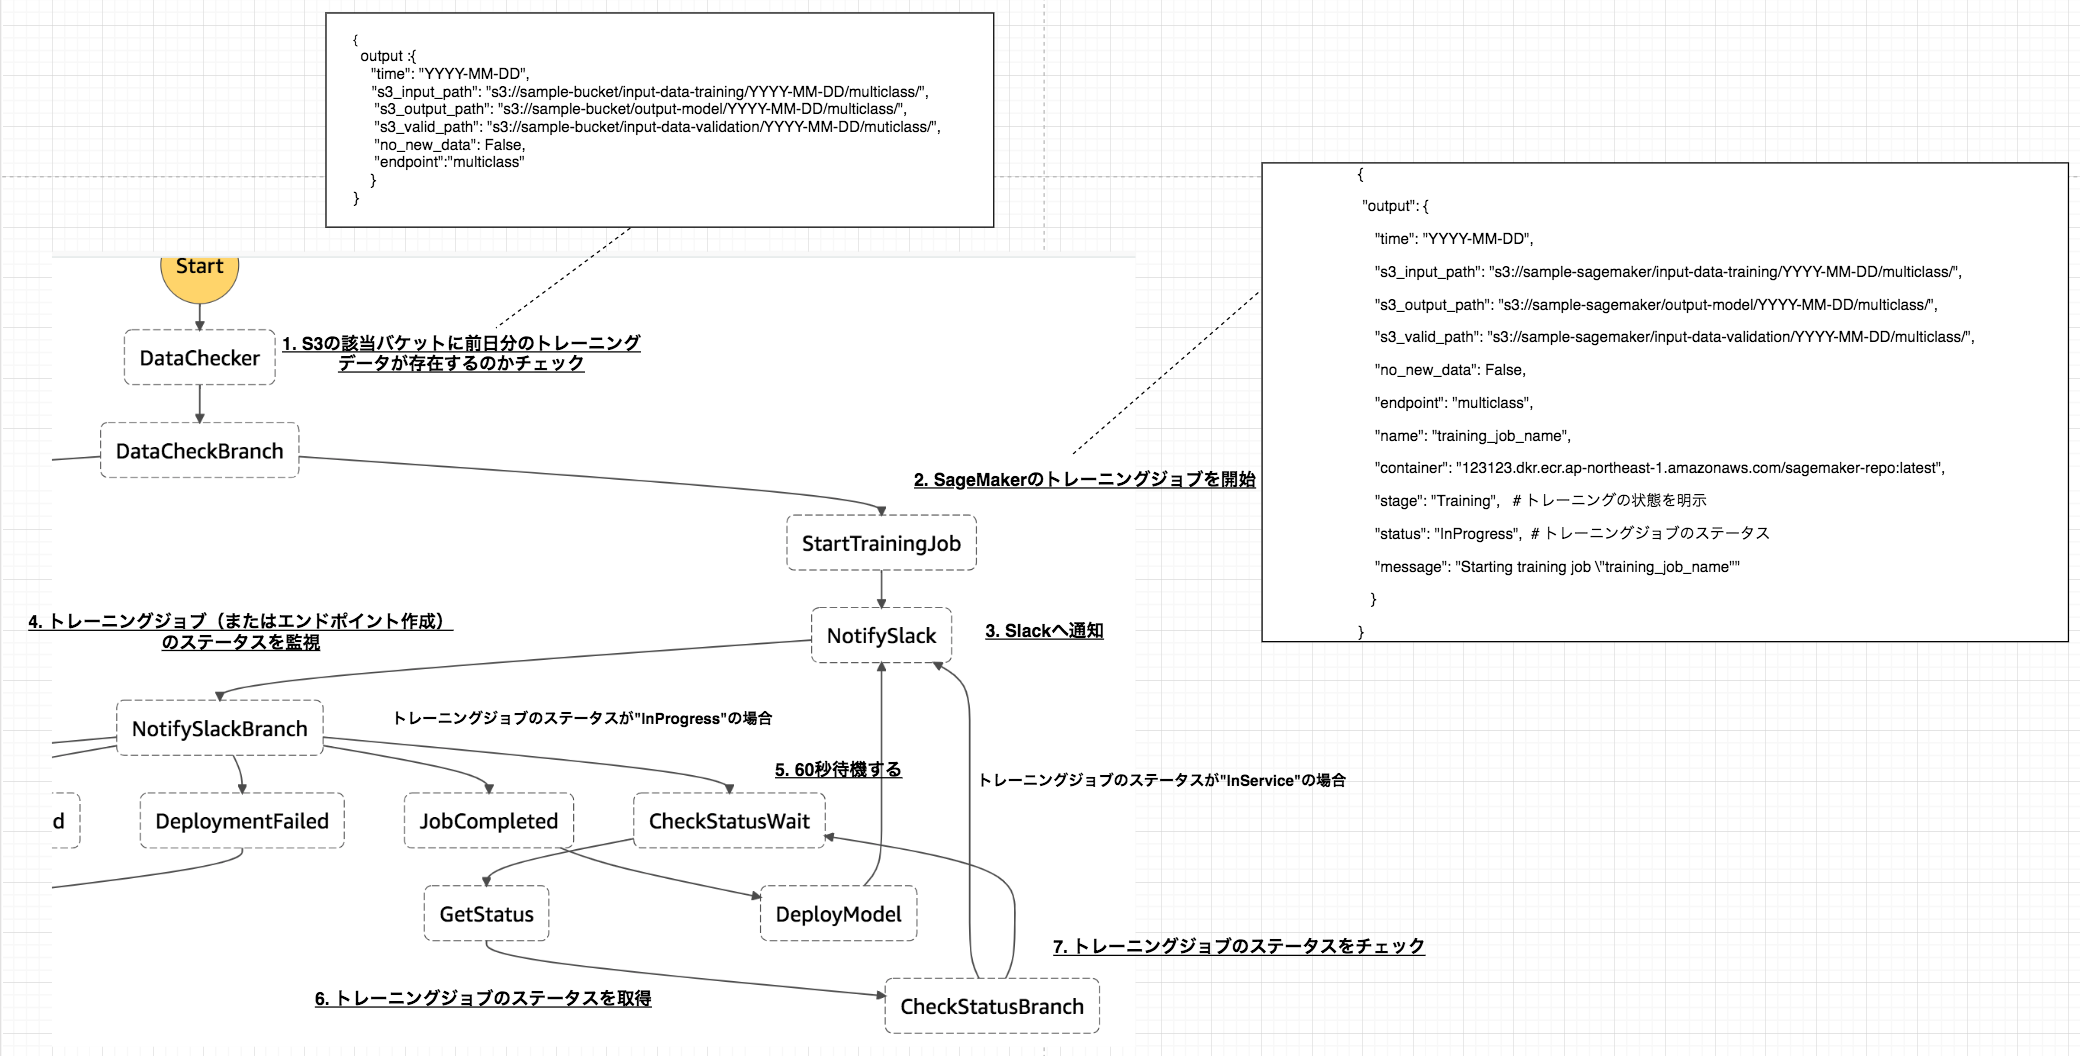
AWS StepFunctionsを使って、トレーニングからエンドポイントの作成までの以下ワークフローを作成する。
- 1.S3にトレーニング用のデータファイルが存在しているのかのチェック
- 2.SageMakerによるトレーニングジョブの開始
- 3.トレーニングジョブが開始された事をSlackに通知
- 4.トレーニングが終了するまでステータスを監視してポーリング
- 5.トレーニングが終了した事をSlackに通知
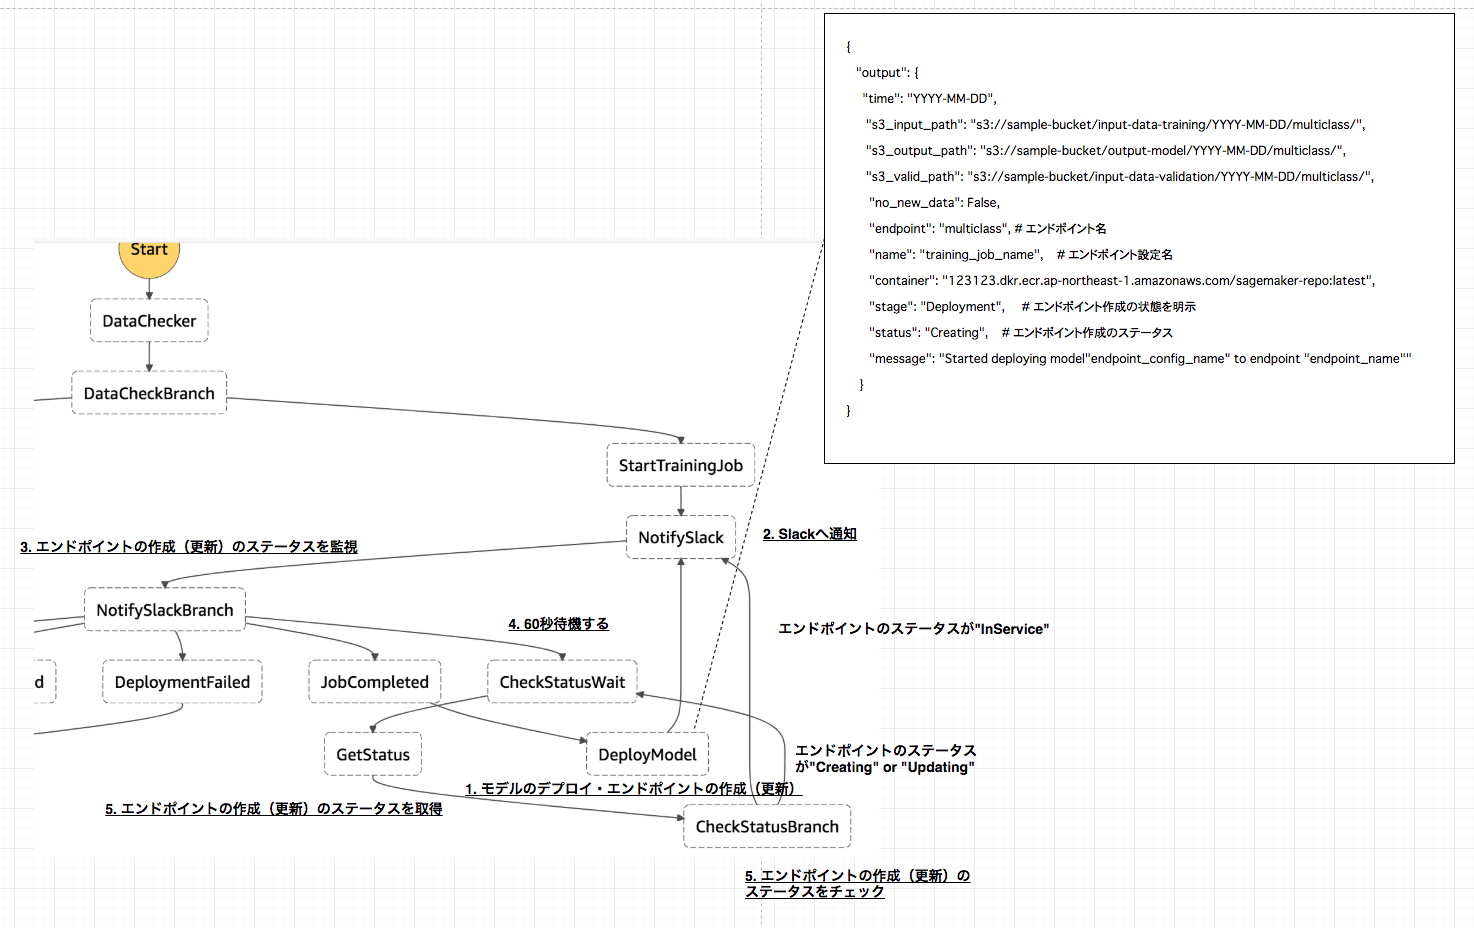
- 6.学習モデルのデプロイ、エンドポイントの作成(または更新)
- 7.エンドポイントが作成されるまでステータスを監視してポーリング
- 8.エンドポイントが作成(または更新)された事をSlackに通知
-
上記のワークフローをCloudFormationを使って作成する。
AWS公式が公開しているワークフローを参考にして作成をしております。
(トレーニングデータを置いているS3のPrefixなど想定しているケースが異なる箇所があるので所々改変して作成しております)
本記事でやらないことは以下の通りなので、私が以前書いた記事を参照してください。
- トレーニングジョブ用のDocker imageのAWS ECRへのPush(こちらを参照してください)
- 各種IAMの設定
また、今回書いたコードはGithubに上げておりますので、適宜ご参照して頂ければと思います。
対象読者
- AWS SageMakerを使ってトレーニングや推論までを行なった事がある方
- AWS StepFunctionsに関して一通りの知識がある方
使用言語
- Python 3.6.3
想定ケース
- トレーニングを行う対象のデータは、前日に作成されたファイルを使用する
- S3のPrefix及びデータファイル名は以下の構成
-
input-data-trainingなどのフォルダ以下に日付のフォルダを作成する。
- トレーニングを行う日付は、StepFunctions実行時に環境変数として与える。
bucket
  ├── input-data-training
  │    └── YYYY-MM-DD
  │          └── multiclass
  │               └── iris.csv # 対象のデータファイル
  │
  ├── input-data-validation
  │    └── YYYY-MM-DD
  │          └── multiclass
  │               └── iris.csv # 対象のデータファイル
  ├── input-data-prediction
  │    └── YYYY-MM-DD
  │          └── multiclass
  │               └── iris.csv # 対象のデータファイル
  └── output-model
       └── YYYY-MM-DD
             └── multiclass
                  └── training-job-name
                       └── output
                             └── model.tar.gz # 学習モデル
使用するファイル及びフォルダの構成
StepFunctionsをCloudformationで作成する際に使用するファイルと構成は以下の様になります。
最初にlambda_scriptsの説明を行い。その後に、Stepfunctionsの定義ファイルやCloudformationのテンプレートファイルの説明を行います。
.
├── cloudformation
│   ├── cloudformation.yml # cloudformation定義用ファイル
│   └── cloudformation.yml.tpl # cloudformation定義用ファイルのテンプレート
│
├── create-stack.sh # cloudformationのスタック作成ファイル
├── delete-stack.sh # cloudformationのスタック削除ファイル
│
├── formation_config_creator.py # cloudformationテンプレートファイルにレンダリングするファイル
│
├── lambda_scripts
│   ├── data_checker.py # トレーニング用データファイルの存在を確認
│   ├── deploy_model.py # 学習モデルのデプロイ~エンドポイントの作成
│   ├── get_status.py # SageMaker上でのトレーニングジョブ・エンドポイント作成のステータスを取得
│   ├── notify_slack.py # slack通知
│   └── start_training_job.py # トレーニングジョブの開始
│
└── stepfunctions
    └── state_machine.json # StepFunctionsの定義
今回作成するワークフローの説明

トレーニング時のワークフロー概要
1. S3の該当バケットに前日分のトレーニングデータが存在しているのかチェック
以下のファイルで行なっている内容は、
- StepFunctions実行時に与えられた日付の前日の日付を取得
- S3の対象Prefixに指定したファイル名が存在しているのかをチェック
- 存在していれば、
日付とS3のinput-data-path、output-data-pathvalidation-data-pathendpointに値を入れ返す。またno_new_dataにfalseを入れる。 - 存在していなければ、
no_new_dataにtrueを入れて返す。
import os
import logging
import boto3
from datetime import datetime, timedelta, timezone

# データ確認用のバケット
BUCKET = "sample-bucket"
# 存在を確認するファイル名
FILE_NAME = "iris.csv"
# エンドポイント名
ENDPOINT_NAME = "multiclass"

# loggerの作成
LOGGER = logging.getLogger()
LOGGER.setLevel(logging.INFO)


def lambda_handler(event, _context):
    LOGGER.info(event)

    s3_client = boto3.client("s3")

    # 指定された日付の前日の日付を取得
    one_days_before = add_days(event["DATE"], -1)

    # 前日分の訓練データが存在するのか確認
    status = check_data(s3_client, one_days_before)

    if status is not True:
        print('No new data uploaded since last training run.')
        print('Skipping training until next scheduled training run.')
        return {
            "no_new_data": True
        }
    s3_input_path, s3_output_path, s3_valid_path = generate_s3_path(one_days_before)
    return {
        "time": one_days_before,
        "s3_input_path": s3_input_path,
        "s3_output_path": s3_output_path,
        "s3_valid_path": s3_valid_path,
        "no_new_data": False,
        "endpoint": ENDPOINT_NAME
    }


def check_data(s3_client, date):

    prefix = "input-data-training"
    response = s3_client.list_objects(
        Bucket=BUCKET,
        Prefix=prefix
    )

    assumed_keys = [f'input-data-training/{date}/multiclass/{FILE_NAME}']
    try:
        keys = [content['Key'] for content in response['Contents']]
        print("keys:", keys)
        status = set(assumed_keys).issubset(keys)
    except KeyError:
        status = False

    return status


def generate_s3_path(date):

    train_set_prefix = os.path.join('input-data-training', date, 'multiclass')
    output_set_prefix = os.path.join("output-model", date, "multiclass")
    validation_set_prefix = os.path.join("input-data-validation", date, "multiclass")

    s3_input_path = os.path.join('s3://', BUCKET, train_set_prefix, '')
    s3_output_path = os.path.join('s3://', BUCKET, output_set_prefix, '')
    s3_valid_path = os.path.join('s3://', BUCKET, validation_set_prefix, '')

    return s3_input_path, s3_output_path, s3_valid_path


def datetime_to_str(date: datetime) -> str:
    year = str(date.year)
    month = str("{0:02d}".format(date.month))
    day = str("{0:02d}".format(date.day))
    str_date = '{0}-{1}-{2}'.format(year, month, day)

    return str_date


def str_to_datetime(str_date: str) -> datetime:

    return datetime.strptime(str_date, '%Y-%m-%d')


def add_days(str_dt: str, days: int) -> str:
    datetime_dt = str_to_datetime(str_dt)
    n_days_after = datetime_dt + timedelta(days=days)
    str_n_days_after = datetime_to_str(n_days_after)

    return str_n_days_after
2. SageMakerのトレーニングジョブを開始
SageMakerへトレーニングジョブを投げるファイルです。
また、以下のファイルで行なっている内容は、
-
トレーニングジョブを投げる際のパラメータに埋め込む変数を取得する。
-
training_job_name: トレーニングジョブの名前(定義したBASE_JOB_NAMEに日時を加える) -
target: トレーニングジョブの対象(今回は多クラス分類なのでmulticlassとする) -
num_class: 分類数 -
image_arn: 予めECRにpushしておいた独自アルゴリズムのDocker image -
input_data_path: インプットデータが置いてあるS3のパス -
valid_data_path: バリデーションデータが置いてあるS3のパス -
output_data_path: 学習したモデルを置くS3のパス
-
-
トレーニングジョブを投げるパラメータを作成する。
-
トレーニングジョブを投げる
-
event内に以下の変数を代入する。-
name: トレーニングジョブ名 -
container: Docker imageのarn -
stage: トレーニングの状態を明示するための文字列(ここではTrainingを代入) -
status: トレーニングジョブのステータス(一番最初のループではInProgressを代入) -
message: Slackに通知する文言の文字列
-
import logging
import os
import boto3
import copy
from time import strftime, gmtime

TARGET = os.environ["TARGET"]
BASE_JOB_NAME = f"dev-sagemaker-{TARGET}"
NUM_CLASS = os.environ["NUM_CLASS"]
IMAGE_ARN = f"123123.dkr.ecr.ap-northeast-1.amazonaws.com" \
               f"/sagemaker-repo:latest"

LOGGER = logging.getLogger()
LOGGER.setLevel(logging.INFO)


def lambda_handler(event, _context):
    LOGGER.info(event)
    sagemaker_client = boto3.client("sagemaker", region_name="ap-northeast-1")

    base_training_conf = create_training_conf(event)
    training_conf = generate_name_with_timestamp(base_training_conf, "training_job_name")
    training_params = create_parameter(training_conf)
    create_training_job(training_params, sagemaker_client)
    event["name"] = training_conf["training_job_name"]
    event["container"] = training_conf["image_arn"]
    event["stage"] = "Training"
    event["status"] = "InProgress"
    event['message'] = 'Starting training job "{}"'.format(training_conf["training_job_name"])
    return event


def create_training_job(params, client):
    try:
        response = client.create_training_job(**params)
        LOGGER.info(response)
    except Exception as e:

        LOGGER.info('Unable to create training job.')
        raise (e)


def generate_name_with_timestamp(conf: dict, key: str):
    conf = copy.deepcopy(conf)
    name = conf[key] + "-" + strftime("%Y-%m-%d-%H-%M-%S", gmtime())
    conf[key] = name
    return conf


def create_training_conf(event):
    input_data_path = event["s3_input_path"]
    valid_data_path = event["s3_valid_path"]
    output_data_path = event["s3_output_path"]

    return {
        "training_job_name": BASE_JOB_NAME,
        "target": TARGET,
        "num_class": NUM_CLASS,
        "image_arn": IMAGE_ARN,
        "input_data_path": input_data_path,
        "valid_data_path": valid_data_path,
        "output_data_path": output_data_path
    }


def create_parameter(conf):

    params = {
        "TrainingJobName": conf["training_job_name"],
        "HyperParameters": {
            "objective": conf["target"],
            "num_class": conf["num_class"],
            "max_leaf_nodes": "5"
        },
        "AlgorithmSpecification": {
            "TrainingImage": conf["image_arn"],
            "TrainingInputMode": "File"
        },
        "RoleArn": "arn:aws:iam::507635064363:role/dev-sagemaker",
        "InputDataConfig": [
            {
                "ChannelName": "training",
                "DataSource": {
                    "S3DataSource": {
                        "S3DataType": "S3Prefix",
                        "S3Uri": conf["input_data_path"]
                    }
                }
            },
            {
                "ChannelName": "validation",
                "DataSource": {
                    "S3DataSource": {
                        "S3DataType": "S3Prefix",
                        "S3Uri": conf["valid_data_path"]
                    }
                }
            }
        ],
        "OutputDataConfig": {
            "S3OutputPath": conf["output_data_path"]
        },
        "ResourceConfig": {
            "InstanceType": "ml.m4.xlarge",
            "InstanceCount": 1,
            "VolumeSizeInGB": 10
        },
        "StoppingCondition": {
            "MaxRuntimeInSeconds": 1800
        }
    }
    return params
3. Slackへ通知
トレーニングの開始、エンドポイントの作成・更新または完了をSlackへ通知するファイル。
一般的な処理内容なので、説明は割愛します。
import os
import logging
from urllib.request import Request, urlopen
import json

CHANNEL = os.environ["CHANNEL"]
HOOK_URL = os.environ["HOOK_URL"]

LOGGER = logging.getLogger()
LOGGER.setLevel(logging.INFO)


def lambda_handler(event, _context):
    message = event["message"]

    contents = {
        "channel": CHANNEL,
        "text": message,
        "username": "incoming-webhook"
    }
    post_message(contents)

    return event


def post_message(contents):

    req = Request(HOOK_URL, json.dumps(contents).encode('utf-8'))
    response = urlopen(req)
    response.read()
    LOGGER.info("Message posted to %s", contents["channel"])
6. トレーニングジョブまたはエンドポイントのステータスを取得
SageMakerで行われているトレーニングジョブまたはエンドポイントのステータスを取得するファイルになります。
以下の処理内容は、「トレーニングを行なっている」状態(stage="Training")と「エンドポイントを作成している」(stage="Deployment")状態の2つに分かれています。
- 「トレーニングを行なっている」状態(stage="Training")
- event内に予め置いたトレーニング名(
name)を取得する。 - boto3の
describe_training_jobメソッドを用いて、1で定義したトレーニングジョブ名のステータスを取得する。 - ステータスが
Completedであれば、以下をeventに代入する。- 学習モデルが出力されるS3のパス
- slackに通知するためのメッセージ
- ステータスが
Failedであれば、エラーメッセージをeventに代入する。 - ステータスが、
InProgressのままであればeventのステータスに再度代入する。
- event内に予め置いたトレーニング名(
エンドポイントの作成も上記同様にSageMakerのステータスを取得し、ステータス毎にメッセージを変えてeventに代入をしているだけです。
import os
import boto3


def lambda_handler(event, _context):

    sagemaker_client = boto3.client("sagemaker", region_name="ap-northeast-1")

    stage = event["stage"]

    # トレーニングジョブの場合
    if stage == "Training":
        # トレーニングジョブ名を取得
        name = event["name"]
        training_details = describe_training_job(name, sagemaker_client)
        status = training_details["TrainingJobStatus"]  # 'InProgress'|'Completed'|'Failed'|'Stopping'|'Stopped'

        # トレーニングジョブの状態
        if status == "Completed":
            s3_output_path = training_details["OutputDataConfig"]["S3OutputPath"]
            model_data_url = os.path.join(s3_output_path, name, "output/model.tar.gz")
            event["message"] = 'Training job "{}" complete. Model data uploaded to "{}"'.format(name, model_data_url)
            event["model_data_url"] = model_data_url
        elif status == "Failed":
            failure_reason = training_details['FailureReason']
            event['message'] = 'Training job failed. {}'.format(failure_reason)

    # エンドポイント作成・更新の場合
    elif stage == "Deployment":
        # エンドポイントの名前
        name = event["endpoint"]
        endpoint_details = describe_endpoint(name, sagemaker_client)
        # 'OutOfService'|'Creating'|'Updating'|'SystemUpdating'|'RollingBack'|'InService'|'Deleting'|'Failed'
        status = endpoint_details["EndpointStatus"]

        # エンドポイントの状態
        if status == "InService":
            event["message"] = 'Deployment completed for endpoint "{}".'.format(name)
        elif status == "Failed":
            failure_reason = endpoint_details['FailureReason']
            event["message"] = 'Deployment failed for endpoint "{}". {}'.format(name, failure_reason)
        elif status == 'RollingBack':
            event[
                'message'] = 'Deployment failed for endpoint "{}", rolling back to previously deployed version.'.format(
                name)
    event["status"] = status
    return event


def describe_training_job(training_job_name, client):
    try:
        response = client.describe_training_job(
            TrainingJobName=training_job_name
        )
    except Exception as e:
        print(e)
        print('Unable to describe training job.')
        raise (e)
    return response


def describe_endpoint(endpoint_name, client):
    try:
        response = client.describe_endpoint(
            EndpointName=endpoint_name
        )
    except Exception as e:
        print(e)
        print('Unable to describe endpoint.')
        raise (e)
    return response
モデルのデプロイ・エンドポイント作成時のワークフロー概要
2.Slackへの通知や5.エンドポイントの作成(更新)のステータスを取得の処理内容は、上記トレーニングジョブのワークフローで説明した通りなので、ここでは1.モデルのデプロイ・エンドポイントの作成(更新)のlambdaスクリプトについてのみ説明します。
1. モデルのデプロイ・エンドポイントの作成(更新)
トレーニングジョブが完了したら、SageMakerへモデルのデプロイとエンドポイントの作成(更新)のジョブを投げるステップへ移行します。
以下がその処理を行うファイルになります。
基本的には、トレーニングジョブを投げる際に行なっていることと同様です。
-
モデルをデプロイする際のパラメータを取得する。
- モデル名は、eventの
nameを使用する。(トレーニングジョブ名と同様の名前になります) - Docker imageは、予めeventに代入していた
containerを使用する。 - 学習モデルが格納されているS3パスは、上記トレーニングジョブのステータスを取得した際にeventに代入した
model_data_urlを使用する。
- モデル名は、eventの
-
上記パラメータを引数としてSageMakerへモデルのデプロイを行う。
-
エンドポイント設定の作成を行う。
- エンドポイント設定名もeventの
nameを使用するので、モデル名・トレーニングジョブ名と同様の名前になります。
- エンドポイント設定名もeventの
-
エンドポイントの名前を予めeventに代入していた
endpointで定義する。 -
上記で定義したエンドポイント名前と同様の名前でエンドポイントが既に作成されていたら、更新作業を行う。存在していなかったら作成作業を行う。
import os
import boto3

EXECUTION_ROLE = os.environ['EXECUTION_ROLE']


def lambda_handler(event, _context):
    sagemaker_client = boto3.client("sagemaker", region_name="ap-northeast-1")
    model_params = create_parameter(event)
    print('Creating model resource from training artifact...')
    # モデルの作成
    create_model(model_params, sagemaker_client)
    print('Creating endpoint configuration...')
    # エンドポイントの設定の作成
    create_endpoint_config(event, sagemaker_client)
    print('Checking if model endpoint already exists...')
    endpoint_name = event["endpoint"]
    config_name = event["name"]
    # エンドポイントの存在を確認
    if check_endpoint_exists(endpoint_name, sagemaker_client):
        update_endpoint(endpoint_name, config_name, sagemaker_client)
    else:
        print('There is no existing endpoint for this model. Creating new model endpoint...')
        create_endpoint(endpoint_name, config_name, sagemaker_client)

    event['stage'] = 'Deployment'
    event['status'] = 'Creating'
    event['message'] = 'Started deploying model "{}" to endpoint "{}"'.format(config_name, endpoint_name)
    return event


def create_model(model_params, client):
    try:
        client.create_model(**model_params)
    except Exception as e:
        print(e)
        print('Unable to create model.')
        raise(e)


def create_parameter(event):
    return {
        "ExecutionRoleArn": EXECUTION_ROLE,
        "ModelName": event["name"],
        "PrimaryContainer": {
            "Image": event["container"],
            "ModelDataUrl": event["model_data_url"]
        }
    }


def create_endpoint_config(event, client):
    client.create_endpoint_config(
        EndpointConfigName=event["name"],
        ProductionVariants=[
            {
                'VariantName': 'hoge',
                'ModelName': event["name"],
                'InitialInstanceCount': 1,
                'InstanceType': 'ml.m4.xlarge'
            }
        ]
    )


def check_endpoint_exists(endpoint_name, client):
    try:
        client.describe_endpoint(
            EndpointName=endpoint_name
        )
        return True
    except Exception as e:
        return False


def update_endpoint(endpoint_name, config_name, client):
    try:
        client.update_endpoint(
            EndpointName=endpoint_name,
            EndpointConfigName=config_name
        )
    except Exception as e:
        print(e)
        print('Unable to update endpoint.')
        raise(e)


def create_endpoint(endpoint_name, config_name, client):
    try:
        client.create_endpoint(
            EndpointName=endpoint_name,
            EndpointConfigName=config_name
        )
    except Exception as e:
        print(e)
        print('Unable to create endpoint.')
        raise(e)
StepFunctions定義ファイル
個人的に理解が難しかったNotifySlackBranch、CheckStatusBranch に関して説明を行います。
-
NotifySlackBranch- このステップは、基本的にはトレーニングジョブの状態 or エンドポイント作成の状態でのSageMaker上の各ジョブのステータスによって、次のステップを決める分岐点になっています。
- トレーニングジョブのステータスが
InProgressor エンドポイント作成のステータスがCreatingorUpdatingであれば、CheckStatusWaitステップへ移行して60秒待機します。 - トレーニングジョブのステータスが
Failedであれば、JobFailedのステップへ移行し、終了します。 - エンドポイントの作成のステータスが
FailedorRollingBackであれば、DeploymentFailedへ移行し終了します。 - トレーニングジョブのステータスが
Completedであれば、JobCompletedへ移行し、モデルのデプロイ・エンドポイント作成のステップへと続きます。 - エンドポイント作成のステータスが
InServiceであれば、DeploymentCompletedへと移行し、終了します。
- トレーニングジョブのステータスが
- このステップは、基本的にはトレーニングジョブの状態 or エンドポイント作成の状態でのSageMaker上の各ジョブのステータスによって、次のステップを決める分岐点になっています。
-
CheckStatusBranch- このステップは、 トレーニングジョブの状態 or エンドポイント作成のSageMaker上の各ジョブが完了しているかどうかを判断し、次のステップを決める分岐点になっています。
- トレーニングジョブのステータスが
Completedor エンドポイント作成のステータスがInServiceであれば、NotifySlackへ移行しslackへメッセージを通知する。 - トレーニングジョブのステータスが
InProgressor エンドポイント作成のステータスがCreatingorUpdatingであれば、CheckStatusWaitへ戻り60秒待機する。 - トレーニングジョブまたはエンドポイント作成のステータスが、
FailedorRollingBackであれば、NotifySlackへ移行し、slackへメッセージを通知する。
- トレーニングジョブのステータスが
- このステップは、 トレーニングジョブの状態 or エンドポイント作成のSageMaker上の各ジョブが完了しているかどうかを判断し、次のステップを決める分岐点になっています。
{
  "Comment": "dev-sagemaker-orchestration flow",
  "StartAt": "DataChecker",
  "States": {
    "DataChecker": {
      "Comment": "check data",
      "Type": "Task",
      "Resource": "${DataCheckerArn}",
      "InputPath": "$",
      "ResultPath": "$",
      "OutputPath": "$",
      "Next": "DataCheckBranch"
    },
    "DataCheckBranch": {
      "Comment": "check data branch",
      "Type": "Choice",
      "Choices": [
        {
          "Variable": "$.no_new_data",
          "BooleanEquals": true,
          "Next": "NoNewData"
        },
        {
          "Variable": "$.no_new_data",
          "BooleanEquals": false,
          "Next": "StartTrainingJob"
        }
      ]
    },
    "NoNewData": {
      "Type": "Pass",
      "End": true
    },
    "StartTrainingJob": {
      "Type": "Task",
      "Resource": "${StartTrainingJob.Arn}",
      "ResultPath": "$",
      "Next": "NotifySlack"
    },
    "NotifySlack": {
      "Type": "Task",
      "Resource": "${NotifySlack.Arn}",
      "ResultPath": "$",
      "Next": "NotifySlackBranch"
    },
    "NotifySlackBranch": {
      "Type": "Choice",
      "Choices": [{
        "Or": [{
            "Variable": "$.status",
            "StringEquals": "InProgress"
        },
          {
            "Variable": "$.status",
            "StringEquals": "Creating"
          },
          {
            "Variable": "$.status",
            "StringEquals": "Updating"
          }],
        "Next": "CheckStatusWait"
      },
        {
          "And": [{
              "Variable": "$.status",
              "StringEquals": "Failed"
          },
            {
              "Variable": "$.stage",
              "StringEquals": "Training"
            }],
          "Next": "JobFailed"
        },
        {
          "Variable": "$.status",
          "StringEquals": "Completed",
          "Next": "JobCompleted"
        },
        {
          "Variable": "$.status",
          "StringEquals": "InService",
          "Next": "DeploymentCompleted"
        },
        {
          "And": [{
            "Or": [{
              "Variable": "$.status",
              "StringEquals": "Failed"
            },
              {
                "Variable": "$.status",
                "StringEquals": "RollingBack"
              }
            ]
          },
            {
              "Variable": "$.stage",
              "StringEquals": "Deployment"
            }
          ],
          "Next": "DeploymentFailed"
        }
      ]
    },
    "CheckStatusWait": {
      "Type": "Wait",
      "Seconds": 60,
      "Next": "GetStatus"
    },
    "GetStatus": {
      "Type": "Task",
      "Resource": "${GetStatus.Arn}",
      "ResultPath": "$",
      "Next": "CheckStatusBranch"
    },
    "CheckStatusBranch": {
      "Type": "Choice",
      "Choices": [{
        "Or": [{
          "Variable": "$.status",
          "StringEquals": "Completed"
        },
          {
            "Variable": "$.status",
            "StringEquals": "InService"
          }],
        "Next": "NotifySlack"
      },
        {
          "Or": [{
            "Variable": "$.status",
            "StringEquals": "InProgress"
          },
            {
              "Variable": "$.status",
              "StringEquals": "Creating"
            },
            {
              "Variable": "$.status",
              "StringEquals": "Updating"
            }],
          "Next": "CheckStatusWait"
        },
        {
          "Or": [{
            "Variable": "$.status",
            "StringEquals": "Failed"
          },
            {
              "Variable": "$.status",
              "StringEquals": "RollingBack"
            }
          ],
          "Next": "NotifySlack"
        }
      ]
    },
    "JobFailed": {
      "Type": "Fail"
    },
    "JobCompleted": {
      "Type": "Pass",
      "Next": "DeployModel"
    },
    "DeployModel": {
      "Type": "Task",
      "Resource": "${DeployModel.Arn}",
      "Next": "NotifySlack"
    },
    "DeploymentCompleted": {
      "Type": "Pass",
      "End": true
    },
    "DeploymentFailed": {
      "Type": "Fail"
    }
  }
}
CloudFromationによるStepFunctionsのステートマシンの作成
CloudFormationを使ってこれまで説明したワークフローのStepFunctionsのステートマシンを作成します。
上記、StepFunctionsのstate_machine.jsonやlambdaスクリプトをレンダリングするテンプレートファイルが以下になります。(こちらのテンプレートファイルへのレンダリング方法は割愛させて頂きます。詳細はGithubをご参照ください。)
---
# define include macro
{% macro include(file) %}{% include(file) %}{% endmacro %}

AWSTemplateFormatVersion: 2010-09-09
Description: Build SageMaker Orchestration environment
# =======set parameters======== #
Parameters:
  Runtime:
    Description: Language of scripts
    Type: String
    Default: python3.6
  NumClass:
    Description: Number of class
    Type: String
    Default: 3
  Target:
    Description:Targets
    Type: String
    Default: multiclass
  HookUrl:
    Description: hookurl of  slack
    Type: String
    Default: https://hooks.slack.com/services/hogehoge
  SlackChannel:
    Description: channel of  slack
    Type: String
    Default: aws_notify
  ExecutionRole:
    Description: sagemaker execution role
    Type: String
    Default: arn:aws:iam::123123:role/dev-sagemaker

Resources:
  # =======IAM======== #
  StepFunctionsRole:
    Type: AWS::IAM::Role
    Properties:
      AssumeRolePolicyDocument:
        Version: '2012-10-17'
        Statement:
          - Effect: Allow
            Principal:
              Service:
                - states.amazonaws.com
            Action:
              - sts:AssumeRole
      ManagedPolicyArns:
        - arn:aws:iam::aws:policy/AWSLambdaFullAccess
      Path: "/service-role/"

  DataCheckerLambdaRole:
    Type: AWS::IAM::Role
    Properties:
      AssumeRolePolicyDocument:
        Version: "2012-10-17"
        Statement:
        - Effect: Allow
          Principal:
            Service:
            - lambda.amazonaws.com
          Action:
          - sts:AssumeRole
      ManagedPolicyArns:
      - arn:aws:iam::aws:policy/AWSLambdaFullAccess
      - arn:aws:iam::aws:policy/AmazonSageMakerFullAccess
      Path: "/service-role/"

  # =======Step Functions======== #
  SageMakerStateMachine:
    Type: "AWS::StepFunctions::StateMachine"
    Properties:
      StateMachineName: "dev-SageMaker-orchestration"
      DefinitionString:
        !Sub
          - |-
            {{ include('./stepfunctions/state_machine.json')|indent(12) }}
          - DataCheckerArn: !GetAtt DataChecker.Arn
      RoleArn: !GetAtt StepFunctionsRole.Arn

  # =======Lambda======== #
  DataChecker:
    Type: AWS::Lambda::Function
    Properties:
      Code:
        ZipFile: !Sub |
          {{ include('./lambda_scripts/data_checker.py')|indent(10) }}
      Description: "SagaMaker orchestration data checker lambda"
      FunctionName: "DataChecker"
      Handler: index.lambda_handler
      MemorySize: 128
      Role: !GetAtt DataCheckerLambdaRole.Arn
      Runtime: !Ref Runtime
      Timeout: 15
  StartTrainingJob:
    Type: AWS::Lambda::Function
    Properties:
      Code:
        ZipFile: !Sub |
          {{ include('./lambda_scripts/start_training_job.py')|indent(10) }}
      Description: "SagaMaker orchestration start training job lambda"
      FunctionName: "StartTrainingJob"
      Handler: index.lambda_handler
      MemorySize: 128
      Role: !GetAtt DataCheckerLambdaRole.Arn
      Runtime: !Ref Runtime
      Timeout: 15
      Environment:
        Variables:
          TARGET: !Ref Target
          NUM_CLASS: !Ref NumClass

  NotifySlack:
    Type: AWS::Lambda::Function
    Properties:
      Code:
        ZipFile: !Sub |
          {{ include('./lambda_scripts/notify_slack.py')|indent(10) }}
      Description: "SagaMaker orchestration notify slack"
      FunctionName: "NotifySlack"
      Handler: index.lambda_handler
      MemorySize: 128
      Role: !GetAtt DataCheckerLambdaRole.Arn
      Runtime: !Ref Runtime
      Timeout: 15
      Environment:
        Variables:
          HOOK_URL: !Ref HookUrl
          CHANNEL: !Ref SlackChannel

  GetStatus:
    Type: AWS::Lambda::Function
    Properties:
      Code:
        ZipFile: !Sub |
          {{ include('./lambda_scripts/get_status.py')|indent(10) }}
      Description: "SagaMaker orchestration get status"
      FunctionName: "GetStatus"
      Handler: index.lambda_handler
      MemorySize: 128
      Role: !GetAtt DataCheckerLambdaRole.Arn
      Runtime: !Ref Runtime
      Timeout: 15

  DeployModel:
    Type: AWS::Lambda::Function
    Properties:
      Code:
        ZipFile: !Sub |
          {{ include('./lambda_scripts/deploy_model.py')|indent(10) }}
      Description: "SagaMaker orchestration deploy model"
      FunctionName: "DeployModel"
      Handler: index.lambda_handler
      MemorySize: 128
      Role: !GetAtt DataCheckerLambdaRole.Arn
      Runtime: !Ref Runtime
      Timeout: 15
      Environment:
        Variables:
           EXECUTION_ROLE: !Ref ExecutionRole
以下、コマンドを適切なディレクトリで実行してください。スタックが無事作成されれば完了です。
# !/bin/bash

# ECRへのログイン
eval $(aws ecr get-login --region ap-northeast-1 --no-include-email --profile your_profile)

echo "スタックを作成します"

# CloudFormationのテンプレートファイルへのレンダリングを実行
python formation_config_creator.py

# スタックの作成を実行
aws cloudformation create-stack \
    --stack-name sagemaker-orchestration \
    --template-body file://$PWD/cloudformation/cloudformation.yml \
    --capabilities CAPABILITY_IAM \
    --profile your_profile
終わりに
今回は、TrainingジョブとPredictionジョブに依存関係を持たせた機械学習の一連のフローをStepFunctionsを使って作成してみました。また、このワークフローはAWS公式が公開しているレポジトリーを参考にして作成をしております。
個人的には、このワークフローはベストプラクティスではなく機械学習のワークフローをSageMakerを使って学ぶチュートリアルみたいなものだと感じました。
TrainingジョブとPredictionジョブに依存関係を持たせる方法として、1つのステートマシンにまとめる以外にも「Traininジョブが完了したらSQSにキューを出力し、Predictionジョブが毎分・毎時でキューを見にいく」とかでもいいのかなと思っています。この方法についても、手が空いた時に実験してみたいと思います。
また、今回書いたコードはGithubに上げておりますのでそちらも適宜参照して頂ければと思います。

