割と間が空いてしまいました。。。
お待たせしてしまい、申し訳ありません(><)
念のため。
これは 定期的に Twitter で特定の内容を検索して通知してくれる Bot を作った話(前編) の続きです。
作成手順の 1 ~ 3 までを前編で説明しています。
(作成手順)
- GoogleAppsScripts の作成
- Twitter Developer Account の設定
- Twitter Developer Account の登録
- Twitter App の作成
- LINEWORKS Developer Console の設定
- GoogleAppsScripts でコードを作成
- Twitter の認証トークンを取得
- Twitter 上を検索
- 検索結果を LINEWORKS トーク Bot で通知
- 通知内容を共有するボタンを追加
- GoogleAppsScripts 定期実行する(トリガーの作成)
それでは、いよいよコードを作成していきます!
いってみよー(*‘∀‘)ノ
GoogleAppsScripts でコードを作成
既にご存じの方もごじゃりましょうが。
GoogleAppsScripts は Google が提供するサーバーサイド・スクリプト環境です。
Javascript をベースとしています。
まぁ、あくまでベースなので色々と違う点はあるのですが、そこは今回飛ばしますので、詳しく知りたい方は Qiita を検索してみてください!(*‘∀‘)
では、https://script.google.com/home にアクセスして、前編で作成したプロジェクトに書き込んでいきましょう~♪

コード.gs にはまだ function myFunction() しかなく、中に何も書かれていません。
さぁ、どんどん function を作っていきましょう!
1. Twitter の認証トークンを取得
Twitter API を使用するには Twitter の認証トークンを取得します。
(公式)Authentication
例によって英語だらけなので Google 翻訳さんに頑張ってもらいます。
なんやかんや書いてありますが、つまりこの2ステップでいいみたいですね!
-
API KeyとAPI secret keyの間に:を入れてくっつけて BASE64 エンコードする - Header 情報に載せて
https://api.twitter.com/oauth2/tokenに POST する
実際のコードはこんな感じです。
function getToken() {
  const apiKey = "xxxxxxxxxxxxxxxxxxxyz";
  const apiSecretKey = "xxxxxxxxxxxxxxxxxxxxxxxxxyz";
  const credential = Utilities.base64Encode(apiKey + ':' + apiSecretKey);
  const options = {
    "method": "post",
    "contentType": "application/x-www-form-urlencoded;charset=UTF-8",
    "headers": { "Authorization" : "Basic " + credential },
    "payload": { "grant_type": "client_credentials" }
  };
  const uri = "https://api.twitter.com/oauth2/token";
  const res = JSON.parse(UrlFetchApp.fetch(uri, options));
  return res.access_token;
}
apiKey と apiSecretKey は自分のものを入れてくださいねー。
これで認証トークンは取得できました!
意外と楽チン。
それでは、次は Twitter 上を検索しましょう!(*‘∀‘)
2. Twitter 上を検索
Twitter 上を検索するには、Standard Search API を使用します。
無料で使えるやつです。
余談ですが、Twitter の Search API はプランごとに API が用意されていて、Premium と Enterprise は検索範囲が広くなります。
詳しく知りたい方は公式ページの Search Tweets にて確認してください。
検索オプションはいくつかあるのですが、今回は以下のオプションを使います。
-
q検索ワード(必須)。まぁ、これがないと話になりませんね (;・д・) -
lang言語です。日本語の Tweet だけで充分ですね。 -
result_type最新のものから探すか、人気のものから探すかの設定で、デフォルトは両方からになっています。今回は最新のものから探すことにします。 -
count何件取ってくるかです。どんんだけ Tweet されるかにもよると思うのですが、今回は取り敢えず 5件くらいにしときます。
キーワードは外部から取得できるようにして、サーチする function を作ります。
function searchTwitter(keyword){
  const options = {
    "method": "get",
    "headers": { "Authorization" : "Bearer " + getToken() }
  }
  const uri = "https://api.twitter.com/1.1/search/tweets.json?q=" + keyword + "&lang=ja&result_type=recent&count=5";
  return JSON.parse(UrlFetchApp.fetch(uri, options));
}
headers の Authorization には先ほど作成した getToken() を使います。
実行結果はこんな感じです。

うん、なっがい!(/・ω・)/
これ、成形しないとやってられませんね。
日時とコメントだけ取り出すようにしましょう。
function searchTwitter(keyword){
  const options = {
    "method": "get",
    "headers": { "Authorization" : "Bearer " + getToken() }
  }
  const q = encodeURIComponent(keyword + " -filter:retweets");
  const uri = "https://api.twitter.com/1.1/search/tweets.json?q=" + q + "&lang=ja&result_type=recent&count=5";
  const res = JSON.parse(UrlFetchApp.fetch(uri, options));
  var texts = [];
  res.statuses.forEach(function(status) {
    texts.push(status.created_at + "\n" + status.text + "\n" + status.user.name + "\n");
  });
  return texts;
}
texts って配列に日時と Tweet 文とユーザ名を入れました。
あと、リツイートを含めてしまうと同じコメントが何回も表示されるので -filter:retweets を指定して省きました。

これでスッキリ!('ω')
必要なところだけ抽出できました。
さぁ、いよいよトーク Bot に通知してもらいましょう!
3. 検索結果を LINEWORKS トーク Bot で通知
LINEWORKS のトーク Bot に通知させるのに、今回は メッセージ送信 (buttonTemplate) を使います。
共有ボタンを作るために普通のテキスト送信ではなくボタンテンプレートを使います。
前編で取得しておいた API ID やら BotNo やらを使いますので、ご用意を。
LINEWORKS の API を使用するにあたり、JWT の認証が必要になるのですが、この処理が非常に面倒だったので私の作ったライブラリを登録して使ってください。
もし、自分でコード書きたい!って人がいらっしゃいましたらこちらの記事で解説していますので、ご参考ください。
GoogleAppsScript で LINEWORKS のチャット BOT を作る
ライブラリを登録する
- 「リソース」-「ライブラリ」をクリック
- 「ライブラリを追加」の欄に
1aLcCr3CWqfenPMyM0_FWIDUgRcTxsit9bO6BTx61NCXrCtkY2zbHBlodを入力して追加ボタンをクリック - 「LINEWORKS」ライブラリが追加されるので、一番新しいバージョンを選んで保存ボタンをクリック
これで登録完了です!
では、コードを書いていきましょう。
function main(){
  sendLineworks(searchTwitter("こぐまのケーキ屋さん"));
}
function sendLineworks(texts){
  const keys = {
    "apiId" : "API ID",
    "consumerKey" : "Server API Consumer Key",
    "serverId" : "Server List(ID登録タイプ) の ID",
    "privateKey" : "Server List(ID登録タイプ) の認証キー",
    "botNo" : "botNo"
  };
  const accountId = "自分の LINEWORKS ID";

  const uri = "https://apis.worksmobile.com/r/" + keys.apiId + "/message/v1/bot/" + keys.botNo + "/message/push";
  const headers = {
    "Content-type": "application/json",
    "consumerKey": keys.consumerKey,
    "Authorization": "Bearer " + LINEWORKS.getToken(keys)
  };

  texts.forEach( function(text){
    const options = {
      "method": "post",
      "headers": headers,
      "payload": JSON.stringify({
        "accountId": accountId,
        "content": {
          "type": "button_template",
          "contentText": text,
          "actions": [{
            "type": "message",
            "label": "共有する",
            "text": "全体のトークルームに共有します。",
            "postback": "action=share&text=" + text
          }]
	    }
      })
    };
    UrlFetchApp.fetch(uri, options);
  });
}
いやー、長くなってきましたね。
ちょっと読み疲れてきたのではないでしょうか( ゚Д゚)
そんな疲れている頭に補足説明です。
認証キーについてですが、実際に見てもらうとわかる通りもの凄く長い上に変な改行が入っています。少々面倒なのですが、
"-----BEGIN PRIVATE KEY-----\nMIIEvAIBADANBgkqhkiG9...\n-----END PRIVATE KEY-----" となるように \n と \n の間に認証キーを入れて一行で表記します。
実行すれば、自分のトークに Bot が通知してくれます!
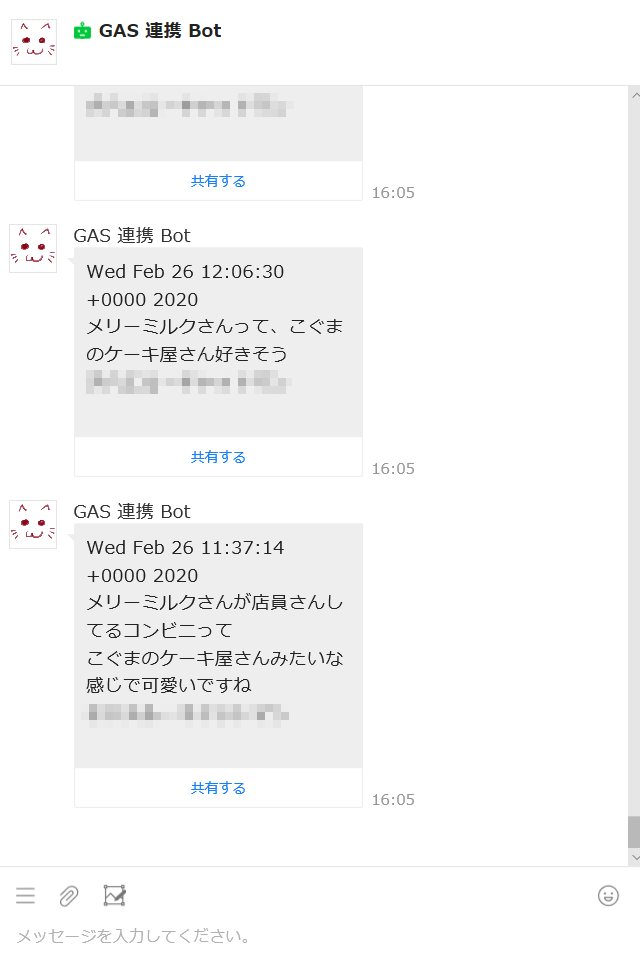
だーいせーいこー!ヾ(´∀`)ノ
もう、ここまでで良いような気もしますな・・・( ^ω^)
4. 通知内容を共有するボタンを追加
タイトルつけミスで本当に申し訳ないのですが、この内容、手順 4-3 でやっちゃっていますね!(; ・`д・´)
そして、書かなきゃいけなかったのは**「共有するボタンを押したら全体のトークルームに送信する方法」**でした!
ここに来て、なんたる痛恨のミス。。。もう終わると思っていたのに。。。
もう、気力が保てないので、後日、続きを書かせていただきます。。。
ホントゴメンナサイ( ;∀;)
では、ここまでのコードです。
function main(){
  sendLineworks(searchTwitter("こぐまのケーキ屋さん"));
}
function sendLineworks(texts){
  const keys = {
    "apiId" : "API ID",
    "consumerKey" : "Server API Consumer Key",
    "serverId" : "Server List(ID登録タイプ) の ID",
    "privateKey" : "Server List(ID登録タイプ) の認証キー",
    "botNo" : "botNo"
  };
  const accountId = "自分の LINEWORKS ID";

  const uri = "https://apis.worksmobile.com/r/" + keys.apiId + "/message/v1/bot/" + keys.botNo + "/message/push";
  const headers = {
    "Content-type": "application/json",
    "consumerKey": keys.consumerKey,
    "Authorization": "Bearer " + LINEWORKS.getToken(keys)
  };

  texts.forEach( function(text){
    const options = {
      "method": "post",
      "headers": headers,
      "payload": JSON.stringify({
        "accountId": accountId,
        "content": {
          "type": "button_template",
          "contentText": text,
          "actions": [{
            "type": "message",
            "label": "共有する",
            "text": "全体のトークルームに共有します。",
            "postback": "action=share&text=" + text
          }]
	    }
      })
    };
    UrlFetchApp.fetch(uri, options);
  });
}

function searchTwitter(keyword){
  const options = {
    "method": "get",
    "headers": { "Authorization" : "Bearer " + getToken() }
  }
  const q = encodeURIComponent(keyword + " -filter:retweets");
  const uri = "https://api.twitter.com/1.1/search/tweets.json?q=" + q + "&lang=ja&result_type=recent&count=5";
  const res = JSON.parse(UrlFetchApp.fetch(uri, options));
  var texts = [];
  res.statuses.forEach(function(status) {
    texts.push(status.created_at + "\n" + status.text + "\n" + status.user.name + "\n\n");
  });
  return texts;
}
function getToken() {
  const apiKey = "xxxxxxxxxxxxxxxxxxxyz";
  const apiSecretKey = "xxxxxxxxxxxxxxxxxxxxxxxxxyz";
  const credential = Utilities.base64Encode(apiKey + ':' + apiSecretKey);
  const options = {
    "method": "post",
    "contentType": "application/x-www-form-urlencoded;charset=UTF-8",
    "headers": { "Authorization" : "Basic " + credential },
    "payload": { "grant_type": "client_credentials" }
  };
  const uri = "https://api.twitter.com/oauth2/token";
  const res = JSON.parse(UrlFetchApp.fetch(uri, options));
  return res.access_token;
}
GoogleAppsScripts 定期実行する(トリガーの作成)
気を取り直して、最後に定期実行する方法を説明したいと思います。
もう、これは簡単です。
https://script.google.com/home にアクセスして作成したスクリプト名を選びます。
スクリプトのページに移動したら、右上のメニューから トリガー を選びます。
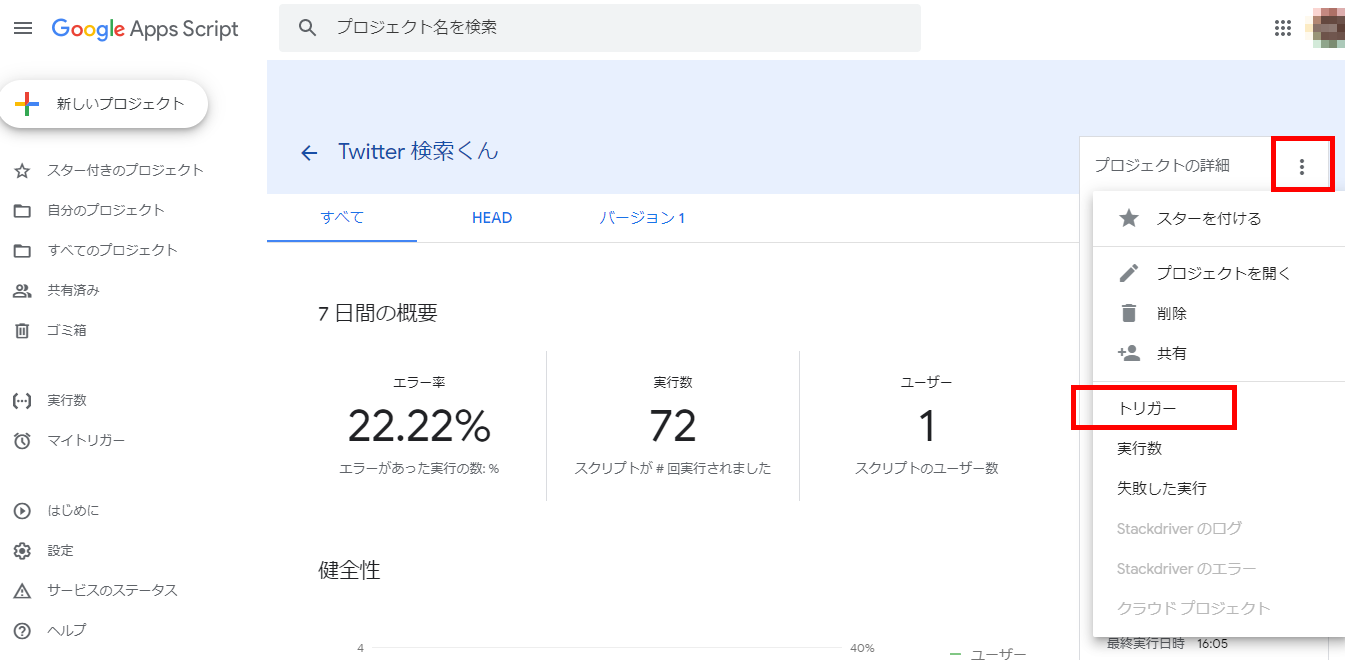
トリガーを追加 ボタンをクリックして追加していきます。

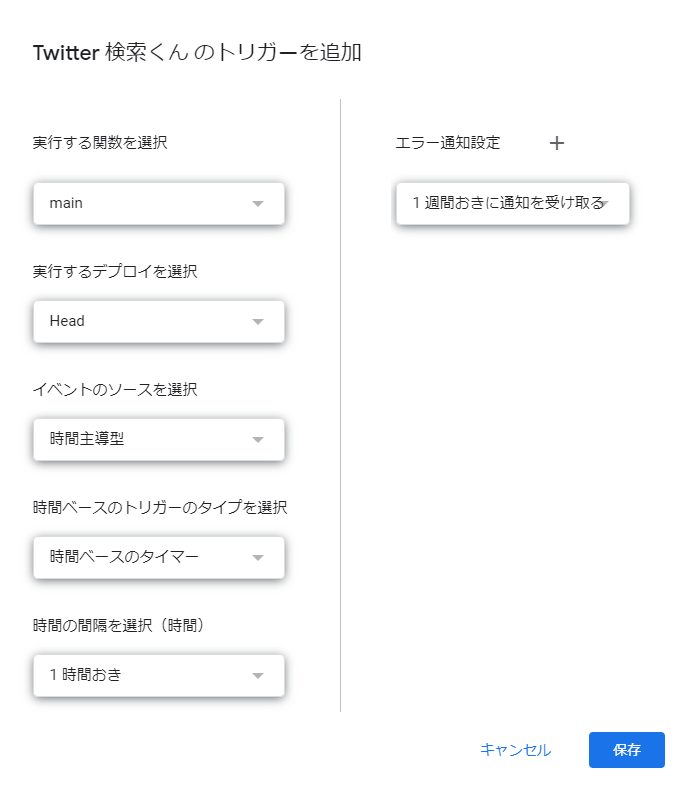
実行する関数は main を選びます。
実行間隔とかはお好みで。1時間起きだとうるさいかな?
ま、いっか(*‘∀‘)←テキトー
保存すれば設定完了です!
これで、定期的に実行されて通知が送られてきます。やったね!
おわりに
ここまでお付き合いいただきありがとうございました。
長らく間が空いた上に、結局まとめきれなかったです。
本当に、本当に申し訳なくっ!(T_T)
やっぱり、全部書ききってから投稿した方が良いってことですね!
いい経験になりました!反省しています!( ・`д・´)キリッ
近日中に、共有するボタンを押したら全体のトークルームに送信する方法は上げさせていただきます!
ではまた!(^^)/
参考にさせていただきましたm(_ _)m
GoogleAppsScript 公式
Twitter Developers 公式
LINEWORKS Developers 公式