さくらのVPSのプランを1GB->2GBに上げようとしたら、自分が契約してるv3は非対応だったのでイチから構築し直しました。その時の手順をメモがてら書きます。
2019/09/29
続編となる「Nginx+PHP7.1+MariaDBのphpMyAdminを構築」を書きました
各種バージョン等は以下の通りです。
- CentOS Linux release 7.2.1511 (Core)
- nginx version: nginx/1.12.1
- PHP 7.1.8 (cli) (built: Aug 2 2017 12:13:05) ( NTS )
- mysql Ver 15.1 Distrib 10.2.7-MariaDB, for Linux (x86_64) using readline 5.1
何はともあれ、v4の2GBプランを契約してスタート。
なお、コマンドの最初が#の場合はroot、$の場合は一般ユーザ(sudo su rootが使える)とします。
OS再インストール(CentOS7)
さくらのVPSの初期OSは「CentOS 6(x86_64)」なので、**「CentOS7 x86_64」**をインストールします。
コンパネの右上にある「各種設定」から「OSインストール」を選んで、画面の指示に従って進むだけです。
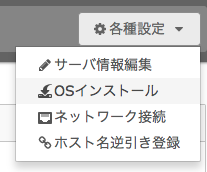
「標準OS」として選択可能です。

初期設定(セキュリティ的なところとか)
ログイン
$ ssh root@xx.xxx.xxx.xx
又は
$ ssh root@hoegehoge.com
ユーザ作成
とりあえず、adminさんを作ります。
# useradd admin

# passwd admin
Changing password for user admin.
New password:
Retype new password:
passwd: all authentication tokens updated successfully.
sudoを使いたいので、wheelグループに追加します。
# id admin
uid=1000(admin) gid=1000(admin) groups=1000(admin)

# usermod -G wheel admin

# id admin
uid=1000(admin) gid=1000(admin) groups=1000(admin),10(wheel)
visudoで、以下の行のコメントアウトを外す、という手順をたまに見かけるけど、デフォルトで外れてました。(無意識に外したか、CentOS7の仕様か)
## Allows people in group wheel to run all commands
%wheel  ALL=(ALL)       ALL
ユーザ切り替え -> sudoでrootになる
# exit

$ ssh admin@xx.xxx.xxx.xx

$ sudo su root
We trust you have received the usual lecture from the local System
Administrator. It usually boils down to these three things:

    #1) Respect the privacy of others.
    #2) Think before you type.
    #3) With great power comes great responsibility.

[sudo] password for admin:
ssh設定
設定ファイルは以下です。
# vi /etc/ssh/sshd_config
rootログイン禁止
# PermitRootLogin yes
PermitRootLogin no
パスワードログイン禁止
# PasswordAuthentication yes
PasswordAuthentication no
【確認】鍵登録がない or authorized_keysのpermissionが600でない
$ ssh admin@xx.xxx.xxx.xx
Permission denied (publickey).
デフォルトポートの変更
# Port 22
Port 10022
【確認】デフォルトポート(22)は拒否されるようになる
$ ssh admin@xx.xxx.xxx.xx
ssh: connect to host xx.xxx.xxx.xx port 22: Connection refused

$ ssh admin@xx.xxx.xxx.xx -p 10022
ssh再起動
設定ファイルを編集して再起動すると反映されてしまうのでexitしないように注意!
(パスワードログインや22番ポートログインができなくなるだけでなく、10022番ポートは未開放なので!)
# systemctl restart sshd.service
公開鍵認証
公開鍵自体は事前に作っておくほうがいいかもしれません。
Macローカル
// 鍵がない場合
$ ssh-keygen -t rsa

$ cat .ssh/id_rsa.pub
ssh-rsa .......
サーバ
$ mkdir ~/.ssh
$ chmod 700 .ssh
$ cd .ssh/
$ vi authorized_keys

// ローカルの公開鍵を貼り付ける(FTPとかで送ったほうが正確だけど)
ssh-rsa .......

$ chmod 600 authorized_keys
sudoユーザのPATHを引き継ぐ
adminさんの$PATHとsudo su rootした時の$PATHがズレていると面倒なので合わせます。
$ echo $PATH
/usr/local/bin:/usr/bin:/usr/local/sbin:/usr/sbin:/home/admin/.local/bin:/home/admin/bin

$ sudo su root
# echo $PATH
/sbin:/bin:/usr/sbin:/usr/bin

# exit

$ sudo visudo
---
Defaults    env_reset
Defaults    env_keep =  "COLORS DISPLAY HOSTNAME HISTSIZE INPUTRC KDEDIR LS_COLORS"
Defaults    env_keep += "MAIL PS1 PS2 QTDIR USERNAME LANG LC_ADDRESS LC_CTYPE"
Defaults    env_keep += "LC_COLLATE LC_IDENTIFICATION LC_MEASUREMENT LC_MESSAGES"
Defaults    env_keep += "LC_MONETARY LC_NAME LC_NUMERIC LC_PAPER LC_TELEPHONE"
Defaults    env_keep += "LC_TIME LC_ALL LANGUAGE LINGUAS _XKB_CHARSET XAUTHORITY"
Defaults    env_keep += "PATH" <-追加

// コメントアウト
# Defaults    secure_path = /sbin:/bin:/usr/sbin:/usr/bin
---

// 確認
$ sudo su root
# echo $PATH
/usr/local/bin:/usr/bin:/usr/local/sbin:/usr/sbin:/home/admin/.local/bin:/home/admin/bin
firewall設定
折角CentOS7にしたので、お馴染みのiptablesではなく、firewallを使ってみます。
- sshのポートを
22から10022とする -
http(80)とhttps(443)を許可する
# cp /usr/lib/firewalld/services/ssh.xml /etc/firewalld/services/.
# vi /etc/firewalld/services/ssh.xml
---
<port protocol="tcp" port="22"/>
                            ▼
<port protocol="tcp" port="10022"/>
---

# firewall-cmd --permanent --zone=public --add-service=http
# firewall-cmd --permanent --zone=public --add-service=https
# firewall-cmd --reload
success

// 確認
# firewall-cmd --list-all
public (default, active)
  interfaces: eth0
  sources:
  services: dhcpv6-client http https ssh
  ports:
  masquerade: no
  forward-ports:
  icmp-blocks:
  rich rules:
参考: CentOS7のfirewalldをまじめに使うはじめの一歩(systemdも少し) - Qiita
ここまでで、OSインストール(CentOS7)と、セキュリティ絡みの初期設定が完了です。
Webサーバ、PHP、DBの準備
Nginx
今回はWebサーバとして、Apacheではなく、Nginxを採用しました。(初挑戦)
リポジトリ追加
nginx: Linux packagesのPre-Built Packages for Stable versionを参照しつつ、以下の要領でリポジトリを追加します。
# vi /etc/yum.repos.d/nginx.repo
---
[nginx]
name=nginx repo
baseurl=http://nginx.org/packages/centos/7/$basearch/
gpgcheck=0
enabled=1
---
インストールと設定
設定は/etc/nginx/conf.d/default.confを編集します。コメントアウトになっているところは初期状態です。
# yum -y install nginx
Complete!

# vi /etc/nginx/conf.d/default.conf
server {
    root /var/www/html;

    location / {
        #root   /usr/share/nginx/html;
        root /var/www/html;
        #index  index.html index.htm;
        index  index.php index.html index.htm;
    }

    # proxy from nginx to php-fpm
    location ~ \.php$ {
        fastcgi_pass  localhost:9000;
        fastcgi_param SCRIPT_FILENAME $document_root/$fastcgi_script_name;
        include       fastcgi_params;
    }
}
起動と自動起動設定
# nginx -t
# systemctl start nginx
# systemctl enable nginx
DocumentRoot準備
adminをnginxグループに追加します。(-aがないと上書きになってwheelが消えます)
$ sudo usermod -aG nginx admin
$ exit

// 再ログインして確認
$ id
uid=1000(admin) gid=1000(admin) groups=1000(admin),10(wheel),990(nginx)
ドキュメントルートの権限をnginxとします。今後作られるファイルも同様な権限となるように設定(2770)します。
$ sudo chown -R nginx:nginx /var/www/html
$ sudo chmod -R 2770 /var/www/html

$ ls -lrth
drwxrws--- 2 nginx nginx 6 Apr 13 06:04 html
PHP7.1
標準のyumでインストールできるPHPはversionが古い(5.6とか?)ようなので、EPEL/Remiリポジトリを追加して、そこからPHP7.1をインストールします。
リポジトリの追加
// EPELリポジトリ
# yum -y install epel-release
Complete!

// Remiリポジトリ
# rpm -Uvh http://rpms.famillecollet.com/enterprise/remi-release-7.rpm
Updating / installing...
   1:remi-release-7.3-2.el7.remi      ################################# [100%]
インストールと設定
設定は/etc/php.iniを編集します。コメントアウトになっているところは初期状態です。
// PHP7.1(php-*は使いそうなものを適当に入れてます。但し、php-fpmはnginxとの連携で必須!)
# yum -y install --enablerepo=remi-php71 php php-cli php-common php-devel php-fpm php-gd php-mbstring php-mysqlnd php-pdo php-pear php-pecl-apcu php-soap php-xml php-xmlrpc
Complete!

# php -v
PHP 7.1.8 (cli) (built: Aug  2 2017 10:45:15) ( NTS )
Copyright (c) 1997-2017 The PHP Group
Zend Engine v3.1.0, Copyright (c) 1998-2017 Zend Technologies

# vi /etc/php.ini
---
;date.timezone =
date.timezone = "Asia/Tokyo"

;expose_php = On
expose_php = Off

;mbstring.language = Japanese
mbstring.language = Japanese

;mbstring.internal_encoding =
mbstring.internal_encoding = UTF-8

;mbstring.http_input =
mbstring.http_input = auto
---
php-fpmの設定
PHP7.1と一緒にインストールしたPHP-FPMの設定を編集します。
# vi /etc/php-fpm.d/www.conf
---
;user = apache
user = nginx

;group = apache
group = nginx
---
起動と自動起動設定
# php-fpm -t
[16-Aug-2017 18:15:04] NOTICE: configuration file /etc/php-fpm.conf test is successful

# systemctl start php-fpm
# systemctl enable php-fpm
確認
ドキュメントルートで、いわゆるphpinfo()が表示できれば成功です。
$ cd /var/www/html
$ vi index.php
---
<?php
phpinfo();
?>
---

$ rm index.php
MariaDB
PHP同様、標準のyumでインストールするとversionが古いようなので、リポジトリを追加します。
リポジトリ追加
# vi /etc/yum.repos.d/MariaDB.repo
---
# MariaDB 10.2 CentOS repository list - created 2017-08-15 04:25 UTC
# http://downloads.mariadb.org/mariadb/repositories/
[mariadb]
name = MariaDB
baseurl = http://yum.mariadb.org/10.2/centos7-amd64
gpgkey=https://yum.mariadb.org/RPM-GPG-KEY-MariaDB
gpgcheck=1
---
インストール
# yum -y install MariaDB-server MariaDB-client
Complete!

# mysql -V
mysql  Ver 15.1 Distrib 10.2.7-MariaDB, for Linux (x86_64) using readline 5.1
起動と自動起動設定
# systemctl start mariadb
# systemctl enable mariadb
参考: CentOS7 + PHP7.1 + h2o + MariaDB10.1 + Word Press
参考: MariaDB - Setting up MariaDB Repositories - MariaDB
初期設定
基本、すべての質問にYで回答すればいい感じにやってくれるみたいです。
# mysql_secure_installation

NOTE: RUNNING ALL PARTS OF THIS SCRIPT IS RECOMMENDED FOR ALL MariaDB
      SERVERS IN PRODUCTION USE!  PLEASE READ EACH STEP CAREFULLY!

In order to log into MariaDB to secure it, we'll need the current
password for the root user.  If you've just installed MariaDB, and
you haven't set the root password yet, the password will be blank,
so you should just press enter here.

Enter current password for root (enter for none):
OK, successfully used password, moving on...

Setting the root password ensures that nobody can log into the MariaDB
root user without the proper authorisation.

Set root password? [Y/n] Y
New password:
Re-enter new password:
Password updated successfully!
Reloading privilege tables..
 ... Success!


By default, a MariaDB installation has an anonymous user, allowing anyone
to log into MariaDB without having to have a user account created for
them.  This is intended only for testing, and to make the installation
go a bit smoother.  You should remove them before moving into a
production environment.

Remove anonymous users? [Y/n] Y
 ... Success!

Normally, root should only be allowed to connect from 'localhost'.  This
ensures that someone cannot guess at the root password from the network.

Disallow root login remotely? [Y/n] Y
 ... Success!

By default, MariaDB comes with a database named 'test' that anyone can
access.  This is also intended only for testing, and should be removed
before moving into a production environment.

Remove test database and access to it? [Y/n] Y
 - Dropping test database...
 ... Success!
 - Removing privileges on test database...
 ... Success!

Reloading the privilege tables will ensure that all changes made so far
will take effect immediately.

Reload privilege tables now? [Y/n] Y
 ... Success!

Cleaning up...

All done!  If you've completed all of the above steps, your MariaDB
installation should now be secure.

Thanks for using MariaDB!
文字コード設定
# vi /etc/my.cnf.d/server.cnf
---
[mysqld]
character-set-server = utf8
---
再起動
# systemctl restart mariadb
DB作業ユーザ作成、権限付与
WordPressで使う空DBを作成し、adminユーザに権限を付与します。(パスワードも設定します)
# mysql -p
Enter password:
Welcome to the MariaDB monitor.  Commands end with ; or \g.
Your MariaDB connection id is 17
Server version: 10.2.7-MariaDB MariaDB Server

MariaDB [(none)]> create database [DB Name];
Query OK, 1 row affected (0.00 sec)

MariaDB [(none)]> grant all privileges on [DB Name].* to admin@localhost identified by '[Your Password]';
Query OK, 0 rows affected (0.00 sec)

// 必要なら(反映?)
MariaDB [(none)]> FLUSH PRIVILEGES;
Query OK, 0 rows affected (0.00 sec)

MariaDB [(none)]> quit;
Bye
WordPressの準備
WordPressのインストール
公式から最新WordPressを取得
$ cd /var/www/html
$ wget http://ja.wordpress.org/latest-ja.tar.gz
--2017-08-15 14:09:10--  http://ja.wordpress.org/latest-ja.tar.gz
Resolving ja.wordpress.org (ja.wordpress.org)... 66.155.40.250, 66.155.40.249
Connecting to ja.wordpress.org (ja.wordpress.org)|66.155.40.250|:80... connected.
HTTP request sent, awaiting response... 301 Moved Permanently
Location: https://ja.wordpress.org/latest-ja.tar.gz [following]
--2017-08-15 14:09:10--  https://ja.wordpress.org/latest-ja.tar.gz
Connecting to ja.wordpress.org (ja.wordpress.org)|66.155.40.250|:443... connected.
HTTP request sent, awaiting response... 200 OK
Length: 8652714 (8.3M) [application/octet-stream]
Saving to: 'latest-ja.tar.gz'

100%[========================================================>] 8,652,714   3.16MB/s   in 2.6s

2017-08-15 14:09:13 (3.16 MB/s) - 'latest-ja.tar.gz' saved [8652714/8652714]
解凍・権限変更
ドキュメントルート直下にwpというパスでアクセスできるようにします。
$ tar xzvf latest-ja.tar.gz
$ mv wordpress wp
$ sudo find /var/www/html -type d -exec chmod 770 {} \;
$ sudo find /var/www/html -type f -exec chmod 660 {} \;
初期設定
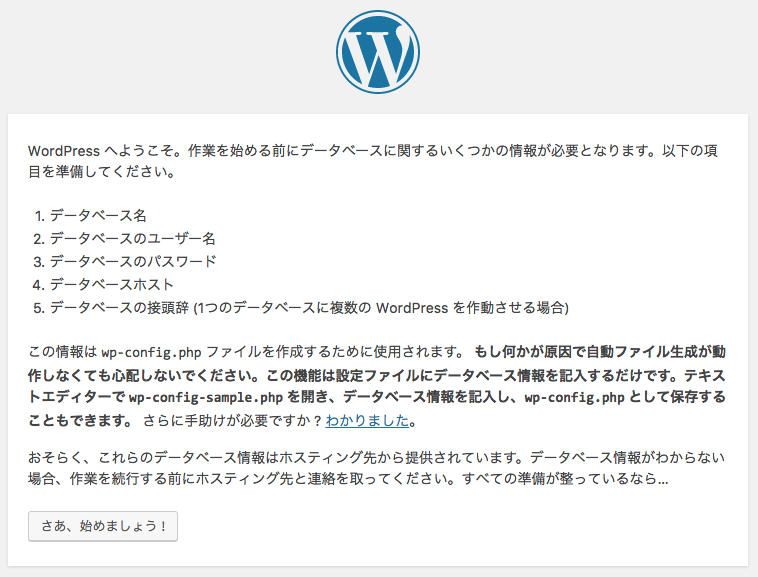
http://xx.xxx.xxx.xx/wp にアクセスすると、初期設定が始まります。
追加設定(推奨)
- pluginインストールなどをFTP不要とする
- wp-configのパーミッション設定
$ cd /var/www/html/wp

$ sudo vi wp-config.php
---
define('FS_METHOD', 'direct');
---

$ sudo chmod 400 wp-config.php
$ ls -l
-r--------  1 nginx nginx 4.1K Aug 16 13:05 wp-config.php
パーマリンク変更に伴うNginx設定変更
今回はxx.xxx.xxx.xx/wp/YYYY/MM/DD/PostTitleというURLでアクセスできるようにします。
WordPressのパーマリンク設定

Nginxの設定ファイル
server {
    listen       80;
    server_name  xx.xxx.xxx.xx;
    root         /var/www/html;
    index  index.php index.html index.htm;

    charset utf-8;

    location / {
        try_files $uri $uri/ @wordpress;
    }

    # proxy from nginx to php-fpm
    location ~ \.php$ {
        try_files $uri @wordpress;
        fastcgi_index index.php;
        fastcgi_split_path_info ^(.+\.php)(.*)$;
        fastcgi_pass  127.0.0.1:9000;
        fastcgi_param SCRIPT_FILENAME $document_root/$fastcgi_script_name;
        include       fastcgi_params;
    }
    location @wordpress {
        fastcgi_index index.php;
        fastcgi_split_path_info ^(.+\.php)(.*)$;
        fastcgi_pass  127.0.0.1:9000;
        fastcgi_param SCRIPT_FILENAME  $document_root/wp/index.php;
        include       fastcgi_params;
    }
}
Let’s encryptでHTTPS対応
HTTPS対応に必要な証明書を無料で発行してくれるLet's encryptを使います。
が、その前にGitが必要なのでインストールしておきます。(折角なのでソースコードから)
Gitインストール
# yum -y install curl-devel expat-devel gettext-devel openssl-devel zlib-devel perl-ExtUtils-MakeMaker
Complete!

# cd /usr/local/src
# wget https://www.kernel.org/pub/software/scm/git/git-2.14.1.tar.gz
[sudo] password for admin:
--2017-08-15 16:20:12--  https://www.kernel.org/pub/software/scm/git/git-2.14.1.tar.gz

# ls -l
-rw-r--r-- 1 root root 6987933 Aug 11 02:57 git-2.14.1.tar.gz

# tar xzvf git-2.14.1.tar.gz
# cd git-2.14.1/
# make prefix=/usr/local all
# make prefix=/usr/local install

// 確認(root(またはPATHが通っていない場合)だとgit version 1.8.3.1となる?)
# exit
$ git --version
git version 2.14.1
ようやくLet's encrypt
証明書の発行
$ cd /usr/local/
$ sudo git clone https://github.com/certbot/certbot
[sudo] password for admin:
Cloning into 'certbot'...
remote: Counting objects: 48175, done.
remote: Compressing objects: 100% (33/33), done.
remote: Total 48175 (delta 13), reused 17 (delta 7), pack-reused 48135
Receiving objects: 100% (48175/48175), 14.77 MiB | 3.76 MiB/s, done.
Resolving deltas: 100% (34465/34465), done.

$ cd certbot/
$ ./certbot-auto certonly --webroot --agree-tos -w /var/www/html -m hogehoge@mail.com -d hogehoge.com
証明書確認
$ sudo ls -lrth /etc/letsencrypt/live/hogehoge.com
lrwxrwxrwx 1 root root  41 Aug 16 16:53 privkey.pem -> ../../archive/hogehoge/privkey1.pem
lrwxrwxrwx 1 root root  43 Aug 16 16:53 fullchain.pem -> ../../archive/hogehoge/fullchain1.pem
lrwxrwxrwx 1 root root  39 Aug 16 16:53 chain.pem -> ../../archive/hogehoge/chain1.pem
lrwxrwxrwx 1 root root  38 Aug 16 16:53 cert.pem -> ../../archive/hogehoge/cert1.pem
-rw-r--r-- 1 root root 543 Aug 16 16:53 README
HTTPS対応に伴うNginx設定変更
http(80)へのアクセスはhttps(443)にリダイレクトさせます。
server {
    listen      80;
    server_name hogehoge;
    return      301 https://$host$request_uri;
}
server {
    listen      443 ssl;
    server_name hogehoge;
    root        /var/www/html;
    index       index.php index.html index.htm;
    charset utf-8;
    ssl_certificate /etc/letsencrypt/live/hogehoge/fullchain.pem;
    ssl_certificate_key /etc/letsencrypt/live/hogehoge/privkey.pem;
    location / {
        try_files $uri $uri/ @wordpress;
    }
    ---略
}
Let's encryptの証明書期限に合わせて、自動更新の設定をcronなどで入れておくと便利です。
基本的には以上ですが、WordPressのThemeとDBダンプ、プラグインなどを適用させて完成となります。
PHP7.3にアップデート
WordPressの管理画面で警告が出たので対応しました。
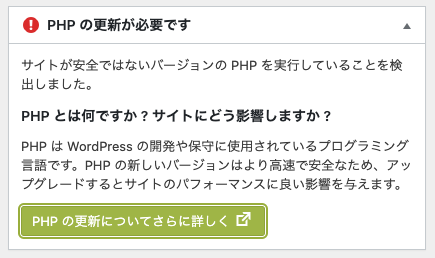
解説は割愛でコマンドだけ書きます。
// 削除
$ sudo yum remove php-*

// インストール
$ sudo yum -y install --enablerepo=remi-php73 php php-cli php-common php-devel php-fpm php-gd php-mbstring php-mysqlnd php-pdo php-pear php-pecl-apcu php-soap php-xml php-xmlrpc
php-fpmの設定
当初(7.1)の手順に書き忘れていただけかもしれませんが、PHP7.3にアップデートした時、userとgroup以外の部分の編集も必要でした。
# vi /etc/php-fpm.d/www.conf
---
;listen = 127.0.0.1:9000
listen = /var/run/php-fpm/php-fpm.sock

;user = apache
user = nginx

;group = apache
group = nginx

;listen.owner = nobody
;listen.group = nobody
;listen.mode = 0660
listen.owner = nginx
listen.group = nginx
listen.mode = 0666
---

# systemctl stop php-fpm
# systemctl start php-fpm
# systemctl stop nginx
# systemctl start nginx
上記の設定を忘れていた時のNginxエラー
2020/06/14 16:28:00 [crit] 28320#28320: *2 connect() to unix:/var/run/php-fpm/php-fpm.sock failed (13: Permission denied) while connecting to upstream, client: xxx.xxx.xxx.xxx, server: hogehoge.com, request: "GET /favicon.ico HTTP/1.1", upstream: "fastcgi://unix:/var/run/php-fpm/php-fpm.sock:", host: "hogehoge.com", referrer: "https://hogehoge.com/wp/"