本記事の内容
- この記事では、Graphene Python を利用した GraphQL × Flask × SQLAlchemy Server の構築方法をまとめたものとなっております
GraphQL とは(一応)
- Facebook製 オープンソースのクエリ言語
- RESTに変わるものとして注目されている
- クライアントとサーバ間のデータのやりとりを容易に記述することができる
- クエリに対して、JSON で結果を返す
参考
- https://qiita.com/syu_chan_1005/items/3350f1d12c17a77e98c7
- https://vitalify.jp/app-lab/20171006-graphql/
- https://tukumemo.com/graphql/
Graphene とは
- Python 用 GraphQL フレームワーク (JavaScript用もあるらしい)
実行環境
- MacOS Mojave 10.14.1
- Python 3.6.5
- Flask 1.0.2
- sqlite 3.24.0
動かすまで
## プロジェクト用のディレクトリを作成
mkdir flask_sqlalchemy
cd flask_sqlalchemy

## virtualenv 環境の作成と読み込み
virtualenv env
source env/bin/activate  # On Windows use `env\Scripts\activate`

## SQLAlchemy と graphene_sqlalchemy の pip install
pip install SQLAlchemy
pip install graphene_sqlalchemy

## Flask と Flask-GraphQL のインストール
pip install Flask
pip install Flask-GraphQL
モデルの定義
# flask_sqlalchemy/models.py
from sqlalchemy import *
from sqlalchemy.orm import (scoped_session, sessionmaker, relationship,
                            backref)
from sqlalchemy.ext.declarative import declarative_base

engine = create_engine('sqlite:///database.sqlite3', convert_unicode=True)
db_session = scoped_session(sessionmaker(autocommit=False,
                                         autoflush=False,
                                         bind=engine))

Base = declarative_base()
# We will need this for querying
Base.query = db_session.query_property()


class Department(Base):
    __tablename__ = 'department'
    id = Column(Integer, primary_key=True)
    name = Column(String)


class Employee(Base):
    __tablename__ = 'employee'
    id = Column(Integer, primary_key=True)
    name = Column(String)
    hired_on = Column(DateTime, default=func.now())
    department_id = Column(Integer, ForeignKey('department.id'))
    department = relationship(
        Department,
        backref=backref('employees',
                        uselist=True,
                        cascade='delete,all'))
スキーマの作成
GraphQLは、慣れ親しんだより階層的な構造ではなく、グラフ構造としてオブジェクトを表現します。
今回の例では、 all_employees を介してすべての従業員を一覧表示する機能と、ノード経由で特定のノードを取得する機能を提供します。
flask_sqlalchemy/schema.py を作成して、次のように編集しましょう。
# flask_sqlalchemy/schema.py
import graphene
from graphene import relay
from graphene_sqlalchemy import SQLAlchemyObjectType, SQLAlchemyConnectionField
from models import db_session, Department as DepartmentModel, Employee as EmployeeModel


class Department(SQLAlchemyObjectType):
    class Meta:
        model = DepartmentModel
        interfaces = (relay.Node, )


class DepartmentConnection(relay.Connection):
    class Meta:
        node = Department


class Employee(SQLAlchemyObjectType):
    class Meta:
        model = EmployeeModel
        interfaces = (relay.Node, )


class EmployeeConnection(relay.Connection):
    class Meta:
        node = Employee


class Query(graphene.ObjectType):
    node = relay.Node.Field()
    # Allows sorting over multiple columns, by default over the primary key
    all_employees = SQLAlchemyConnectionField(EmployeeConnection)
    # Disable sorting over this field
    all_departments = SQLAlchemyConnectionField(DepartmentConnection, sort=None)

schema = graphene.Schema(query=Query)
Flask 上での GraphQL環境を作成
RESTful APIとは異なり、GraphQLにアクセスするURLは1つだけです。
Flaskを使用して、 /graphql の下にGraphQLスキーマを公開するサーバーと、簡単にクエリを実行するための GraphiQL と呼ばれるインターフェイスを作成します。
Flask-GraphQL ライブラリは、この機能を実現できるようサポートしてくれます。
# flask_sqlalchemy/app.py
from flask import Flask
from flask_graphql import GraphQLView

from models import db_session
from schema import schema, Department

app = Flask(__name__)
app.debug = True

app.add_url_rule(
    '/graphql',
    view_func=GraphQLView.as_view(
        'graphql',
        schema=schema,
        graphiql=True # for having the GraphiQL interface
    )
)

@app.teardown_appcontext
def shutdown_session(exception=None):
    db_session.remove()

if __name__ == '__main__':
    app.run()
データを試しに作成してみる
$ python3 でコンソールを開きます。
>>> from models import engine, db_session, Base, Department, Employee
>>> Base.metadata.create_all(bind=engine)

>>> # Fill the tables with some data
>>> engineering = Department(name='Engineering')
>>> db_session.add(engineering)
>>> hr = Department(name='Human Resources')
>>> db_session.add(hr)

>>> peter = Employee(name='Peter', department=engineering)
>>> db_session.add(peter)
>>> roy = Employee(name='Roy', department=engineering)
>>> db_session.add(roy)
>>> tracy = Employee(name='Tracy', department=hr)
>>> db_session.add(tracy)
>>> db_session.commit()
GraphQL の動作テスト
これで、準備は整いました。コマンドラインから Server を起動して動作を確認してみましょう。
$ python3 ./app.py
 * Running on http://127.0.0.1:5000/ (Press CTRL+C to quit)
起動させたら、 http://localhost:5000/graphql にアクセスしてみましょう。
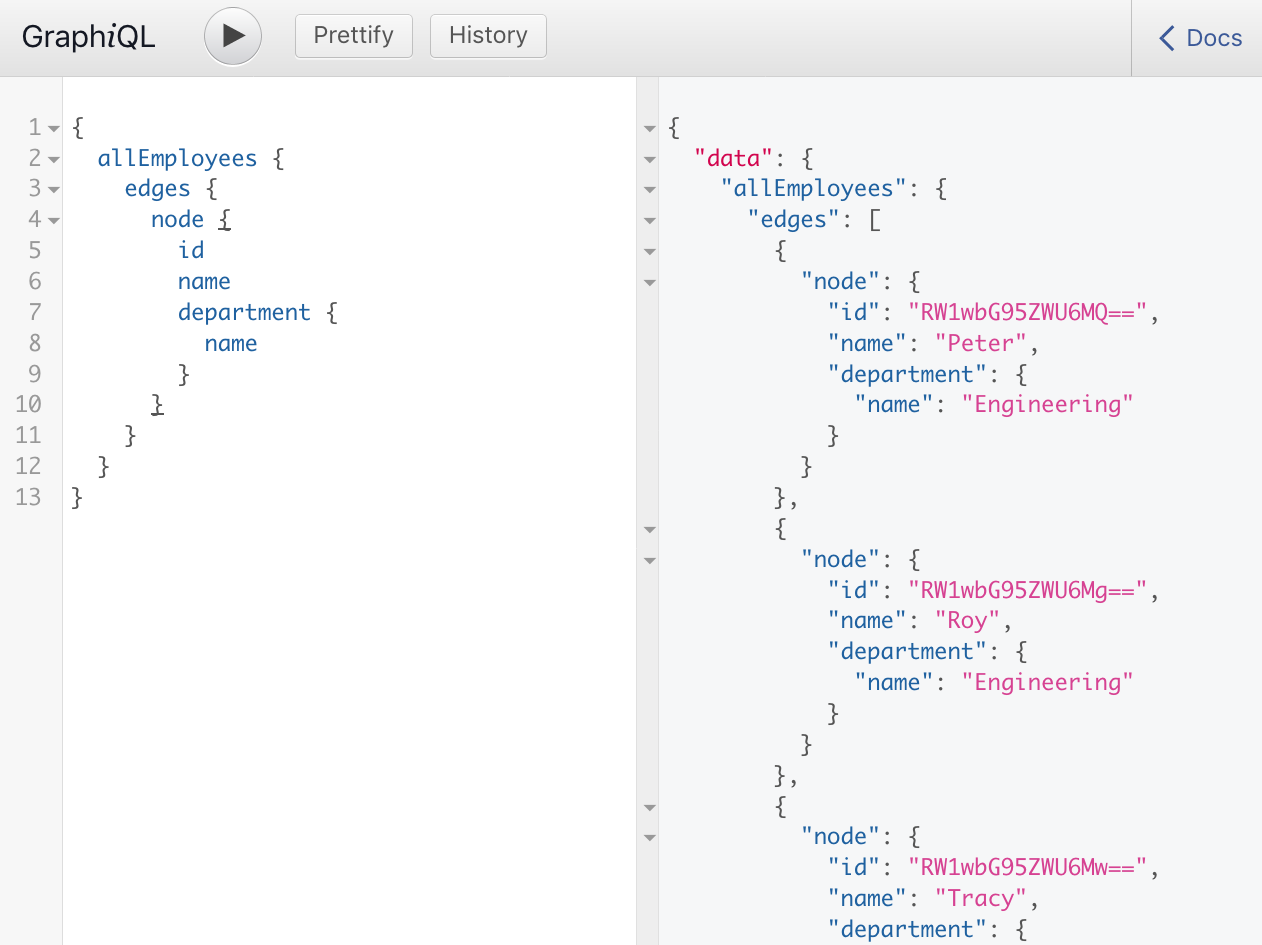
左側に Query を入力して動作を確かめる。
{
  allEmployees {
    edges {
      node {
        id
        name
        department {
          name
        }
      }
    }
  }
}
これでクエリに対するレスポンスを確認できましたね。
本記事の内容は以上となります。
シンプルな GraphQL + DB Server を構築したい時に非常に便利そうです。
うまく動かない方は、Github Repository に example があるのでそちらを試してみてください。
長くなりましたが、読んでいただきありがとうございました❗️
おまけ
MongoDB 用のチュートリアルもあるようです

