はじめに
Firebase Authenticationを使ってReactアプリに認証機能を最小構成で実装します。また、状態管理ライブラリとしてRedux Toolkitを用いて全コンポーネントからユーザー情報を参照できるようにします。
環境構築
TypeScriptを使います
npx create-react-app my-app --template typescript
react-redux、redux-tool-kit
npm install react-redux
npm install @reduxjs/toolkit
firebase
npm install firebase
version一覧
{
  "name": "redux-firebase-auth",
  "version": "0.1.0",
  "private": true,
  "dependencies": {
    "@reduxjs/toolkit": "^2.0.1",
    "@testing-library/jest-dom": "^5.17.0",
    "@testing-library/react": "^13.4.0",
    "@testing-library/user-event": "^13.5.0",
    "@types/jest": "^27.5.2",
    "@types/node": "^16.18.67",
    "@types/react": "^18.2.42",
    "@types/react-dom": "^18.2.17",
    "firebase": "^10.7.0",
    "node-sass": "^7.0.3",
    "react": "^18.2.0",
    "react-dom": "^18.2.0",
    "react-redux": "^9.0.1",
    "react-scripts": "5.0.1",
    "redux-persist": "^6.0.0",
    "typescript": "^4.9.5",
    "web-vitaを使ったls": "^2.1.4"
  },
  "scripts": {
    "start": "react-scripts start",
    "build": "react-scripts build",
    "test": "react-scripts test",
    "eject": "react-scripts eject"
  },
  "eslintConfig": {
    "extends": [
      "react-app",
      "react-app/jest"
    ]
  },
  "browserslist": {
    "production": [
      ">0.2%",
      "not dead",
      "not op_mini all"
    ],
    "development": [
      "last 1 chrome version",
      "last 1 firefox version",
      "last 1 safari version"
    ]
  }
}
Firebaseの準備
Firebaseのアカウントを作成し、新規プロジェクトを作成します。
Googleを使った認証機能を実装していきます。上記のドキュメント通りにセットアップしていきます。
firebaseConfigの内容は、firebase内のプロジェクトの設定から参照できます。
import { GoogleAuthProvider, getAuth } from "firebase/auth";
import { initializeApp } from "firebase/app";
// Follow this pattern to import other Firebase services
// import { } from 'firebase/<service>';

// TODO: Replace the following with your app's Firebase project configuration
const firebaseConfig = {
  apiKey: "",
  authDomain: "",
  projectId: "",
  storageBucket: "",
  messagingSenderId: "",
  appId: "",
};

const app = initializeApp(firebaseConfig);

const auth = getAuth();

const provider = new GoogleAuthProvider();

export { app, provider, auth };
認証機能に必要なauthオブジェクトもexportしておきましょう。
認証機能の実装
ここまで出来れば、Firebaseの認証機能は、以下のサンプルコードを貼り付けるだけで動きます。先ほど定義したauthオブジェクトとproviderオブジェクトをimportしましょう。
import { signInWithPopup } from "firebase/auth";
import { auth, provider } from ""// auth、providerをexportしたパス

const auth = getAuth();
signInWithPopup(auth, provider)
  .then((result) => {
    // This gives you a Google Access Token. You can use it to access the Google API.
    const credential = GoogleAuthProvider.credentialFromResult(result);
    const token = credential.accessToken;
    // The signed-in user info.
    const user = result.user;
    // IdP data available using getAdditionalUserInfo(result)
    // ...
  }).catch((error) => {
    // Handle Errors here.
    const errorCode = error.code;
    const errorMessage = error.message;
    // The email of the user's account used.
    const email = error.customData.email;
    // The AuthCredential type that was used.
    const credential = GoogleAuthProvider.credentialFromError(error);
    // ...
  });
resultの中にログインしたユーザーの情報が入っています。
Reduxのデータフロー
redux-toolkitを使った認証機能の実装の前にreduxについて軽く触れておきます。
ここでは、ボタンを押すと数字がカウントアップされる簡単なアプリケーションを例に、Reduxのデータのフローを見ていきます。
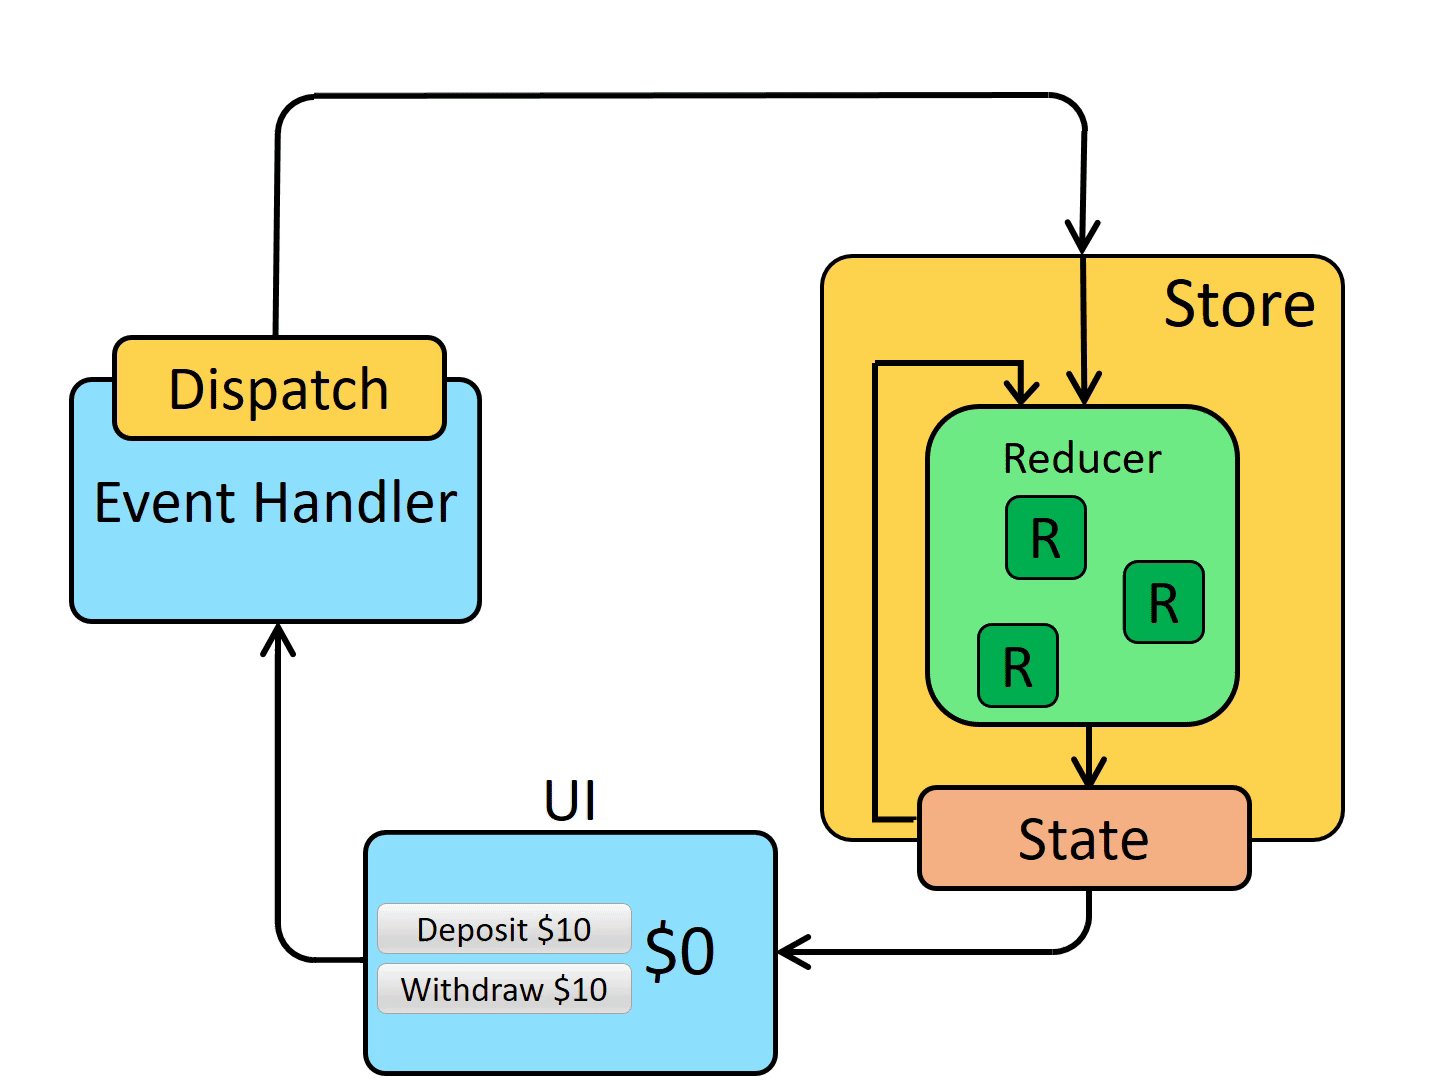
https://redux.js.org/tutorials/fundamentals/part-2-concepts-data-flow
Store
Reduxにおける状態(state)全体を保持するオブジェクト。ここにReducerを登録します。Reducerは複数個登録可能です。
import { configureStore } from '@reduxjs/toolkit';
import counterReducer from './counterSlice';

const store = configureStore({
  reducer: {
    counter: counterReducer,
  },
});

export default store;
Reducer
reducerは現在の状態(state)とDispatchによるアクションを受け取り、新しい状態を返す関数です。
createSliceを使用して作成できます。
import { createSlice } from '@reduxjs/toolkit';

const counterSlice = createSlice({
  name: 'counter',
  initialState: {
    value: 0,
  },
  reducers: {
    increment: (state) => {
      state.value += 1;
    },
    decrement: (state) => {
      state.value -= 1;
    },
  },
});

export const { increment, decrement } = counterSlice.actions;
export default counterSlice.reducer;
Dispatch
dispatch関数は、Reducerに渡すためのアクションを発行します。ここでは、createSlice内で作成したincrementアクションを指定しています。
dispatch(increment())
認証機能を実装してみる
警告
TypeScriptでreact-reduxを使用する際、useDispatch、useSelectorを直接使うのではなく、以下のように定義し直してください。
import { TypedUseSelectorHook, useDispatch, useSelector } from "react-redux";
import type { RootState, AppDispatch } from "../store";

// Use throughout your app instead of plain `useDispatch` and `useSelector`
type DispatchFunc = () => AppDispatch;
export const useAppDispatch: DispatchFunc = useDispatch;
export const useAppSelector: TypedUseSelectorHook<RootState> = useSelector;
Reducerの作成
resultオブジェクト内のuid, displayname, email, photoURLを取り出したいので、それらの型をInitialUserStateとして定義します。
"login"リデューサーでは、アクションがdispatchされると、第二引数のpayloadプロパティにユーザーの情報が渡ってきます。
import { createSlice } from "@reduxjs/toolkit";

interface InitialUserState {
  user: null | {
    uid: string;
    displayName: string;
    email: string;
    photoURL: string;
  };
}

const initialState: InitialUserState = {
  user: null,
};

const user = createSlice({
  name: "user",
  initialState,
  reducers: {
    login(state, { payload }) {
      state.user = payload;
    },
    logout(state, { payload }) {
      state.user = null;
    },
  },
});

const { login, logout } = user.actions;

export { login, logout };
export default user.reducer;
Storeの作成
先ほど定義したreducerを登録します。
import { configureStore, combineReducers } from "@reduxjs/toolkit";
import reducer from "./auth/user";

export const store = configureStore({
  reducer,
});

// Infer the `RootState` and `AppDispatch` types from the store itself
export type RootState = ReturnType<typeof store.getState>;
// Inferred type: {posts: PostsState, comments: CommentsState, users: UsersState}
export type AppDispatch = typeof store.dispatch;
useContextと同様に、ルートコンポーネントをProviderで囲んであげます。Propsには先ほど作成したstoreオブジェクトを指定してください。
import React from "react";
import ReactDOM from "react-dom/client";
import "./index.css";
import App from "./App";
import { Provider } from "react-redux";
import { store } from "./redux/store";

const root = ReactDOM.createRoot(
  document.getElementById("root") as HTMLElement
);
root.render(
  <React.StrictMode>
    <Provider store={store}>
      <App />
    </Provider>
  </React.StrictMode>
);
これで、アプリケーション全体でReduxのstoreにアクセスできる準備が整いました。後は、コンポーネント内で自由にstateを参照したり、dispatch関数によりstateを変更したりできます。
ログインページを実装する
ログイン画面とログイン後のホーム画面の二つのページを実装します。
githubにも載せています
import { useState, useEffect } from "react";
import Home from "./home/Home";
import Login from "./login/Login";
import { useAppSelector } from "./redux/hooks/hooks";

function App() {
  const state = useAppSelector((state) => state);
  const [authorized, setAuthorized] = useState(false);
  useEffect(() => {
    if (state.user) {
      setAuthorized(true);
    } else {
      setAuthorized(false);
    }
  }, [state.user]);
  return (
    <div className="App">
      {authorized ? <Home setAuthorized={setAuthorized} /> : <Login />}
    </div>
  );
}

export default App;
import "./Login.scss"; //sassファイルはgithub上で確認できます。
import { signInWithPopup } from "firebase/auth";
import { provider } from "../Firebase";
import { useAppDispatch } from "../redux/hooks/hooks";
import { login } from "../redux/auth/user";
import { auth } from "../Firebase";

const Login = () => {
  const dispatch = useAppDispatch();
  const popup = () => {
    signInWithPopup(auth, provider)
      .then((result) => {
        // This gives you a Google Access Token. You can use it to access the Google API.
        const userInfo = {
          uid: result.user.uid,
          displayName: result.user.displayName,
          email: result.user.email,
          photoURL: result.user.photoURL,
        };
        dispatch(login(userInfo));
        console.log(auth);
      })
      .catch((error) => {
        // Handle Errors here.
        const errorCode = error.code;
        const errorMessage = error.message;
        // The email of the user's account used.
        const email = error.customData.email;
        console.log(errorCode, errorMessage, email);
      });
  };

  return (
    <div className="loginContainer">
      <div className="login" onClick={popup}>
        <img src="./google.svg" className="icon" alt="" sizes="100px" />
        <div className="buttonName">ログイン</div>
      </div>
    </div>
  );
};

export default Login;
import { useAppSelector } from "../redux/hooks/hooks";
import { RootState } from "../redux/store";
import { signOut } from "firebase/auth";
import { auth } from "../Firebase";

type Props = {
  setAuthorized: React.Dispatch<React.SetStateAction<boolean>>;
};

const Home = ({ setAuthorized }: Props) => {
  const state = useAppSelector((state: RootState) => state);
  let userInfo = state.user;
  const signoutHandler = () => {
    signOut(auth)
      .then(() => {
        setAuthorized((prev) => !prev);
        console.log("signout success");
      })
      .catch((error) => {
        console.log(error);
      });
  };
  return (
    <>
      <div>displayName: {userInfo?.displayName}</div>
      <div>email: {userInfo?.email}</div>
      <div>photoURL: {userInfo?.photoURL}</div>
      <div>uid: {userInfo?.uid}</div>

      <div>
        <button onClick={signoutHandler}>signOut</button>
      </div>
    </>
  );
};

export default Home;
おまけ
これで、redux-toolkit, firebaseを用いた認証機能、ログイン画面の実装まで完了しました。
しかし、このままだとページをリロードしたタイミングで、reduxのstateの状態が初期化されてしまうため、ログイン情報が破棄されてしまいます。
これを回避するには、ブラウザのlocalStrage等を利用する必要があります。
直接localStrageを操作してもいいのですが、redux-persistというライブラリを使うことで、簡単にlocalStrage上にreduxのstateの情報を保持することができます。
このライブラリを使用してページリロード後もstateの情報を保持するプログラムも書いてみたので、参考にしてみてください。
import { configureStore, combineReducers } from "@reduxjs/toolkit";
import reducer from "./auth/user";
import { persistReducer } from "redux-persist";
import storage from "redux-persist/lib/storage";

const reducers = combineReducers({ user: reducer });
const persistConfig = {
  key: "root", // Storageに保存されるキー名を指定する
  storage, // 保存先としてlocalStorageがここで設定される
};

const persistedReducer = persistReducer(persistConfig, reducers);

export const store = configureStore({
  reducer: persistedReducer,
});

// Infer the `RootState` and `AppDispatch` types from the store itself
export type RootState = ReturnType<typeof store.getState>;
// Inferred type: {posts: PostsState, comments: CommentsState, users: UsersState}
export type AppDispatch = typeof store.dispatch;
import React from "react";
import ReactDOM from "react-dom/client";
import "./index.css";
import App from "./App";
import { Provider } from "react-redux";
import { store } from "./redux/store";
import { PersistGate } from "redux-persist/integration/react";
import { persistStore } from "redux-persist";

const root = ReactDOM.createRoot(
  document.getElementById("root") as HTMLElement
);
let persistor = persistStore(store);
root.render(
  <React.StrictMode>
    <Provider store={store}>
      <PersistGate loading={null} persistor={persistor}>
        <App />
      </PersistGate>
    </Provider>
  </React.StrictMode>
);