この記事について、公式ドキュメントのZAPping the OWASP Top 10を参考にしています。このページを見てわからないことがあれば、公式ドキュメントを参照してください。
公式サイト:https://www.zaproxy.org/
ドキュメント:https://www.zaproxy.org/docs/
OWASP Zed Attack Proxy (ZAP)とは
オープンソースのWebアプリケーション脆弱性診断ツールです。無料で使えて、世界で最も広く使われていると言われています。開発中に開発者が、テストとして診断する時に使えます。
なお、この記事ではOWASP ZAP2.9.0を使っています。
APIを診断する
ZAPを使って、脆弱性診断をする時に重要なことの一つに、対象のURLをもれなく抽出するということがあります。ZAPで対象URLを抽出する方法は大きく2点あります。spiderやajax spiderを使ってサイトをクロールする方法、Manual Exploreを使ってブラウザで探索する方法です。APIの場合、この2つの方法で対象を探しきることは難しいです。
そこで、ZAPでは下記2つの定義からAPIを読み込むオプションがあります。
- SOAP
- OpenAPI / Swagger
本記事では、OpenAPIで定義されたAPIを説明します。
Desktop版
OpenAPIで記述されたJSONを読み込むことで、そこに記述されたAPIをサイトツリーに取り込むことができます。
なお、Desktop版の使い方については、OWASP ZAP2.9.0で脆弱性診断をする - Getting Startedで記載しましたので参考にしてください。
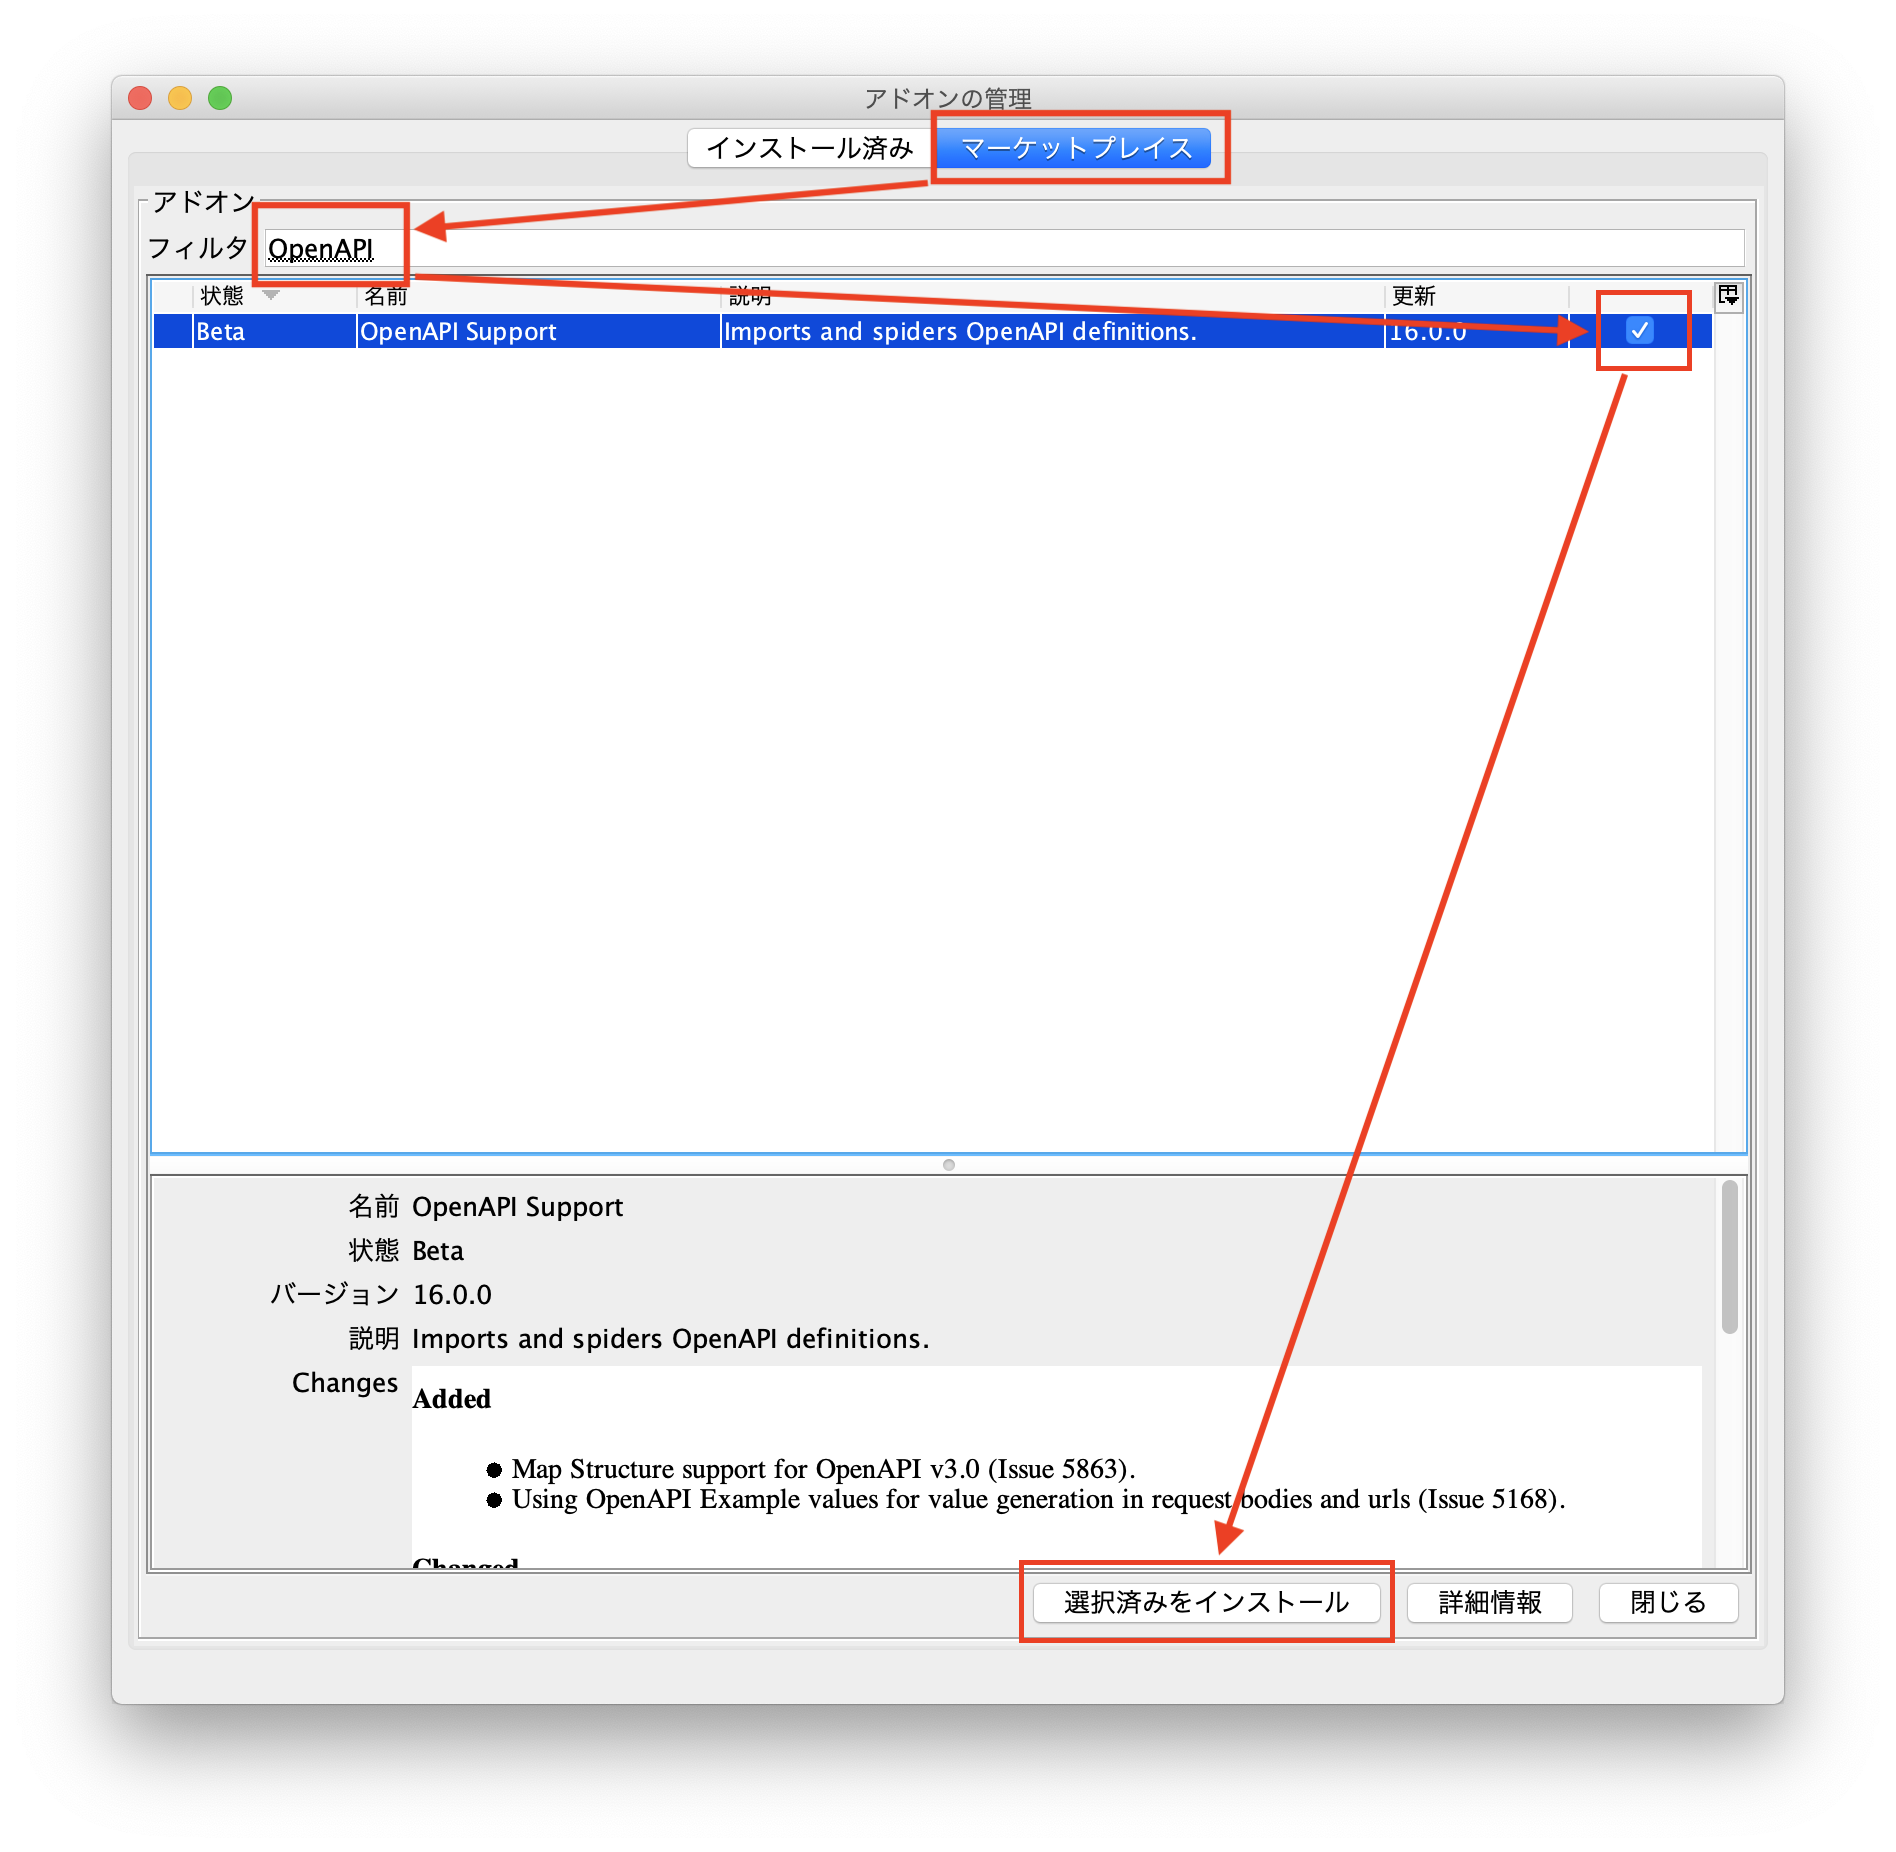
add-onのインストール
「OpenAPI Support」というadd-onを追加します。
- ヘッダのアイコンをクリックして、アドオン管理ダイアログを開きます
- マーケットプレイスをクリックし、目的のアドオンを検索します
- チェックして、選択済みインストールをクリックするとインストールされます

マーケットプレイスを選択し、フィルタに「OpenAPI」と入力すると絞り込めます。チェックを入れて、選択済みをインストールされます。
OpenAPIの定義を読み込む
- Importメニューから「Import an OpenAPI definition from the local file system」を選択します
- 表示されたダイアログで、ローカルファイルを選択します
- サイトツリーにAPIが表示されます


サイトツリーに読み込まれます。Errorになった場合は、フッタメニューのアウトプットタブを見ると、エラー内容が出力されます。
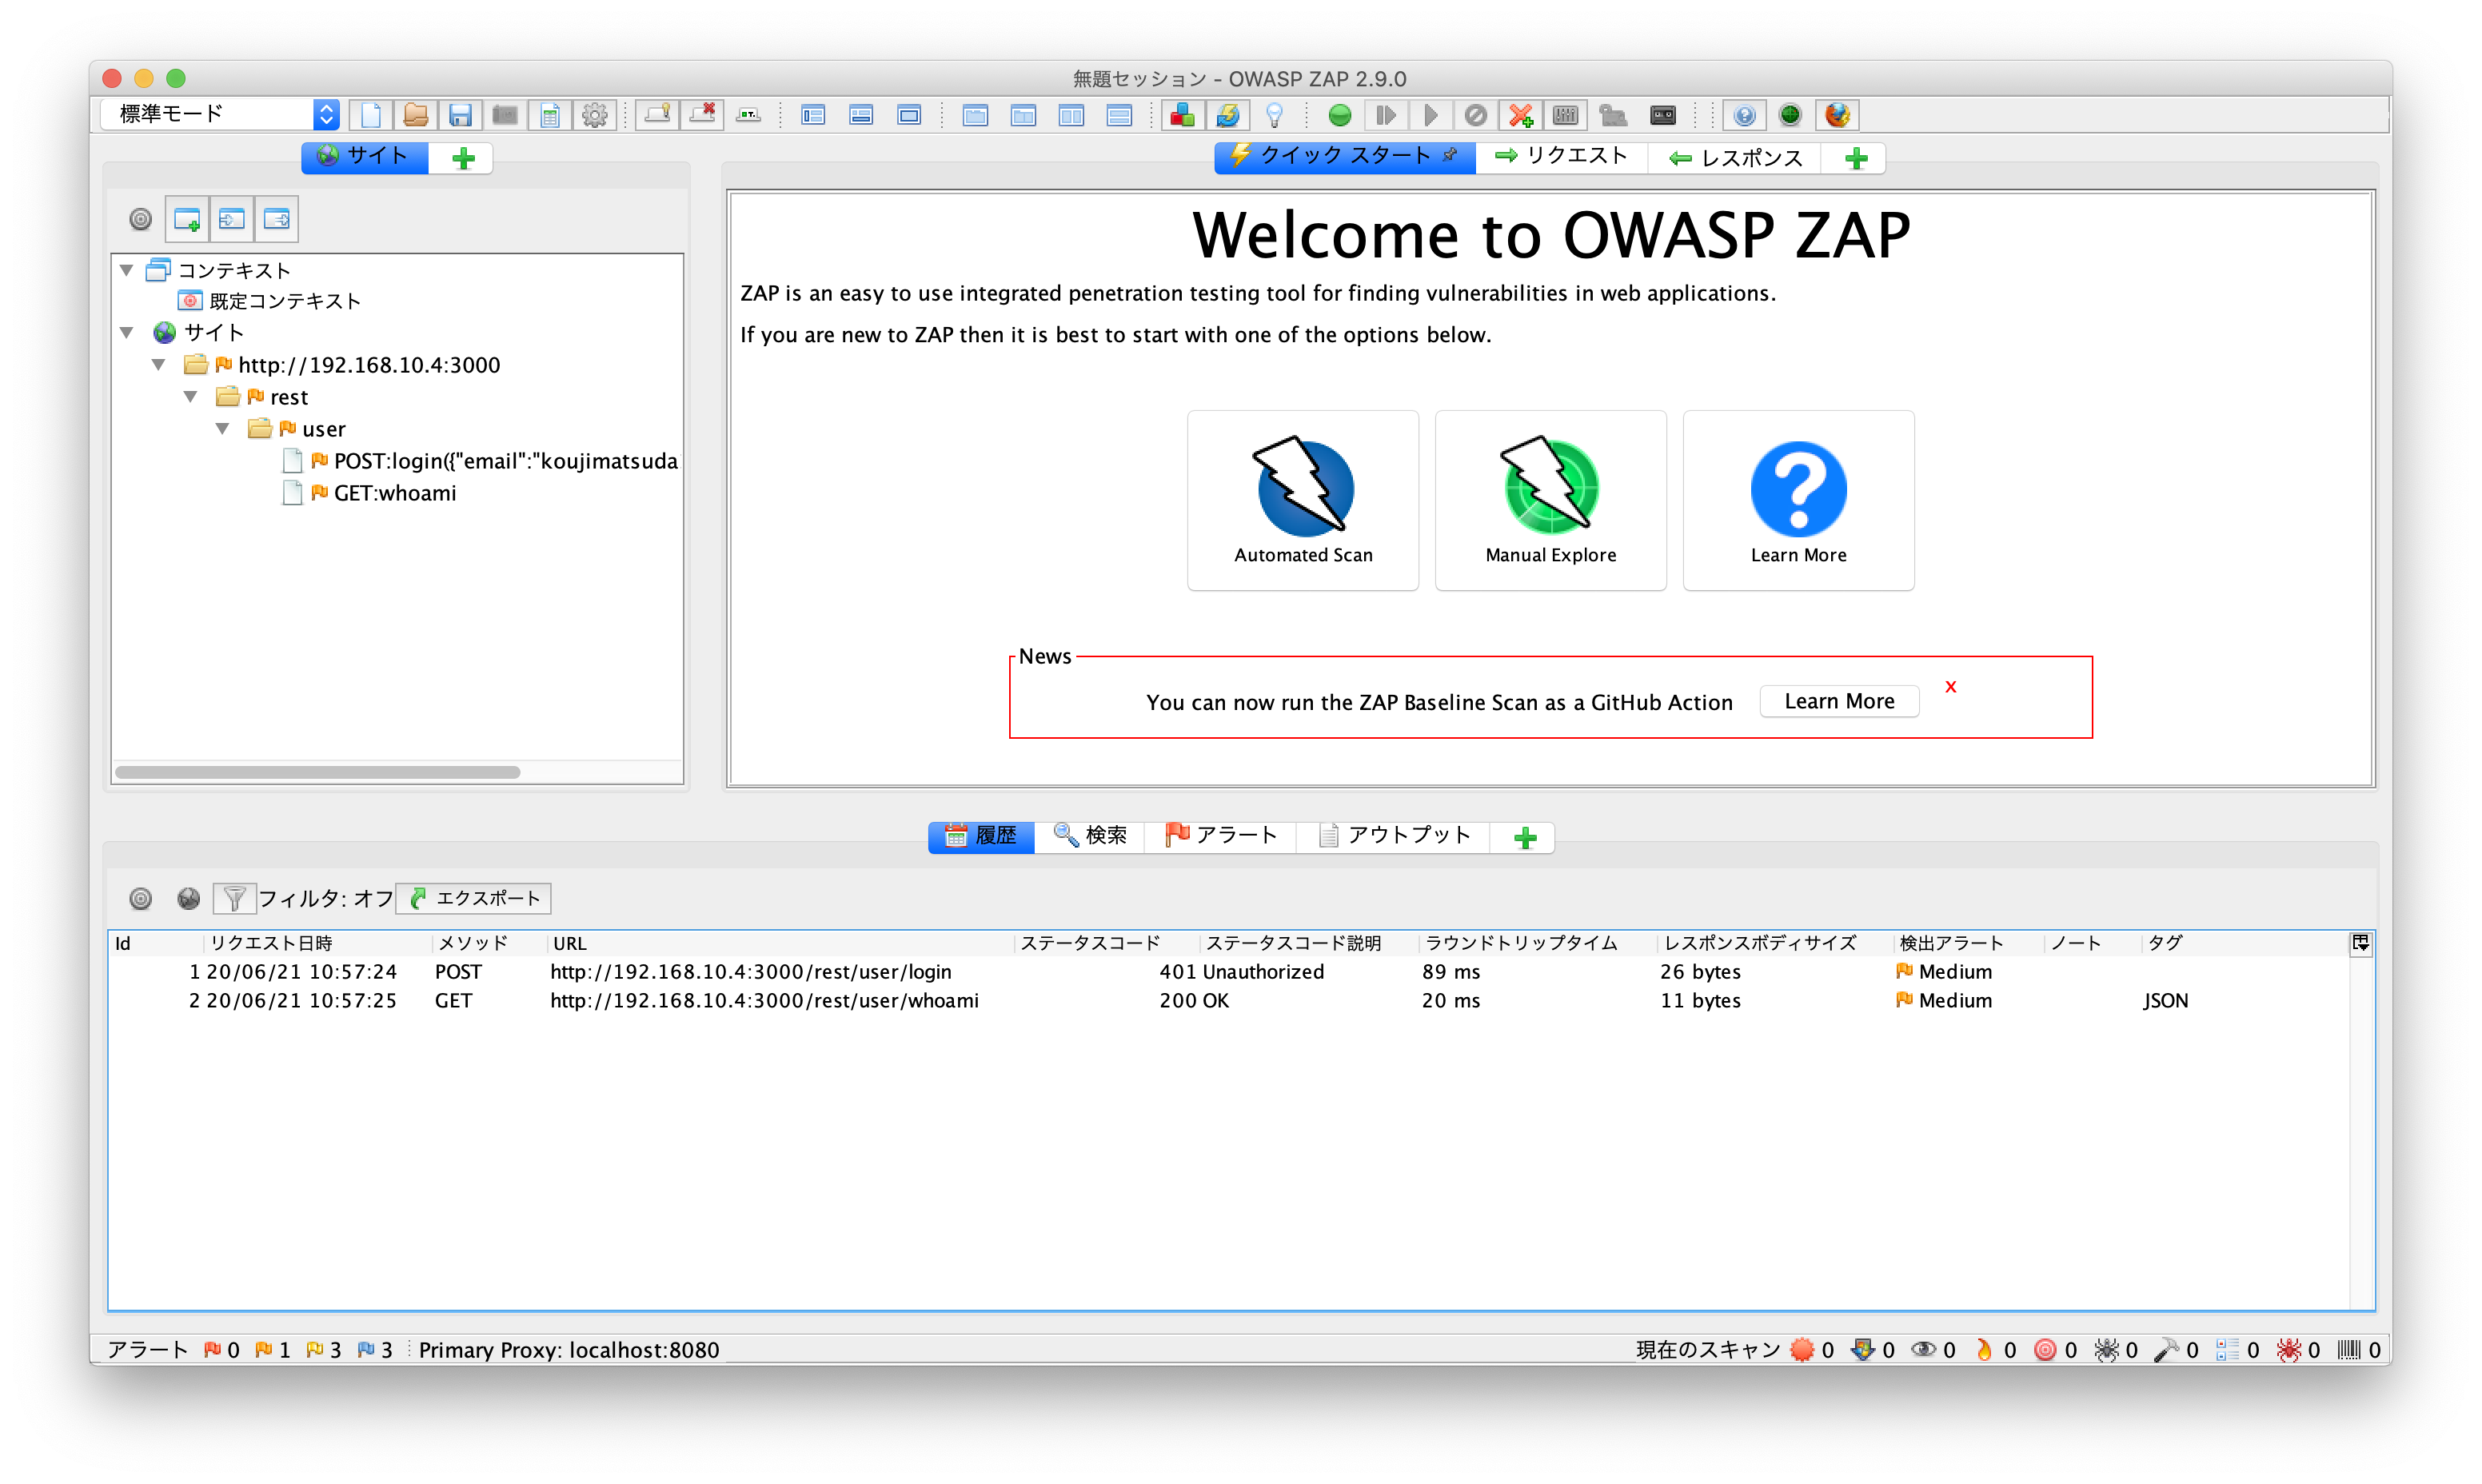
読み込まれたURLに対して、スパイダー(spider)や動的スキャン(Active Scan)を実施することで診断を行うことができます。
スキャンの仕方は、OWASP ZAP2.9.0で脆弱性診断をする - Getting Startedで記載しましたので参考にしてください。
Docker版
Docker版には、zap-api-scan.pyというAPIスキャンスクリプトが用意されています。これにより、コマンドラインからAPIのセキュリティスキャンを実行できます。
なお、Docker版ZAPの簡単な使い方は、Docker版OWASP ZAPを動かしてみるで記載しましたので、参考にしてください。
API Scan
API Scanは、-tオプションで指定されたAPI定義を読み込み、読み込まれたURLに対してActive Scanを実行します。API定義の形式は、-fオプションでopenapiかsoapを指定します。
docker pull owasp/zap2docker-weekly
docker run -t owasp/zap2docker-weekly zap-api-scan.py -t \
    https://www.example.com/openapi.json -f openapi
Usage: zap-api-scan.py -t <target> -f <format> [options]
    -t target         target API definition, currently only an OpenAPI URL, eg https://www.example.com/openapi.json
    -f format         either openapi or soap
Options:
    -h                print this help message
    -c config_file    config file to use to INFO, IGNORE or FAIL warnings
    -u config_url     URL of config file to use to INFO, IGNORE or FAIL warnings
    -g gen_file       generate default config file (all rules set to WARN)
    -r report_html    file to write the full ZAP HTML report
    -w report_md      file to write the full ZAP Wiki (Markdown) report
    -x report_xml     file to write the full ZAP XML report
    -J report_json    file to write the full ZAP JSON document
    -a                include the alpha passive scan rules as well
    -d                show debug messages
    -P                specify listen port
    -D                delay in seconds to wait for passive scanning
    -i                default rules not in the config file to INFO
    -l level          minimum level to show: PASS, IGNORE, INFO, WARN or FAIL, use with -s to hide example URLs
    -n context_file   context file which will be loaded prior to scanning the target
    -p progress_file  progress file which specifies issues that are being addressed
    -s                short output format - dont show PASSes or example URLs
    -S                safe mode this will skip the active scan and perform a baseline scan
    -T                max time in minutes to wait for ZAP to start and the passive scan to run
    -O                the hostname to override in the (remote) OpenAPI spec
    -z zap_options    ZAP command line options e.g. -z "-config aaa=bbb -config ccc=ddd"
    --hook            path to python file that define your custom hooks
使い方は、オプションの使い方は、Baesline Scanとほとんど同じなので、Docker版OWASP ZAPを動かしてみるを参考にしてください。
ローカルファイルを指定する
ローカルからファイルを渡す場合やdockerからファイルをもらう場合、下記のように実行すると、実行したディレクトリでファイルを連携できます。
docker run -v $(pwd):/zap/wrk/:rw -t owasp/zap2docker-weekly zap-api-scan.py  \
    -t openapi.json -f openapi
パラメータの値を指定する
スキャンする時のデフォルト値を、オプションで指定できます。OpenAPIで定義されたAPIの場合、zap_optionsで指定します。
  -config formhandler.fields.field\\(0\\).fieldId=username \
  -config formhandler.fields.field\\(0\\).value=test@example.com \
  -config formhandler.fields.field\\(0\\).enabled=true \
  -config formhandler.fields.field\\(1\\).fieldId=phone \
  -config formhandler.fields.field\\(1\\).value=012345678 \
  -config formhandler.fields.field\\(1\\).enabled=true
上記の例だと、
username = test@example.com
phone = 012345678
というパラメータ名と値になります。
実際には、こんな感じです。
docker run -v $(pwd):/zap/wrk/:rw -t owasp/zap2docker-weekly zap-api-scan.py \
     -t openapi.json -f openapi \
     -z "-addoninstall sqliplugin -newsession /zap/wrk/20200620_5 \
     -config formhandler.fields.field\\(0\\).fieldId=email \
     -config formhandler.fields.field\\(0\\).value=koujimatsuda11@gmail.com \
     -config formhandler.fields.field\\(0\\).enabled=true \
     -config formhandler.fields.field\\(1\\).fieldId=password \
     -config formhandler.fields.field\\(1\\).value=password \
     -config formhandler.fields.field\\(1\\).enabled=true"
-addoninstall sqlipluginは、Advanced SQLInjection Scannerというアドオンを追加しています。
-newsession /zap/wrk/20200620_5は、セッションファイルを指定しています。セッションファイルはZAPのデータファイルで、診断結果や履歴などの情報が格納され、Desktop版ZAPで開くことで見ることができます。このコマンドでは、実行したディレクトリに、20200620_5.sessionというセッションファイルができます。newsessionなので、すでにファイルがあれば、エラーになるため、自動でコマンドを実行するようにする場合は、予め作成したセッションファイルを、-sessionオプションで指定します。
認証を追加する
APIには、認証を使用してAPIが保護されている場合があります。
ヘッダーを使用する場合では、別途適切な手段を使用してアプリケーションに適したトークンを取得した上で、APIスキャンではコマンドラインオプションでそれらを使うことができます。
APIスキャンでは、ヘッダに認証情報をくわえるするAPIの場合、
  -config replacer.full_list\\(0\\).description=auth1 \
  -config replacer.full_list\\(0\\).enabled=true \
  -config replacer.full_list\\(0\\).matchtype=REQ_HEADER \
  -config replacer.full_list\\(0\\).matchstr=Authorization \
  -config replacer.full_list\\(0\\).regex=false \
  -config replacer.full_list\\(0\\).replacement=123456789 \
  -config replacer.full_list\\(1\\).description=auth2 \
  -config replacer.full_list\\(1\\).enabled=true \
  -config replacer.full_list\\(1\\).matchtype=REQ_HEADER \
  -config replacer.full_list\\(1\\).matchstr=AnotherHeader \
  -config replacer.full_list\\(1\\).regex=false \
  -config replacer.full_list\\(1\\).replacement=abcdefghi
上記の例ですと、
Authorization: 123456789
AnotherHeader: abcdefghi
というヘッダが全てのAPIに付与されます。
この機能は、Replacerというアドオンを使っております。リクエストヘッダに追加するだけではなく、置換したり削除したり、リクエストボディやレスポンスヘッダやレスポンスボディも置換することができます。例によって、ドキュメントがそんなに詳しくないので、まだ手探りですが、使えそうです。
実際には、こんな感じです。
docker run -v $(pwd):/zap/wrk/:rw -t owasp/zap2docker-weekly zap-api-scan.py \
     -t openapi.json -f openapi \
     -z "-addoninstall sqliplugin -newsession /zap/wrk/20200620_5 \
     -config formhandler.fields.field\\(0\\).fieldId=email \
     -config formhandler.fields.field\\(0\\).value=koujimatsuda11@gmail.com \
     -config formhandler.fields.field\\(0\\).enabled=true \
     -config formhandler.fields.field\\(1\\).fieldId=password \
     -config formhandler.fields.field\\(1\\).value=password \
     -config formhandler.fields.field\\(1\\).enabled=true \
     -config replacer.full_list\\(0\\).description=auth1 \
     -config replacer.full_list\\(0\\).enabled=true \
     -config replacer.full_list\\(0\\).matchtype=REQ_HEADER \
     -config replacer.full_list\\(0\\).matchstr=Authorization \
     -config replacer.full_list\\(0\\).regex=false \
     -config replacer.full_list\\(0\\).replacement='Bearer eyJh....Yc'"
Bearer tokenを指定する場合は、半角スペースが入るのでシングルクォートで囲ってみると動きました。
結果の見方
実際にスキャンすると下記のような結果になります。
2020-06-21 11:41:38,452 Number of Imported URLs: 5
Total of 16 URLs
PASS: Directory Browsing [0]
(中略)
PASS: Loosely Scoped Cookie [90033]
WARN-NEW: A Server Error response code was returned by the server [100000] x 11
http://192.168.10.4:3000/rest/5192850544705766826 (500 Internal Server Error)
http://192.168.10.4:3000/rest/user/2935822711054471034 (500 Internal Server Error)
http://192.168.10.4:3000/rest (500 Internal Server Error)
http://192.168.10.4:3000/rest/user (500 Internal Server Error)
http://192.168.10.4:3000/rest/user/login (500 Internal Server Error)
WARN-NEW: Unexpected Content-Type was returned [100001] x 19
http://192.168.10.4:3000/rest/user/login (401 Unauthorized)
http://192.168.10.4:3000/644738476978233966 (200 OK)
http://192.168.10.4:3000/7137581008155817315 (200 OK)
http://192.168.10.4:3000/rest/5192850544705766826 (500 Internal Server Error)
http://192.168.10.4:3000/rest/user/2935822711054471034 (500 Internal Server Error)
WARN-NEW: Server Leaks Information via "X-Powered-By" HTTP Response Header Field(s) [10037] x 2
http://192.168.10.4:3000/rest/user/login (401 Unauthorized)
http://192.168.10.4:3000/rest/user/whoami (200 OK)
WARN-NEW: Content Security Policy (CSP) Header Not Set [10038] x 1
http://192.168.10.4:3000/rest/user/login (401 Unauthorized)
WARN-NEW: Feature Policy Header Not Set [10063] x 1
http://192.168.10.4:3000/rest/user/login (401 Unauthorized)
WARN-NEW: Cross-Domain Misconfiguration [10098] x 2
http://192.168.10.4:3000/rest/user/login (401 Unauthorized)
http://192.168.10.4:3000/rest/user/whoami (200 OK)
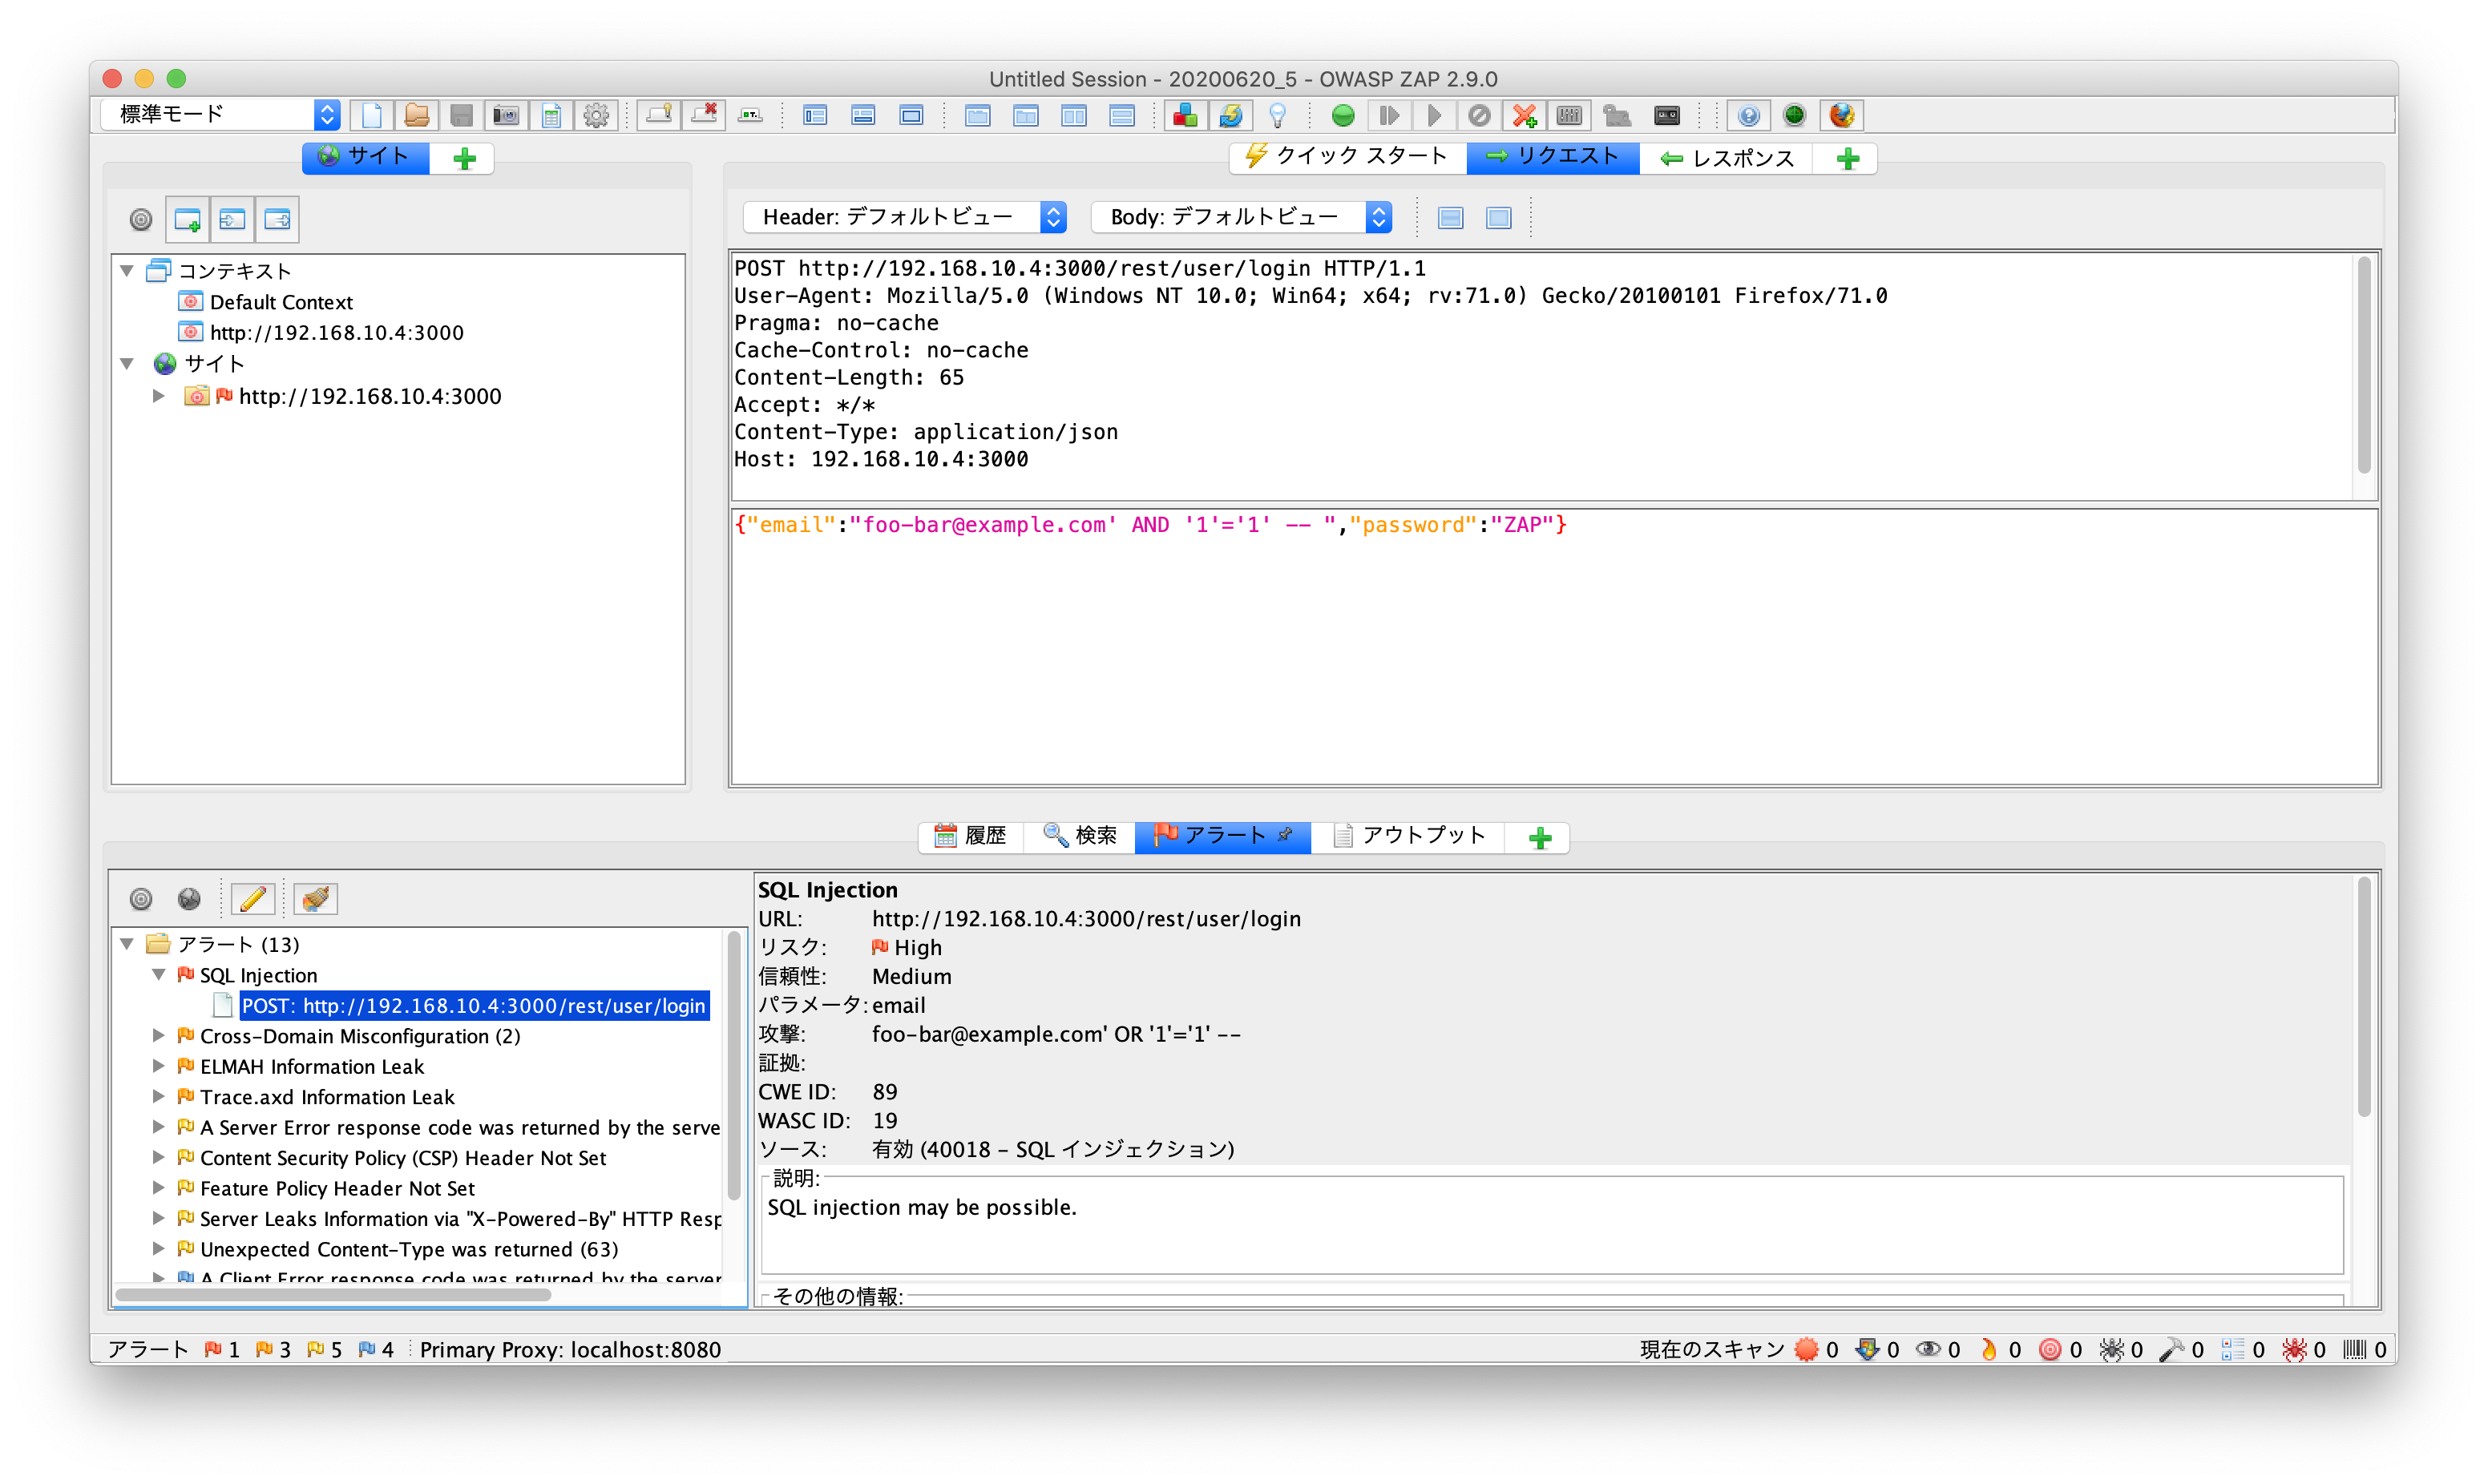
WARN-NEW: SQL Injection [40018] x 1
http://192.168.10.4:3000/rest/user/login (401 Unauthorized)
WARN-NEW: ELMAH Information Leak [40028] x 1
http://192.168.10.4:3000/elmah.axd (200 OK)
WARN-NEW: Trace.axd Information Leak [40029] x 1
http://192.168.10.4:3000/trace.axd (200 OK)
FAIL-NEW: 0 FAIL-INPROG: 0 WARN-NEW: 9 WARN-INPROG: 0 INFO: 0 IGNORE: 0 PASS: 109
パッと見、どこでどんな警告が出ているかわかりづらいです。しかも、しれっと、SQL Injection出てますし、見逃したら大変です。
Docker版OWASP ZAPを動かしてみるのconfig_fileを設定するという章でレベルの設定の変更の仕方を書きました。
ただ、それよりはセッションファイルを指定しておき、そのセッションファイルをDesktop版で読み込んだ方が、見やすいと思います。アラートが出たときのリクエストの内容やレスポンスの内容も確認できますし、そのままで再リクエストもできます。うまく併用するのがいいと思います。
まとめ
OpenAPIは、超便利ですね。定義さえしっかり書いておけば、自動でコードも作成してくれますし、ZAPを使えば自動で診断環境を構築できます。Dockerであれば、Javaを追加でインストールするとか面倒な手間もいらないです。自動で診断を繰り返し行うことで、早く脆弱性に気づくことができるので、対処も早くできるようになります。ぜひ、開発段階からZAPで診断してみてください。
参考
https://www.zaproxy.org/docs/desktop/
https://www.zaproxy.org/docs/docker/
https://www.zaproxy.org/docs/docker/api-scan/
https://www.zaproxy.org/docs/desktop/addons/replacer/