Docker版OWASP ZAPを動かしてみる
Docker版OWASP ZAPは、特にCI / CD環境でZAPを実行する簡単な方法です。Linux上でもコマンドラインからZAPのスキャンを実行できます。
公式マニュアル
https://www.zaproxy.org/docs/docker/
インストール
安定版:
docker pull owasp/zap2docker-stable
最新のweekly(週次)リリース:
docker pull owasp/zap2docker-weekly
最新のリリース:
docker pull owasp/zap2docker-live
ベアリリース(非常に小さなDockerイメージ、ZAPの実行に必要な依存関係のみが含まれ、CI環境に最適)
docker pull owasp/zap2docker-bare
ZAP Baseline Scan
ZAPベースラインスキャンは、-tオプションで指定したターゲットにspiderを(デフォルトで)1分間実行し、passive scanを行います。
docker run -t owasp/zap2docker-weekly zap-baseline.py -t https://www.example.com
Usage: zap-baseline.py -t <target> [options]
    -t target         target URL including the protocol, eg https://www.example.com
Options:
    -h                print this help message
    -c config_file    config file to use to INFO, IGNORE or FAIL warnings
    -u config_url     URL of config file to use to INFO, IGNORE or FAIL warnings
    -g gen_file       generate default config file (all rules set to WARN)
    -m mins           the number of minutes to spider for (default 1)
    -r report_html    file to write the full ZAP HTML report
    -w report_md      file to write the full ZAP Wiki (Markdown) report
    -x report_xml     file to write the full ZAP XML report
    -J report_json    file to write the full ZAP JSON document
    -a                include the alpha passive scan rules as well
    -d                show debug messages
    -P                specify listen port
    -D                delay in seconds to wait for passive scanning
    -i                default rules not in the config file to INFO
    -I                do not return failure on warning
    -j                use the Ajax spider in addition to the traditional one
    -l level          minimum level to show: PASS, IGNORE, INFO, WARN or FAIL, use with -s to hide example URLs
    -n context_file   context file which will be loaded prior to spidering the target
    -p progress_file  progress file which specifies issues that are being addressed
    -s                short output format - dont show PASSes or example URLs
    -T                max time in minutes to wait for ZAP to start and the passive scan to run
    -z zap_options    ZAP command line options e.g. -z "-config aaa=bbb -config ccc=ddd"
    --hook            path to python file that define your custom hooks
DeskTop版ZAPの[攻撃]->[スパイダー]と実行するのと同じようなスキャンを実行します。
結果
Total of 80 URLs
PASS: Vulnerable JS Library [10003]
PASS: Cookie No HttpOnly Flag [10010]
PASS: Cookie Without Secure Flag [10011]
(省略)
PASS: Charset Mismatch [90011]
PASS: Application Error Disclosure [90022]
PASS: Loosely Scoped Cookie [90033]
WARN-NEW: CSP Scanner: Notices [10055] x 813
	https://192.168.10.4/ja/mypage (302 Found)
	https://192.168.10.4/ja/login (200 OK)
	https://192.168.10.4/robots.txt (404 Not Found)
	https://192.168.10.4/sitemap.xml (404 Not Found)
	https://192.168.10.4/ja (200 OK)
WARN-NEW: Cross-Domain JavaScript Source File Inclusion [10017] x 44
	https://192.168.10.4/ja/login (200 OK)
	https://192.168.10.4/ja (200 OK)
	https://192.168.10.4/ (200 OK)
	https://192.168.10.4/ja/ (200 OK)
	https://192.168.10.4/en/ (200 OK)
WARN-NEW: X-ChromeLogger-Data (XCOLD) Header Information Leak [10052] x 180
	https://192.168.10.4/ja/login (200 OK)
	https://192.168.10.4/login (200 OK)
	https://192.168.10.4/member/entry (200 OK)
	https://192.168.10.4/inquiry (200 OK)
	https://192.168.10.4/en/login (200 OK)
WARN-NEW: Cookie Without SameSite Attribute [10054] x 3
	https://192.168.10.4/ja/mypage (302 Found)
	https://192.168.10.4/robots.txt (404 Not Found)
	https://192.168.10.4/ (200 OK)
WARN-NEW: PII Disclosure [10062] x 13
	https://192.168.10.4/ja/privacy (200 OK)
	https://192.168.10.4/robots.txt (404 Not Found)
	https://192.168.10.4/debug/openhandler.js (404 Not Found)
	https://192.168.10.4/debug/vendor/highlightjs/styles (404 Not Found)
	https://192.168.10.4/idreminder (200 OK)
WARN-NEW: Private IP Disclosure [2] x 84
	https://192.168.10.4/ja/login (200 OK)
	https://192.168.10.4/robots.txt (404 Not Found)
	https://192.168.10.4/sitemap.xml (404 Not Found)
	https://192.168.10.4/ja (200 OK)
	https://192.168.10.4/ (200 OK)
FAIL-NEW: 0	FAIL-INPROG: 0	WARN-NEW: 6	WARN-INPROG: 0	INFO: 0	IGNORE: 0	PASS: 45
結果はテキスト形式で、アウトプットされます。
PASSは通過、つまり問題なかったことを表します。WARNが警告、つまり問題があったことを表します。WARNの下部には、警告になった対象のURLが表示されます。表示されるのは、URLだけなので、より詳しい情報が欲しい場合は、後述する-rオプションを使って、HTMLとして結果を出力すると確認できます。
なお、デフォルトでは全てのルールが、WARNです。サイトによって、このルールは無視するやINFOレベルとするなどの調整がある場合は、後述するConfig Fileで設定できます。
オプション
ターゲットについて
-tオプションでターゲットを指定しますが、その際にlocalhostや127.0.0.1は指定できません。ローカルで動かしているサイトにスキャンしたい場合は、IPアドレスを指定します。下記コマンドで取得できます。
$(ip -f inet -o addr show docker0 | awk '{print $4}' | cut -d '/' -f 1)
macOS Catalinaの場合、ipコマンドがなかったので、ifconfigのeth0のIPアドレスを使いました。
docker run -t owasp/zap2docker-weekly zap-baseline.py -t https://192.168.10.4/
ファイルを指定するオプションについて
ホストからファイルを渡す場合やdockerからファイルをもらう場合、下記のように実行すると、実行したディレクトリでファイルを連携できます。
docker run -v $(pwd):/zap/wrk/:rw -t owasp/zap2docker-weekly zap-baseline.py \
    -t https://www.example.com -c config.conf -r testreport.html
上記のコマンドだと、-cオプションで、config.confというconfigファイルをローカルからdockerへ連携し、-rオプションで、testreport.htmlという結果HTMLをdockerからローカルに連携します。
zap_optionsを指定する
-zオプションを使用すると、ZAPのCommand Lineで使用するオプションが指定できます。できることの幅が広がりますので、活用してください。
オプションの中身は、公式マニュアルのCommand Lineにあります。
docker run -v $(pwd):/zap/wrk/:rw -t owasp/zap2docker-weekly zap-baseline.py \
    -t https://www.example.com -c config.conf -r testreport.html \
    -z "-newsession /zap/wrk/newsession"
上記のように記載すると、新しいセッションとしてスキャンを実行します。スキャン後、newsession.sessionと言うファイルができます。そのファイルをDeskTop版ZAPに引き継いで使うこともできます。
addonをインストールする
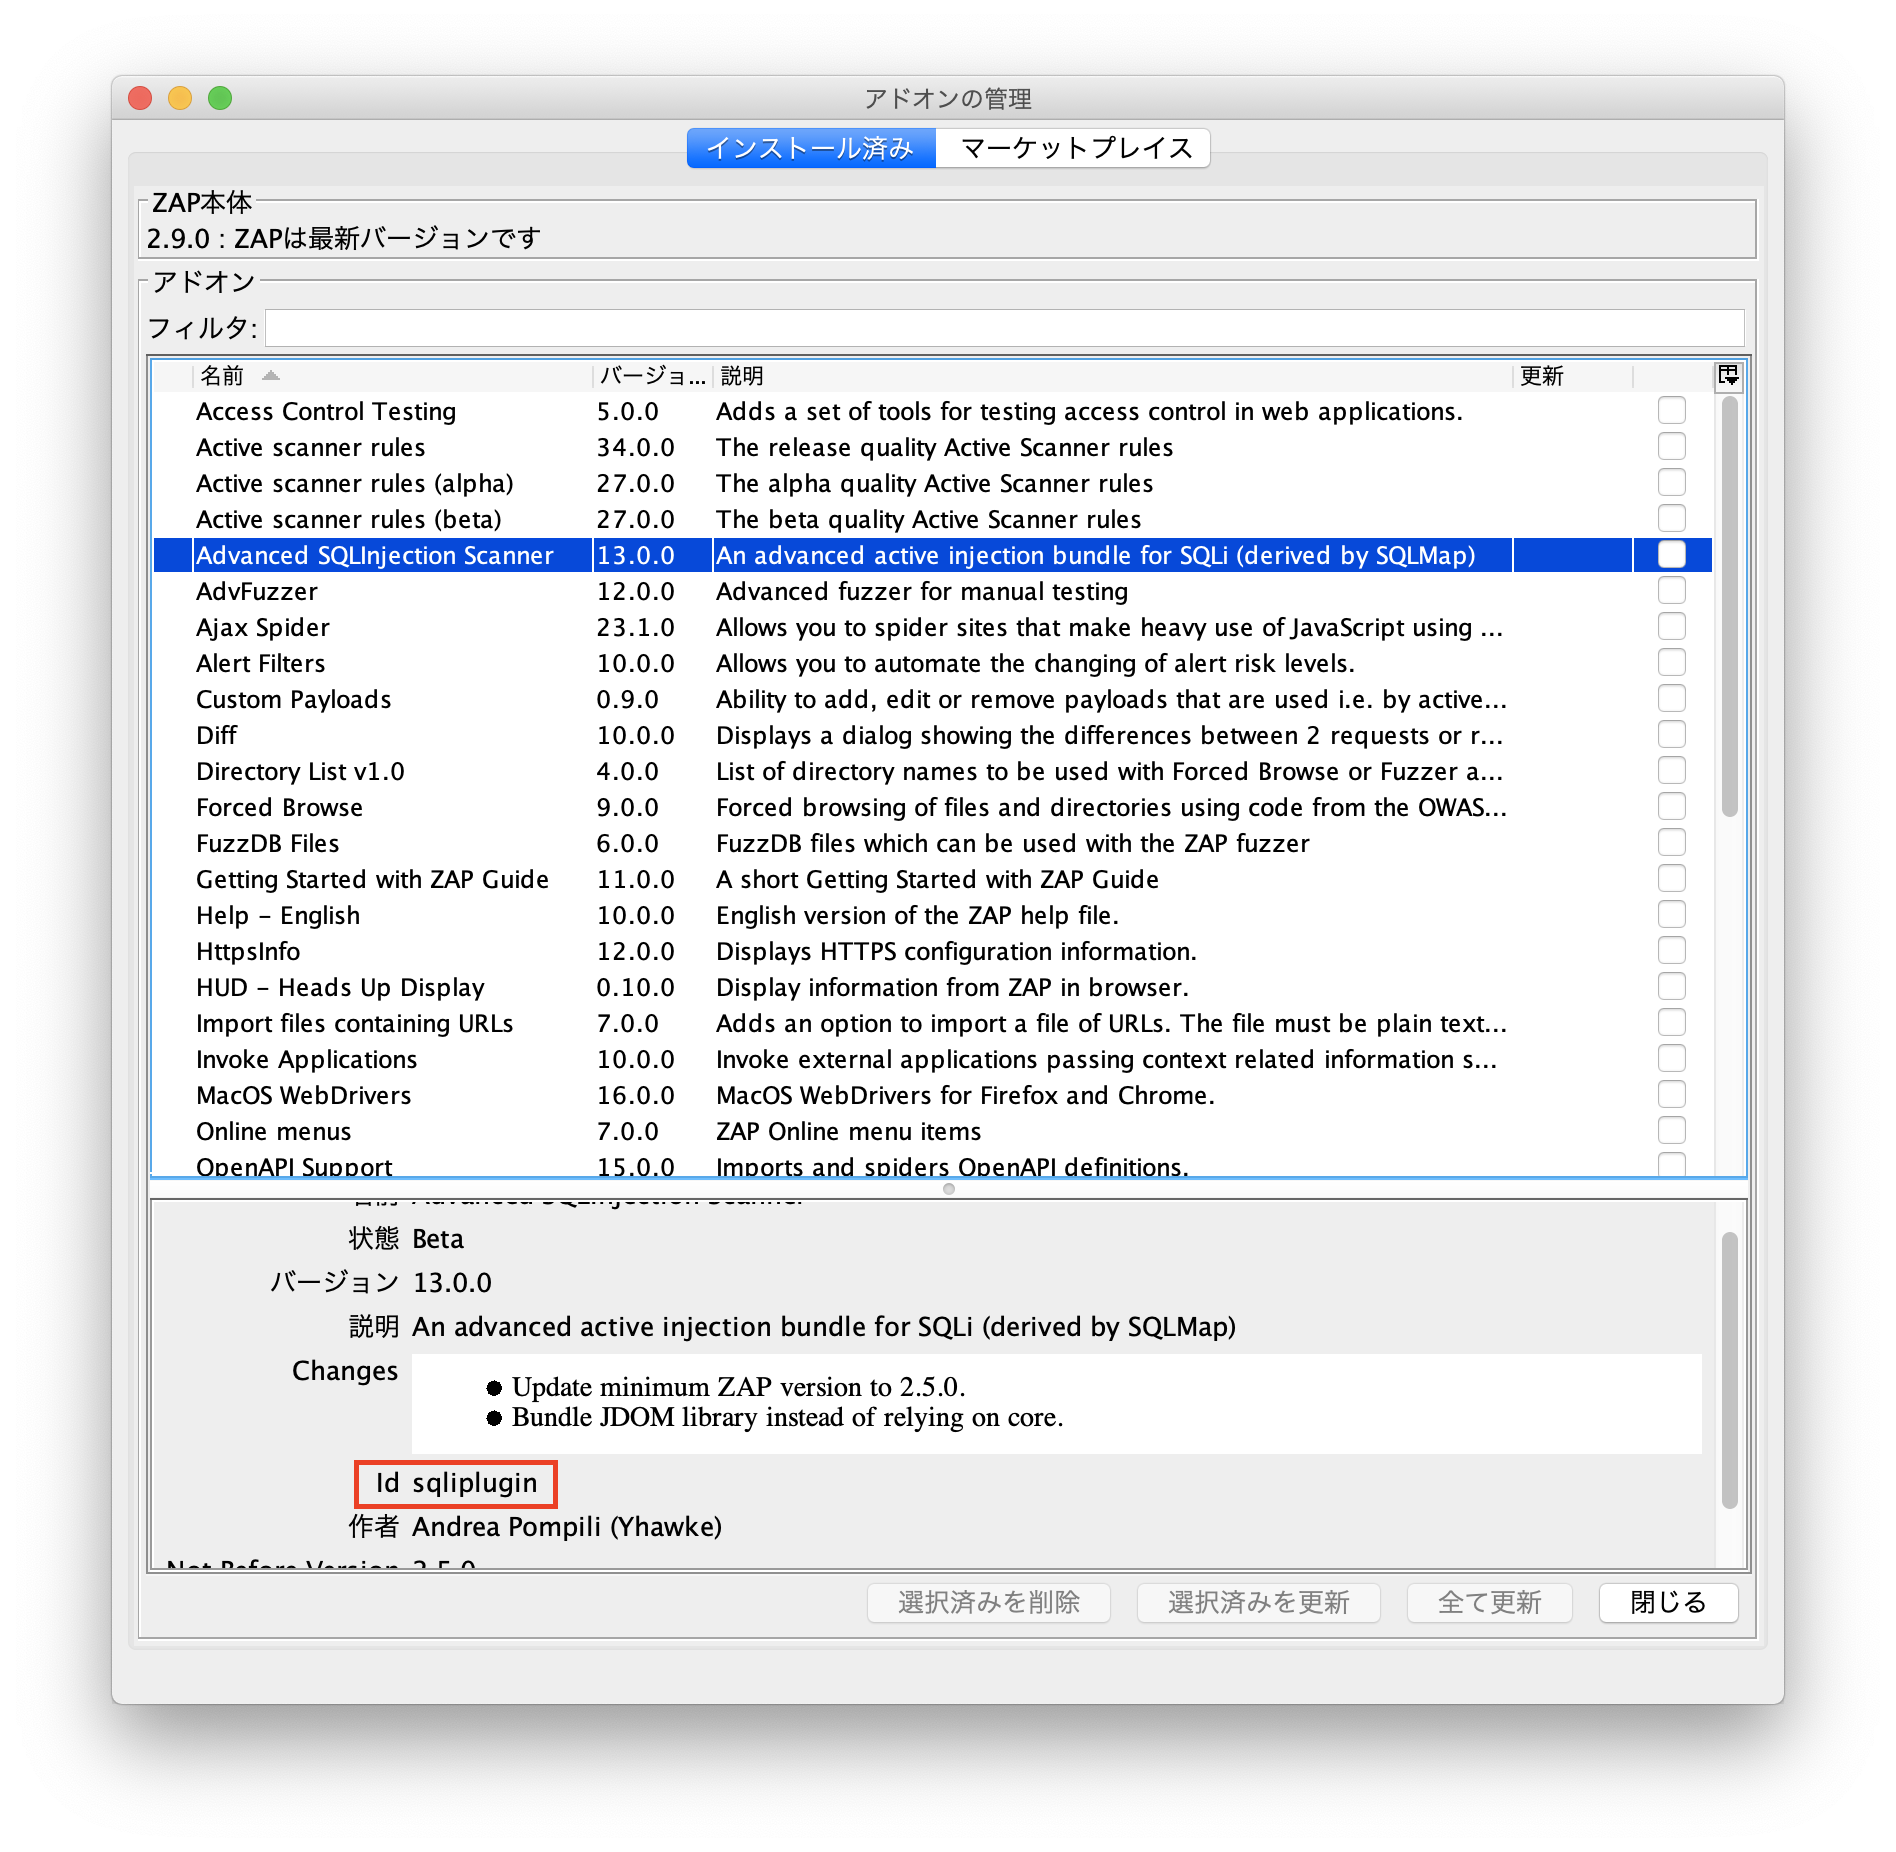
zap_optionsの-addoninstall オプションを使うとアドオンを追加できます。addOnIdは、DeskTop版ZAPのManage Add-ons画面で確認できます。

上記のAdvanced SQLInjection Scannerの場合は、下記のようにします。
docker run -v $(pwd):/zap/wrk/:rw -t owasp/zap2docker-weekly zap-baseline.py \
    -t https://www.example.com -c config.conf -r testreport.html \
    -z "-addoninstall sqliplugin"
configを設定する
zap_optionsの-config オプションを使うと、DeskTop版ZAPのオプションが一通り設定できます。key = valueの形式で指定します。
keyを探すためには、configファイルを見るのが一番いいです。詳しくは、マニュアルのFAQにあるHow do you find out what key to use to set a config value on the command line?に記載があります。
Mac版DeskTopの場合は、/Users/[user]/Library/Application\ Support/ZAP/config.xmlにあります。
例えば、xmlの中で下記のような定義であれば、
<scanner><strength>MEDIUM</strength></scanner>
オプションの指定は、下記のようになります。
scanner.strength=MEDIUM
です。
アンチCSRFトークンパラメータを設定する
DeskTop版ZAPでオプションで設定することができるアンチCSRFトークンパラメータですが、-config オプションを使うことで追加できます。
config.xmlを見ると下記のように、複数設定されています。
    <anticsrf>
        <tokens>
            <token>
                <name>anticsrf</name>
                <enabled>true</enabled>
            </token>
            <token>
                <name>CSRFToken</name>
                <enabled>true</enabled>
            </token>
この場合は、配列形式の場合で指定する必要があります。
-config anticsrf.tokens.token\(0\).name=csrf -config anticsrf.tokens.token\(0\).enabled=true
0でいいのかという疑問がありますが、診断対象サイトで使うアンチcsrfトークンは、1種類か2種類だと思いますので、0に設定して上書きしちゃえばいいと思います。
Progress Fileを設定する
-p progress_fileオプションを使うとProgress Fileを設定できます。
docker run -v $(pwd):/zap/wrk/:rw -t owasp/zap2docker-weekly zap-baseline.py \
    -t https://www.example.com -p progress.json -r testreport.html
Progress Fileには、対応中の脆弱性を記載することで、新規に発見されたものか、すでに対応中のものかを結果から判断することができます。
{
	"site" : "www.example.com",
	"issues" : [
		{
			"id" : "10016",
			"name" : "Web Browser XSS Protection Not Enabled",
			"state" : "inprogress",
			"link": "https://www.example.com/bugtracker/issue=1234"
		},
		{
			"id" : "10020",
			"name" : "X-Frame-Options Header Not Set",
			"state" : "inprogress",
			"link": "https://www.example.com/bugtracker/issue=1235"
		}
	]
}
siteには、診断対象のドメインを記載します。
idには、ruleのidを指定します。
stateは、inprogress固定でいいようです。それ以外を指定すると無視されます。
linkは、issueトラッカーのURLを指定します。
例
{
	"site" : "192.168.10.4",
	"issues" : [
		{
			"id" : "10055",
			"name" : "Incomplete or No Cache-control and Pragma HTTP Header Set",
			"state" : "inprogress",
			"link" : "https://www.example.com/bugtracker/issue=1234"
		}
	]
}
WARN-NEW: CSP Scanner: Notices [10055] x 63
	https://192.168.10.4/ja/mypage (302 Found)
	https://192.168.10.4/ja/login (200 OK)
	https://192.168.10.4/robots.txt (404 Not Found)
	https://192.168.10.4/sitemap.xml (404 Not Found)
	https://192.168.10.4/ja (200 OK)
FAIL-NEW: 0	FAIL-INPROG: 0	WARN-NEW: 8	WARN-INPROG: 0	INFO: 0	IGNORE: 0	PASS: 44
WARN-IN_PROGRESS: CSP Scanner: Notices [10055] x 63
	Progress link: https://www.example.com/bugtracker/issue=1234
	https://192.168.10.4/ja/mypage (302 Found)
	https://192.168.10.4/ja/login (200 OK)
	https://192.168.10.4/robots.txt (404 Not Found)
	https://192.168.10.4/sitemap.xml (404 Not Found)
	https://192.168.10.4/ja (200 OK)
FAIL-NEW: 0	FAIL-INPROG: 0	WARN-NEW: 7	WARN-INPROG: 1	INFO: 0	IGNORE: 0	PASS: 44
config_fileを設定する
-c config_fileオプションを使うとConfig Fileを設定できます。
docker run -v $(pwd):/zap/wrk/:rw -t owasp/zap2docker-weekly zap-baseline.py \
    -t https://www.example.com -c config_file -r testreport.html
このConfig Fileは、予め-g gen_fileオプションで出力して作成します。
docker run -v $(pwd):/zap/wrk/:rw -t owasp/zap2docker-weekly zap-baseline.py \
    -t https://www.example.com -g config_file -r testreport.html
出力されるファイルの中身を下記のような中身です。
# zap-baseline rule configuration file
# Change WARN to IGNORE to ignore rule or FAIL to fail if rule matches
# Only the rule identifiers are used - the names are just for info
# You can add your own messages to each rule by appending them after a tab on each line.
10003	WARN	(Vulnerable JS Library)
10010	WARN	(Cookie No HttpOnly Flag)
10011	WARN	(Cookie Without Secure Flag)
10015	WARN	(Incomplete or No Cache-control and Pragma HTTP Header Set)
10017	WARN	(Cross-Domain JavaScript Source File Inclusion)
10019	WARN	(Content-Type Header Missing)
10020	WARN	(X-Frame-Options Header Scanner)
10021	WARN	(X-Content-Type-Options Header Missing)
10023	WARN	(Information Disclosure - Debug Error Messages)
(省略)
<rule-id> <level> comment
の形式で記述します。
には、IGNORE, INFO, WARN, FAILを書きます。左から順番に強くなっていき、そのルールの検知レベルを指定します。-l levelオプションと組み合わせることで結果の表示を簡素化できます。
docker run -v $(pwd):/zap/wrk/:rw -t owasp/zap2docker-weekly zap-baseline.py \
    -t https://www.example.com -l WARN -c config_file
上記のようにすると、WARNで指定されたものしか結果に出ません。
また、下記のように記述してruleとURLごとに無視するルールを正規表現で記載できます。
<rule-id> OUTOFSCOPE <regex>
# 特定のルールを特定URLで無視する
10012    OUTOFSCOPE    https://www.example.com/test.html
# .cssファイルを全てのルールで無視する
*    OUTOFSCOPE    .*\.css
Progress Fileで指定してもWARN-IN_PROGRESSと言う結果になるだけで、結果から除外されることはありません。結果から除外する場合は、上記のようにConfig Fileで記載することで、除外することができます。
WARN-NEW: Strict-Transport-Security Header Not Set [10035] x 7
	https://192.168.10.4/asset/material/plugins/bootstrap/css/bootstrap.min.css (200 OK)
	https://192.168.10.4/asset/material/css/style.css (200 OK)
	https://192.168.10.4/asset/front/js/app.js (200 OK)
	https://192.168.10.4/asset/front/images/icons/ja.png (200 OK)
	https://192.168.10.4/asset/front/images/icons/en.png (200 OK)
WARN-NEW: Strict-Transport-Security Header Not Set [10035] x 4
	https://192.168.10.4/asset/front/js/app.js (200 OK)
	https://192.168.10.4/asset/front/images/icons/ja.png (200 OK)
	https://192.168.10.4/asset/front/images/icons/en.png (200 OK)
	https://192.168.10.4/asset/common/js/form.js (200 OK)
結果をHTMLで出力する
-rオプションをつけると結果をHTMLで出力します。
docker run -v $(pwd):/zap/wrk/:rw -t owasp/zap2docker-weekly zap-baseline.py \
    -t https://www.example.com -r testreport.html
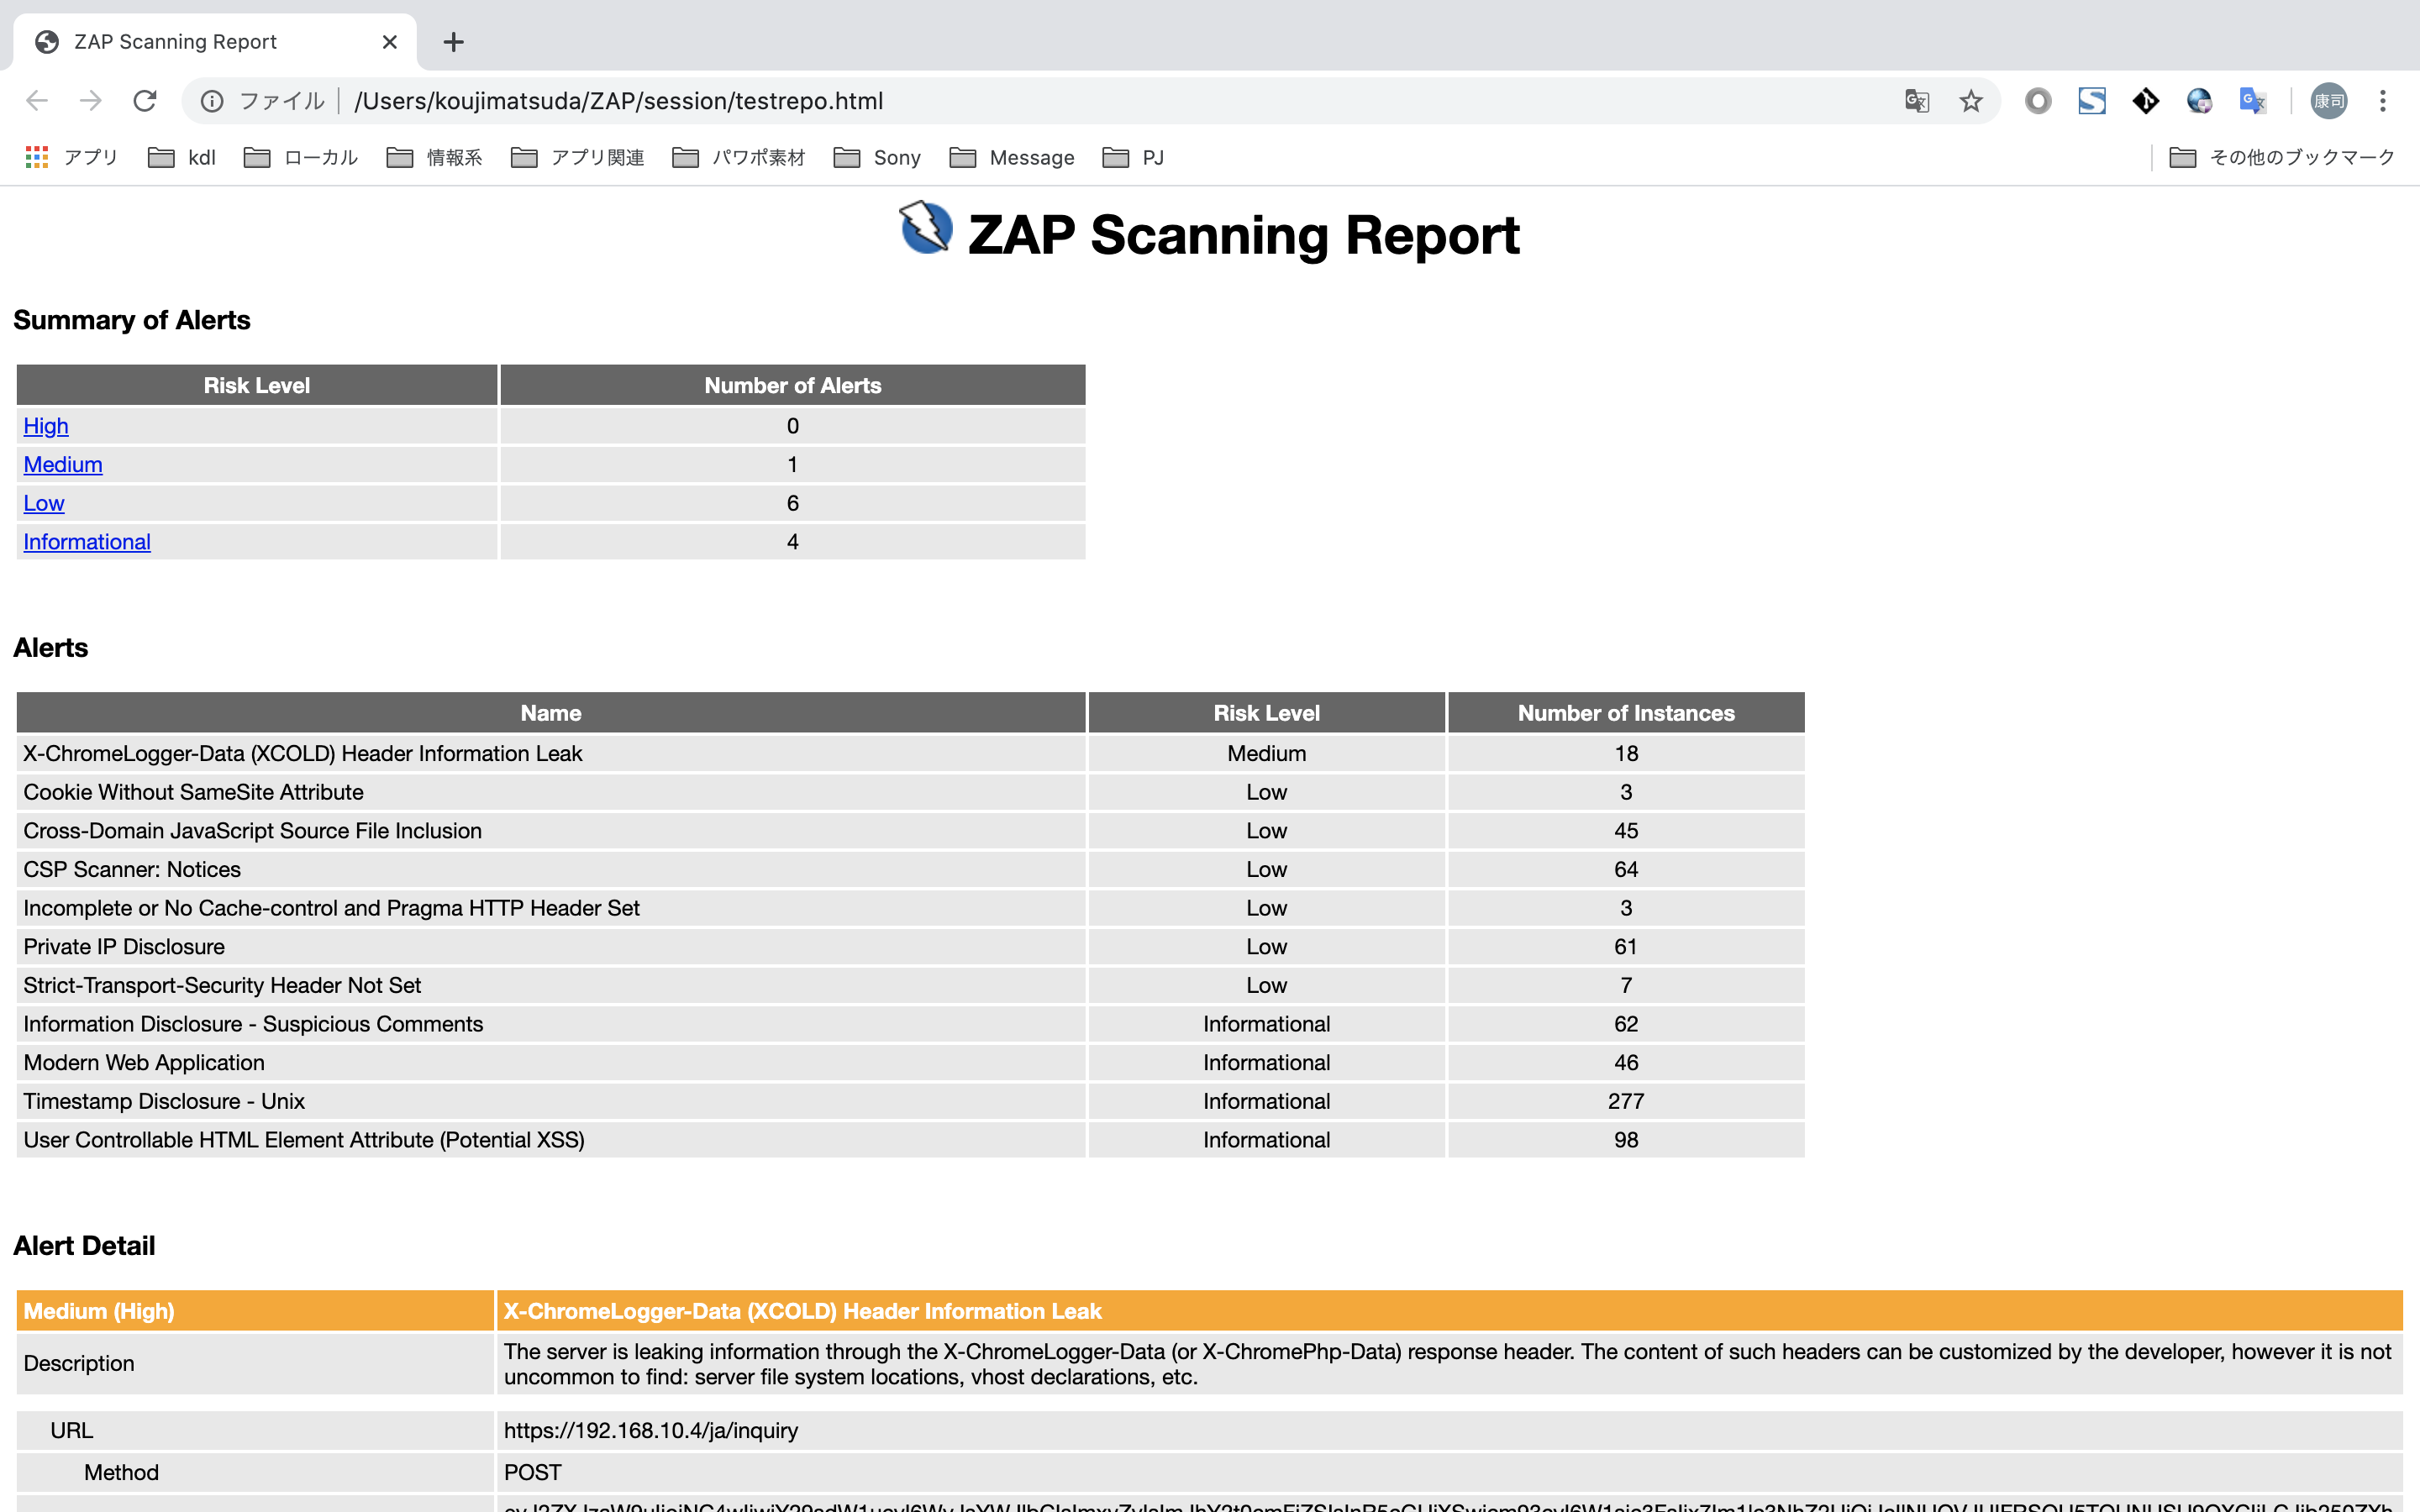
結果は下記のようになっており、URLやパラメータの内容も取得してくれており、再現させるのに役立ちます。
ただし、このtestreport.htmlは注意が必要です。Progress FileやConfig Fileで設定したIGNOREなどが一切反映されません。なので、単純にいっぱい出ます。見辛いこともあるので、うまく検索しながら見る必要があります。
ZAP Full Scan
ZAPフルスキャンは、-tオプションで指定したターゲットにspiderを実行し、active scanを行います。
active scanは実際に攻撃を行いますので、攻撃する権限のないサイトには、行わないでください。
docker run -t owasp/zap2docker-stable zap-full-scan.py -t https://www.example.com
Usage: zap-full-scan.py -t <target> [options]
    -t target         target URL including the protocol, eg https://www.example.com
Options:
    -h                print this help message
    -c config_file    config file to use to INFO, IGNORE or FAIL warnings
    -u config_url     URL of config file to use to INFO, IGNORE or FAIL warnings
    -g gen_file       generate default config file(all rules set to WARN)
    -m mins           the number of minutes to spider for (defaults to no limit)
    -r report_html    file to write the full ZAP HTML report
    -w report_md      file to write the full ZAP Wiki(Markdown) report
    -x report_xml     file to write the full ZAP XML report
    -J report_json    file to write the full ZAP JSON document
    -a                include the alpha active and passive scan rules as well
    -d                show debug messages
    -P                specify listen port
    -D                delay in seconds to wait for passive scanning
    -i                default rules not in the config file to INFO
    -j                use the Ajax spider in addition to the traditional one
    -l level          minimum level to show: PASS, IGNORE, INFO, WARN or FAIL, use with -s to hide example URLs
    -n context_file   context file which will be loaded prior to scanning the target
    -p progress_file  progress file which specifies issues that are being addressed
    -s                short output format - dont show PASSes or example URLs
    -T                max time in minutes to wait for ZAP to start and the passive scan to run
    -z zap_options    ZAP command line options e.g. -z "-config aaa=bbb -config ccc=ddd"
    --hook            path to python file that define your custom hooks
使い方は、ZAP Baseline Scanと同じです。
まとめ
Docker版ZAPは、簡単に始められるので非常に便利です。開発中などのとりあえず、一回かけとこか。ぐらいのノリで診断できるぐらい簡単です。ただ、スキャンはかけれますが、結果を見るのに苦労するかもしれません。例えば、sessionに保存して、ZAPのDeskTop版で見るなどの工夫をするといいかもしれません。
参考資料
https://www.zaproxy.org/docs/desktop/
https://www.zaproxy.org/docs/docker/
