はじめに
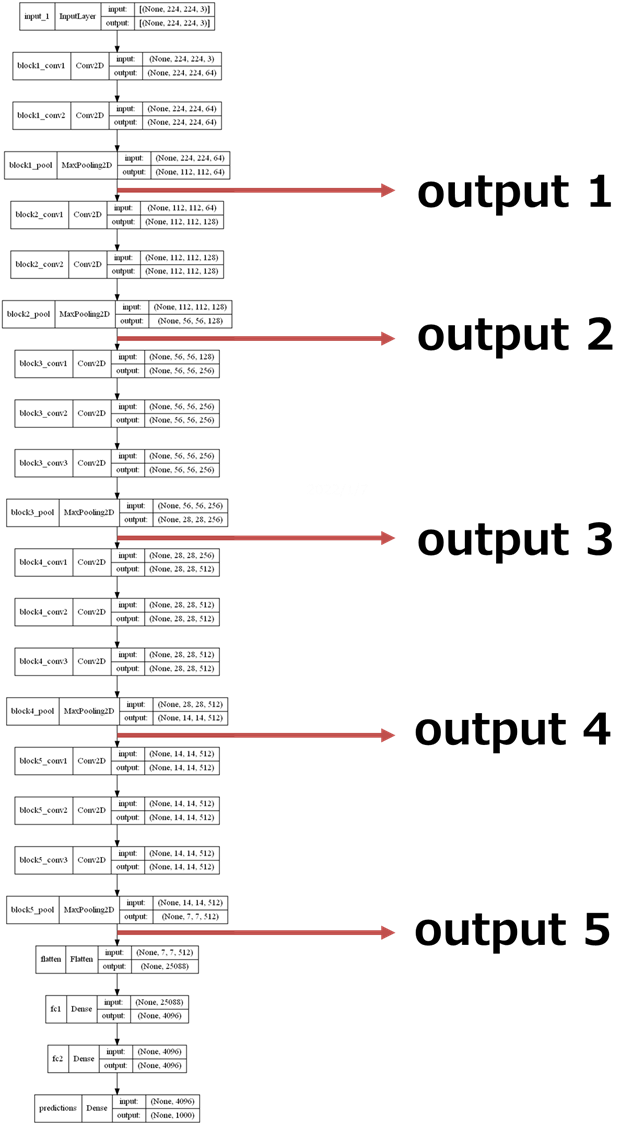
VGG16の学習済みモデルから、Pooling層の出力するモデルを作ってみます。
任意の画像をVGG16に入力した時、学習済みVGG16のPooling層の出力を見たい用途で使います。
下記のようなイメージのニューラルネットワークモデルです。
やり方の整理
- ImageNetのデータセットで学習されたVGG16モデルをダウンロード
- 1のモデルをbase_modelに名付け、 base_modelの各レイヤの名前を取得する。
- レイヤの名前で、pooling層を確認し、get_layer()で出力テンソルを集める。
- 3の出力テンソルの集合(リスト)を出力とする新しいモデルを作る。
実行コード
1. ImageNetのデータセットで学習されたVGG16モデルをダウンロード
from tensorflow.keras.applications.vgg16 import VGG16
from tensorflow.keras.preprocessing import image
from tensorflow.keras.applications.vgg16 import preprocess_input
from tensorflow.keras.models import Model
import numpy as np

# model
base_model = VGG16(weights='imagenet')
print(base_model.summary())
2. 1のモデルをbase_modelに名付け、 base_modelの各レイヤの名前を取得する。
# layerの名前を取得
layer_name_list = []
for layer in base_model.layers:
    # print(layer)
    # print(layer.name)
    layer_name_list.append(layer.name)

print(len(layer_name_list))
print(layer_name_list)
layerの数が23で、その名前のリストを取得しました。
狙うpooling層の名前は、**'block1_pool','block2_pool','block3_pool','block4_pool','block5_pool'**であることも確認しました。
23

['input_1', 'block1_conv1', 'block1_conv2', 'block1_pool', 'block2_conv1', 'block2_conv2', 'block2_pool', 'block3_conv1', 'block3_conv2', 'block3_conv3', 'block3_pool', 'block4_conv1', 'block4_conv2', 'block4_conv3', 'block4_pool', 'block5_conv1', 'block5_conv2', 'block5_conv3', 'block5_pool', 'flatten', 'fc1', 'fc2', 'predictions']
3. レイヤの名前で、pooling層を確認し、get_layer()で出力テンソルの情報を集める。
参考として、'block1_pool'の出力について調べてみます。レイヤの名前を知っている場合、**get_layer()**が使えます。
sample_output = base_model.get_layer('block1_pool').output
print('sample output:', sample_output)
print('sample output shape:', sample_output.shape)
print('sample output type:', type(sample_output))
output自体は、KerasTensor Objectで、Shape, data typeの情報が分かります。
outputのShapeは、(None, 112,112,64)で、「はじめに」に表示されたモデル図でのblock1_poolの出力Shapeと一致していることが確認できます。
outputのタイプは、kerasTesor ですね。
sample output: KerasTensor(type_spec=TensorSpec(shape=(None, 112, 112, 64), dtype=tf.float32, name=None), name='block1_pool/MaxPool:0', description="created by layer 'block1_pool'")
sample output shape: (None, 112, 112, 64)
sample output type: <class 'keras.engine.keras_tensor.KerasTensor'>
4. 3の出力テンソルの集合(リスト)を出力とする新しいモデルを作る。
それでは、**'block1_pool','block2_pool','block3_pool','block4_pool','block5_pool'**層の出力のリストを作成します。
# outputs listを作成
output_list = [base_model.get_layer('block1_pool').output,
               base_model.get_layer('block2_pool').output,
               base_model.get_layer('block3_pool').output,
               base_model.get_layer('block4_pool').output,
               base_model.get_layer('block5_pool').output]
それでは、準備ができたため、新しいモデルを作りましょう。
新しいモデルはactive_modelと名付けます。
inputsは、VGG16の入力と同じなので、base_model.inputと指定します。outputsに先ほど作成したoutput_listを指定するだけです。
# 新しいモデルを作る。
active_model = Model(inputs=base_model.input,
                     outputs=output_list)
結果
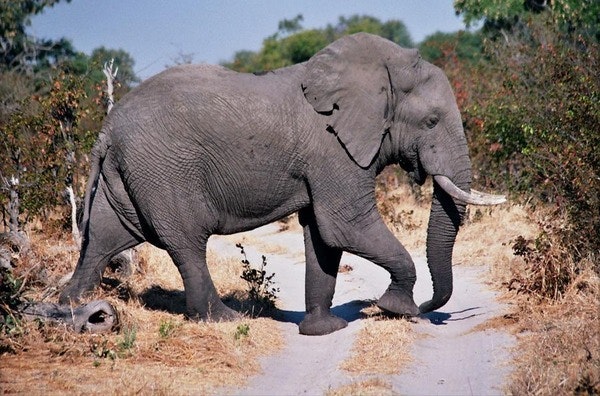
それでは、任意の画像ファイルを入れて、新しいモデルの出力を確認してみましよう。下記のアフリカ像の画像を入力画像として使います。
特徴量を抽出は推論なのでpredict()を使います。
img_path = './elephant.jpg'
img = image.load_img(img_path, target_size=(224,224))
x = image.img_to_array(img)
x = np.expand_dims(x, axis=0)
print(x.shape)
x = preprocess_input(x)

features = active_model.predict(x)
Featuresは五つの要素を持つリストであり、それぞれのShapeも確認可能です。
print('number_of_outputs', len(features))
print('1st outputs shape', features[0].shape)
print('2nd outputs shape', features[1].shape)
print('3rd outputs shape', features[2].shape)
print('4st outputs shape', features[3].shape)
print('5st outputs shape', features[4].shape)
number_of_outputs 5
1st outputs shape (1, 112, 112, 64)
2nd outputs shape (1, 56, 56, 128)
3rd outputs shape (1, 28, 28, 256)
4st outputs shape (1, 14, 14, 512)
5st outputs shape (1, 7, 7, 512)
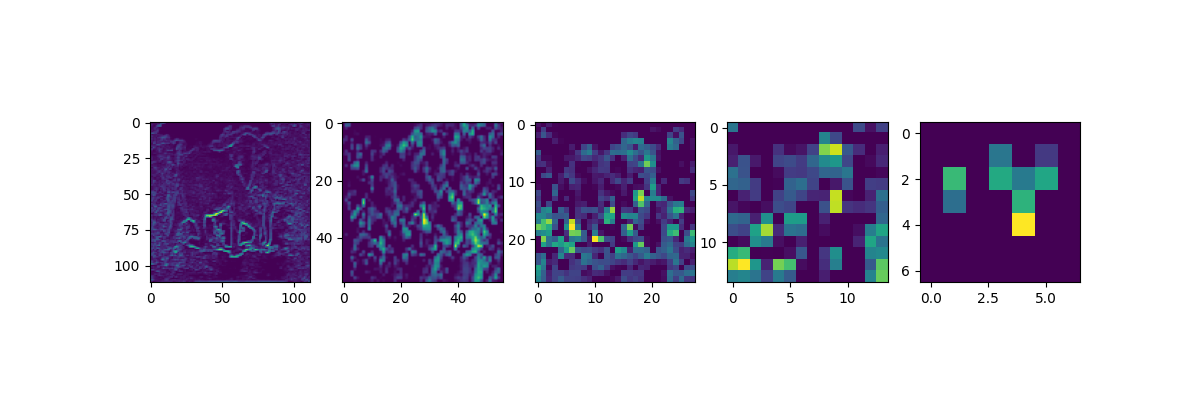
各出力の最後のチャンネルの画像を出力してみます。
import matplotlib.pyplot as plt

fig, ax = plt.subplots(nrows=1, ncols=5, figsize=(12,4) )
ax[0].imshow(features[0][0,:,:,63])
ax[1].imshow(features[1][0,:,:,127])
ax[2].imshow(features[2][0,:,:,255])
ax[3].imshow(features[3][0,:,:,511])
ax[4].imshow(features[4][0,:,:,511])

plt.show()
各Outputの出力サイズを吟味しながら、出力結果を見てみましょう。なるほど。
結論
学習済みモデルを利用して、その途中の出力を取り出す方法を確認してみました。
下記の順番で処理すれば、必要な出力が得られます。
model.layers() -> layer.name -> base_get_layer('layer name') -> base_get_layer('layer name').ouput