Big QueryにプリセットされているpublicdataのSampleテーブルを使って短い時間でbigqueryを体験してみます。
環境
・CentOS6.5を使用
・インストールはMAC OS X10.9でも確認
事前準備
・事前にGoogle Developers Consoleにログインできるアカウントを作成し、
プロジェクトも作成しておいてください
・Google Developers ConsoleからBig QueryのAPIをONにしてください
注)課金に関する内容は事前にGoogleで確認してください。
CLI環境の準備と設定
GUIで頑張り続けるのも大変なので、SDKを入れてコマンドで操作します
1.Google SDKのインストール
# curl https://sdk.cloud.google.com | bash
App Engine toolsに関する選択肢が出ますが、後でインストールできます。
なので、ここでは4のNo App Engineを選択してください。
※インストール後、shellを再起動してください。
2.Googleアカウントにログイン
# gcloud config set account *******@gmail.com

# gcloud auth login
Go to the following link in your browser:
※URLが出るのでブラウザで開いてログイン後に「承認する」を選択してください。
OSによっては自動でポップアップします。
3.プロジェクトを設定
# gcloud config set project <project>
project ID を使います。プロジェクト作成時に自動で付与されたものです。
4.設定の確認
# gcloud config list
[core]
account = <username>
disable_usage_reporting = False
project = <project>
user_output_enabled = True
5.bqコマンドの確認
ここまでうまく行っていれば下記のような出力になるはずです。
# bq shell
Welcome to BigQuery! (Type help for more information.)
6.確認コマンドを叩いてみる
最後にプロジェクトが正しく設定されているかを確認します。
project>  ls -p
      projectId       friendlyName
 ------------------- --------------
  projectid   project
実際のデータを触ってみる
1.publicdata内のテーブルを確認
bq ls publicdata:samples
      tableId       Type
 ----------------- -------
  github_nested     TABLE
  github_timeline   TABLE
  gsod              TABLE
  natality          TABLE
  shakespeare       TABLE
  trigrams          TABLE
  wikipedia         TABLE
上記を見ると分かると思いますが、datasetは複数のテーブルを格納する入れ物です。
今回は準備されたものを使用しますが、datasetを作成しテーブルをimportすることも可能です。
2.samples.shakespeareに関する情報を確認
project> show publicdata:samples.shakespeare
Table publicdata:samples.shakespeare

   Last modified                  Schema                 Total Rows   Total Bytes   Expiration
 ----------------- ------------------------------------ ------------ ------------- ------------
  02 May 08:47:25   |- word: string (required)           164656       6432064
                    |- word_count: integer (required)
                    |- corpus: string (required)
                    |- corpus_date: integer (required)
3.ブラウザからも確認してみる
https://bigquery.cloud.google.com/project/
もしくはDeveloper Console -> BIG DATA -> Big Query
ログインすると左下にサンプルデータがあるのがわかるかと思います。
今回、「samples.shakespeare」というTebleに対してQueryを試してみます。
右上のNew Queryの欄にSQL文を入力し、「Run Query」ボタンを押します。
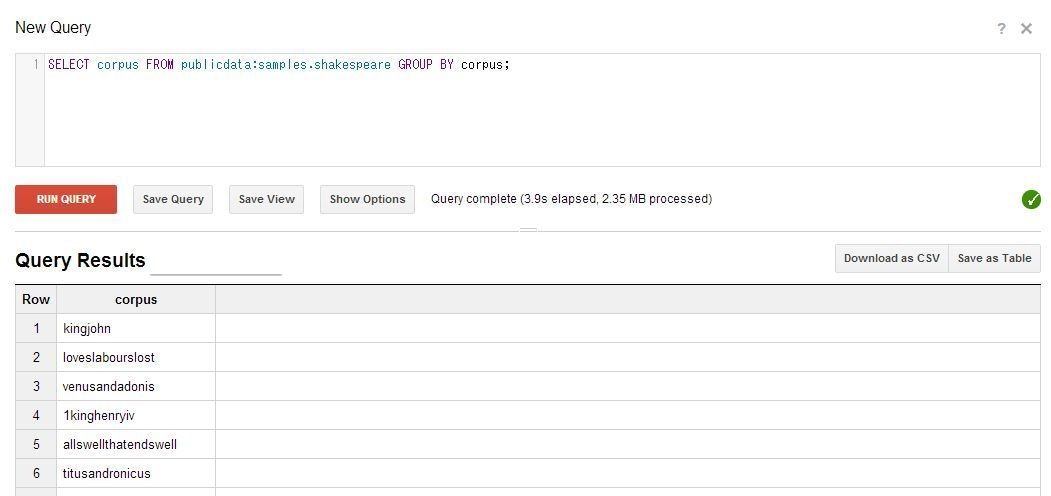
このQueryの処理にかかった時間が出てきます。
Query complete (1.7s elapsed, 2.35 MB processed)
ちなみにTableの情報は以下の通りです。Big Queryからすると小さなデータでしょうか。
Table ID	publicdata:samples.shakespeare
Table Size	6.13 MB
Number of Rows	164,656
Creation Time	8:47am, 2 May 2012
Last Modified	8:47am, 2 May 2012
samples.gsodを触って過去の天気情報を確認してみる
1.まずはテーブルの情報を確認してみます。
# bq show publicdata:samples.gsod
Table publicdata:samples.gsod


   Last modified                        Schema                       Total Rows   Total Bytes   Expiration
 ----------------- ------------------------------------------------ ------------ ------------- ------------
  02 May 08:47:20   |- station_number: integer (required)            114420316    17290009238
                    |- wban_number: integer
                    |- year: integer (required)
                    |- month: integer (required)
                    |- day: integer (required)
                    |- mean_temp: float
                    |- num_mean_temp_samples: integer
                    |- mean_dew_point: float
                    |- num_mean_dew_point_samples: integer
                    |- mean_sealevel_pressure: float
                    |- num_mean_sealevel_pressure_samples: integer
                    |- mean_station_pressure: float
                    |- num_mean_station_pressure_samples: integer
                    |- mean_visibility: float
                    |- num_mean_visibility_samples: integer
                    |- mean_wind_speed: float
                    |- num_mean_wind_speed_samples: integer
                    |- max_sustained_wind_speed: float
                    |- max_gust_wind_speed: float
                    |- max_temperature: float
                    |- max_temperature_explicit: boolean
                    |- min_temperature: float
                    |- min_temperature_explicit: boolean
                    |- total_precipitation: float
                    |- snow_depth: float
                    |- fog: boolean
                    |- rain: boolean
                    |- snow: boolean
                    |- hail: boolean
                    |- thunder: boolean
                    |- tornado: boolean
2.サンフランシスコの2010年以降の雨の日数を確認する
SELECT
  count(*)
FROM
  [publicdata:samples.gsod]
WHERE
  station_number = 724940
  AND year >= 2010
  AND rain=TRUE

16.1GB
number of rows 114,420,316

 Query complete (3.1s elapsed, cached)
3.コマンドラインから別のQueryで試してみます。
# bq query "SELECT year, month, day, thunder, rain, FROM [publicdata:samples.gsod] WHERE thunder=TRUE AND rain=TRUE AND station_number=037720 ORDER BY year DESC, month DESC, day DESC LIMIT 10"

+------+-------+-----+---------+------+
| year | month | day | thunder | rain |
+------+-------+-----+---------+------+
| 2010 |     3 |  23 |    true | true |
| 2010 |     2 |  21 |    true | true |
| 2010 |     2 |  15 |    true | true |
| 2010 |     1 |  23 |    true | true |
| 2010 |     1 |  18 |    true | true |
| 2010 |     1 |  16 |    true | true |
| 2010 |     1 |  15 |    true | true |
| 2009 |    12 |  24 |    true | true |
| 2009 |    12 |  23 |    true | true |
| 2009 |    12 |  22 |    true | true |
+------+-------+-----+---------+------+
新しいdatasetの作成方法
・Google Developer Console
→DataSetの+ボタンからNew datasetを選択
・bqコマンド
# bq mk mydataset
作成後「bq ls」で確認してみてください。
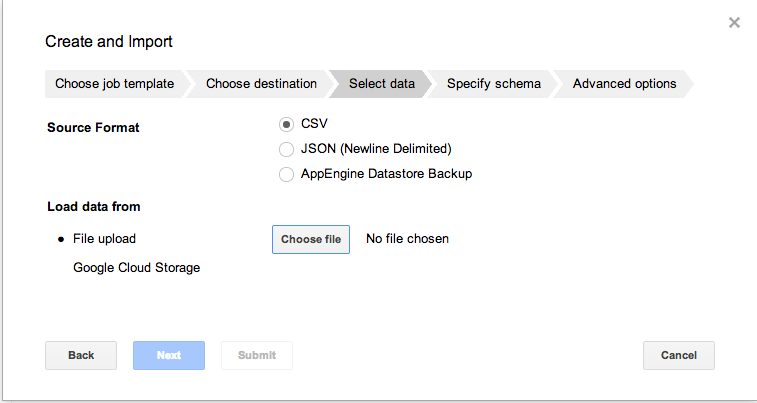
新しいテーブルのimport方法
・Google Developer Console
→datasetの右側の「+」ボタンからWizard形式で追加可能です。
テーブル名を設定、uploadするファイルの形式とSourceを設定、schemaを指定。
・bgコマンド
→https://developers.google.com/bigquery/loading-data-into-bigquery?hl=ja#loaddatagcs
bq load --schema=cloud_storage_usage_schema.json my_dataset.usage_2012_06_18_v0 gs://my_logs/bucket_usage_2012_06_18_14_v0
その他
・正規表現を使ってもほぼ遅くならない。並列度がけた違いとのこと。
・パフォーマンスが出ないときは、Query PriorityがInteractiveになっているか確認。
冒頭にも記載しましたが、課金については事前に十分にご確認の上で実施してください。
この記事によりいかなるトラブルがあった場合でも当方は一切責任を取れません。