Mattermost向けのチャットボットをNode-REDで作る。
Incoming WebhookでNode-REDを活用しましたので、次はOutgoing webhookでチャットボットに取り組みます。チャットボットの会話エンジンには、IBM Cloud ライトアカウントで使用可能なWatson Assistantの無料(ライト)プランを使用します。
Node-REDは、一番簡単に用意できる方法はIBM Cloudですが、自社用サーバーに導入するなどしても問題ありません。
Node-REDでOutgoing Webhookを用いる
基本形
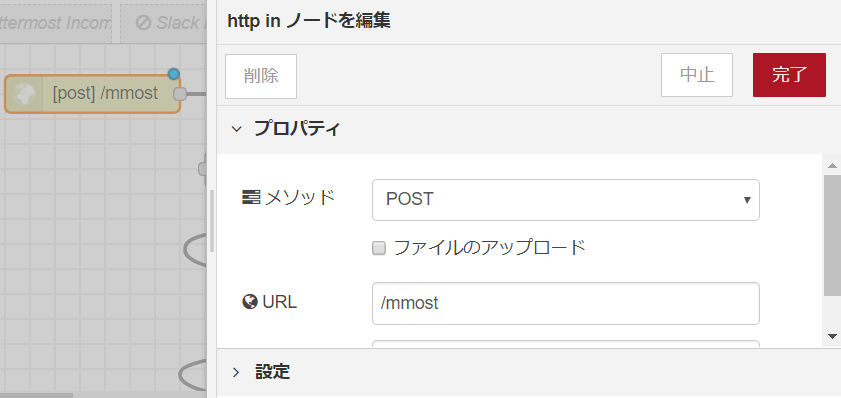
基本形は、下図です。http inノードを使い「[post]/mmost」ノードを作ります。「[post]/mmost」ノードに、debugノードを繋げ、「From mattermost」とします。

「[post]/mmost」ノードは、http inノードです。ここで指定するURLは、/mmostとしています。たとえば、Node-REDが、https://mynodered.mybluemix.net 上で稼働している場合、https://mynodered.mybluemix.net/mmost で、Mattermostからのメッセージを受け取ります。

Node-REDの画面右上の「デプロイ」をクリックします。次はMattermost側の設定です。
MattermostのOutgoing Webhook
Mattermostからのメッセージを受信するNode-RED側のURLが決まりましたら、MattermostにてOutgoing Webhookの設定を行います。
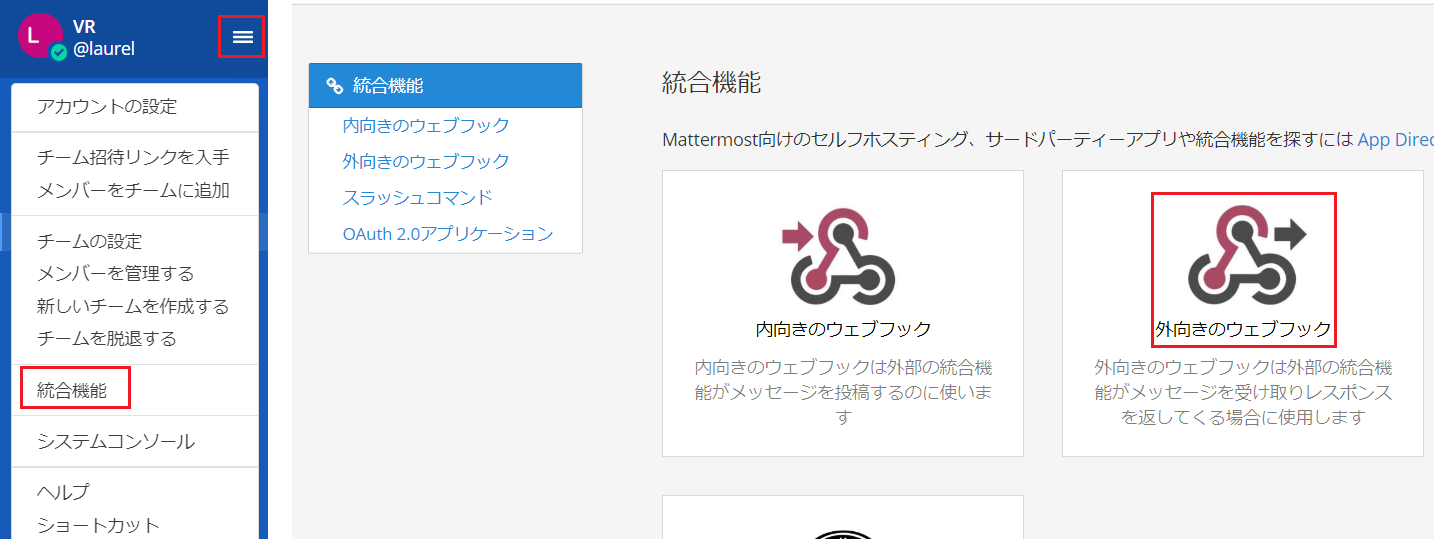
Mattermostに管理者権限のあるユーザーとしてログインします。ログイン後、「メインメニュー」→「統合機能」→「外向きのウェブフック」の順にクリックします。

外向きのウェブフック、つまりOutgoing Webhookについて、タイトルなどを入力します。Node-REDで扱うために下図を参考にしてください。
- コンテントタイプ:application/json
- トリガーワード:#で始まる英数字
- トリガーとなる条件:最初の単語がトリガーワードと正確に一致する
- コールバックURL:Node-REDで設定したものを使います。例 https://mynodered.mybluemix.net/mmost

必要項目を入力し、画面右下の「保存する」をクリックします。
Mattermostに戻り、ウェブフックで指定したチャンネルにて、トリガーワード スペース メッセージの順で投稿すると、Node-REDのデバッグタブに、Mattermostから届いたメッセージが表示されます。
Watson Assistant連携
基本形を発展させ、Node-REDでMattermostのIncomng Webhookを使うで実装したサンプルを拡張し、Watson Assistantを会話エンジンとしたチャットボットを実装します。
MattermostとWatson Assistantを連携させたチャットボットサンプルコード
[
    {
        "id": "f2b4f349.4101d",
        "type": "tab",
        "label": "Mattermost chatbot with Watson",
        "disabled": false,
        "info": ""
    },
    {
        "id": "847547fa.f9ec48",
        "type": "http in",
        "z": "f2b4f349.4101d",
        "name": "",
        "url": "/mmost",
        "method": "post",
        "upload": false,
        "swaggerDoc": "",
        "x": 130,
        "y": 40,
        "wires": [
            [
                "fbae9336.0b01e",
                "66e3ceb0.d81ec"
            ]
        ]
    },
    {
        "id": "fbae9336.0b01e",
        "type": "debug",
        "z": "f2b4f349.4101d",
        "name": "From mattermost",
        "active": true,
        "tosidebar": true,
        "console": false,
        "tostatus": false,
        "complete": "true",
        "x": 730,
        "y": 40,
        "wires": []
    },
    {
        "id": "66e3ceb0.d81ec",
        "type": "function",
        "z": "f2b4f349.4101d",
        "name": "cut trigger word",
        "func": "var message = msg.payload.text;\nvar cutmsg = message.slice(5);\nmsg.payload = cutmsg;\nreturn msg;",
        "outputs": 1,
        "noerr": 0,
        "x": 300,
        "y": 100,
        "wires": [
            [
                "36821b55.626704",
                "e2e9a55c.934c58"
            ]
        ]
    },
    {
        "id": "36821b55.626704",
        "type": "watson-conversation-v1",
        "z": "f2b4f349.4101d",
        "name": "",
        "workspaceid": "",
        "multiuser": false,
        "context": true,
        "empty-payload": false,
        "default-endpoint": true,
        "service-endpoint": "https://gateway.watsonplatform.net/assistant/api",
        "timeout": "",
        "optout-learning": false,
        "x": 300,
        "y": 180,
        "wires": [
            [
                "e14708d.1cb6bf8"
            ]
        ]
    },
    {
        "id": "e14708d.1cb6bf8",
        "type": "function",
        "z": "f2b4f349.4101d",
        "name": "output text",
        "func": "var watson0 = msg.payload.output.text[0];\nvar watson1 = msg.payload.output.text[1];\nif ( watson1 === undefined ){\n    msg.payload = watson0;\n    }\n    else{\n    msg.payload = watson0 + watson1;\n    }\nreturn msg;",
        "outputs": 1,
        "noerr": 0,
        "x": 490,
        "y": 180,
        "wires": [
            [
                "d76f62c4.d5bb6",
                "b2ba4760.5a5878"
            ]
        ]
    },
    {
        "id": "d76f62c4.d5bb6",
        "type": "function",
        "z": "f2b4f349.4101d",
        "name": "post function",
        "func": "var message = msg.payload;\nmsg.payload={\n channel: \"Incoming Webhookを使うチャンネル\",\n username:\"Incoming Webhookを使うユーザー名\",\n text:message,\n}\nreturn msg;",
        "outputs": 1,
        "noerr": 0,
        "x": 310,
        "y": 280,
        "wires": [
            [
                "71f541f0.fdd1b"
            ]
        ]
    },
    {
        "id": "71f541f0.fdd1b",
        "type": "http request",
        "z": "f2b4f349.4101d",
        "name": "",
        "method": "POST",
        "ret": "txt",
        "url": "MattermostのIncoming Webhook設定で生成されたURL",
        "tls": "",
        "x": 510,
        "y": 280,
        "wires": [
            [
                "2f21ea89.bb4e36"
            ]
        ]
    },
    {
        "id": "2f21ea89.bb4e36",
        "type": "debug",
        "z": "f2b4f349.4101d",
        "name": "",
        "active": true,
        "tosidebar": true,
        "console": false,
        "tostatus": false,
        "complete": "false",
        "x": 710,
        "y": 280,
        "wires": []
    },
    {
        "id": "e2e9a55c.934c58",
        "type": "debug",
        "z": "f2b4f349.4101d",
        "name": "input debug",
        "active": true,
        "tosidebar": true,
        "console": false,
        "tostatus": false,
        "complete": "payload",
        "x": 710,
        "y": 100,
        "wires": []
    },
    {
        "id": "b2ba4760.5a5878",
        "type": "debug",
        "z": "f2b4f349.4101d",
        "name": "response debug",
        "active": true,
        "tosidebar": true,
        "console": false,
        "tostatus": false,
        "complete": "payload",
        "x": 720,
        "y": 180,
        "wires": []
    }
]
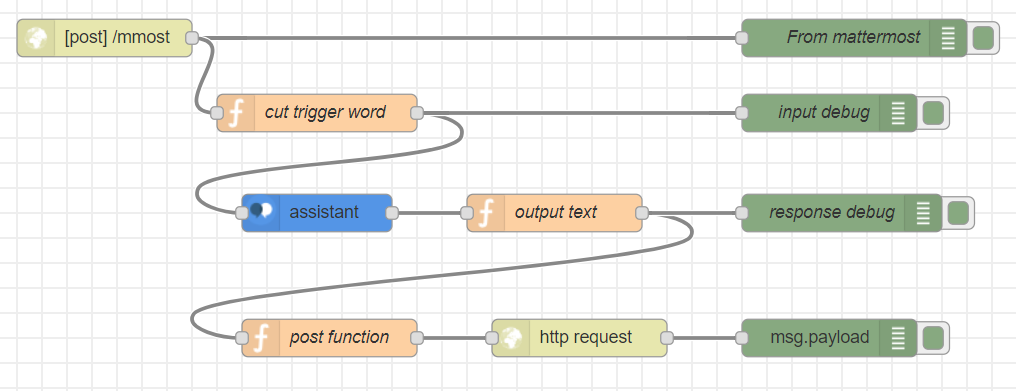
Node-REDの画面で、画面右上の「三」→「読み込み」→「クリップボード」の順にクリックし、下記のサンプルコードを「JSON形式のフローデータを貼り付けてください」と表示されている箇所にコピー&ペーストし、「読み込み」をクリックします。
各ノードについて解説します。
[post]/mmostノード
基本形の時の設定と同じです。
cut trigger wordノード
例としてトリガーワードを#を含めて5文字としましたので、Mattermostから受け取ったメッセージの冒頭5文字をカットし、assistantノードに渡す処理を行っています。

assistantノード
IBM Cloud ライトアカウントで有効化したWatson Assistant内のWorkspaceを指定しています。サンプルデータがありますので、IBM Cloud x Lineボットハンズオン 2018年7月14日 資料の25ページまでをご覧ください。
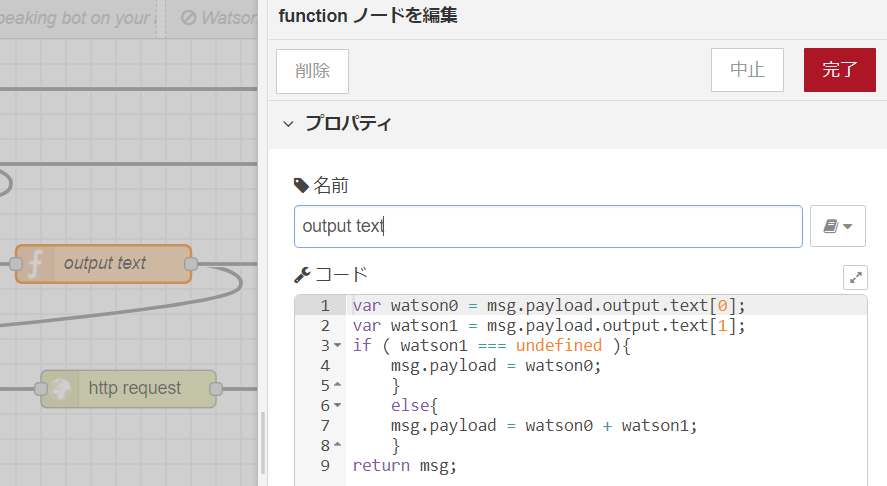
output textノード
Watson Assistantからのレスポンスから、テキストデータ部分を抜き出す処理を行っています。

その他
「post function」ノードや「http request」ノードは、Node-REDでMattermostのIncomng Webhookを使うの記事と同じです。
画面右側に集めた濃緑色のノードはデバッグで、Node-REDのデバッグタブにログが表示されます。
サンプルの動作確認
Node-REDで各ノードを設定後、画面右上の「デプロイ」をクリックします。「デプロイ」をクリックしなければ、動作することができません。
そして、Mattermostでウェブフックに指定したチャンネルにて、トリガーワード付きでメッセージを投稿します。ここでは、トリガーワードを「#send」とし、「#send インターネットにつながらない」と投稿したところ、Watson Assistantから「ご質問を確認します。ネットへの接続についてですね?近くにシステムスタッフはいますか?」とWatson Assistantから返事が届きました。
Mattermostで、「BOT」と表示されている投稿がWebhook、つまりチャットボットとしての投稿になります。

まとめ
Incoming Webhook(内向きのウェブフック)とOutgoing Webhook(外向きのウェブフック)、Node-REDを用いることで、Mattermost用のチャットボットを実装することができました。
Node-REDは、データの加工や別システムへの受け渡しが得意ですから、Watson以外にも、プロジェクト管理ツールの「Jira」や「Redmine」等と連携も可能です。
今回ご紹介したノウハウを使うことで、Slack経由でJiraの課題を作成する方法にて、Slackの代わりにMattermostに変更することが可能です。
Mattermostのようにデータ連携の口が用意されているチャットツールは楽しいですね=^-^=
