TensorFlowQuantumが公開されたので早速遊んでみた。
tutorialsにmnistの識別のサンプルコードがあったので(手書き数字の識別と言っていいのか?ってくらい元データをダウンスケールしているが、、、そのため別の題材で識別問題に挑戦中)、それを参考に、TensorFlowQuantumを使って回帰問題に取り組んでみた。コードはgithub.com/koke-saka/quantum-machine-learning
機械学習については素人のため、機械学習的に危ういところがあったら、優しく指摘してほしい。
QuantumCircuitLearning
量子回路の構造を制限することで勾配計算を可能にしたQuantumCircuitLearningの実装がQuantumNativeDojoにあり、それを参考に三角関数の学習をTensorFlowQuantumでやってみる。
学習データの準備
詳細はgithub.com/koke-saka/quantum-machine-learningへ。
とりあえず200個のサンプルを用意し、ランダムに150個を訓練セット、50個をテストセットに振り分けた。
入力状態の作成
mnistの学習ではスレッショルドをひいて画像を2値画像にしてそれをqubitの0,1に対応させていた。(正確には1の場合にXゲートをかましていた)
ここではQuantumNativeDojoにならい $\arcsin(x)$ と$\arccos(x^2)$をそれぞれRY、RXゲートの回転角に対応させて、入力状態のエンコードを行った。TensorFlowQuantumではどうやら予めその状態を準備しておくようだ。(Qulacsでは逐一回路を作り直していた気がする。)
def convert_to_circuit(x):
    """Encode truncated classical image into quantum datapoint."""
    y = np.arcsin(x)
    z = np.arccos(x**2)
    qubits = cirq.GridQubit.rect(5, 1)
    circuit = cirq.Circuit()
    for i in range(5):
        circuit.append(cirq.ry(y).on(qubits[i]))
        circuit.append(cirq.rz(z).on(qubits[i]))
    return circuit


x_train_circ = [convert_to_circuit(x) for x in x_train]
x_test_circ = [convert_to_circuit(x) for x in x_test]
x_train_tfcirc = tfq.convert_to_tensor(x_train_circ)
x_test_tfcirc = tfq.convert_to_tensor(x_test_circ)
convert_to_circuit()は自前で用意する必要がある。tutorial/mnistの該当部分を見ると理解が深まると思う。
convert_to_tensor()したやつを今後の学習で用いる。
パラメトリック量子回路(ニューラルネットワーク)の作成
未解決
readoutとdataqubitsは別々に用意する必要があるのか不明。
QuantumNativeDojoのように出力量子ビットにも入力をエンコードしたいのだが、今の所できないでいる。
とりあえずの実装
def create_quantum_model(c_depth=3):
    data_qubits = cirq.GridQubit.rect(5,1)
    readout = cirq.GridQubit(-1,-1)
    circuit = cirq.Circuit()


    builder = CircuitLayerBuilder(
        data_qubits = data_qubits,
        readout = readout
    )

    for i in range(c_depth):
        builder.add_entangler(circuit,5)
        builder.add_layer(circuit, gate = cirq.XX, prefix='xx'+str(i))
        builder.add_layer(circuit, gate = cirq.ZZ, prefix='zz'+str(i))
        builder.add_layer(circuit, gate = cirq.XX, prefix='xx1'+str(i))

    return circuit, cirq.Z(readout)

model_circuit, model_readout = create_quantum_model()
クラスCircuitLayerBuilderについてはgithubを参照。隣接する量子ビットにCZゲートをかますadd_entanglerを自前で用意。
モデルの作成、学習
モデルを作成する準備が整った。モデルを作って学習させてみよう。
回帰問題のため、損失関数はmseにした。
model = tf.keras.Sequential([
    # The input is the data-circuit, encoded as a tf.string
    tf.keras.layers.Input(shape=(), dtype=tf.string),
    # The PQC layer returns the expected value of the readout gate, range [-1,1].
    tfq.layers.PQC(model_circuit, model_readout),
])

model.compile(
    loss=tf.keras.losses.mse,
    optimizer=tf.keras.optimizers.Adam(),
    metrics=['mae'])

qnn_history = model.fit(
      x_train_tfcirc, y_train,
      batch_size=25,
      epochs=EPOCHS,
      verbose=1,
      validation_data=(x_test_tfcirc,y_test)
)
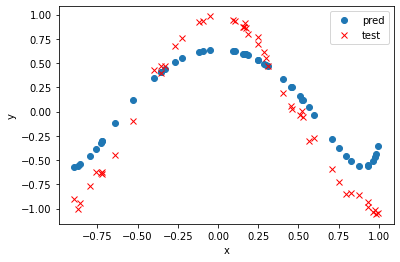
なんとなく学習できているようだが、最大最小が小さく出ているのが気になる。readoutはパウリのZ行列の期待値なので1から-1の間を取りうるはずなのだが、、
終わりに
とりあえず、TensorFlowQuantumで遊ぶことはできた。不具合の原因は今後考えることにする。TensorFlowQuantum触ってみるかってなる人が増えればと嬉しい。

