はじめに
今、ちょっとしたWebアプリを作ってるのですが、認証システムを自作するのはセキュリティの意味でも生産性の意味でもナンセンスです。
なので何かしらのCIAM(Customer identity access management)を入れようと思ったのですが、ちょうどGCPを使っていたのでIdentity Platform(IDプラットフォーム)を使ってみることにしました。これはFireabase認証をベースにGoogleがエンタープライズグレードとしてGCPに統合したIDaaSです。
というわけで備忘録としてIdentity PlatformとVue.jsおよびJWT(+Quarkus)を使ったサーバサイドでAPI認証のやり方を解説します。
システム構成
今回作るシステム構成はクライアント(Vue.js)、API(Quarkus)、認証サーバ(Identity Platform)、IdP(Google/Twitterなどのソーシャルログイン)で構築します。イメージ図は以下の通り。
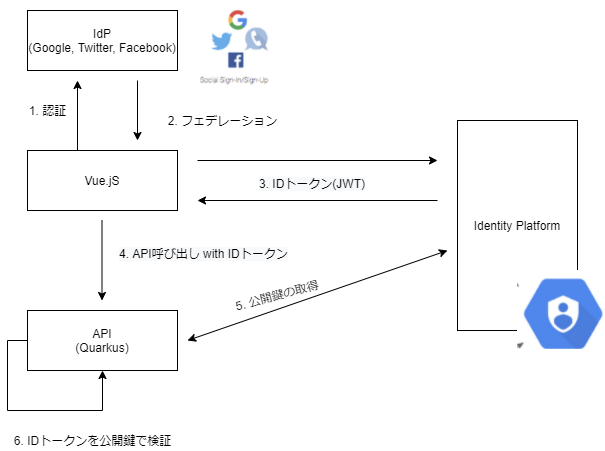
JWTなのでAPI側は基本的にトークンのみを見れば良く、実際のIdPと通信をする必要はありません。今回は公開鍵をIdentity Platformから取得するのをリアルタイムでやっていますが負荷などの観点で必要であればオフラインで事前に取得しておくこともできます。
そもそもIdentity Platformって?
日本語訳が「IDプラットフォーム」で英語名が「Identity Platform」なのと「Cloud Identity」というまったく別のサービスをGoogleは持っているので非常に分かりづらいですが、これはFirebase認証をベースにGCP側に取り込んで作られたIDaaSです。Firebase Authenticationとの主な違いは下記の通り。
Functional Features
| Feature | Identity Platform | Firebase Authentication |
|---|---|---|
| Sign in with email | Yes | Yes |
| Sign in with OAuth (ソーシャル認証) | Yes | Yes |
| Sign in with phone | Yes | Yes |
| Custom authentication | Yes | Yes |
| Sign in with OIDC | Yes | No |
| Sign in with SAML | Yes | No |
| Multi-tenancy | Yes | No |
| IAP integration | Yes | No |
Non Functional Features
| Feature | Identity Platform | Firebase Authentication |
|---|---|---|
| ISO 27001 | Yes | Yes |
| SSAE 18 SOC1 | Yes | Yes |
| SSAE 18 SOC2 | Yes | Yes |
| SSAE 18 SOC3 | Yes | Yes |
| TISAX | Yes | No |
| BAA coverage | Yes | No |
| PCI-DDS in scope | Yes | No |
| Enterprise SLA | 99.95% uptime | No |
Price
下記は独自のパスワード認証やGoogle/Twitter/Facebook/GitHubなどを使ったソーシャル認証の価格テーブルです。SAMLやOpenID Connectを使う場合は価格テーブルが異なります。1 人の MAU を 1 か月で複数回認証しても追加料金はかからないようです。
| 月間アクティブ ユーザー(MAU) | Identity Platform | Firebase Authentication |
|---|---|---|
| 0~49,999 | $0 | $0 |
| 50,000~99,999 | $0.0055 | $0 |
| 100,000~999,999 | $0.0046 | $0 |
| 1,000,000~9,999,999 | $0.0032 | $0 |
| 10,000,000 以上 | $0.0025 | $0 |
Identity Platform まとめ
Identity Platformの主な違いはOIDC/SAMLへの対応、コンプライアンスとSLA準拠、有料か無償かの違いです。
個人的には月間5万ユーザを超えるまでは無料ですし、それ以降も十分安いのでエンタープライズグレードのIdentity PlatformがGCPにも統合されていて便利だと思います。
なお、現時点ではFirebase AuthenticationとIdentity Platformは別のプロダクトですが、将来的にはFireaStoreの時のように同じ製品の別モードという形になるのでは無いかと想像しています。
注意点としては、Identity Platform単体でのドキュメントは非常に少ないです。SDKも含めてFireabaseのものをそのまま利用しているので、基本的にはFirebase側のドキュメントを読むことになります。この辺は成熟度が全然足りて無いところですね。。。
GCPでIdentity Platformのセットアップ
こちらのページを参考にIdentity Platformのセットアップをします。まずはIdentity PlatformのマーケットプレイスからAPIを有効にします。
続いて、Identity Platformのページに遷移してプロバイダの追加を行います。
今回は独自のアカウントは不要なのでGoogleとTwitterを追加しておきます。

後から追加や削除は出来るので必要最小限で作ればよいと思います。
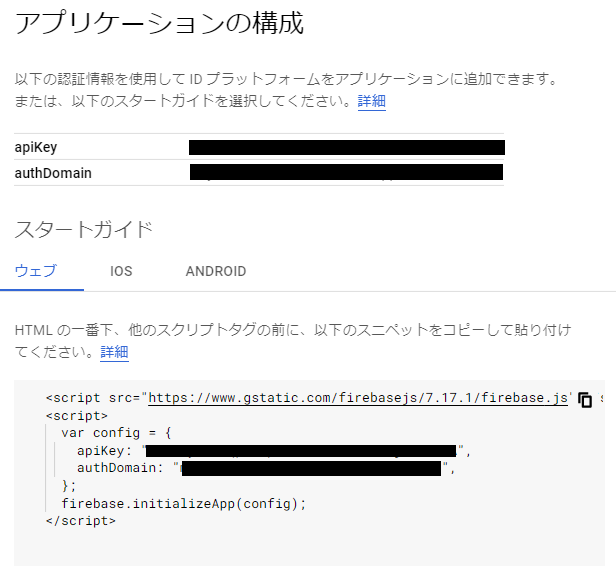
次に、「アプリケーション設定の詳細」リンクから「アプリケーションの構成」を開き、apiKeyとauthDomainを確認します。これは後程、Vue.jsで設定します。
以上で、とりあえずのIdentity Platformのセットアップは完了です。
Vue.jsでのIdentity Platformによる認証の実装
セットアップ
まずはVue.jsにIdentity Platformでの認証を組み込みます。Identity Platformは既存のFirebase SDKをそのまま利用します。
yarn add firebase
ライブラリと設定をmain.jsで読み込みます。API Keyは先ほどメモしたものを利用します。誤ってGitHubなどに上げてしまわないように環境変数を取得するようにし.env.localあたりに記載しておくのが無難でしょう。
import firebase from 'firebase';
var config = {
  apiKey: process.env.VUE_APP_AUTH_API_KEY,
  authDomain: process.env.VUE_APP_AUTH_API_DOMAIN,
};
VUE_APP_AUTH_API_KEY={YOUR_API_KEY}
VUE_APP_AUTH_API_DOMAIN={YOUR_API_DOMAIN}
サインインページの作成
サインインページの作成をします。今回はソーシャルログインを使いかつ追加のユーザ情報を入力しないので、ユーザ登録の画面等は不要です。
<template>
  <div class="signin">
    <h1>サインイン</h1>
    <button @click="signIn">Googleで認証</button>
    <p>Token: {{token}}</p>
  </div>
</template>

<script>
import firebase from "firebase";

export default {
  name: "Signin",
  data() {
    return { token: "" };
  },
  methods: {
    signIn: function () {
      const self = this;
      firebase.auth().signInWithPopup(new firebase.auth.GoogleAuthProvider())
        .then((res) => {
          res.user.getIdToken()
            .then((token) => (self.token = token))
            .catch((error) => {
              console.log(error);
              this.errorMessage = error.message;
              this.showError = true;
            });
        });
    },
  },
};
</script>
firebase.auth().signInWithPopup(new firebase.auth.GoogleAuthProvider())でGoogleの認証画面を呼び出して認証情報を取得し、Identity PlatformのIDトークン(アクセストークン)をJWTで取得します。プロバイダの部分を変更する事でそれ以降のロジックは特に変えずに認証が可能になります。
1点注意したいのは例えばサンプルコードには以下のようにも書いてあります。
firebase.auth().signInWithPopup(provider).then(function(result) {
  // This gives you a Google Access Token. You can use it to access the Google API.
  var token = result.credential.accessToken;
}
ここでcredential.accessTokenで取得できるものがFirebase/Identity Platformのアクセストークンだと勘違いしてしまいますが、これはあくまでも **「認証プロバイダのアクセストークンでありIdentity Platformのアクセストークンでは無い」ということです。なので、ここで取得出来ているのは「Googleのアクセストークン」**です。Twitterで認証してればTwitterのアクセストークン、GitHubならGitHubのアクセストークンが返ります。そのためこちらのトークンを使ってをAPIの検証等は出来ません。
「Firebase/Identity Platformのアクセストークンの取得はgetIdToken()」 という事に注意してください。
トークンを利用したAPIの認証
つづいてFireabaseから取得したトークンを使ってサーバサイドでAPIの認証をする仕組みを作ります。今回もQuarkusを使用しています。
MicroProfile JWT RBACの実装
MicroProfile にはMicroProfile JWT RBAC (Json Web Token Role-Based Access Control)の仕様があるので、こちらを使います。Firebase SDKを使う事も可能ですがJWTとして処理する方が汎用性があって良い気がします。
まずはライブラリを追加します。
./mvnw quarkus:add-extension -Dextensions="smallrye-jwt"
JAX-RSのコードは以下のように書きます。
@Path("/secured")
@RequestScoped
public class TokenSecuredResource {
    @Inject
    JsonWebToken jwt;

    @GET
    @Authenticated
    @Produces(MediaType.APPLICATION_JSON)
    public Response get(@Context SecurityContext ctx) throws JsonProcessingException {
        var caller = ctx.getUserPrincipal();
        var result = Map.of(
                "id", caller == null ? "anonymous" : caller.getName(),
                "name", jwt.getClaim("name"),
                "picture", jwt.getClaim("picture"),
                "expiration_time", jwt.getExpirationTime(),
                "has_jwt", jwt.getClaimNames() != null,
                "payload", jwt.getClaimNames().stream()
                        .map(k -> List.of(k, jwt.getClaim(k).toString()))
                        .collect(Collectors.toMap(x -> x.get(0), x -> x.get(1)))
        );

        return Response.ok(new ObjectMapper().writeValueAsString(result))
                .build();
    }
}
@PermitAllなど「JSR 250に登録されたアノテーション」を使用するとこでアクセスコントロールを行えます。
ただ、JSR250は「認証済みのユーザ」というシンプルなものが無くRolesAllowedもロールの指定が必要なのでio.quarkus.security.Authenticatedを使うのがお勧めです。
Authorization: Bearer ...からのJWTの取得は自動でされJsonWebTokenに格納されています。ペイロードはJsonWebToken#getClaimで取得できます。
続いて、JWTの複合および検証をするためのPublic Keyの場所等の指定をします。これはFireabase/Identity Platformに対して検証が行われるのでGoogleやTwitterにフェデレーションをしている時でも記述するlocationやissuerは同一です。
# JWT with Firebase/Identity Platform
mp.jwt.verify.publickey.location=https://www.googleapis.com/service_accounts/v1/jwk/securetoken@system.gserviceaccount.com
mp.jwt.verify.issuer=https://securetoken.google.com/{YOUR_GCP_PEOJCT_ID}
quarkus.smallrye-jwt.auth-mechanism=MP-JWT
quarkus.smallrye-jwt.enabled=true
1点注意が必要なのはmp.jwt.verify.publickey.locationです。「Firebaseのドキュメント」にはサードパーティでの検証に使う公開鍵はhttps://www.googleapis.com/robot/v1/metadata/x509/securetoken@system.gserviceaccount.comを使えと記載があります。
しかし、x509は「Quarkus」でサポートされるJWT向けの公開鍵の範囲ではありません。なので、サポートに入っているJWKSに対応するURLであるhttps://www.googleapis.com/service_accounts/v1/jwk/securetoken@system.gserviceaccount.comを使う必要があります。
これでサーバサイド側の準備は完了です。
Vue.jsとサーバサイドの連携
Signin.vueを拡張して認証情報の取得後にAPIにトークンを付与してリクエストを投げるコードを作成します。
<template>
  <div class="signin">
    <h1>サインイン</h1>
    <button @click="signInWithGoogle">Googleで認証</button>
    <button @click="signInWithTwitter">Twitterで認証</button>
    <div v-show="user.id">
      <p>ID: {{user.id}}</p>
      <p>
        名前:
        <img :src="user.pic" width="24px" height="24px" />
        {{user.name}}
      </p>
      <p>有効期限: {{user.expiration_time}}</p>
    </div>
  </div>
</template>

<script>
import firebase from "firebase";

export default {
  name: "Signin",
  data() {
    return {
      user: {
        id: "",
        name: "",
        expiration_time: "",
        pic: "",
      },
    };
  },
  methods: {
    signInWithGoogle: function () {
      this.signIn(new firebase.auth.GoogleAuthProvider());
    },
    signInWithTwitter: function () {
      this.signIn(new firebase.auth.TwitterAuthProvider());
    },
    signIn: function (provider) {
      const callApi = (token) => {
        const url = "http://localhost:8080/secured";
        const config = {
          headers: {
            Authorization: "Bearer " + token,
          },
        };
        this.axios.get(url, config).then((response) => {
          this.user.id = response.data.id;
          this.user.name = response.data.name;
          this.user.expiration_time = new Date(
            response.data.expiration_time * 1000
          );
          this.user.pic = response.data.picture;
        });
      };

      firebase
        .auth().signInWithPopup(provider).then((res) => {
          res.user
            .getIdToken().then(callApi).catch((error) => {
              console.log(error);
              this.errorMessage = error.message;
              this.showError = true;
            });
        });
    },
  },
};
</script>
認証後にaxiosを使ってサーバサイドにリクエストを投げています。その際にトークンをAuthorizationヘッダーにBearerキーワードと共に投げています。
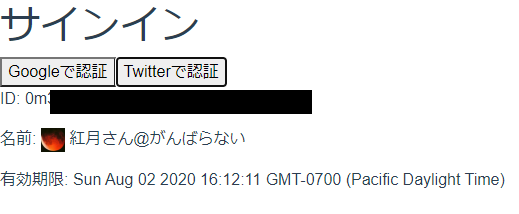
これによって認証したトークンをサーバサイドの認証に使えることが分かりました。
まとめ
今回はGoogleのCIAMであるIdentity Platform(IDプラットフォーム)とVue.jsを組合わせた認証の仕組みを実装しました。
SPAの場合は古き良きWebアプリケーションと違いクライアント側の認証とAPI側の認証が両方必要です。自前で作る事はもちろん可能ですが、CIAMを使う事で独自のアカウントでもソーシャルログインでも簡単に作る事が可能です。
まあ、独自ロジックをベースにする場合はFIDO認証に対応したCIAMを使う方が今後は良いでしょうけど。。。
今回は省きましたが実際にアプリとして作るときにはクライアント側の認証画面の制御とかも必要になるのでVue.jsでの実装方法はこちらの記事をご覧ください。
Identity Platformでアクセストークンの寿命の設定やリフレッシュトークンを無効にする方法はまだ調べきってないので、その辺も今後調査しておきたいと思います。
それではHappy Hacking!