サクッと行きましょう。
前提
- 2025/12/22(月)時点の情報です
- Windows11
- VSCodeはinstall済み
WSLの有効化
まず、PowerShellを管理者権限で実行します。

管理者権限で立ち上げたPowerShell上で以下のコマンドを実行します。
# Ubuntuのinstall
PS C:\Windows\System32> wsl --install
うまくいくと、ユーザ名・パスワードの設定を求められます。
忘れないユーザ名・パスワードを設定しましょう。
ユーザ名・パスワードを入力し、シェルが切り替わったら成功です。
<ユーザ名>@<デバイス名>:/mnt/c/Windows/System32$
一旦exitコマンドでUbuntuを出て、PowerShellのウィンドウを削除しましょう。
<ユーザ名>@<デバイス名>:/mnt/c/Windows/System32$ exit
ログアウト

PS C:\Windows\System32>
その後、通常権限でPowerShellを起動しましょう。
次の節では、この時開いたシェルを用います。

- これがうまくいかない場合は、Windowsが古い可能性があります
- 以前のバージョンの WSL の手動インストール手順の方法をお試しください
Dockerのinstall
WSLを有効化すると、PowerShellからwslコマンドを実行することでWSLに入ることができます。
PS C:\Windows\System32> wsl

<ユーザ名>@<デバイス名>:/mnt/c/Windows/System32$
Docker用のaptリポジトリをセットアップ・install
以下のコマンドを、1行ずつ実行します。
# Add Docker's official GPG key:
$ sudo apt update && sudo apt install ca-certificates curl
$ sudo install -m 0755 -d /etc/apt/keyrings
$ sudo curl -fsSL https://download.docker.com/linux/ubuntu/gpg -o /etc/apt/keyrings/docker.asc
$ sudo chmod a+r /etc/apt/keyrings/docker.asc

# Add the repository to Apt sources:
$ sudo tee /etc/apt/sources.list.d/docker.sources <<EOF
> Types: deb
> URIs: https://download.docker.com/linux/ubuntu
> Suites: $(. /etc/os-release && echo "${UBUNTU_CODENAME:-$VERSION_CODENAME}")
> Components: stable
> Signed-By: /etc/apt/keyrings/docker.asc
> EOF
$ sudo apt update

# Install the Docker packages
$ sudo apt install docker-ce docker-ce-cli containerd.io docker-buildx-plugin docker-compose-plugin
上記でinstallは完了です。
あとは、Docker関連のコマンドをsudoなしで実行できるようにdockerグループにユーザを参加させましょう。
# ユーザをdockerグループに参加させる
$ sudo usermod -aG docker $USER

# シェルのリロード
$ source ~/.bashrc

# Docker関連のパッケージがinstallできているかを確認
$ docker -v
Docker version 29.1.2, build 890dcca

$ docker compose version
Docker Compose version v5.0.0
VSCode上で、拡張機能をinstall
まず、WSL上でVSCodeを起動しましょう。
# ホームディレクトリに移動
$ cd ~

# VSCodeをカレントディレクトリで起動
$ code .
VSCode上でCtrl + Shift + Xを押下すると、拡張機能タブを開くことができます。
検索用テキストボックスから検索し、以下の拡張機能をinstallします。
installすると、Containersタブ用のボタンが出現します。

hello-world用のコンテナを作成
VSCode上でCtrl + J(またはCtrl + @)を押下すると、ターミナルを起動できます。
起動したターミナル上で、以下のコマンドを実行します。
$ docker run hello-world

Unable to find image 'hello-world:latest' locally
latest: Pulling from library/hello-world
17eec7bbc9d7: Pull complete
ea52d2000f90: Download complete
Digest: sha256:d4aaab6242e0cace87e2ec17a2ed3d779d18fbfd03042ea58f2995626396a274
Status: Downloaded newer image for hello-world:latest

Hello from Docker!
This message shows that your installation appears to be working correctly.

To generate this message, Docker took the following steps:
 1. The Docker client contacted the Docker daemon.
 2. The Docker daemon pulled the "hello-world" image from the Docker Hub.
    (amd64)
 3. The Docker daemon created a new container from that image which runs the
    executable that produces the output you are currently reading.
 4. The Docker daemon streamed that output to the Docker client, which sent it
    to your terminal.

To try something more ambitious, you can run an Ubuntu container with:
 $ docker run -it ubuntu bash

Share images, automate workflows, and more with a free Docker ID:
 https://hub.docker.com/

For more examples and ideas, visit:
 https://docs.docker.com/get-started/
これで、hello-world用のDocker image・containerを作成できました。
VSCodeのContainersタブから確認します。hello-world関連のCONTAINERS・IMAGESが存在していれば成功です。
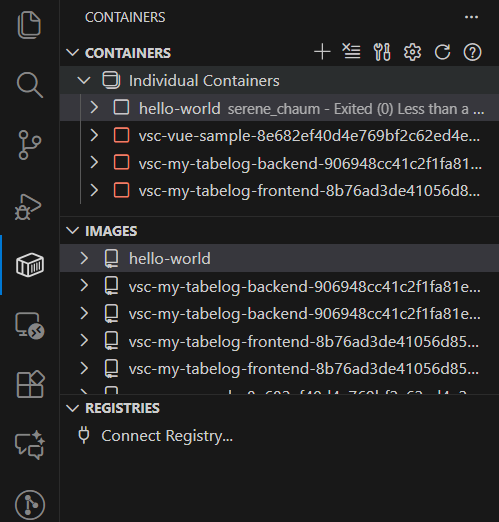
※hello-world用のimage・containerは、不要であれば適宜削除してください。
最後に
以前は「以前のバージョンの WSL の手動インストール手順」の方法でWSLをinstallしており手間でしたが、簡単にWSLをinstallできるようになりました。
また、Dockerのinstallも割と簡単に行うことができます。
プロジェクトのルートに.devcontainerディレクトリと.devcontainer/devcontainer.jsonを作成し、そのプロジェクトのルートをVSCodeで開くと、簡単にプロジェクトをコンテナ環境で開くことができます。
これらのセットアップについては、後続の記事でいつか説明しようと思います。
- Ctrl + Shift + Pでコマンドパレットを開き、
.devcontainerディレクトリの内容からコンテナを開くコマンドを参照

より良い方法などありましたらご教示ください。