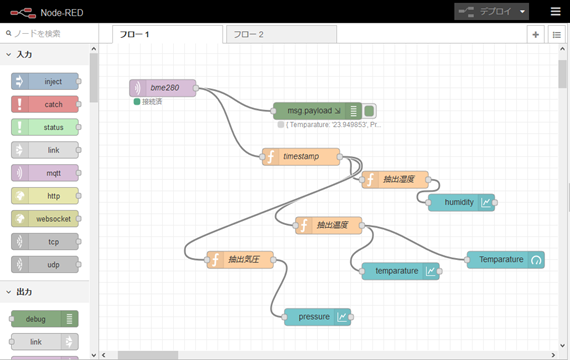
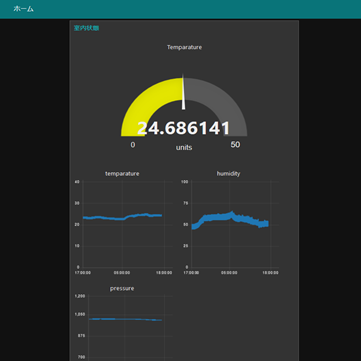
はじめに#
2019年5月にIoTLTにてLTをさせていただきました。
その内容のフォローを記入しながら自分なりに整理していきたいと思います。
発表内容:
スタートアップIoTデバイスのセキュリティを考える
前回までのあらすじ#
セキュアなIoTデバイス通信をやってみた(MbedTLS移植編-httpsテスト-接続)でhttpsでの基本的なGETリクエストの送信とレスポンスの受信を行いました。
今回の記事に関連するソースコードは下記にて公開中。
kmwebnet/ECC608-mqtts-client
MQTT接続のためのポーティング#
デバイス側から、MQTTSにてブローカーへ接続し、パブリッシュとサブスクライブをテストします。
今回の送信先のMQTTブローカーはCentOS7へOpenSSL1.1.1とMosquitto1.6をインストールで構築済みの
環境を使用します。
今回もコードからポーティングのポイントを整理します。
MQTTクライアントの組み込み
ESP-IDF向けのMQTTコードをsrc/mqttに配置する。
そのうち、transport_ssl.cのssl_connect関数へ、デバイスの証明書をATECC608A から抽出して組み込むルーチンを入れる。
    /* Convert to an mbedtls key */
    if (0 != atca_mbedtls_pk_init(&pkey, 0))
    {
        printf("Failed to parse key from device\n");
        goto exit;
    }

    /* Extract the device certificate and convert to mbedtls cert */
    if (0 != atca_mbedtls_cert_add(&ssl->cert, &g_cert_def_2_device))
    {
        printf("Failed to parse cert from device\n");
        goto exit;
    }

    status = atcab_release();
	 if (ATCA_SUCCESS != (status = atcab_init(&cfg)))
	 {
	     printf("Failed to init: %d\r\n", status);
	 }

    /* Extract the signer certificate, convert, then attach to the chain */
    if (0 != atca_mbedtls_cert_add(&ssl->cert, &g_cert_def_1_signer))
    {
        printf("Failed to parse cert from device\n");
        goto exit;
    }


    /* Attach the certificate chain and private key to the SSL/TLS context */
    printf("  . Set up the client credentials.");
    fflush(stdout);
    if(0 != (ret = mbedtls_ssl_conf_own_cert(
            &ssl->conf, &ssl->cert, &pkey)))
    {
        printf(" failed\n ! mbedtls_ssl_conf_own_cert returned %d\r\n", ret);
        goto exit;
    }
    printf(" ok\n");
メイン処理について
main.c内の分析。
実際のMQTTの処理は、まずmqtt_app_start内の下記、接続先URLの設定とクライアントの起動が行われる。
    const esp_mqtt_client_config_t mqtt_cfg = {
        .uri = "mqtts://testcorp.com:8883",
//        .host = "",
//        .port = ,
        .event_handle = mqtt_event_handler,
        .cert_pem = (const char *)rootcacert,
    };

    ESP_LOGI(TAG, "[APP] Free memory: %d bytes", esp_get_free_heap_size());
    esp_mqtt_client_handle_t client = esp_mqtt_client_init(&mqtt_cfg);
    esp_mqtt_client_start(client);
esp_mqtt_client_start(client);は内部で、サブスクライブのFreeRTOSのタスクを起動させ、
MQTTメッセージを待ち受けている状態になる。
そのあと、BME280 の初期化が行われた後、下記のループに入る。
    while(1) {

…

            com_rslt = bme280_read_uncomp_pressure_temperature_humidity(
          &v_uncomp_pressure_s32, &v_uncomp_temperature_s32, &v_uncomp_humidity_s32);

…

    sprintf(pubMessage,
        "{\"Temparature\": \"%f\" , "
        "\"Pressure\": \"%f\" , "
        "\"Humidity\": \"%f\"}",
        bme280_compensate_temperature_double(v_uncomp_temperature_s32),
        bme280_compensate_pressure_double(v_uncomp_pressure_s32)/100,
        bme280_compensate_humidity_double(v_uncomp_humidity_s32)) ;


esp_mqtt_client_publish(client, "/topic/qos0", pubMessage, 0, 0, 0);

const portTickType yDelay = 10000 / portTICK_RATE_MS; // 1000ms

vTaskDelay(yDelay);

    }
処理の流れとしては、
1、 BME280 の計測結果を取得
2、 JSONの形にデータを整形
3、 esp_mqtt_client_publishでデータをパブリッシュ
4、 10秒ウェイト
この繰り返しになる。
/topic/qos0 がトピック名になり、他のノードからこのトピックへパブリッシュすると
mqtt_event_handlerのMQTT_EVENT_DATAが捕まえてコンソール上へ表示する動作を行う。
I (24175) ECC608: Stack remaining for task 'main' is 1904 bytes
I (24185) MQTT_CLIENT: deliver_publish, message_length_read=97, message_length=97
I (24185) ECC608: MQTT_EVENT_DATA
TOPIC=/topic/qos0
DATA={"Temparature": "26.485141" , "Pressure": "1004.483107" , "Humidity": "53.987691"}
I (25325) MQTT_CLIENT: deliver_publish, message_length_read=97, message_length=97
I (25325) ECC608: MQTT_EVENT_DATA
TOPIC=/topic/qos0
DATA={"Temparature": "26.947010" , "Pressure": "1005.009985" , "Humidity": "59.377412"}

