はじめに#
2019年5月にIoTLTにてLTをさせていただきました。
その内容のフォローを記入しながら自分なりに整理していきたいと思います。
発表内容:
スタートアップIoTデバイスのセキュリティを考える
前回までのあらすじ#
セキュアなIoTデバイス通信をやってみた(概念理解編)でセキュリティを向上させるハードウェアの整理と、具体的にハードウェアがどうセキュリティを向上させるのかを整理しました。
環境構築#
実際に手元のマイコンを使って環境を構築し、セキュアなIoTデバイス通信を行ってみます。
一番安いATECC608AをDigi-keyにて発注
25個買うと割引!(91円→85円)
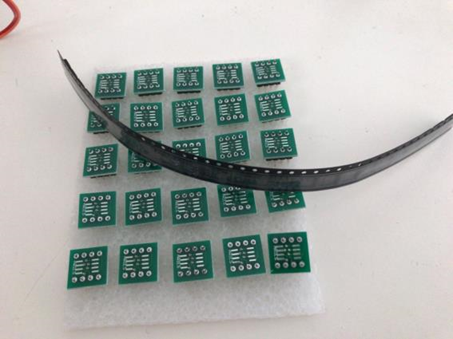
SOIC⇒DIP変換のほうが高い!(279円)
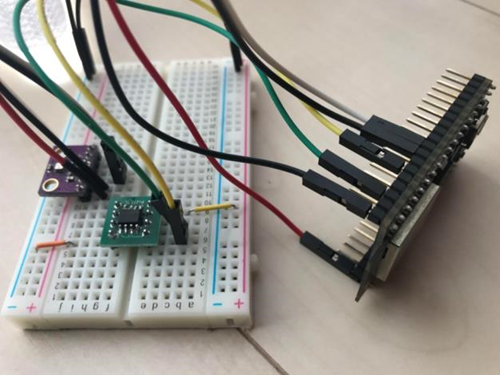
■実装
BOMリスト:
ESP32-DevKitC 1個
ATECC608A 1個
SOIC⇒DIP変換 1個
GY-BME280 1個
I2Cは100kHzで
I2C0をピン21,22(ATECC608A)
I2C1をピン18,19(GY-BME280)へ接続
■ファーストステップ
まず、ESP32とATECC608Aが疎通できるかどうかの確認を行うこととする。
きちんとI2Cレベルの通信ができるか、Arduinoのサンプルプログラム、I2CScannerをベースにカスタマイズを行い、2つのI2Cの疎通を確認できるプログラムを作成、実行する。
Arduino 1.8.9でのコードサンプル。
    #include <Wire.h>

    TwoWire i2c1(1);
    void setup()
    {
      Wire.begin();
      Wire.setClock(100000);

      pinMode(21, INPUT_PULLUP);
      pinMode(22, INPUT_PULLUP);

      i2c1.begin(18, 19);
      i2c1.setClock(100000);

      Serial.begin(115200);
      while (!Serial);
      Serial.println("\nI2C Scanner");
    }


    void loop()
    {
      byte error, address;
      int nDevices;

      Serial.println("Scanning...");

      nDevices = 0;
      for(address = 1; address < 127; address++ )
      {
        // The i2c_scanner uses the return value of
        // the Write.endTransmisstion to see if
        // a device did acknowledge to the address.
        Wire.beginTransmission(address);
        error = Wire.endTransmission();

        if (error == 0)
        {
          Serial.print("device found on I2C port 0 at address 0x");
          if (address<16)
            Serial.print("0");
          Serial.print(address,HEX);
          Serial.println("  !");

          nDevices++;
        }
        else if (error==4)
        {
          Serial.print("Unknown error at address 0x");
          if (address<16)
            Serial.print("0");
          Serial.println(address,HEX);
        }

        i2c1.beginTransmission(address);
        error = i2c1.endTransmission();

        if (error == 0)
        {
          Serial.print("device found on I2C port 1 at address 0x");
          if (address<16)
            Serial.print("0");
          Serial.print(address,HEX);
          Serial.println("  !");

          nDevices++;
        }
        else if (error==4)
        {
          Serial.print("Unknown error at address 0x");
          if (address<16)
            Serial.print("0");
          Serial.println(address,HEX);
        }


      }
      if (nDevices == 0)
        Serial.println("No I2C devices found on I2C port 0\n");
      else
        Serial.println("done\n");

      delay(5000);           // wait 5 seconds for next scan
    }
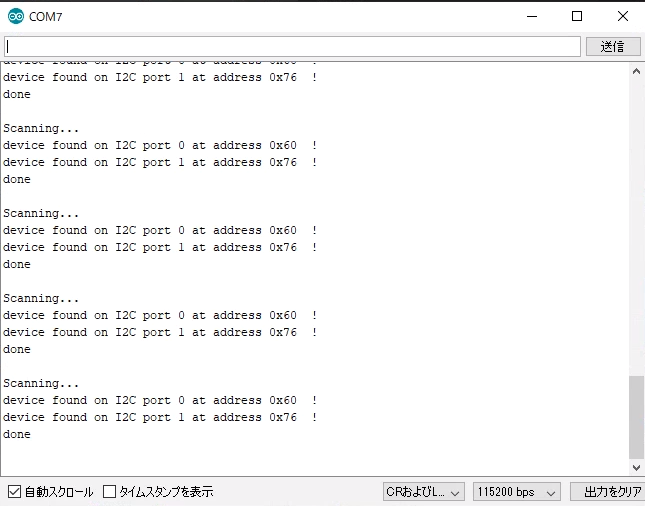
実装すると、以下のように、ポート0では0x60でATECC608Aを見つけ、ポート1で0x76でBME280 を問題なく認識しているのを確認できる。
I2Cのクロック速度は今回は100kHzにて設定。