#幼稚園9月号 のふろく、#セブン銀行 のATMをQRコード対応にしてみた。仕組みは近日公開。#soracom #wiolte pic.twitter.com/gkvA7Stk9s
— Kosuke Koiwai (@kocko) August 25, 2019
7月末にネットを駆け巡った、月刊「ようちえん」の付録に関するニュース。
幼稚園9月号ふろくは「セブン銀行ATM」。モーターユニット内蔵で、お札の出し入れが楽しめます。お札を入れるときは、なるべくまっすぐ入れてください。本物と同じサイズのお札が12枚付き。8月1日ごろ発売です。 pic.twitter.com/9uVRXkV6LN
— 小学館『幼稚園』編集部 (@youchien_hensyu) July 29, 2019
絶対欲しい!と思い、即予約注文しました。
でも、ただ組み立てて遊ぶだけではつまらないので、スマホATM対応させることにしました。
スマホATMとは、セブン銀行のATMで表示されるQRコードを、スマホアプリで読み込むことで、キャッシュカード不要でお金が引き出せる、じぶん銀行など一部の銀行が対応しているサービスです。

全体像
今回作った、スマホATMの全体像はこんな感じです。
ATMに表示させた(貼り付けた)QRコードをスマホで読み込むことでブラウザを起動し、AWS上のWebサイトを表示。Webサイト上の操作で、SORACOM Beamを経由してMQTTでWio-LTEに信号を送って、ATMのモーターを動かします。
それぞれ繋ぐだけで、簡単に動くと思ったのですが、とくにハード側が意外と面倒でした。

スマホ・サーバ間の仕組みをつくる
まずはサーバ側の仕組みを作っていきます。
サーバは、すべてAWSで構成します。AWSといっても、EC2などを使うと、維持費がそれなりにかかってしまうので、なるべく安上がりになるように、Lambdaを中心に組み立てていきます。

LamdaとAPI GatewayでWebサイトを作る
AWS Lambda と Python で作る動的な HTML ページ - Qiita を参考にさせて頂き、かんたんなHTMLを返したり、GETリクエストに対応するWebサイトを作りました。ソースは後ほど。
画面デザイン
外注しました。


ロジック
今回、時間とやる気の都合上、ATMに表示するQRコードは動的に変更されない(画像として貼り付ける)ことにします。
すると、複数のユーザが同時にWebサイトにアクセスされる可能性があるので、それを防止するために、下記ページを参考にさせて頂き、ロックを実現しました。
DynamoDBでセマフォを実現するための同時アクセスを検証してみた | DevelopersIO
Topページにアクセスされると、他にユーザがアクセスしていないかDBに問い合わせ、誰もいなければ、uuidを払い出してDBに保存します。ユーザのその後のGETリクエストに、uuidが付与されるようにします。
タイムアウト時間も設定して、一定期間後にはuuidが無効になるようにします。
ソースはまとめて後ほど。
Wio-LTEへの指示だし(MQTT)
ATMを操作するマイコンボード、Wio-LTEとは、MQTTで通信します。LamdaからMQTTで通信するための設定は、下記エントリをご参照ください。
Wio LTE M1/NB1(BG96) で本当にパケ死せずにデータを受け取る(MQTT編) - Qiita
なるべく処理を簡略化させるために、送信する情報は int8_t (1バイトの整数: -127から128の間の値)とします。数値は、モータを動作させる秒数、マイナスは逆転、プラスは正転です。
画面遷移

Lambdaのソースコード
長いですが。
import sys
import boto3
import time
import json
import uuid

from pprint import pprint

dynamodb = boto3.resource('dynamodb')
table = dynamodb.Table("watashi-atm-lock-status")

iot = boto3.client('iot-data')

def lambda_handler(event, context):

    if (event["httpMethod"] != "GET"):
        # GET以外は受け付けない
        html = render_top_error()
    elif (event["path"] == "/" ):
        # rootに来たらトップメニュー
        html = top_menu()
    elif (event["path"] == "/close"):
        # 取引終了画面は、uuidパラメータなしでも表示
        if event.get("queryStringParameters") is None:
            # get("queryStringParameters",{})は、Noneが返って来ちゃうのでget("uuid")がエラーになる
             html = close_transaction(None)
        else:
            html = close_transaction(event["queryStringParameters"].get("uuid"))
    elif (event["path"] == "/timeout" ):
        html = render_timeout_error()
    elif event.get("queryStringParameters") is None:
        # 引数がない場合はエラー
        html = render_top_error()
    elif (event["path"] == "/cash_in" ):
        html = cash_in(event["queryStringParameters"].get("uuid"))
    elif (event["path"] == "/cash_out" ):
        html = cash_out(event["queryStringParameters"].get("uuid"))
    else:
        html = render_top_error()

    return {
        "statusCode": 200,
        "headers": {"Content-Type": "text/html"},
        "body": html
    }

def top_menu():
    # トップ画面にアクセスされた場合
    # 1. 他のユーザがアクセスしていないか確認し、uuidを払い出し
    #    → もし他のユーザがアクセス中だったらエラー画面
    # 2. メニューを表示

    client_uuid = lock_uuid()
    if(client_uuid == None):
        return render_top_error()

    else:
        return render_top_menu(client_uuid)

def cash_out(client_uuid):
    # ロックを外す(成功したなら、いままで利用権を持っていたということ)
    if(unlock_uuid(client_uuid)):
        activate_atm("cash_out")
        return render_cash_out(client_uuid)
    else:
        # 失敗したということは、タイムアウトしてしまった
        return render_timeout_error()

def cash_in(client_uuid):
    # ロックを外す(成功したなら、いままで利用権を持っていたということ)
    if(unlock_uuid(client_uuid)):
        activate_atm("cash_in")
        return render_cash_in(client_uuid)

    else:
        # 失敗したということは、タイムアウトしてしまった
        return render_timeout_error()


def close_transaction(client_uuid):
    # 取引終了画面

    # TOPから直接来た場合にはロックが外れていないため,とりあえずロックを外す(成功しても失敗してもよい)
    unlock_uuid(client_uuid)

    return render_close_transaction()


def render_top_menu(client_uuid):
    # TopメニューのHTMLを生成し、返却
    html = render_html_header("わたし銀行 TOP")
    html += f"""
    <body>
    <img src="https://watashi-atm-static.s3-ap-northeast-1.amazonaws.com/top.png" usemap="#ImageMap" alt="" />
    <map name="ImageMap">
      <area shape="rect" coords="0,0,486,191" href="https://短縮.jp/atm" alt="仕組みの説明" />
      <area shape="rect" coords="66,466,1121,750" href="/atm/cash_out?uuid={client_uuid}" alt="お金を引き出す" />
      <area shape="rect" coords="65,773,1118,954" href="/atm/cash_in?uuid={client_uuid}" alt="お金をあずける" />
      <area shape="rect" coords="65,973,1119,1201" href="/atm/close?uuid={client_uuid}" alt="終了する" />
    </map>
    """+"""
    <script>
    setTimeout(function(){
         window.location.href = '/atm/timeout';
    }, 10*1000);
    </script>
    """
    html += render_html_footer()
    return html

def render_top_error():
    # TopメニューのHTMLを生成し、返却
    html = render_html_header("わたし銀行 TOP")
    html += '''
    <img src="https://watashi-atm-static.s3-ap-northeast-1.amazonaws.com/busy.png" usemap="#ImageMap" alt="しばらく経ってから再度お試しください。。" />
    <map name="ImageMap">
      <area shape="rect" coords="0,0,486,191" href="https://短縮.jp/atm" alt="仕組みの説明" />
      <area shape="rect" coords="180,860,1084,1247" href="javascript:window.open('about:blank','_self').close();" alt="画面を閉じる" />
    </map>
    '''
    html += render_html_footer()
    return html


def render_timeout_error():
    # TopメニューのHTMLを生成し、返却
    html = render_html_header("わたし銀行 タイムアウト")
    html += '''
    <img src="https://watashi-atm-static.s3-ap-northeast-1.amazonaws.com/timeout.png" usemap="#ImageMap" alt="しばらく経ってから再度お試しください。。" />
    <map name="ImageMap">
      <area shape="rect" coords="0,0,486,191" href="https://短縮.jp/atm" alt="仕組みの説明" />
      <area shape="rect" coords="180,860,1084,1247" href="javascript:window.open('about:blank','_self').close();" alt="画面を閉じる" />
    </map>
    '''
    html += render_html_footer()
    return html


def render_close_transaction():
    # 取引終了画面のHTMLを生成し、返却
    html = render_html_header("わたし銀行 取引終了")
    html += '''
    <img src="https://watashi-atm-static.s3-ap-northeast-1.amazonaws.com/close.png" usemap="#ImageMap" alt="ご利用ありがとうございました。" />
    <map name="ImageMap">
      <area shape="rect" coords="0,0,486,191" href="https://短縮.jp/atm" alt="仕組みの説明" />
      <area shape="rect" coords="180,860,1084,1247" href="javascript:window.open('about:blank','_self').close();" alt="画面を閉じる" />
    </map>
    '''
    html += render_html_footer()
    return html

def render_cash_out(client_uuid):
    # 取引終了画面のHTMLを生成し、返却
    html = render_html_header("わたし銀行 引き出し")
    html += '''<body>
    <img src="https://watashi-atm-static.s3-ap-northeast-1.amazonaws.com/cash_out.png" alt="引き出し中" />
    <script>
    setTimeout(function(){
         window.location.href = '/atm/close';
    }, 5*1000);
    </script>
    </body>
    '''
    html += render_html_footer()
    return html

def render_cash_in(client_uuid):
    # 取引終了画面のHTMLを生成し、返却
    html = render_html_header("わたし銀行 預け入れ")
    html += '''<body>
    <img src="https://watashi-atm-static.s3-ap-northeast-1.amazonaws.com/cash_in.png" alt="お金を入れてください" />
    <script>
    setTimeout(function(){
         window.location.href = '/atm/close';
    }, 5*1000);
    </script>
    </body>
    '''
    html += render_html_footer()
    return html

def lock_uuid():
    # 現在ATMをだれも利用していない場合、client_uuidを返却
    # 現在ATMを誰かが利用している場合、nullを返却

    client_uuid = str(uuid.uuid4())

    # client_uuid で Lockテーブルをstatus=1に更新する。
    now = int(time.time())
    timeout = now - 10 # 10秒以上前にアップデートされていたらタイムアウトなので上書きできる
    key = {"atm_id": "1"}
    update = 'SET LockStatus = :status, update_time= :datetime, client_uuid = :client_uuid'
    condition = "LockStatus = :condition OR update_time < :timeout"
    attrib = {":status": 1,":datetime":now, ":condition": 0, ":timeout" : timeout, ":client_uuid" : client_uuid}

    try:
        table.update_item(
            Key=key,
            UpdateExpression=update,
            ConditionExpression=condition,
            ExpressionAttributeValues=attrib)

    except Exception as error:
        # Updateが失敗したということは、現在利用中の他ユーザが存在
        print("error caught: ")
        pprint(error)
        return None

    # Updateが成功
    return client_uuid


def unlock_uuid(client_uuid):
    # client_uuidが現在も有効な場合(uuidが同一かつstatus=1かつupdateが10秒以内)、statusを0(非利用)にしてtrueを返却
    # client_uuidが無効な場合(他のユーザが利用中、非利用中、またはタイムアウト)、falseを返却

    # client_uuid で Lockテーブルをstatus=0に更新する。
    now = int(time.time())
    timeout = now - 10 # 10秒以上前にアップデートされていたらタイムアウトなので失敗
    key = {"atm_id": "1"}
    update = 'SET LockStatus = :status, update_time= :datetime, client_uuid = :client_uuid'
    condition = "client_uuid = :client_uuid AND LockStatus = :condition AND update_time > :timeout"
    attrib = {":status": 0,":datetime":now, ":condition": 1, ":timeout" : timeout, ":client_uuid" : client_uuid}

    try:
        table.update_item(
            Key=key,
            UpdateExpression=update,
            ConditionExpression=condition,
            ExpressionAttributeValues=attrib)

    except Exception as error:
        # Updateが失敗
        print("error caught: ")
        pprint(error)
        return False

    # Updateが成功
    return True

def render_html_header(title):
    return """
    <!DOCTYPE html>
    <html lang="ja">
    <head>
    <meta charset="UTF-8">
    <title>""" + title + """</title>
    <style>
    div {
    	width: 100%;
    }
    img {
    	border: none;
    	height: auto;
    	max-width: 100%;
    	width: auto;
    }
    </style>
    </head>
    """


def render_html_footer():
    return """
    <script src="http://ajax.googleapis.com/ajax/libs/jquery/1.10.2/jquery.min.js"></script>
    <script src="https://watashi-atm-static.s3-ap-northeast-1.amazonaws.com/jquery.rwdImageMaps.min.js"></script>
    <script>
        $(document).ready(function(e) {
        	$('img[usemap]').rwdImageMaps();
        });
    </script>
    </body>
    </html>
    """


def activate_atm(action):
    # signed char で受け取るので、127以下
    atm_duration_sec = 5
    if (action=="cash_out"):
        atm_duration_sec = atm_duration_sec * -1

    try:
        iot.publish(
            topic= 'AtmActivate',
            qos=0,
            # signed charに変換
            payload=atm_duration_sec.to_bytes(1, byteorder='little', signed=True)
        )
    except Exception as e:
        print(e)
サーバ・ATM間の仕組みをつくる
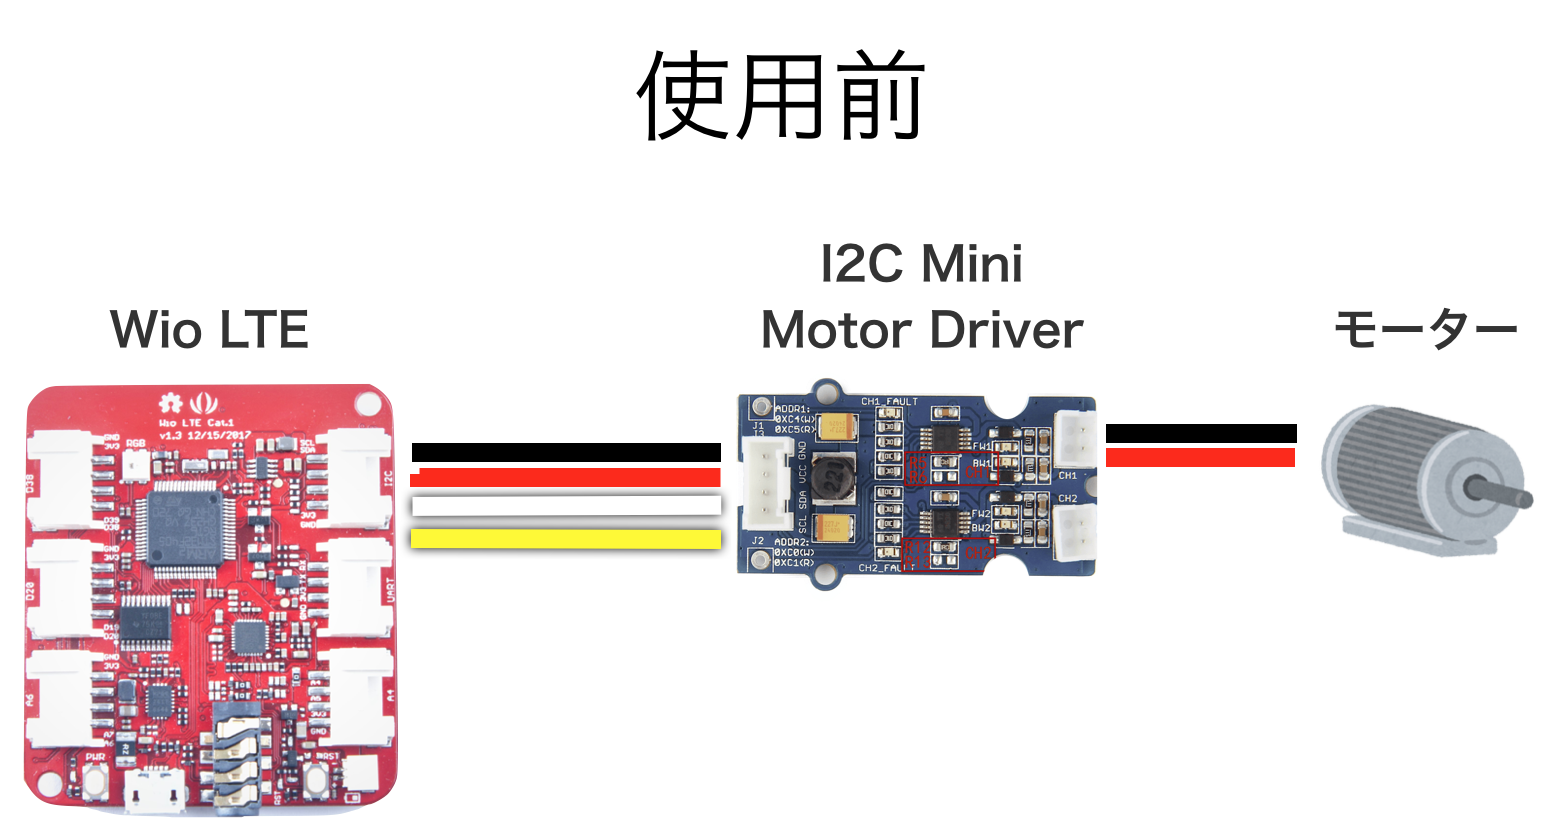
サーバとATMとの間の構成は下記の通りです。
MQTTで指示を受けたWio-LTEが、モーターを駆動させます。

モータードライバーの接続
Wio-LTEには、Groveコネクタが6つついており、あらゆるセンサーなどを簡単に接続して使うことができます。モータを動かすため、下記のGroveモジュールを買いました。
GROVE - I2C ミニモータードライバ - SWITCH-SCIENCE
そして、テストコードで試してみたところ。。。
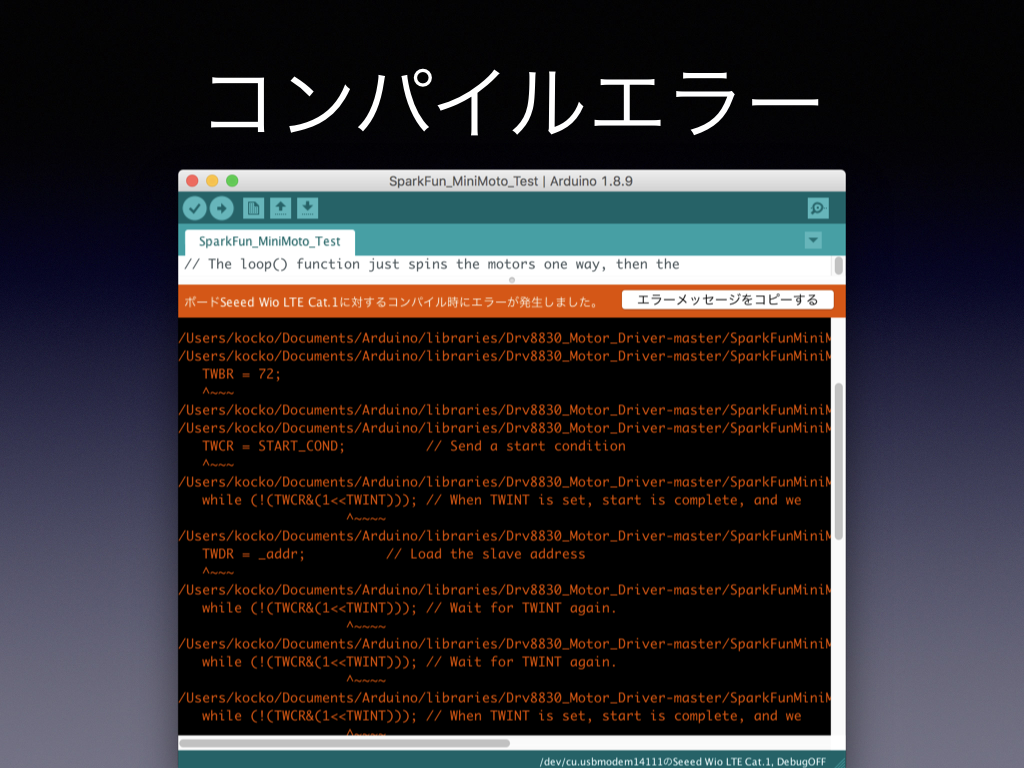
どうやら、Seeed社の公開している純正ライブラリでは、いわゆる普通のArduinoで使われる、AVR系のマイコンのみに対応しており、Wio-LTEが搭載しているSTM32シリーズには対応していないようです。
そのため、ライブラリを修正します。
ライブラリの修正
修正したライブラリはこちら。
kkoiwai/Grove_Mini_I2C_Motor_Driver: Grove_Mini_I2C_Motor_Driver - DRV8830 Library using Wire
純正ライブラリでは、AVR系マイコンのレジスタを直接叩いてI2C通信をしていましたが、Arduinoには、I2C通信を抽象化したWireライブラリがあるので、こちらを利用するように修正しました。
ちなみに、注意点ですが、i2cのデバイスのアドレスは7bitで、最後の8bit目で送信・受信を切り替えます。修正前のライブラリは8bitでアドレスを指定しますが、Wireライブラリは7bitで指定するので、1ビット右にシフトする必要があります。
ちなみにですが、後で気付いたのですが、純正ライブラリをForkして、同様にWireライブラリ対応している人がいました。車輪の再発明。
Wio-LTEのソースコード
# include <WioLTEforArduino.h>
# include <WioLTEClient.h>
# include <PubSubClient.h>		// https://github.com/SeeedJP/pubsubclient
# include <GroveMiniMoto.h> // https://github.com/kkoiwai/Grove_Mini_I2C_Motor_Driver
# include <stdio.h>

# define APN               "soracom.io"
# define USERNAME          "sora"
# define PASSWORD          "sora"

# define MQTT_SERVER_HOST  "beam.soracom.io"
# define MQTT_SERVER_PORT  (1883)

# define ID                "WioLTE"
# define IN_TOPIC          "AtmActivate"
# define OUT_TOPIC         "AtmActivateError"

# define MOTOR_POWER   0x13 // 1.53v
MiniMoto motor0(0x65);  // 0x65 = (0xCA >> 1)

WioLTE Wio;
WioLTEClient WioClient(&Wio);
PubSubClient MqttClient;

void callback(char* topic, byte* payload, unsigned int length) {
  SerialUSB.print("Subscribe:");
  for (int i = 0; i < length; i++) SerialUSB.print((int8_t)payload[i]);
  SerialUSB.println("");

  int secs = (int8_t)payload[0];

  int power = MOTOR_POWER;
  if(secs < 0){
    power = power * -1;
  }
  secs = abs(secs);

  SerialUSB.print("Motor will run for:");
  SerialUSB.print(secs);
  SerialUSB.print(" seconds and power: ");
  SerialUSB.print(power);
  SerialUSB.println(".");

  motor0.drive(power);

  SerialUSB.println("Motor Power On");
  do{
    SerialUSB.print("   remaining:");
    SerialUSB.println(secs);
    delay(1000);
  }while(checkFaultStatus() && --secs > 0);
  motor0.stop();
  SerialUSB.println("Motor Power Off");
}

void setup() {
  delay(200);

  SerialUSB.println("");
  SerialUSB.println("--- START ---------------------------------------------------");

  SerialUSB.println("### I/O Initialize.");
  Wio.Init();
  Wio.PowerSupplyGrove(true);
  delay(100);
  motor0.begin();
  motor0.stop();

  SerialUSB.println("### Power supply ON.");
  Wio.PowerSupplyLTE(true);
  delay(500);

  SerialUSB.println("### Turn on or reset.");
  if (!Wio.TurnOnOrReset()) {
    SerialUSB.println("### ERROR! ###");
    return;
  }

  SerialUSB.println("### Connecting to \""APN"\".");
  if (!Wio.Activate(APN, USERNAME, PASSWORD)) {
    SerialUSB.println("### ERROR! ###");
    return;
  }

  SerialUSB.println("### Connecting to MQTT server \""MQTT_SERVER_HOST"\"");
  MqttClient.setServer(MQTT_SERVER_HOST, MQTT_SERVER_PORT);
  MqttClient.setCallback(callback);
  MqttClient.setClient(WioClient);
  if (!MqttClient.connect(ID)) {
    SerialUSB.println("### ERROR! ###");
    return;
  }
  MqttClient.subscribe(IN_TOPIC);

  char data[100];
  sprintf(data,"Setup complete.");
  MqttClient.publish(OUT_TOPIC, data);
  SerialUSB.println("### Setup completed.");
}

void loop() {
  MqttClient.loop();
  delay(500);

}

bool checkFaultStatus(){
    byte result = motor0.getFault();
  // If result masked by FAULT is non-zero, we've got a fault
  //  condition, and we should report it.
  if (result & FAULT)
  {
    SerialUSB.print("Motor 0 fault: ");
    if (result & OCP) SerialUSB.println("Chip overcurrent!");
    if (result & ILIMIT) SerialUSB.println("Load current limit!");
    if (result & UVLO) SerialUSB.println("Undervoltage!");
    if (result & OTS) SerialUSB.println("Over temp!");

    char data[100];
    if (result & OCP) sprintf(data,"Chip overcurrent!");
    if (result & ILIMIT) sprintf(data,"Load current limit!");
    if (result & UVLO) sprintf(data,"Undervoltage!");
    if (result & OTS) sprintf(data, "Over temp!");
    MqttClient.publish(OUT_TOPIC, data);
    return false;

  }

  return true;
}
ATMとの接続
モータードライバの端子を、ATMのモータと接続します。
こちらのケーブルを買うと便利です。
JST製PHコネクタ2ピン付きワイヤ(赤黒) - SWITCH-SCIENCE
ATMのモータには、単三電池が1本入ります。
被覆を剥いたケーブルにアルミホイルを巻き付けて、電池の端子に挟みます。
そのあと、ダミー単三電池を入れておくとしっかりと固定できます。
ケースに切り込みを入れて電池の蓋をして、ケーブルを下から出すようにしてモータをセットします。


初回の動作確認では動かず。
コネクタをモータードライバと接続して、さぁ動作確認!と意気込んだのですが、残念ながらびくともせず。電圧が足りないエラーとなりました。

5Vを繋いでみる。
電圧が足らないのならば、直接5Vを供給してしまえ!ということで、Groveのケーブルをぶった切って、モータードライバに5Vを供給するようにしてみます。5Vはモバイルバッテリから供給します。慌てて100円ショップに行き、適当なケーブルを買ってきてつなげました。
ちなみに、Wio-LTEは3.3vなので、i2cの信号の電圧が5vになることが心配でしたが、「大丈夫」との書き込みを見つけたので、それを信じることにします。
All of the pins that can be I2C pins are qualified to be 5V tolerant according to the ST Micro documentation.
Can I directly interface to 5V I2C devices with an STM32 running on 1.8V? - Electrical Engineering Stack Exchange

皆様がお試しになる場合は自己責任で。
(多少)動いた
紆余曲折ありましたが、多少不安定なものの、無事ATMを動かすことができました。
— Kosuke Koiwai (@kocko) August 25, 2019