今回はいよいよTektonベースのOpenshift Pipelineを使用して以下のリンク先のTutorialを実施します。
openshift/pipelines-tutorial: A step-by-step tutorial showing OpenShift Pipelines
ちなみに今回は、以下で紹介されているIBM Cloud上のOpenShiftクラスター環境を使用した結果を元に書いています。
(環境の利用手順などはリンク先の記事を参照ください)
OpenShift on IBM Cloud をデモサイトから無料で試す方法
Red Hat OpenShift on IBM Cloud の無料Hands-onを試してみる - Lab1
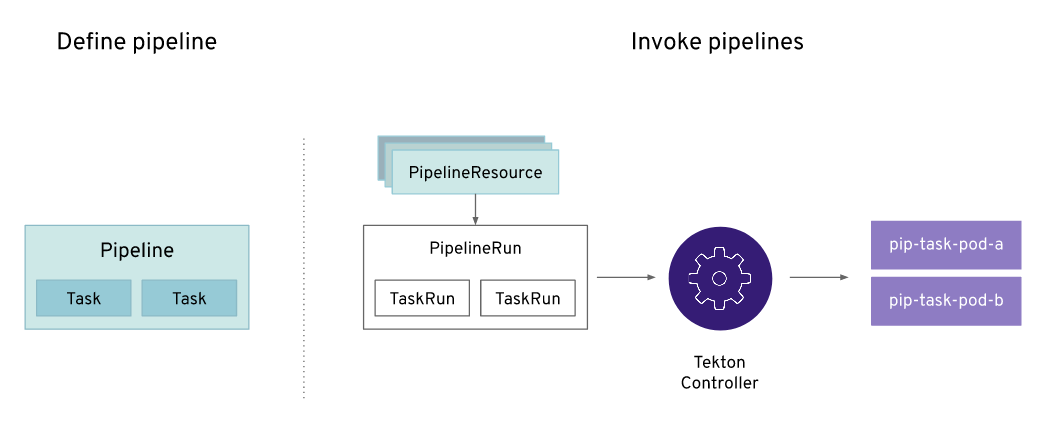
Tektonの概要
Tektonは昨年発足したContinuous Delivery Foundation (CDF) の下で開発されており、Kubernetes-StyleでCI/CDパイプラインを実現するためのオープンソース・プロジェクトになります。
このTektonをベースとしたOpenshift Pipelineについては、先日 Technical Preview 1.0がリリースされています。(以下参考)
OpenShift Pipelines Now Available as Technology Preview
Tektonの特徴として、以下が挙げられます。
- カスタムリソースとして定義されるKubernetes NativeなCI/CDパイプライン
- パイプラインはKubernetes上のコンテナとして、Serverlessモデルでオンデマンドで稼働
- 様々な環境のKubernetesクラスター上でポータブルに実行可能なパイプラインを実現
- 予めカタログされた様々なTaskをパイプライン上で利用可能
Tekton CLIの導入
まずTutorialの内容に入る前に以下のリンク先に従って、Tekton のCLIを導入します。
tektoncd/cli: A CLI for interacting with Tekton!
>tkn
CLI for tekton pipelines

Usage:
  tkn [command]

Available Commands:
  clustertask           Manage clustertasks
  clustertriggerbinding Manage clustertriggerbindings
  condition             Manage conditions
  eventlistener         Manage eventlisteners
  pipeline              Manage pipelines
  pipelinerun           Manage pipelineruns
  resource              Manage pipeline resources
  task                  Manage tasks
  taskrun               Manage taskruns
  triggerbinding        Manage triggerbindings
  triggertemplate       Manage triggertemplates

Other Commands:
  completion            Prints shell completion scripts
  version               Prints version information

Flags:
  -h, --help   help for tkn

Use "tkn [command] --help" for more information about a command.
上記が出力されれば導入は成功です。
今回はIBM Cloud上のOpenShiftクラスター環境に対して、上のCLIを使用して主な操作を行っています。
なおoc loginしてバージョンを確認すると、以下のように自分の環境では表示されました。
>oc version
Client Version: openshift-clients-4.3.14-202004180552
Server Version: 4.3.19
Kubernetes Version: v1.16.2
OpenShift Pipeline の導入
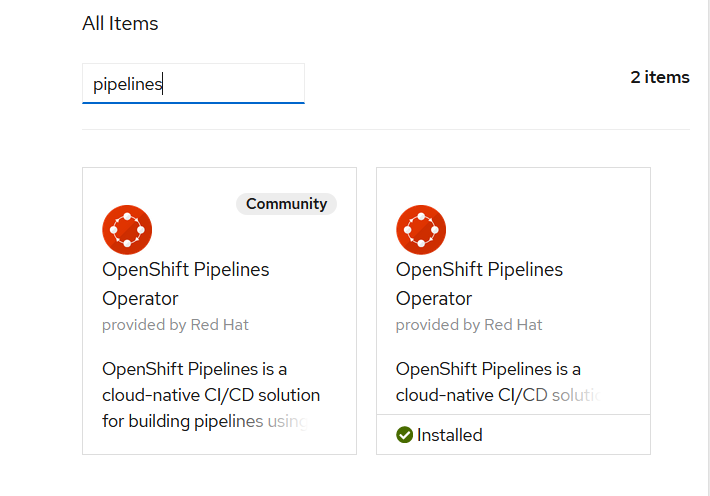
TektonベースのPipelineを利用するためには、まずOpenshift Pipelines Operatorを導入します。
OpenShiftのWebコンソールにアクセスし、OperatorHubで対象のOperatorを検索します。
同名のOperatorが2つ表示されますが、Communityのついていない方を選択します。
こちらが先日リリースされた最新のOperatorです。
(下の画面は導入後のものになりますので、installedがついている方です)
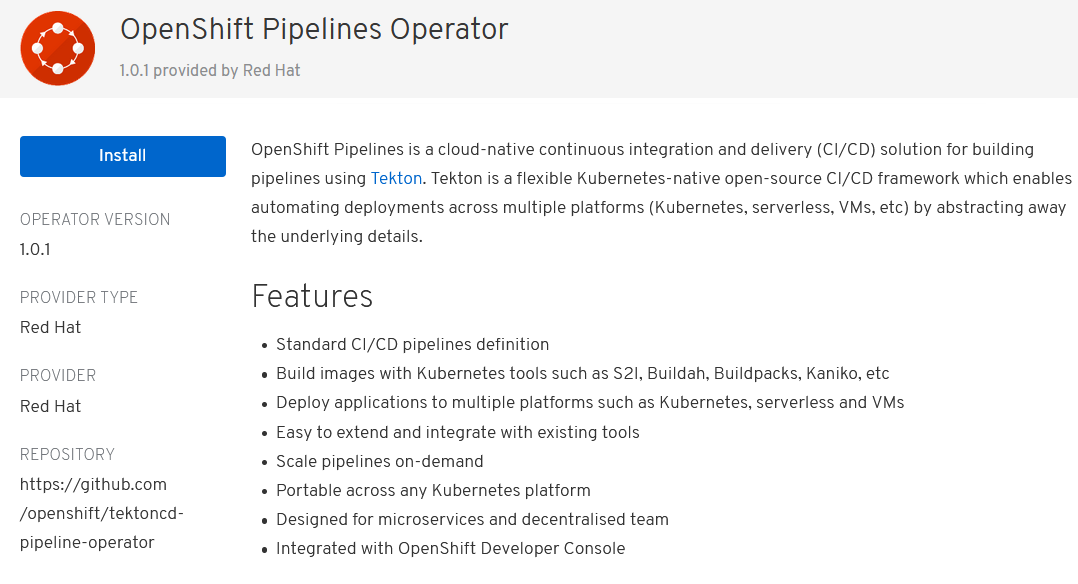
Operatorの詳細を確認して、Installを押下します。
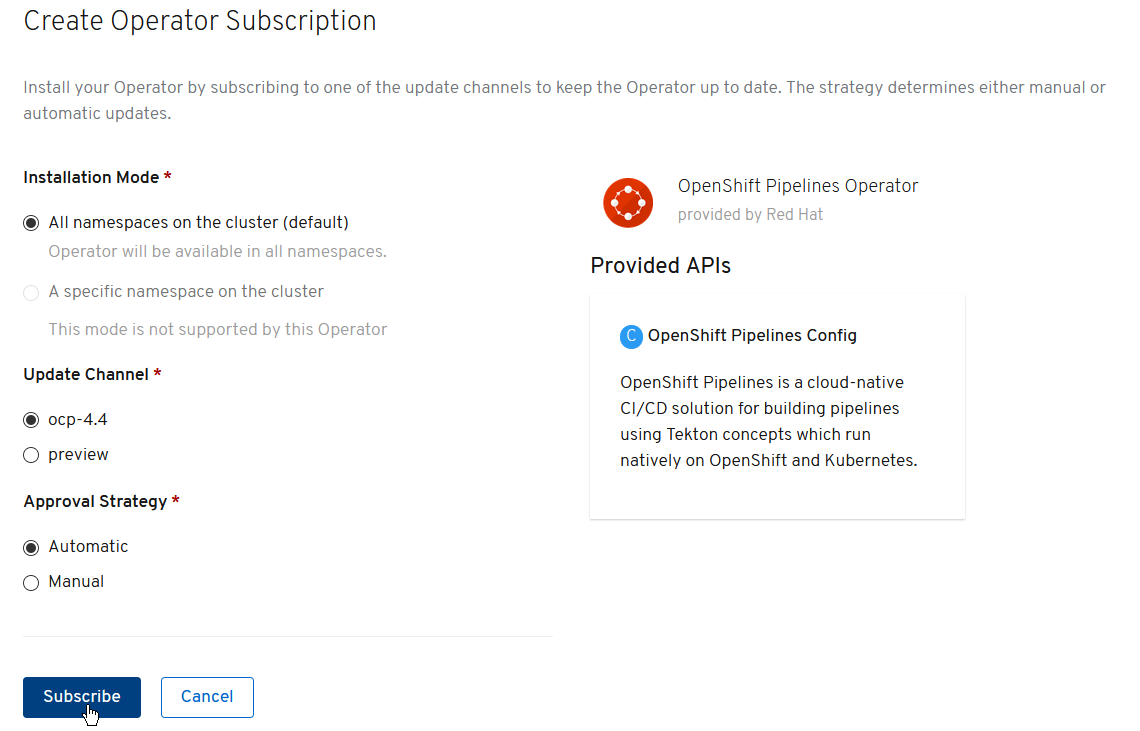
Subscription画面ではそのままSubscribeを押下します。
少し待つとOperatorの導入が完了し、以下のように表示されます。
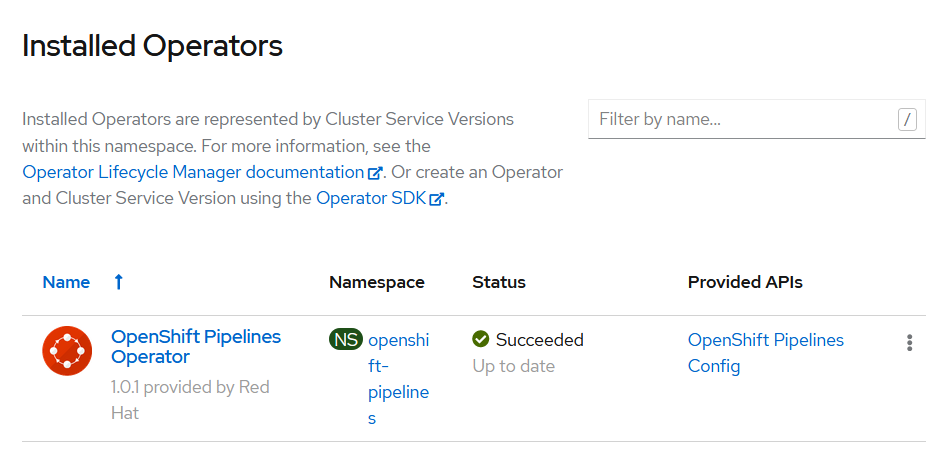
Operatorを導入すると、openshift-pipelinesプロジェクトに以下のPodが起動します。
>oc get pods -n openshift-pipelines
NAME                                           READY   STATUS    RESTARTS   AGE
tekton-pipelines-controller-5dcc99d6fd-l926l   1/1     Running   0          4m57s
tekton-pipelines-webhook-98f9fbbc5-f9bqb       1/1     Running   0          4m56s
tekton-triggers-controller-6589555f9d-8m8q8    1/1     Running   0          4m40s
tekton-triggers-webhook-cc4b66bd-bkb9j         1/1     Running   0          4m40s
これでTektonベースのPipelineが利用可能になりました。
今回のTutorial用のプロジェクトpipelines-tutorialもここで作成しておきます。
>oc new-project pipelines-tutorial
Now using project "pipelines-tutorial" on server "https://c106-e.us-south.containers.cloud.ibm.com:30520".

You can add applications to this project with the 'new-app' command. For example, try:

    oc new-app django-psql-example

to build a new example application in Python. Or use kubectl to deploy a simple Kubernetes application:

    kubectl create deployment hello-node --image=gcr.io/hello-minikube-zero-install/hello-node
Taskの作成
TaskはPipelineを構成する個々のステップの処理を定義するリソースです。
実行時にはTaskRunリソースが生成され、処理を実行するためのPodが起動します。
Taskは異なる複数のPipelineで再利用することができ、予めカタログされたものから選んで使うこともできます。
ここではTutorialのPipelineで使用するため、以下を実行して2つのTaskを作成します。
>oc create -f https://raw.githubusercontent.com/openshift/pipelines-tutorial/master/01_pipeline/01_apply_manifest_task.yaml
task.tekton.dev/apply-manifests created

>oc create -f https://raw.githubusercontent.com/openshift/pipelines-tutorial/master/01_pipeline/02_update_deployment_task.yaml
task.tekton.dev/update-deployment created
コンソール上で作成されたTaskが確認できます。
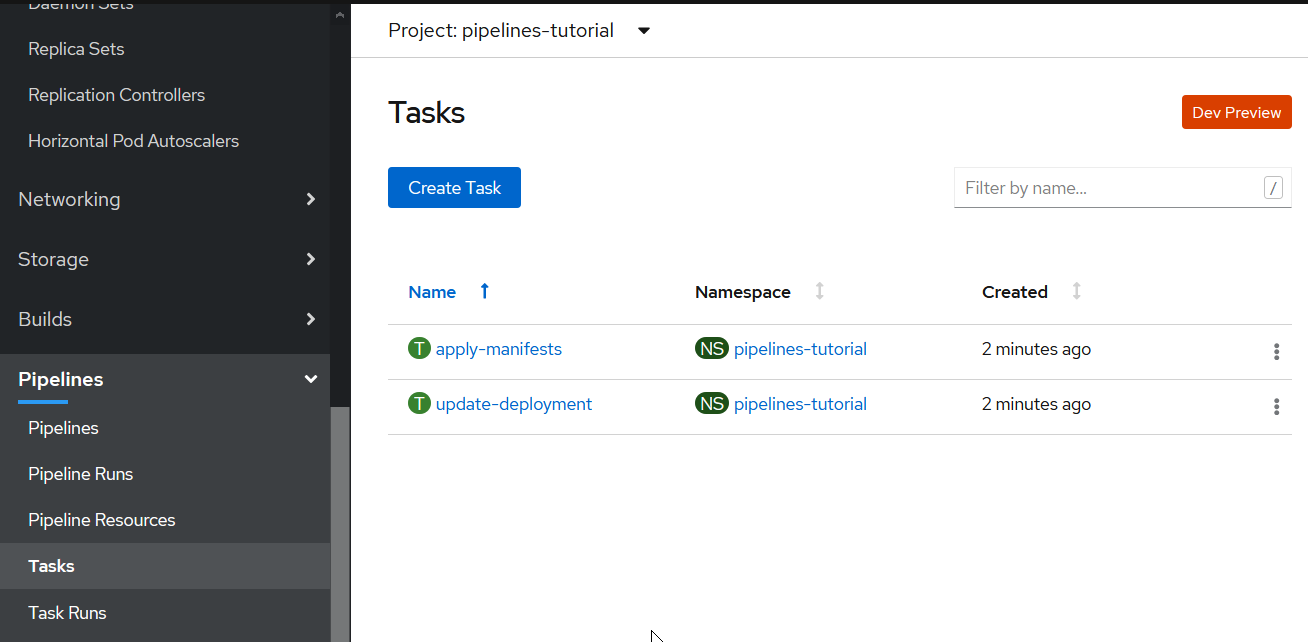
作成したTaskのManifestは以下の通りです。
いずれもocコマンドを使ってManifestをapplyしたり、Imageをデプロイするという内容であることが見て取れます。対象となるManifestファイルやImage、Gitリポジトリは外部から設定するようになっています。
apiVersion: tekton.dev/v1beta1
kind: Task
metadata:
  name: apply-manifests
spec:
  resources:
    inputs:
      - {type: git, name: source}
  params:
    - name: manifest_dir
      description: The directory in source that contains yaml manifests
      type: string
      default: "k8s"
  steps:
    - name: apply
      image: quay.io/openshift/origin-cli:latest
      workingDir: /workspace/source
      command: ["/bin/bash", "-c"]
      args:
        - |-
          echo Applying manifests in $(inputs.params.manifest_dir) directory
          oc apply -f $(inputs.params.manifest_dir)
          echo -----------------------------------
apiVersion: tekton.dev/v1beta1
kind: Task
metadata:
  name: update-deployment
spec:
  resources:
    inputs:
      - {type: image, name: image}
  params:
    - name: deployment
      description: The name of the deployment patch the image
      type: string
  steps:
    - name: patch
      image: quay.io/openshift/origin-cli:latest
      command: ["/bin/bash", "-c"]
      args:
        - |-
          oc patch deployment $(inputs.params.deployment) --patch='{"spec":{"template":{"spec":{
            "containers":[{
              "name": "$(inputs.params.deployment)",
              "image":"$(inputs.resources.image.url)"
            }]
          }}}}'
※今回のTutorialで使用するManifestのapiVersionはtekton.dev/v1beta1で、前のバージョンのTektonでは動作しませんのでご注意ください。(先日バージョンが上がったようです)
作成したTaskはTektonのCLIでも以下のように確認できます。
>tkn task list
NAME                DESCRIPTION   AGE
apply-manifests                   7 minutes ago
update-deployment                 7 minutes ago
なお今回のPipelineでは上のもの以外に、Operatorの導入時に予め作成されるClusterTaskも使用します。
どのようなClusterTaskがあるかは以下で確認できます。
>tkn clustertasks ls
NAME                       DESCRIPTION   AGE
buildah                                  17 minutes ago
buildah-v0-11-3                          17 minutes ago
git-clone                                17 minutes ago
jib-maven                                17 minutes ago
kn                                       16 minutes ago
maven                                    17 minutes ago
openshift-client                         17 minutes ago
openshift-client-v0-11-3                 17 minutes ago
・・・・
Pipelineの作成
今回のPipelineを定義するPipelineリソースを作成します。
Tutorialのページに今回のPipelineの全体像が以下のように示されています。
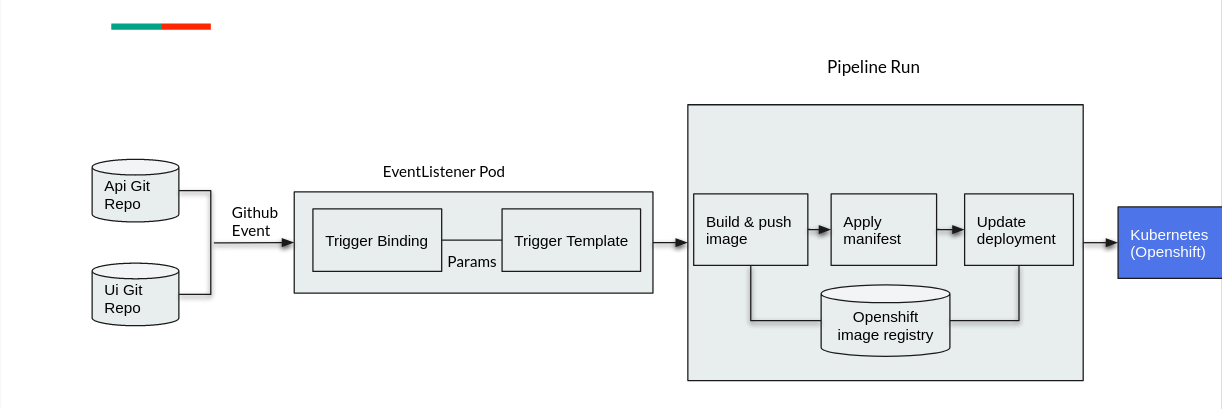
ビルド・デプロイの対象となるサンプルアプリですが、フロントエンド(UI)とバックエンド(API)のソースが異なるGitリポジトリで管理されています。
今回のTutorialでは単一のPipelineに対して、アクセスするリポジトリやImageを実行時に切り替えることにより、フロントとバックエンド双方のデプロイができるように作成します。
では、以下を実行してPipelineを作成します。
CLIでbuild-and-deployというPipelineが作成されたことが確認できます。
>oc create -f https://raw.githubusercontent.com/openshift/pipelines-tutorial/master/01_pipeline/04_pipeline.yaml
pipeline.tekton.dev/build-and-deploy created

>tkn pipeline ls
NAME               AGE             LAST RUN   STARTED   DURATION   STATUS
build-and-deploy   6 minutes ago   ---        ---       ---        ---
使用したManifestは以下になります。
tasks以下に先ほど作成したものを含むTaskが定義されています。
先頭ではbuildahというClusterTaskをイメージのビルドのために指定しています。
また、GitリポジトリのURLやImage名は実行時に設定するため、この定義には具体的に明示されていない点も確認できるかと思います。
apiVersion: tekton.dev/v1beta1
kind: Pipeline
metadata:
  name: build-and-deploy
spec:
  resources:
  - name: git-repo
    type: git
  - name: image
    type: image
  params:
  - name: deployment-name
    type: string
    description: name of the deployment to be patched
  tasks:
  - name: build-image
    taskRef:
      name: buildah
      kind: ClusterTask
    resources:
      inputs:
      - name: source
        resource: git-repo
      outputs:
      - name: image
        resource: image
    params:
    - name: TLSVERIFY
      value: "false"
  - name: apply-manifests
    taskRef:
      name: apply-manifests
    resources:
      inputs:
      - name: source
        resource: git-repo
    runAfter:
    - build-image
  - name: update-deployment
    taskRef:
      name: update-deployment
    resources:
      inputs:
      - name: image
        resource: image
    params:
    - name: deployment
      value: $(params.deployment-name)
    runAfter:
    - apply-manifests
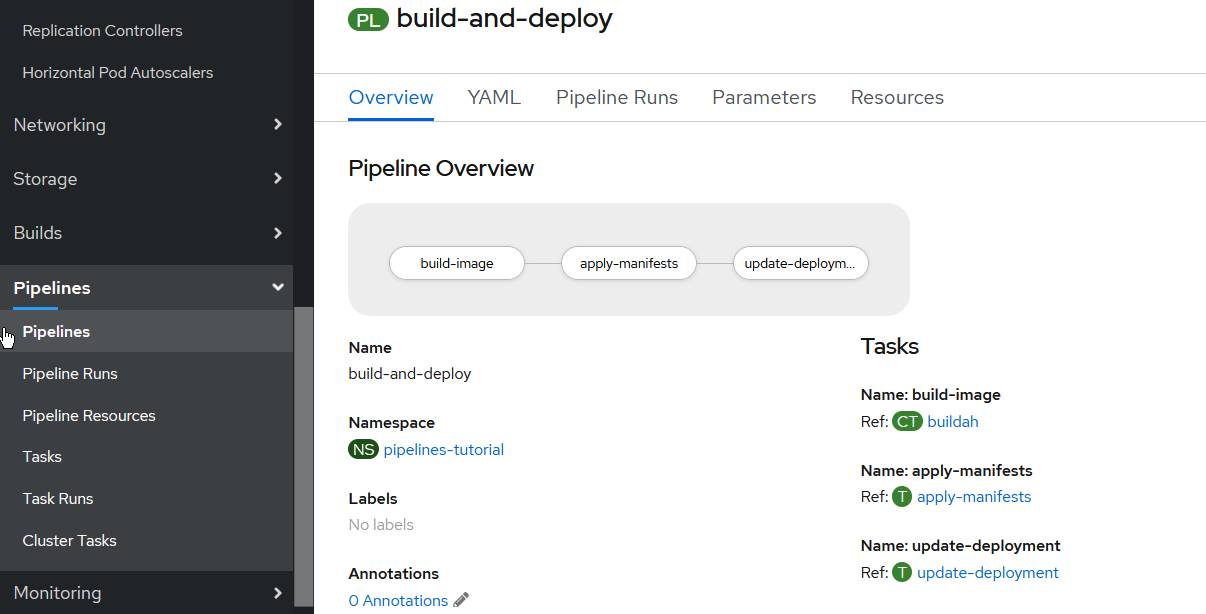
OpenShiftのWebコンソール上では以下のように表示されます。
Pipelineの実行
Pipelineの実行に際し、PipelineResourceリソースを作成します。
これらにPipelineがアクセスするGitリポジトリやImageレジストリの情報をPipelineを別リソースとして定義することにより、複数のPipelineで再利用することが可能です。
以下を実行してリソースを作成し、結果を確認します。
>oc create -f https://raw.githubusercontent.com/openshift/pipelines-tutorial/master/01_pipeline/03_resources.yaml
pipelineresource.tekton.dev/api-repo created
pipelineresource.tekton.dev/api-image created
pipelineresource.tekton.dev/ui-repo created
pipelineresource.tekton.dev/ui-image created

>tkn resource ls
NAME        TYPE    DETAILS
api-repo    git     url: http://github.com/openshift-pipelines/vote-api.git
ui-repo     git     url: http://github.com/openshift-pipelines/vote-ui.git
api-image   image   url: image-registry.openshift-image-registry.svc:5000/pipelines-tutorial/vote-api:latest
ui-image    image   url: image-registry.openshift-image-registry.svc:5000/pipelines-tutorial/vote-ui:latest
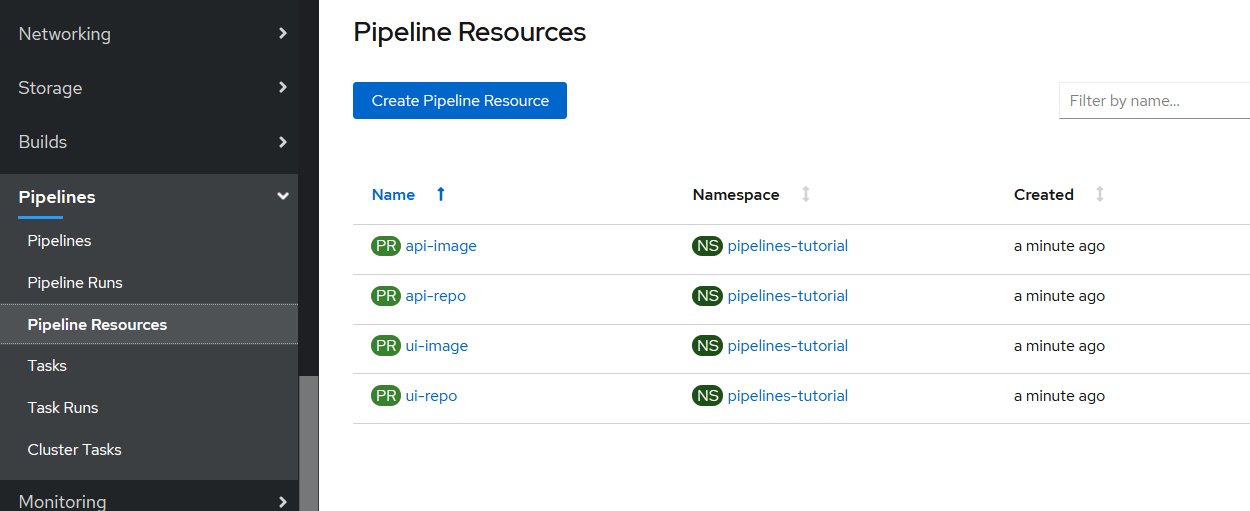
以下がManifestの内容になります。
フロント/バックエンド各々のGitリポジトリとImageのURLを保持するPipelineResource4つを定義していることが確認できます。
---
apiVersion: tekton.dev/v1alpha1
kind: PipelineResource
metadata:
  name: api-repo
spec:
  type: git
  params:
  - name: url
    value: http://github.com/openshift-pipelines/vote-api.git
---
apiVersion: tekton.dev/v1alpha1
kind: PipelineResource
metadata:
  name: api-image
spec:
  type: image
  params:
  - name: url
    value: image-registry.openshift-image-registry.svc:5000/pipelines-tutorial/vote-api:latest
---
apiVersion: tekton.dev/v1alpha1
kind: PipelineResource
metadata:
  name: ui-repo
spec:
  type: git
  params:
  - name: url
    value: http://github.com/openshift-pipelines/vote-ui.git
---
apiVersion: tekton.dev/v1alpha1
kind: PipelineResource
metadata:
  name: ui-image
spec:
  type: image
  params:
  - name: url
    value: image-registry.openshift-image-registry.svc:5000/pipelines-tutorial/vote-ui:latest
初回実行とエラー
では、Pipelineを実行します。
フロント用とバックエンド用について、参照するPipelineResourceを切り替えてPipelineを実行することになります。
>tkn pipeline start build-and-deploy -r git-repo=api-repo -r image=api-image -p deployment-name=vote-api
Pipelinerun started: build-and-deploy-run-qvv8w

In order to track the pipelinerun progress run:
tkn pipelinerun logs build-and-deploy-run-qvv8w -f -n pipelines-tutorial

>tkn pipeline start build-and-deploy -r git-repo=ui-repo -r image=ui-image -p deployment-name=vote-ui
Pipelinerun started: build-and-deploy-run-t2c5k

In order to track the pipelinerun progress run:
tkn pipelinerun logs build-and-deploy-run-t2c5k -f -n pipelines-tutorial
CLIで状況を確認します。Pipelineを実行する都度、PipelineRunリソースが作成され、各々の状況が確認できます。
上で2度実行しましたので、以下では2つのPipelineRunが作成されています。
しかし、いずれもSTATUSがFailedなので、失敗してしまったようです。
>tkn pipeline list
NAME               AGE              LAST RUN                     STARTED          DURATION     STATUS
build-and-deploy   16 minutes ago   build-and-deploy-run-t2c5k   48 seconds ago   17 seconds   Failed

>tkn pipelinerun ls
NAME                         STARTED          DURATION     STATUS
build-and-deploy-run-t2c5k   55 seconds ago   17 seconds   Failed
build-and-deploy-run-qvv8w   2 minutes ago    49 seconds   Failed
tkn pipelinerun logsコマンドでPipelineの実行ログを確認します。
build-imageのステップでerror ensuring container path ~のエラーが発生して失敗となっています。
(2つとも同様のエラーで失敗していました)
>tkn pipelinerun logs build-and-deploy-run-qvv8w -f -n pipelines-tutorial

[build-image : git-source-api-repo-mzmtj] {"level":"info","ts":1591172389.461964,"caller":"git/git.go:105","msg":"Successfully cloned http://github.com/openshift-pipelines/vote-api.git @ master in path /workspace/source"}
[build-image : git-source-api-repo-mzmtj] {"level":"warn","ts":1591172389.462097,"caller":"git/git.go:152","msg":"Unexpected error: creating symlink: symlink /tekton/home/.ssh /root/.ssh: file exists"}
[build-image : git-source-api-repo-mzmtj] {"level":"info","ts":1591172389.5624797,"caller":"git/git.go:133","msg":"Successfully initialized and updated submodules in path /workspace/source"}

[build-image : build] STEP 1: FROM golang:alpine AS builder
[build-image : build] Getting image source signatures
[build-image : build] Copying blob sha256:cbe0275821fc905c0321a44449b7ca670963f2cc0824150bea2125dee8dc7376
[build-image : build] Copying blob sha256:ed8968b2872e472e21554ca58b35a02277634f3e501cc04ab7b0d0963f60f54d
[build-image : build] Copying blob sha256:9e0cccf56431698a0981b191f61dcb4ba6afa272d35deb14eaccf2cb46ed0f9d
[build-image : build] Copying blob sha256:df20fa9351a15782c64e6dddb2d4a6f50bf6d3688060a34c4014b0d9a752eb4c
[build-image : build] Copying blob sha256:a92cc7c5fd73817407fa0e4de5e1fb262a9c0f34c35c7450a2d01a7cef79c62f
[build-image : build] Copying config sha256:3289bf11c2843f3ebc4741a2c08dbb493594ddcd9fb4e4392cd0817d780006b8
[build-image : build] Writing manifest to image destination
[build-image : build] Storing signatures
[build-image : build] STEP 2: WORKDIR /build
[build-image : build] error building at STEP "WORKDIR /build": error ensuring container path "/build": lstat /var/lib/containers/storage/overlay/7da908a15cf2d6850523800d21c43dcc45df83f38b1c4a3e42fd79962e40cc91/merged/build: invalid argument

failed to get logs for task build-image : container step-build has failed  : [{"key":"StartedAt","value":"2020-06-03T08:19:50Z","resourceRef":{}}]
TaskRun build-and-deploy-run-qvv8w-build-image-kchlx has failed
回避策とリトライ
エラーの原因がちょっとわからなかったのですが、このTutorialのGithubリポジトリのIssueを確認していったところ、同様のエラーに関するものがあり(以下)、コメントに回避策が記載されていました。
(参考)
https://github.com/openshift/pipelines-tutorial/issues/83
https://github.com/containers/buildah/issues/2198
https://github.com/openshift/pipelines-tutorial/issues/66
エラーの原因などについては気になるところですが、ひとまず回避策を試してみます。
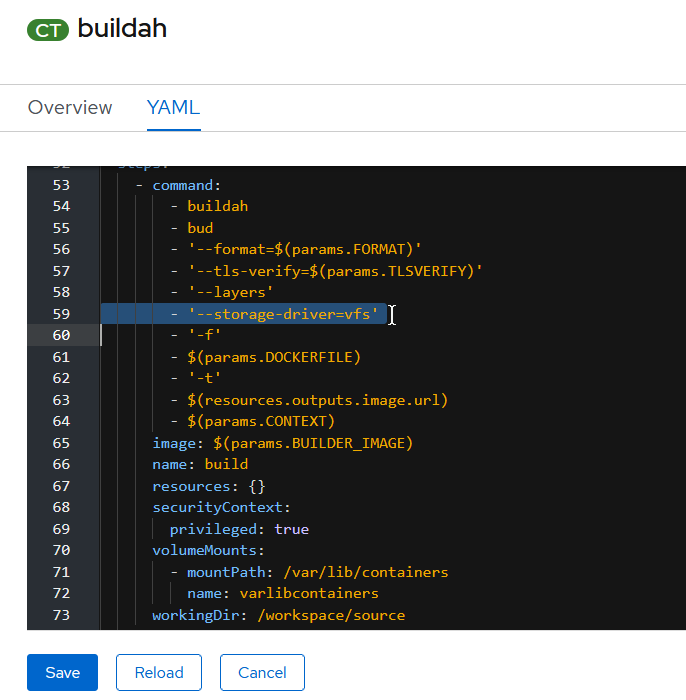
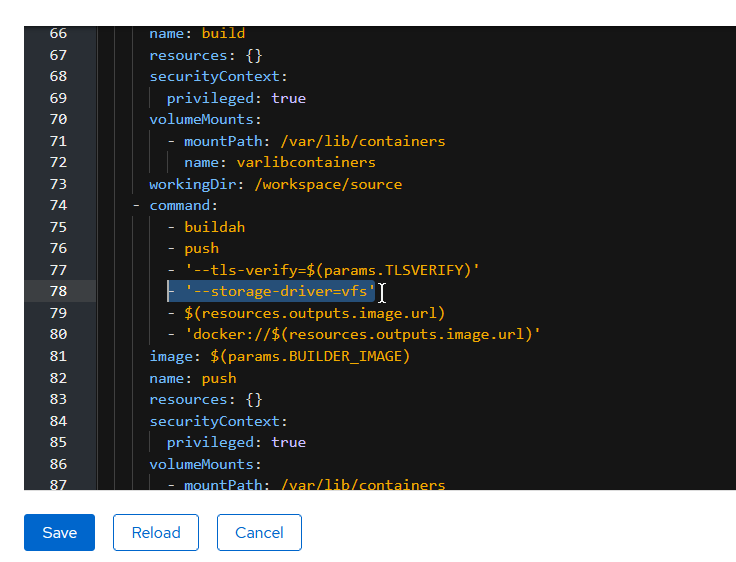
Pipelineで使用している'buildah'Taskの内容をコンソール上で修正します。
このTaskではbuildahというイメージビルドツールを実行しますが、その際のパラメータに--storage-driver=vfsを追加 (2箇所) します。
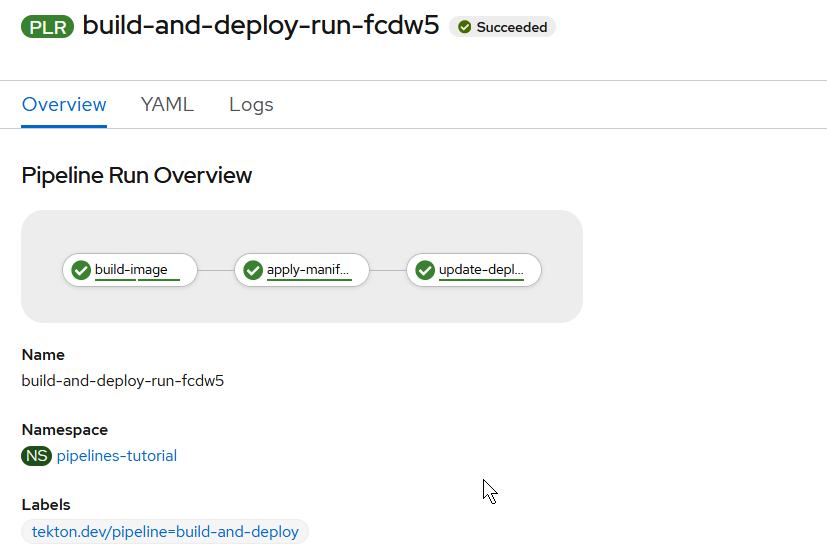
Pipelineを再実行してみると・・・、今度は成功しました。
>tkn pipeline start build-and-deploy -r git-repo=api-repo -r image=api-image -p deployment-name=vote-api
Pipelinerun started: build-and-deploy-run-fcdw5

In order to track the pipelinerun progress run:
tkn pipelinerun logs build-and-deploy-run-fcdw5 -f -n pipelines-tutorial

>tkn pipelinerun logs build-and-deploy-run-fcdw5 -f -n pipelines-tutorial

[build-image : git-source-api-repo-ptrq5] {"level":"info","ts":1591173915.449504,"caller":"git/git.go:105","msg":"Successfully cloned http://github.com/openshift-pipelines/vote-api.git @ master in path /workspace/source"}
[build-image : git-source-api-repo-ptrq5] {"level":"warn","ts":1591173915.449643,"caller":"git/git.go:152","msg":"Unexpected error: creating symlink: symlink /tekton/home/.ssh /root/.ssh: file exists"}
[build-image : git-source-api-repo-ptrq5] {"level":"info","ts":1591173915.5584414,"caller":"git/git.go:133","msg":"Successfully initialized and updated submodules in path /workspace/source"}

[build-image : build] STEP 1: FROM golang:alpine AS builder
[build-image : build] Getting image source signatures
[build-image : build] Copying blob sha256:a92cc7c5fd73817407fa0e4de5e1fb262a9c0f34c35c7450a2d01a7cef79c62f
[build-image : build] Copying blob sha256:df20fa9351a15782c64e6dddb2d4a6f50bf6d3688060a34c4014b0d9a752eb4c
[build-image : build] Copying blob sha256:ed8968b2872e472e21554ca58b35a02277634f3e501cc04ab7b0d0963f60f54d
[build-image : build] Copying blob sha256:9e0cccf56431698a0981b191f61dcb4ba6afa272d35deb14eaccf2cb46ed0f9d
[build-image : build] Copying blob sha256:cbe0275821fc905c0321a44449b7ca670963f2cc0824150bea2125dee8dc7376
[build-image : build] Copying config sha256:3289bf11c2843f3ebc4741a2c08dbb493594ddcd9fb4e4392cd0817d780006b8
[build-image : build] Writing manifest to image destination
[build-image : build] Storing signatures
[build-image : build] STEP 2: WORKDIR /build
[build-image : build] af51e672f802117afd683d916cd3c884743f079703e8224ed13799be7a618a69
[build-image : build] STEP 3: ADD . /build/
[build-image : build] 5ebc25bcb2a2f0c738fb6162d14dafb3f8aed08141151d84fbff3a9c6aa4f2de
[build-image : build] STEP 4: RUN GOOS=linux GARCH=amd64 CGO_ENABLED=0 go build -mod=vendor -o api-server .
[build-image : build] a1107030a93223bc27acb299fc2f7af4dad084ff7ab27748fb1d861b5cfb177e
[build-image : build] STEP 5: FROM scratch
[build-image : build] STEP 6: WORKDIR /app
[build-image : build] c97e389885a5d7354b2cebb6e041c80645b600dd4ee28ac26c2d95dbbdea1ce6
[build-image : build] STEP 7: COPY --from=builder /build/api-server /app/api-server
[build-image : build] 476a54087ca2b0be5627fb75d7428bbf3fe67a2a7ee181104ae32684b1ad3abc
[build-image : build] STEP 8: CMD [ "/app/api-server" ]
[build-image : build] STEP 9: COMMIT image-registry.openshift-image-registry.svc:5000/pipelines-tutorial/vote-api:latest
[build-image : build] 0721f4fe509bfc6da6917277566988ab530492af192ab56f8e0dc11639d5fa3d
[build-image : build] 0721f4fe509bfc6da6917277566988ab530492af192ab56f8e0dc11639d5fa3d

[build-image : push] Getting image source signatures
[build-image : push] Copying blob sha256:28a93e1d4c78661357bee8cbf0851db74876911cd132ae68952dda5faf10d641
[build-image : push] Copying config sha256:0721f4fe509bfc6da6917277566988ab530492af192ab56f8e0dc11639d5fa3d
[build-image : push] Writing manifest to image destination
[build-image : push] Copying config sha256:0721f4fe509bfc6da6917277566988ab530492af192ab56f8e0dc11639d5fa3d
[build-image : push] Writing manifest to image destination
[build-image : push] Storing signatures

[build-image : image-digest-exporter-62zt6] {"level":"info","ts":1591173960.4052322,"logger":"fallback-logger","caller":"logging/config.go:76","msg":"Fetch GitHub commit ID from kodata failed: \"KO_DATA_PATH\" does not exist or is empty"}
[build-image : image-digest-exporter-62zt6] {"level":"info","ts":1591173960.4056447,"logger":"fallback-logger","caller":"imagedigestexporter/main.go:59","msg":"No index.json found for: api-image"}

[apply-manifests : git-source-api-repo-ckz9z] {"level":"info","ts":1591173978.2230394,"caller":"git/git.go:105","msg":"Successfully cloned http://github.com/openshift-pipelines/vote-api.git @ master in path /workspace/source"}
[apply-manifests : git-source-api-repo-ckz9z] {"level":"info","ts":1591173978.3232229,"caller":"git/git.go:133","msg":"Successfully initialized and updated submodules in path /workspace/source"}

[apply-manifests : apply] Applying manifests in k8s directory
[apply-manifests : apply] deployment.apps/vote-api created
[apply-manifests : apply] service/vote-api created
[apply-manifests : apply] -----------------------------------

[update-deployment : patch] deployment.extensions/vote-api patched
コンソールでは以下のように確認できます。
もう1つも再実行すると、同様に成功しました。
>tkn pipeline list
NAME               AGE              LAST RUN                     STARTED         DURATION     STATUS
build-and-deploy   47 minutes ago   build-and-deploy-run-b6459   2 minutes ago   59 seconds   Succeeded

>tkn pipelinerun ls
NAME                         STARTED          DURATION     STATUS
build-and-deploy-run-b6459   3 minutes ago    59 seconds   Succeeded
build-and-deploy-run-fcdw5   7 minutes ago    1 minute     Succeeded
build-and-deploy-run-vjf9t   12 minutes ago   54 seconds   Failed
build-and-deploy-run-t2c5k   31 minutes ago   17 seconds   Failed
build-and-deploy-run-qvv8w   32 minutes ago   49 seconds   Failed
pipeline-tutorialプロジェクトにフロント/バックエンド各々のアプリケーションがデプロイされました。
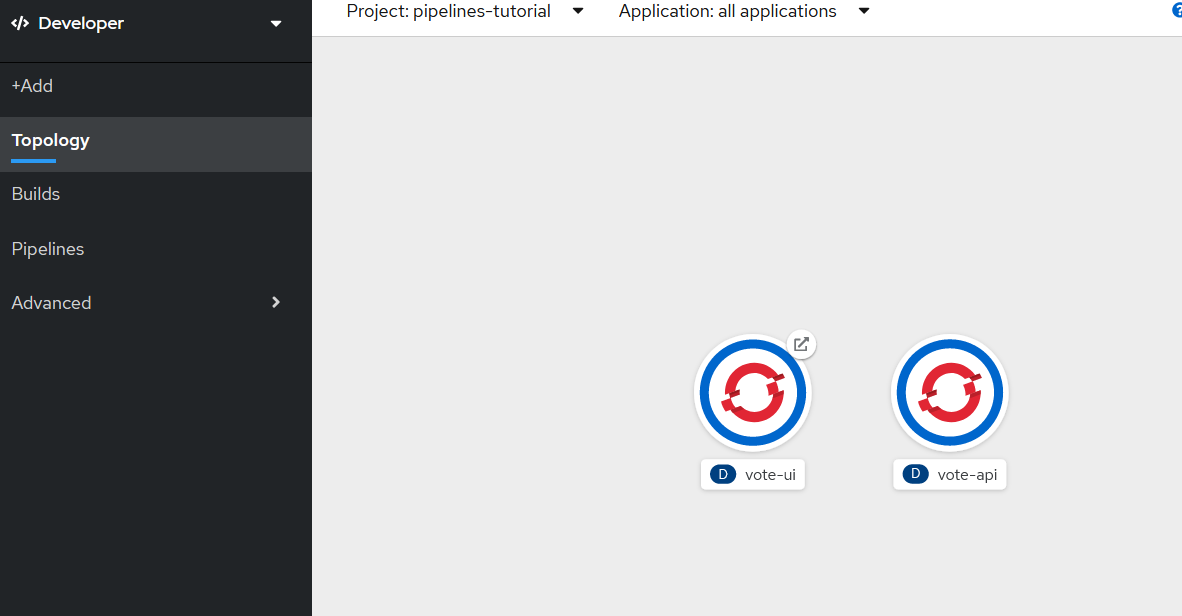
フロント側のRouteのURLにアクセスすると、サンプルアプリのUIにアクセスできました。
Triggerの追加
今まではPipelineを手動で実行していましたが、リポジトリへのPushイベントを捉えて自動実行するためのトリガーを追加しましょう。
トリガーを追加するため、TriggerTemplate、TriggerBinding、EventListenerという3つのリソースを作成します。
今回は各々のManifestが用意されていますので以下のように実行します。
>oc create -f https://raw.githubusercontent.com/openshift/pipelines-tutorial/master/03_triggers/02_template.yaml
triggertemplate.triggers.tekton.dev/vote-app created

>oc create -f https://raw.githubusercontent.com/openshift/pipelines-tutorial/master/03_triggers/01_binding.yaml
triggerbinding.triggers.tekton.dev/vote-app created

>oc create -f https://raw.githubusercontent.com/openshift/pipelines-tutorial/master/03_triggers/03_event_listener.yaml
eventlistener.triggers.tekton.dev/vote-app created
以下に各リソースのManifestを記載します。
まず'TriggerTemplate'ですが、Pipeline実行に必要な'PipelineResource'や'PipelineRun'のパラメータ化された定義になっています。
apiVersion: triggers.tekton.dev/v1alpha1
kind: TriggerTemplate
metadata:
  name: vote-app
spec:
  params:
  - name: git-repo-url
    description: The git repository url
  - name: git-revision
    description: The git revision
    default: master
  - name: git-repo-name
    description: The name of the deployment to be created / patched

  resourcetemplates:
  - apiVersion: tekton.dev/v1alpha1
    kind: PipelineResource
    metadata:
      name: $(params.git-repo-name)-git-repo-$(uid)
    spec:
      type: git
      params:
      - name: revision
        value: $(params.git-revision)
      - name: url
        value: $(params.git-repo-url)

  - apiVersion: tekton.dev/v1alpha1
    kind: PipelineResource
    metadata:
      name: $(params.git-repo-name)-image-$(uid)
    spec:
      type: image
      params:
      - name: url
        value: image-registry.openshift-image-registry.svc:5000/pipelines-tutorial/$(params.git-repo-name):latest

  - apiVersion: tekton.dev/v1beta1
    kind: PipelineRun
    metadata:
      name: build-deploy-$(params.git-repo-name)-$(uid)
    spec:
      serviceAccountName: pipeline
      pipelineRef:
        name: build-and-deploy
      resources:
      - name: git-repo
        resourceRef:
          name: $(params.git-repo-name)-git-repo-$(uid)
      - name: image
        resourceRef:
          name: $(params.git-repo-name)-image-$(uid)
      params:
      - name: deployment-name
        value: $(params.git-repo-name)
次はTriggerBindingリソースです。
トリガーとなるイベント (今回はGithubからのWebhook)で渡ってくる値と、上で作成したTemplateのパラメータのバインディングを定義したリソースです。
apiVersion: triggers.tekton.dev/v1alpha1
kind: TriggerBinding
metadata:
  name: vote-app
spec:
  params:
  - name: git-repo-url
    value: $(body.repository.url)
  - name: git-repo-name
    value: $(body.repository.name)
  - name: git-revision
    value: $(body.head_commit.id)
最後はイベントを受けるためのEventListenerリソースです。
TriggerTemplateとTriggerBindingの紐づけを定義しています。
apiVersion: triggers.tekton.dev/v1alpha1
kind: EventListener
metadata:
  name: vote-app
spec:
  serviceAccountName: pipeline
  triggers:
  - bindings:
    - name: vote-app
    template:
      name: vote-app
EventListenerのServiceをoc exposeで公開します。
作成されたRouteのURLを確認しておきます。
>oc expose svc el-vote-app
route.route.openshift.io/el-vote-app exposed

>oc get route
NAME          HOST/PORT                                                                                                                  PATH   SERVICES      PORT            TERMINATION   WILDCARD
el-vote-app   el-vote-app-pipelines-tutorial.dte-ocp4-20oem0-915b3b336cabec458a7c7ec2aa7c625f-0000.us-south.containers.appdomain.cloud          el-vote-app   http-listener                 None
vote-ui       vote-ui-pipelines-tutorial.dte-ocp4-20oem0-915b3b336cabec458a7c7ec2aa7c625f-0000.us-south.containers.appdomain.cloud              vote-ui       8080-tcp                      None
GitHub WebHookの設定
ここまでPipeline側にTriggerを作成しましたので、リポジトリ側に実際にトリガーとなるGitHub WebHookの設定を行います。
今回はフロントエンド (UI) 側のリポジトリに設定を行います。
先の手順でPipelineResourceとして設定されているフロント側のリポジトリ (http://github.com/openshift-pipelines/vote-ui.git) を自分のアカウントでForkしておきます。
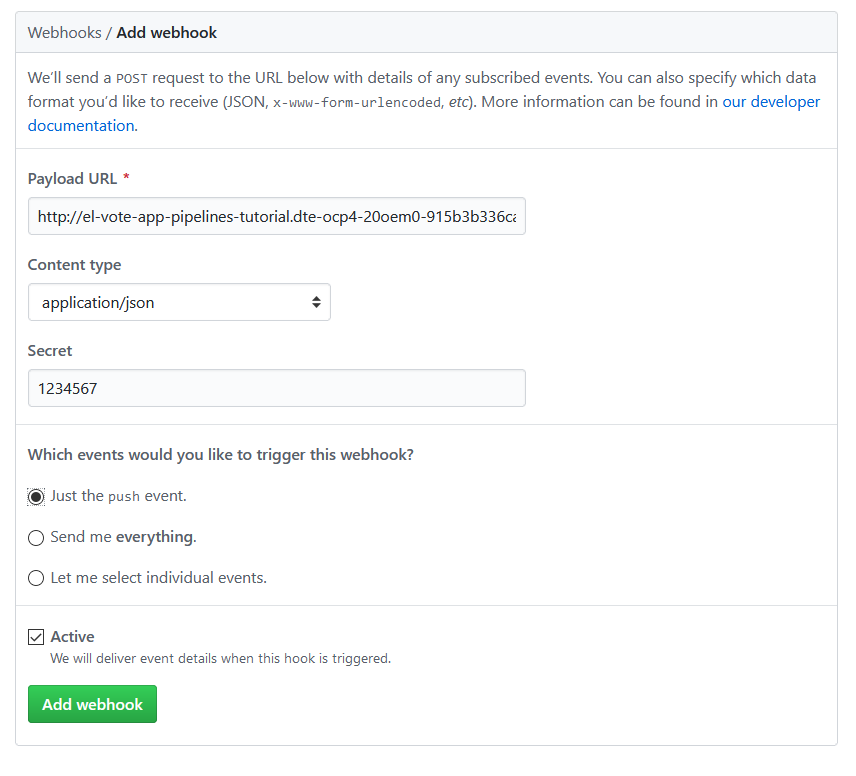
GitHub WebHookの設定は普通に行えばよいです。
Payload URLには先ほど確認したEventListenerのRouteのURLを設定します。
以下が設定例になります。
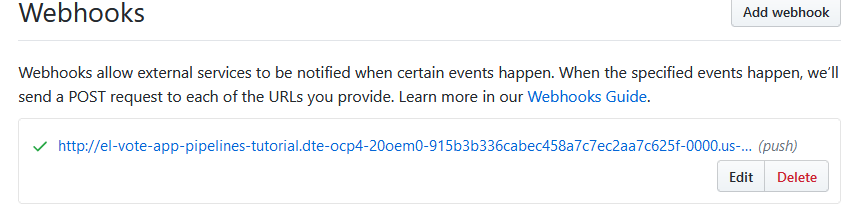
Add webhookで追加されました。
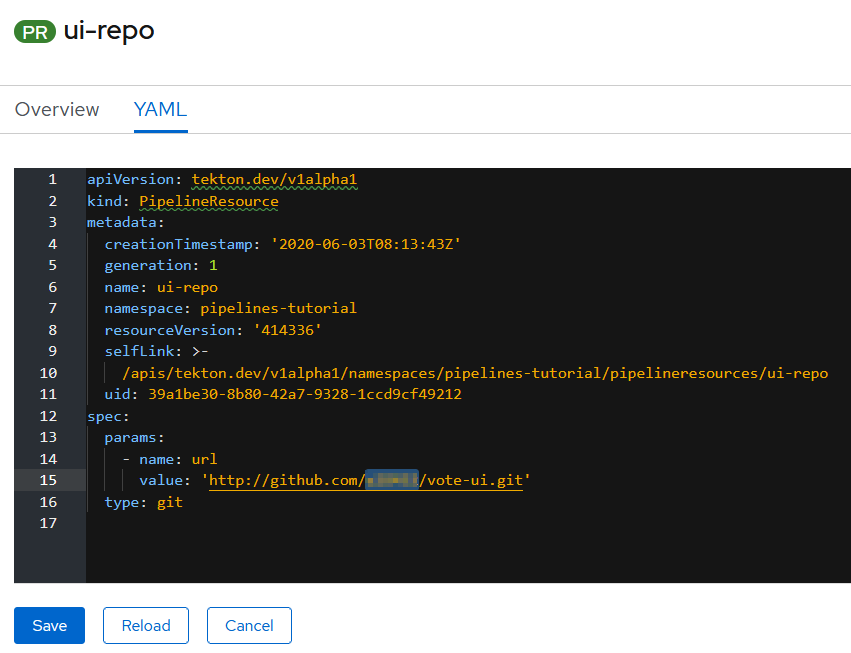
Forkにより参照すべきリポジトリが変わってしまいましたので、フロント側のリポジトリURLを保持しているPipelineResource (ui-repo) も忘れずに修正しておきます。
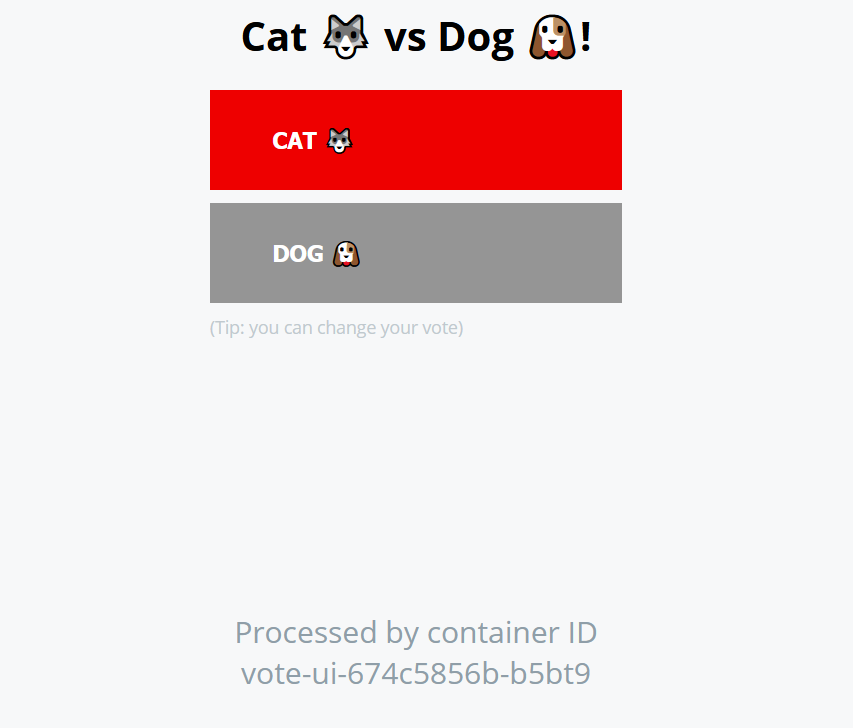
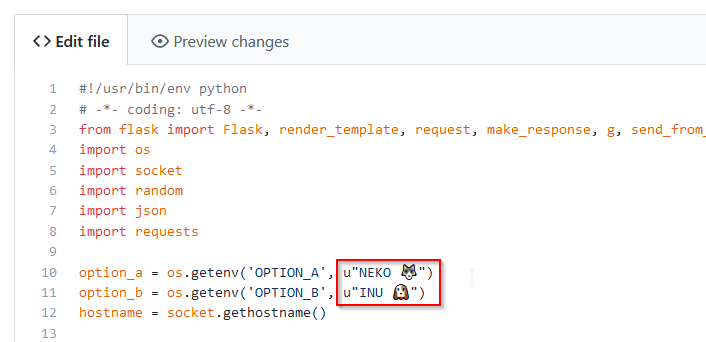
サンプルアプリの画面上に表示されていた「CAT」「DOG」を変更してみます。
今回はリポジトリのRootにあるapp.pyを以下のように修正してCommit/Pushしてみました。
すぐにPipelineが自動実行されます。数分で正常終了しました。
>tkn pipelinerun ls
NAME                         STARTED          DURATION     STATUS
build-deploy-vote-ui-5kdwb   47 seconds ago   ---          Running
build-and-deploy-run-b6459   26 minutes ago   59 seconds   Succeeded
build-and-deploy-run-fcdw5   30 minutes ago   1 minute     Succeeded
build-and-deploy-run-vjf9t   36 minutes ago   54 seconds   Failed
build-and-deploy-run-t2c5k   55 minutes ago   17 seconds   Failed
build-and-deploy-run-qvv8w   56 minutes ago   49 seconds   Failed

>tkn pipelinerun logs
? Select pipelinerun: build-deploy-vote-ui-5kdwb started 1 minute ago

[build-image : git-source-vote-ui-git-repo-5kdwb-5z6q9] {"level":"info","ts":1591175715.3912668,"caller":"git/git.go:105","msg":"Successfully cloned https://github.com/e28492/vote-ui @ f231b4ece70a06172a0065438a71220b45a5b458 in path /workspace/source"}
[build-image : git-source-vote-ui-git-repo-5kdwb-5z6q9] {"level":"warn","ts":1591175715.3916698,"caller":"git/git.go:152","msg":"Unexpected error: creating symlink: symlink /tekton/home/.ssh /root/.ssh: file exists"}
[build-image : git-source-vote-ui-git-repo-5kdwb-5z6q9] {"level":"info","ts":1591175715.4913938,"caller":"git/git.go:133","msg":"Successfully initialized and updated submodules in path /workspace/source"}

・・・

[apply-manifests : apply] Applying manifests in k8s directory
[apply-manifests : apply] deployment.apps/vote-ui configured
[apply-manifests : apply] route.route.openshift.io/vote-ui unchanged
[apply-manifests : apply] service/vote-ui unchanged
[apply-manifests : apply] -----------------------------------

[update-deployment : patch] deployment.extensions/vote-ui patched


>tkn pipelinerun ls
NAME                         STARTED          DURATION     STATUS
build-deploy-vote-ui-5kdwb   4 minutes ago    57 seconds   Succeeded
build-and-deploy-run-b6459   30 minutes ago   59 seconds   Succeeded
build-and-deploy-run-fcdw5   34 minutes ago   1 minute     Succeeded
build-and-deploy-run-vjf9t   40 minutes ago   54 seconds   Failed
build-and-deploy-run-t2c5k   59 minutes ago   17 seconds   Failed
build-and-deploy-run-qvv8w   1 hour ago       49 seconds   Failed
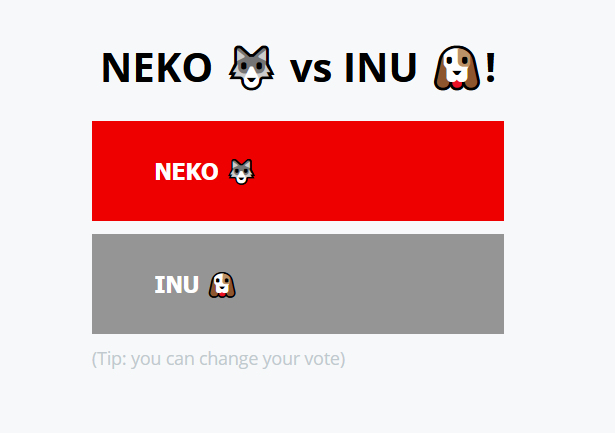
サンプルアプリにアクセスすると・・・、ちゃんと変更されています。
以上で今回のOpenShift PipelineのTutorialは終了です。
おわりに
以前使用したJenkinsベースのPipelineと比較すると、Tektonの場合は作成するリソースが若干多いかな、という印象ですが、これにより個々のリソースの可搬性や再利用性が向上している面があると思われます。
今後はこちらを中心に様々な機能が追加されていくと思いますので、引き続き注目していきたいと思います。