はじめに
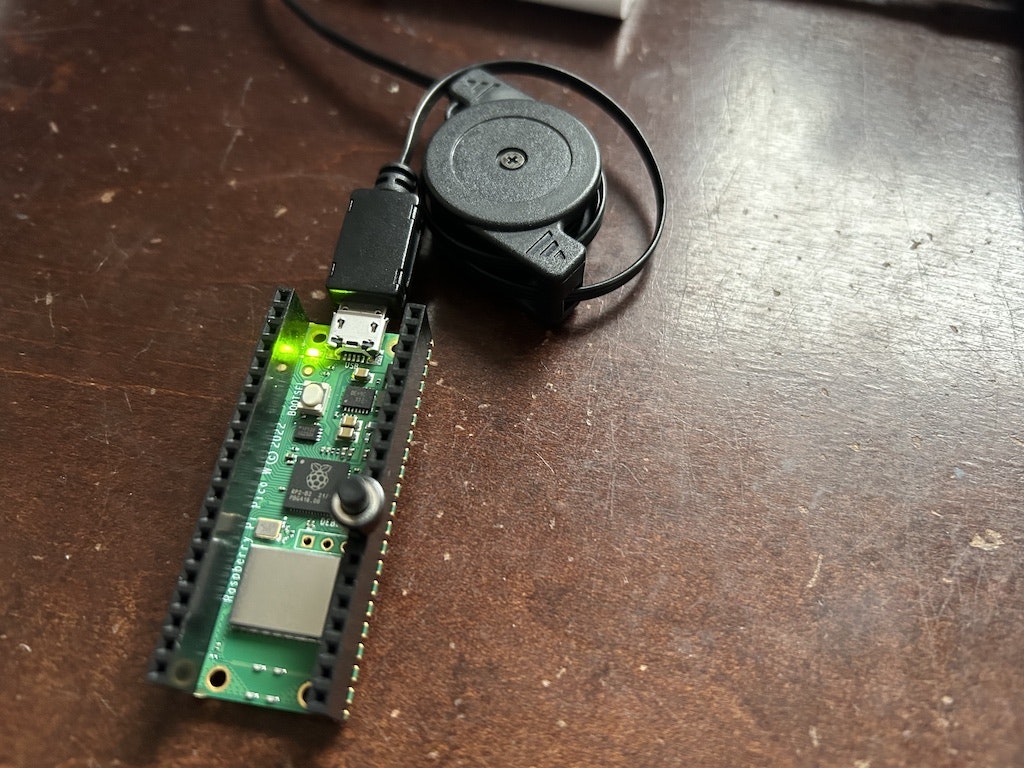
Raspberry Pi Pico Wの技適(RマークとTマーク)が通ったので、Node-RED MCU Editionで動作確認しました。

環境構築
xs-devツールを使用する場合
Moddable SDKとPico SDKの両方の環境構築が完了するので便利です。
Pico SDKの環境を構築する場合は以下の手順です。
$ xs-dev setup --device pico
環境変数を有効にするため、ターミナルを閉じて新しく開きます。
サンプルプログラム(helloworld)を実行します。
Raspberry Pi Pico Wへの書き込みは、BOOTSELボタンを押しながらUSBを接続するか、BOOTSELボタンを押しながらRESETボタン(外付けタクトスイッチ)を押す必要があります。
$ xs-dev run --example helloworld --device pico
手動で環境構築する場合
Moddable SDK
環境構築手順に変更はありません。
以降のPico SDKの環境構築が完了したあと、サンプルプログラム(helloworld)を実行します。
$ cd $MODDABLE/examples/helloworld
$ mcconfig -d -m -p pico/pico_w
Pico SDK
GitHubの「Getting Started with Raspberry Pi Pico」が情報源になります。
事前にbrewコマンドで必要なコンポーネントをインストールします。
brewコマンドのインストール
$ /bin/bash -c "$(curl -fsSL https://raw.githubusercontent.
com/Homebrew/install/HEAD/install.sh)"
必要なコンポーネントのインストール
$ brew update
$ brew install cmake
$ brew tap ArmMbed/homebrew-formulae
$ brew install arm-none-eabi-gcc
Pico SDKとpicotoolsとpico-examples(サンプルプログラム)をインストールします。
Pico SDKのインストール
$ cd ~
$ mkdir pico && cd pico
$ git clone -b 1.5.0 https://github.com/raspberrypi/pico-sdk
$ cd pico-sdk
$ git submodule update --init
$ mkdir build
$ cd build
$ cmake ..
$ make
$ cd pioasm
$ cmake ../../tools/pioasm
$ make
$ cd ../elf2uf2
$ cmake ../../tools/elf2uf2
$ make
環境変数を設定します。
bashの場合
~/.bashrc
zshの場合
~/.zshrc
設定する内容
export PICO_GCC_ROOT=$(brew --prefix)
export PICO_SDK_DIR=$HOME/pico/pico-sdk
環境変数を有効にするため、ターミナルを閉じて新しく開きます。
picotoolsのインストール
$ cd ~/pico
$ git clone https://github.com/raspberrypi/picotool.git
$ cd picotool
$ mkdir build
$ cd build
$ cmake ..
$ make
pico-examplesのインストール
$ cd ~/pico
$ git clone -b master https://github.com/raspberrypi/pico-examples.git
サンプルプログラムのBlink(Lチカ)を実行します。
$ cd pico-examples
$ mkdir build
$ cd build
$ cmake ..
Raspberry Pi Pico Wの基板上のLEDはWi-Fiチップに接続されているため、blinkを実行する場合、外付けのLEDが必要です。
ここでは、LEDのアノードをGPIOの18に、カソードをGNDに接続し、ソースコードのLED_PINの定義を18に変更します。
$ vi ../blink/blink.c
/**
 * Copyright (c) 2020 Raspberry Pi (Trading) Ltd.
 *
 * SPDX-License-Identifier: BSD-3-Clause
 */

#include "pico/stdlib.h"

int main() {
#ifndef PICO_DEFAULT_LED_PIN
#warning blink example requires a board with a regular LED
#else
/*
    const uint LED_PIN = PICO_DEFAULT_LED_PIN;
*/
    const uint LED_PIN = 18;
    gpio_init(LED_PIN);
    gpio_set_dir(LED_PIN, GPIO_OUT);
    while (true) {
        gpio_put(LED_PIN, 1);
        sleep_ms(250);
        gpio_put(LED_PIN, 0);
        sleep_ms(250);
    }
#endif
}
$ cd blink
$ make
$ cp blink.uf2 /Volumes/RPI-RP2

基板上のLEDを点滅させる場合は、picow_blinkを使用します。
$ cd ~/pico/pico-examples/build
$ cmake -DPICO_BOARD=pico_w ..
$ cd pico_w/wifi/blink
$ make
$ cp picow_blink.uf2 /Volumes/RPI-RP2
Node-RED MCU Edition
node-red-mcu-pluginを使用してNode-RED MCUの動作確認を行います。
injectノードとdebugノードを使用する


HTTP requestノードを使用する


クラウドのNode-RED DashboardからLチカする
構成

クラウド側のフロー
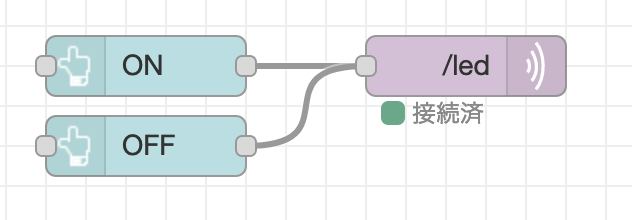

デバイス側のフロー

