JetPack 4.3 (r32.3.1) で追加された Jetson-IO tool を使用すると Pinmux テーブルの設定が容易になりました。
Jetson Nano の 2 つのハードウェア PWM を使用するために、起動する度に busybox devmem コマンドでレジスタに PWM の設定をする手間が不要になります。
手順
まず、Jetson-IO tool を使用できるようにする。
(参考)
Jetson Nano を JetPack 4.3 (r32.3.1) へアップデートして Jetson-IO tool を使用してみた。
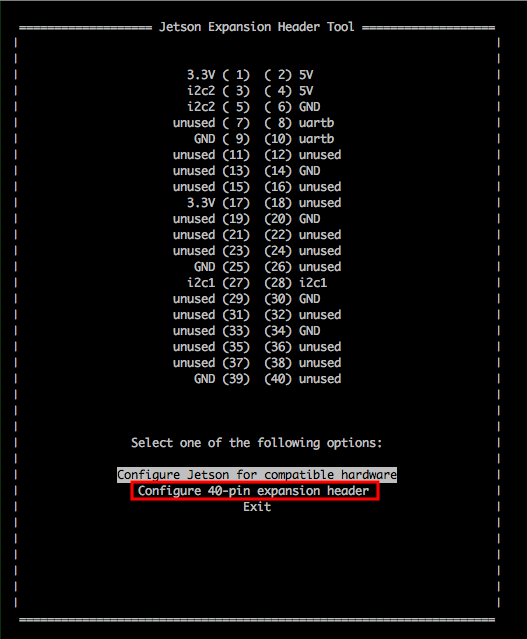
Jetson-IO tool を起動する。
$ sudo /opt/nvidia/jetson-io/jetson-io.py
「Configure 40-pin expansion header」を選択する。
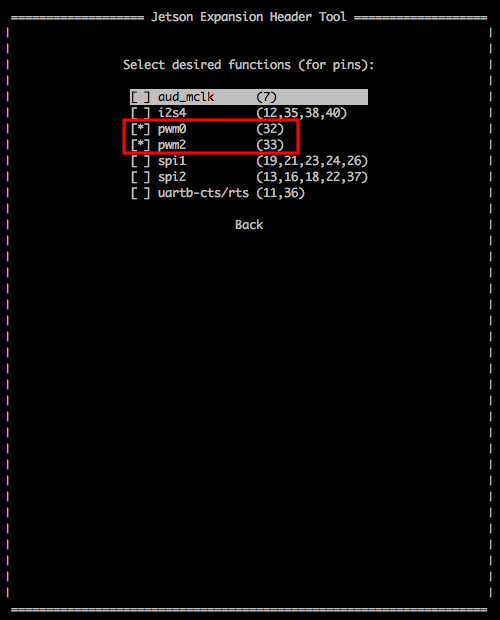
Jetson-IO tool の CUI 画面で PWM を有効にする。
「pwm0 (32)」と「pwm2 (33)」を選択する。(該当の行でスペースキーを押すと「*」マークがつく)
「Back」を選択する。
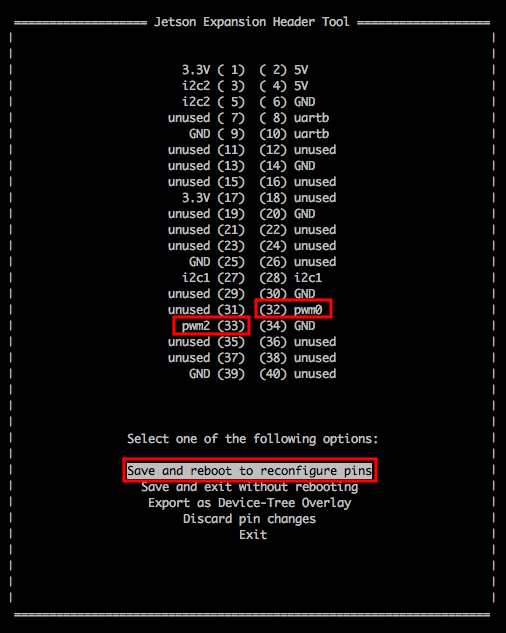
Pin32 に pwm0、Pin33 に pwm2 が設定されていることを確認する。
「Save and reboot to reconfigure pins」を選択する。(設定変更後に再起動される)
再起動後に設定が反映されていることを確認する。(/boot/tegra210-p3448-0000-p3449-0000-b00-user-custom.dtb が Jetson-IO tool で生成された DTB ファイル)
$ ls -l /boot/*.dtb
-rw-r--r-- 1 root root 487148 12月 10 15:59 /boot/tegra210-jetson-tx1-p2597-2180-a01-devkit.dtb
-rw-r--r-- 1 root root 487677 12月 10 15:59 /boot/tegra210-jetson-tx1-p2597-2180-a02-devkit-24x7.dtb
-rw-r--r-- 1 root root 214243 12月 10 15:59 /boot/tegra210-p3448-0000-p3449-0000-a00.dtb
-rw-r--r-- 1 root root 214203 12月 10 15:59 /boot/tegra210-p3448-0000-p3449-0000-a01.dtb
-rw-r--r-- 1 root root 214705 12月 10 15:59 /boot/tegra210-p3448-0000-p3449-0000-a02.dtb
-rw-r--r-- 1 root root 214705 12月 17 04:21 /boot/tegra210-p3448-0000-p3449-0000-b00.dtb
-rw-r--r-- 1 root root 215778  1月  5 19:23 /boot/tegra210-p3448-0000-p3449-0000-b00-user-custom.dtb
-rw-r--r-- 1 root root 214687 12月 10 15:59 /boot/tegra210-p3448-0002-p3449-0000-a02.dtb
-rw-r--r-- 1 root root 214683 12月 10 15:59 /boot/tegra210-p3448-0002-p3449-0000-b00.dtb
extlinux.conf に /boot/tegra210-p3448-0000-p3449-0000-b00-user-custom.dtb が設定されている。
$ cat /boot/extlinux/extlinux.conf
TIMEOUT 30
DEFAULT JetsonIO

MENU TITLE L4T boot options

LABEL primary
      MENU LABEL primary kernel
      LINUX /boot/Image
      INITRD /boot/initrd
      APPEND ${cbootargs} quiet

# When testing a custom kernel, it is recommended that you create a backup of
# the original kernel and add a new entry to this file so that the device can
# fallback to the original kernel. To do this:
#
# 1, Make a backup of the original kernel
#      sudo cp /boot/Image /boot/Image.backup
#
# 2, Copy your custom kernel into /boot/Image
#
# 3, Uncomment below menu setting lines for the original kernel
#
# 4, Reboot

# LABEL backup
#    MENU LABEL backup kernel
#    LINUX /boot/Image.backup
#    INITRD /boot/initrd
#    APPEND ${cbootargs}

LABEL JetsonIO
	MENU LABEL Custom 40-pin Header Config
	LINUX /boot/Image
	FDT /boot/tegra210-p3448-0000-p3449-0000-b00-user-custom.dtb
	INITRD /boot/initrd
	APPEND ${cbootargs}
PWM の操作方法は以下を参照。(root になってディレクトリを移動して echo コマンドで値を sysfs へ書き込む)
$ sudo su
# cd /sys/devices/7000a000.pwm/pwm/pwmchip0