はじめに
野良バッジ初号機(nRF52832チップ)をESP32へ移植する際の気づきをメモに残しておきます。

Bluetooth接続で表示内容を変更できるLEDバッジを国内で使用する場合、技適の問題があったので技術書典7ではNordic社製nRF52832チップを搭載したRaytac社製MDBT42Q BluetoothモジュールとSPI接続MAX7219チップを搭載した8x8ドットマトリクスLEDで実装しました。
その後、サイズが大きくて「バッジじゃない」というご指摘に真摯に対応するため、技術書典8ではドットマトリクスLEDのサイズを小さくする「努力」(設計まで)をしました。
| 技術書典 | モジュール | チップ | 接続方法 | LED制御IC | 個数 | LED | 極性タイプ | サイズ(横x縦) | 個数 |
|---|---|---|---|---|---|---|---|---|---|
| 7 | MDBT42Q | nRF52832 | SPI | MAX7219 | 4 | 8x8ドットマトリクスLED | A | 32mm x 32mm | 4 |
| 8 | MDBT42Q | nRF52832 | I2C | HT16K33 | 2 | 8x8ドットマトリクスLED | A | 20mm x 20mm | 4 |
| (プロトタイプ1) | MDBT42Q | nRF52832 | I2C | HT16K33 | 2 | 8x8ドットマトリクスLED | A | 20mm x 20mm | 4 |
| (プロトタイプ2) | M5Stick-C | ESP32-PICO | I2C | HT16K33 | 2 | 8x8ドットマトリクスLED | A | 20mm x 20mm | 4 |
| (プロトタイプ3) | M5Atom lite | ESP32-PICO | I2C | HT16K33 | 2 | 8x8ドットマトリクスLED | A | 20mm x 20mm | 4 |
| (プロトタイプ4) | M5Atom Matrix | ESP32-PICO | I2C | HT16K33 | 2 | 8x8ドットマトリクスLED | A | 20mm x 20mm | 4 |
8x8ドットマトリクスはLEDのアノードまたはカソードを共通(コモン)化するのが一般的で極性タイプは2種類あります。
| 極性タイプ | 行(ROW)側 | 列(COL)側 |
|---|---|---|
| A | カソードコモン | アノードコモン |
| B | アノードコモン | カソードコモン |

プロトタイプ1でモジュールとLED制御ICとの接続方法をSPIからI2Cに変更した際の注意点は以下で記載しました。
MDBT42Q (nRF52832) で I2C を使用する方法
今回はプロトタイプ2、3、4でチップを変更(nRF52からESP32へ移植)する際の注意点を記載します。
nRF52で使用しているBLEライブラリ(Arduino BLEPeripheral)はNordic社製チップ用なので、ESP32へ移植する場合、BLEライブラリを変更する必要があります。
ESP32で動作実績のあるESP32 BLE ArduinoとNimBLE-Arduinoを候補として選定しました。
ESP32 BLE Arduinoは動作実績は多いですが、プログラムビルド後にチップへ書き込むイメージサイズが非常に大きいため、イメージサイズが小さいNimBLE-Arduinoも試してみました。
| チップ | ライブラリ | バージョン |
|---|---|---|
| nRF52832 | Arduino BLEPeripheral | 0.4.0 |
| ESP32 / ESP32-PICO | ESP32 BLE Arduino | 1.0.1 |
| ESP32 / ESP32-PICO | NimBLE-Arduino | 1.0.1 |
実装
BLEアプリケーションは2つの通信方式(ブロードキャストとコネクション)と2つの汎用プロファイル(GAP: General Access ProfileとGATT: Generic Attribute Protocol)を用いて通信を行います。
構成図

ブロードキャスト方式はBLEデバイスから一方向にデータを送信します。データを送信するBLEデバイスをBroadcaster、データを受信するBLEデバイスをObserverと呼びます。
BLEデバイスのリンク層ではデータを送信することをAdvertising、データを受信することをScanningと呼びます。
ScanningにはPassive ScanとActive Scanの2種類があり、Passive Scanの場合はAdvertisingされたデータを受信するのみで、Active Scanの場合はScanを要求して追加データを取得します。コネクションを要求する方をCentral(またはMaster)、コネクション要求を受け付けてデータ送受信を行う方をPeripheral(またはSlave)と呼びます。
通信方式

BLEデバイスはそれぞれ属性(Attribute)を持っており、属性のやり取りを行う通信方式をAttribute Protocolと呼びます。
Central(MasterまたはClient)からPeripheral(SlaveまたはServer)へ書き込み要求を送信することで、LEDバッジに表示する内容を変更しています。
Attribute Protocol

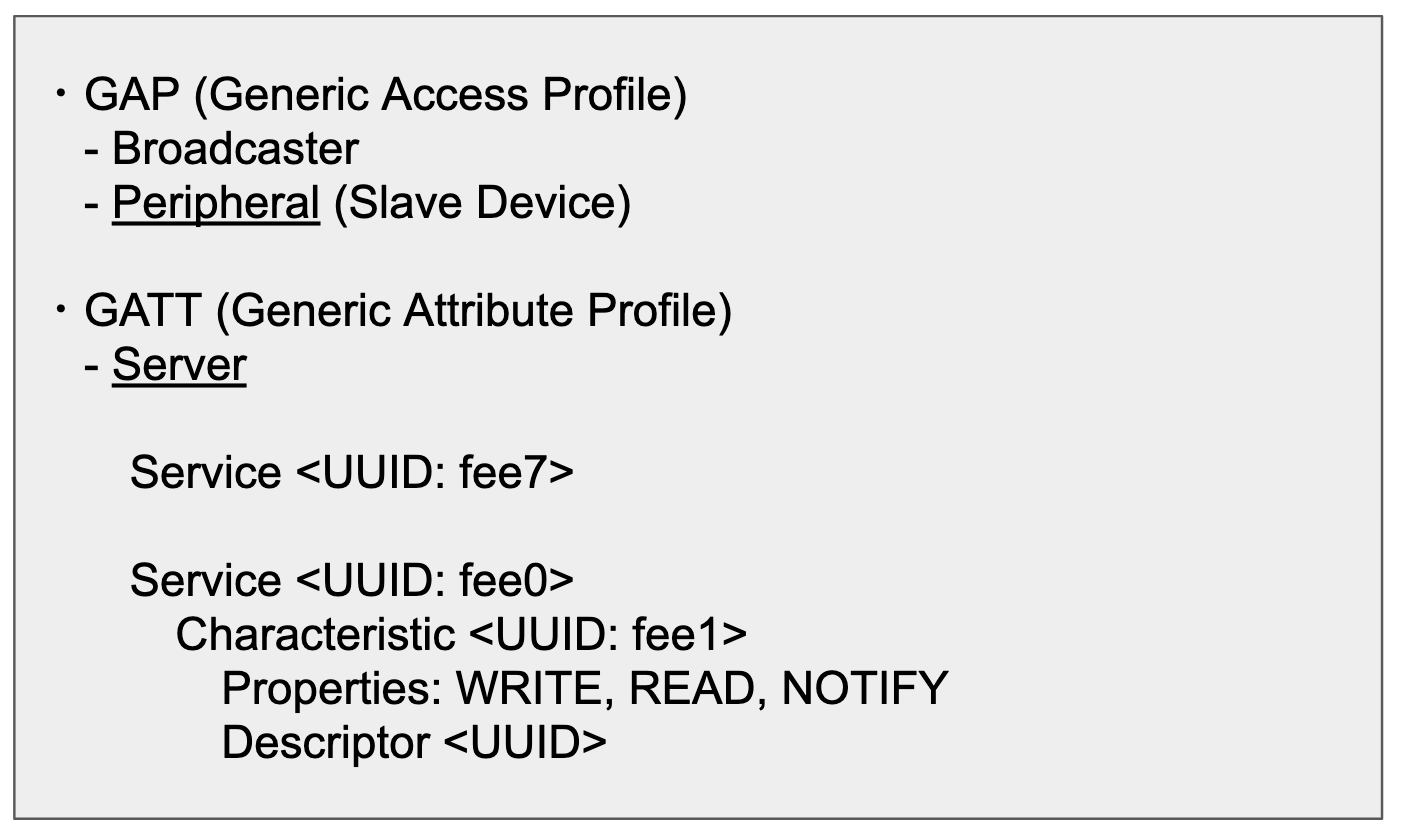
Peripheral(SlaveまたはServer)のデータ階層構造は以下のとおりです。
サービス要素にアクセスするためのユニバーサル固有識別子Service UUIDが2つあり、キャラクタリスティック要素にアクセスするためのユニバーサル固有識別子Characteristic UUIDが1つあります。Characteristic UUIDはValue(データ)を持ち、データの操作方法にはProperty(属性)があります。データに書き込み(WRITE)を行うことでLEDバッジに表示する内容を変更しています。
データ階層構造

ライブラリ毎に使用方法が異なる
ライブラリ毎の使用方法の比較は以下のとおりです。
共通点
- header.h
- BLE通信を行うためにSerial.begin()の実行が必要
# define BLE_DEVICE_NAME "LSLED"
# define BLE_SERVICE_UUID "0000fee7-0000-1000-8000-00805f9b34fb"
# define BLE_CHARACTERISTIC_SERVICE_UUID "0000fee0-0000-1000-8000-00805f9b34fb"
# define BLE_CHARACTERISTIC_DATA_UUID "0000fee1-0000-1000-8000-00805f9b34fb"
差分
- ライブラリ毎にヘッダーファイル(インクルードファイル)が異なる
- Arduino BLEPeripheralはsetEventHandler関数、ESP32 BLE ArduinoとNimBLE-ArduinoはsetCallbacks関数で呼び出す
- ESP32 BLE ArduinoとNimBLE-ArduinoはBLEService毎にstart()の実行が必要
- NimBLE-Arduinoの関数は基本的にESP32 BLE Arduinoの関数の頭に「Nim」を付ける
- Characteristic PROPERTYの設定は、ESP32 BLE ArduinoはBLECharacteristic::PROPERTY_XXXXだが、NimBLE-ArduinoはNIMBLE_PROPERTY::XXXXになる
- advertisementDataの設定はESP32 BLE Arduinoは追加だが、NimBLE-Arduinoは置換になる (NimBLE-ArduinoはsetAdvertisementData()を実行するとaddServiceUUID()が置換されるので、advertisementDataでServiceUUIDを設定する必要がある)
- Arduino BLEPeripheralとESP32 BLE Arduinoは、128bit形式ServiceUUIDは16bit形式でAdvertisingされるが、NimBLE-Arduinoは128bit形式でAdvertisingされる (NimBLE-Arduinoで16bit形式ServiceUUIDをAdvertisingしたい場合、16bit形式ServiceUUIDを指定する必要がある)
Arduino BLEPeripheral
# include <BLEPeripheral.h>

Serial.begin(115200);

BLEPeripheral blePeripheral;

blePeripheral.setLocalName(BLE_DEVICE_NAME);
blePeripheral.setDeviceName(BLE_DEVICE_NAME);

const unsigned char manufacture[] = "NORA";
unsigned char manufacturerDataLength = 4;
blePeripheral.setManufacturerData(manufacture, manufacturerDataLength);

BLEService ledService = BLEService(BLE_SERVICE_UUID);
BLEService ledCharService = BLEService(BLE_CHARACTERISTIC_SERVICE_UUID);
BLECharacteristic CharacteristicData = BLECharacteristic(BLE_CHARACTERISTIC_DATA_UUID, BLERead | BLEWrite | BLENotify, num);

blePeripheral.setAdvertisedServiceUuid(ledService.uuid());
blePeripheral.setAdvertisedServiceUuid(ledCharService.uuid());

blePeripheral.addAttribute(ledService);
blePeripheral.addAttribute(ledCharService);
blePeripheral.addAttribute(CharacteristicData);

blePeripheral.setEventHandler(BLEConnected, blePeripheralConnectHandler);
blePeripheral.setEventHandler(BLEDisconnected, blePeripheralDisconnectHandler);
CharacteristicData.setEventHandler(BLEWritten, CharacteristicDataWritten);

blePeripheral.begin();
ESP32 BLE Arduino
# include <BLEDevice.h>
# include <BLEUtils.h>
# include <BLEServer.h>

Serial.begin(115200);

static BLEUUID ledService(BLE_SERVICE_UUID);
static BLEUUID ledCharService(BLE_CHARACTERISTIC_SERVICE_UUID);
static BLEUUID ledCharData(BLE_CHARACTERISTIC_DATA_UUID);

BLEDevice::init(BLE_DEVICE_NAME);
BLEServer *pServer = BLEDevice::createServer();
pServer->setCallbacks(new ServerCallbacks());

BLEService *pLedService = pServer->createService(ledService);
pLedService->start();

BLEService *pService = pServer->createService(ledCharService);
BLECharacteristic *pCharacteristic = pService->createCharacteristic(ledCharData,
                                       BLECharacteristic::PROPERTY_READ |
                                       BLECharacteristic::PROPERTY_WRITE |
                                       BLECharacteristic::PROPERTY_NOTIFY
                                       );
pCharacteristic->setCallbacks(new CharacteristicDataWritten());
pService->start();

BLEAdvertising *pAdvertising = pServer->getAdvertising();
BLEAdvertisementData advertisementData;
advertisementData.setManufacturerData("NORA");
pAdvertising->setAdvertisementData(advertisementData);
pAdvertising->addServiceUUID(ledService);
pAdvertising->addServiceUUID(ledCharService);
pAdvertising->setScanResponse(true);
BLEDevice::startAdvertising();
NimBLE-Arduino
# include <NimBLEDevice.h>

Serial.begin(115200);

static NimBLEUUID ledService(BLE_SERVICE_UUID);
static NimBLEUUID ledCharService(BLE_CHARACTERISTIC_SERVICE_UUID);
static NimBLEUUID ledCharData(BLE_CHARACTERISTIC_DATA_UUID);

NimBLEDevice::init(BLE_SERVICE_UUID);
NimBLEServer *pServer = NimBLEDevice::createServer();
pServer->setCallbacks(new MyServerCallbacks());

NimBLEService *pLedService = pServer->createService(ledService);
pLedService->start();

NimBLEService *pService = pServer->createService(ledCharService);
NimBLECharacteristic *pCharacteristic = pService->createCharacteristic(ledCharData,
                                          NIMBLE_PROPERTY::READ |
                                          NIMBLE_PROPERTY::WRITE |
                                          NIMBLE_PROPERTY::NOTIFY
                                          );
pCharacteristic->setCallbacks(new switchCharacteristicWritten());
pService->start();

NimBLEAdvertising *pAdvertising = pServer->getAdvertising();
NimBLEAdvertisementData advertisementData;
advertisementData.setManufacturerData("NORA");
advertisementData.setCompleteServices(NimBLEUUID("fee7"));
advertisementData.setCompleteServices(NimBLEUUID("fee0"));
pAdvertising->setAdvertisementData(advertisementData);
pAdvertising->setScanResponse(true);
pAdvertising->start();