UIAlertControllerには、UITextFiledを追加する機能が用意されています。
※UIAlertViewにもありましたが。
それについて。
        //textの表示はalertのみ。ActionSheetだとtextfiledを表示させようとすると
        //落ちます。
        let alert:UIAlertController = UIAlertController(title:"action",
            message: "alertView",
            preferredStyle: UIAlertControllerStyle.Alert)

        let cancelAction:UIAlertAction = UIAlertAction(title: "Cancel",
            style: UIAlertActionStyle.Cancel,
            handler:{
            (action:UIAlertAction!) -> Void in
                println("Cancel")
        })
        let defaultAction:UIAlertAction = UIAlertAction(title: "OK",
            style: UIAlertActionStyle.Default,
            handler:{
            (action:UIAlertAction!) -> Void in
                println("OK")
        })
        alert.addAction(cancelAction)
        alert.addAction(defaultAction)

        //textfiledの追加
        alert.addTextFieldWithConfigurationHandler({(text:UITextField!) -> Void in
        })
        //実行した分textfiledを追加される。
        alert.addTextFieldWithConfigurationHandler({(text:UITextField!) -> Void in
        })
        presentViewController(alert, animated: true, completion: nil)

またこれら追加したUITextFiledに対して、カスタマイズが可能です。
それは、addTextFieldWithConfigurationHandlerで行います。
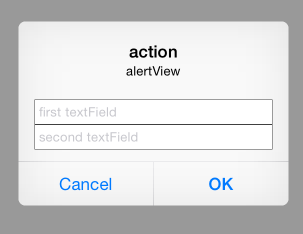
例えば、placeholderを追加してみます。
        alert.addTextFieldWithConfigurationHandler({(text:UITextField!) -> Void in
            //対象UITextFieldが引数として取得できる
            text.placeholder = "first textField"
        })
        alert.addTextFieldWithConfigurationHandler({(text:UITextField!) -> Void in
            text.placeholder = "second textField"

        })
次にOKを押した際にテキストの中身の取得をしてみますが、
それは、UIAlertControllerが、textFieldsというプロパティを持っているので、
それを使います。
        let defaultAction:UIAlertAction = UIAlertAction(title: "OK",
            style: UIAlertActionStyle.Default,
            handler:{
                (action:UIAlertAction!) -> Void in
                let textFields:Array<UITextField>? =  alert.textFields as Array<UITextField>?
                if textFields != nil {
                    for textField:UITextField in textFields! {
                        //各textにアクセス
                        println(textField.text)
                    }
                }
        })
次にラベルの追加をやってみます。
        alert.addTextFieldWithConfigurationHandler({(text:UITextField!) -> Void in
            text.placeholder = "first textField"
            var label:UILabel = UILabel(frame: CGRectMake(0, 0, 50, 30))
            label.text = "ID"
            text.leftView = label
            text.leftViewMode = UITextFieldViewMode.Always
        })
        alert.addTextFieldWithConfigurationHandler({(text:UITextField!) -> Void in
            text.placeholder = "second textField"
            var label:UILabel = UILabel(frame: CGRectMake(0, 0, 50, 30))
            label.text = "PASS"
            text.leftView = label
            text.leftViewMode = UITextFieldViewMode.Always

        })
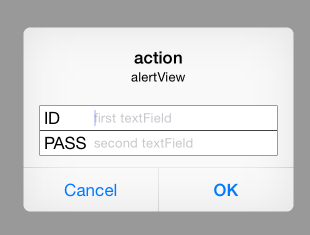
今回は、labelを追加しましたが、leftView(rightViewもあります)は
UIViewを指定する事が可能なので、ボタンや画像なども追加が可能かと思います。