この記事は技術検証を目的としており、Datadogの公式サポートを受けたものではありません。
やりたいこと
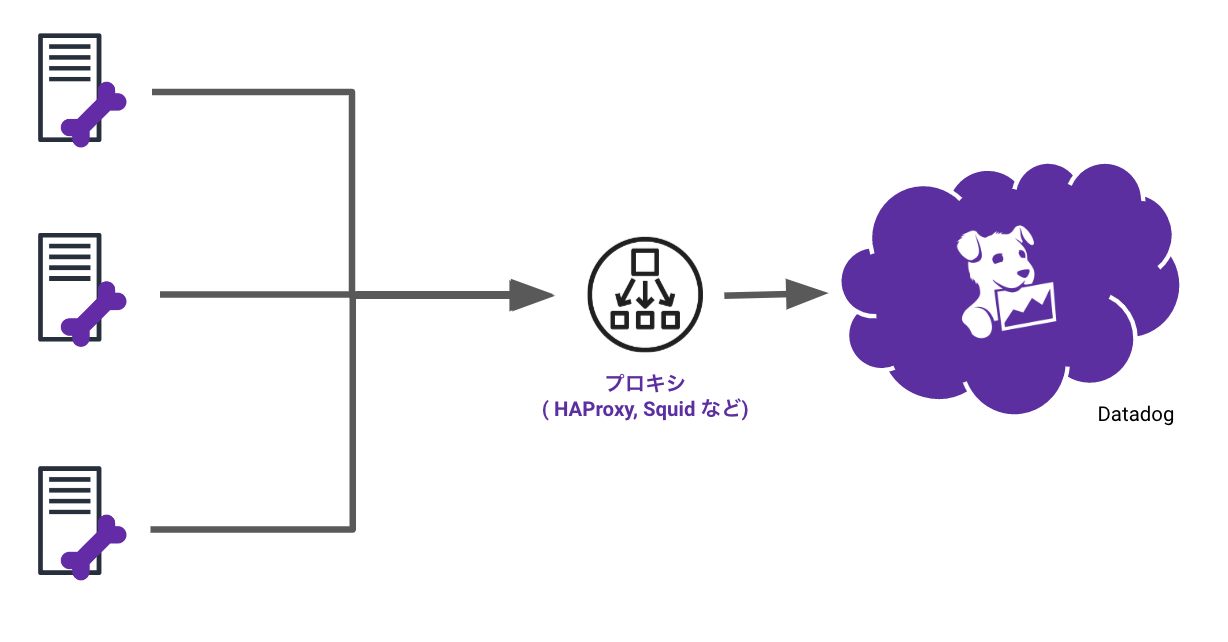
Datadog Agentは通常HTTPSでDatadogにデータを送信しますが、プロキシ経由で送ることも可能です。

この場合、送られる先はエージェントのdatadog.yamlにかかれているAPIキーにしたがって該当のDatadog Orgに送られます。
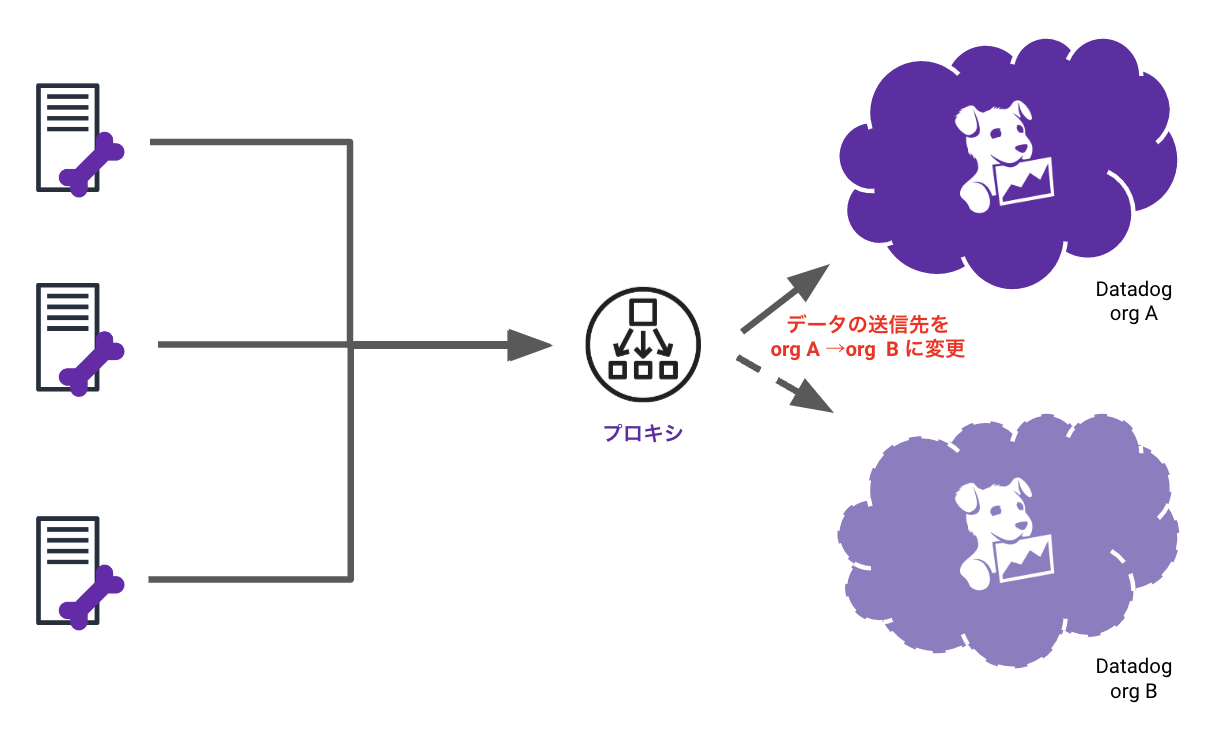
ただこれだと何かの事情で別のOrgにデータを送りたい!となった場合、それぞれのエージェントの構成ファイルを全部書き換えなきゃいけないので、大変なんですよね。
てことで、プロキシのところで宛先情報を書き換えるて(無理やり)別のDatadog Orgにデータを送信できるようにしたいと思います。

プロキシ経由でデータを送るように設定する
まずは純粋にエージェントからの経路がプロキシ経由になるように設定していきます。
プロキシ経由にするには、エージェントの送信先をプロキシ宛に変更するのと、プロキシ側でDatadogの各エンドポイントに転送するように設定する必要があります。
送信するデータの種類ごとにエンドポイントが設定されているのでちゃんとやろうとするとそれぞれ設定をする必要があるのですが、全部やると大変なので今回は「メトリクス」と「ログ」の2つのみで構成することにします。
プロキシの構成
今回はHAProxyを使います。
haproxy.cfgを編集してAgentから受けたデータをDatadogの然るべきエンドポイントに送るよう設定します。
global
	log /dev/log	local0
	log /dev/log	local1 notice
	chroot /var/lib/haproxy
	stats socket /run/haproxy/admin.sock mode 660 level admin expose-fd listeners
	stats timeout 30s
	user haproxy
	group haproxy
	daemon

	# Default SSL material locations
	ca-base /etc/ssl/certs
	crt-base /etc/ssl/private

	# See: https://ssl-config.mozilla.org/#server=haproxy&server-version=2.0.3&config=intermediate
        ssl-default-bind-ciphers XXXXXXX
        ssl-default-bind-ciphersuites XXXXXXX
        ssl-default-bind-options ssl-min-ver TLSv1.2 no-tls-tickets

defaults
	log	global
	mode	http
	option	httplog
	option	dontlognull
        timeout connect 5000
        timeout client  50000
        timeout server  50000
	errorfile 400 /etc/haproxy/errors/400.http
	errorfile 403 /etc/haproxy/errors/403.http
	errorfile 408 /etc/haproxy/errors/408.http
	errorfile 500 /etc/haproxy/errors/500.http
	errorfile 502 /etc/haproxy/errors/502.http
	errorfile 503 /etc/haproxy/errors/503.http
	errorfile 504 /etc/haproxy/errors/504.http

# This declares a view into HAProxy statistics, on port 3833
# You do not need credentials to view this page and you can
# turn it off once you are done with setup.
listen stats
    bind *:3833
    mode http
    stats enable
    stats uri /

# This section is to reload DNS Records
# Replace <DNS_SERVER_IP> and <DNS_SECONDARY_SERVER_IP> with your DNS Server IP addresses.
# For HAProxy 1.8 and newer
resolvers my-dns
    nameserver dns1 8.8.8.8:53
    nameserver dns2 1.1.1.1:53
    resolve_retries 3
    timeout resolve 2s
    timeout retry 1s
    accepted_payload_size 8192
    hold valid 10s
    hold obsolete 60s

# This declares the endpoint where your Agents connects for
# sending metrics (for example, the value of "dd_url").
frontend metrics-forwarder
    bind *:3834
    mode http
    option tcplog
    default_backend datadog-metrics

    use_backend datadog-api if { path_beg -i  /api/v1/validate }
    use_backend datadog-flare if { path_beg -i  /support/flare/ }

# This declares the endpoint where your Agents connects for
# sending Logs (e.g the value of "logs.config.logs_dd_url")
# If sending logs with use_http: true
frontend logs_http_frontend
    bind *:3838
    mode http
    option tcplog
    default_backend datadog-logs-http

# This is the Datadog server. In effect, any TCP request coming
# to the forwarder frontends defined above are proxied to
# Datadog's public endpoints.
backend datadog-metrics
    balance roundrobin
    mode http
    # The following configuration is for HAProxy 1.8 and newer
    server-template mothership 5 haproxy-app.agent.datadoghq.com:443 check port 443 ssl verify required ca-file '/etc/ssl/certs/ca-certificates.crt' check resolvers my-dns init-addr none resolve-prefer ipv4

backend datadog-api
    mode http
    # The following configuration is for HAProxy 1.8 and newer
    server-template mothership 5 api.datadoghq.com:443 check port 443 ssl verify required ca-file '/etc/ssl/certs/ca-certificates.crt' check resolvers my-dns init-addr none resolve-prefer ipv4

backend datadog-flare
    mode http
    # The following configuration is for HAProxy 1.8 and newer
    server-template mothership 5 flare.datadoghq.com:443 check port 443 ssl verify required ca-file '/etc/ssl/certs/ca-certificates.crt' check resolvers my-dns init-addr none resolve-prefer ipv4

backend datadog-logs-http
    balance roundrobin
    mode http
    # The following configuration is for HAProxy 1.8 and newer
    server-template mothership 5 agent-http-intake.logs.datadoghq.com:443 check port 443 ssl verify required ca-file '/etc/ssl/certs/ca-certificates.crt' check resolvers my-dns init-addr none resolve-prefer ipv4
haproxy.cfgファイルの全貌はドキュメントを参照してください。ただ、記事執筆時点で日本語版だとインデント崩れがあるのでコピペする場合は言語を英語にするのをおすすめします。
Agentの構成
エージェント側のデータの宛先をプロキシになるよう設定します。
datadog.yamlを編集し、以下のようにプロキシサーバーのアドレスを記載します。
dd_url: http://haproxy-server:3834

logs_config:
    use_http: true
    logs_dd_url: haproxy-server:3837
    logs_no_ssl: true
datadog.yamlにはproxy:という設定項目があり、これを修正したい気持ちにかられますが、ぐっと気持ちを堪えてここは無視します。
# proxy:
#   http:
#   https:
最後にDatadog Agentを再起動すれば設定完了です。
$ sudo service datadog-agent restart
http://haproxy-server:3833/とか見るとちゃんとプロキシ経由になっていることを確認できます。
プロキシの設定を変更して違うOrgにデータを送る
さてここからが本題です。
Datadogはマルチテナントでサービスを提供しており、ユーザーごとの環境(Org)はAPIキーを使って識別しています。
そしてそのAPIキーは、HTTPヘッダーのDD-API-KEYで送られています。
HAProxyではhttp-request set-headerでHTTPヘッダーを上書きできるので、これを使ってDD-API-KEYの値を上書きしちゃいます。
Use
http-request set-headerto add a new header or overwrite it if it already exists.
てことで、ログならこんな感じで1行追加します。
backend datadog-logs-http
    http-request set-header DD-API-KEY <送信したいOrgのAPIキー> #追加
    balance roundrobin
    mode http
    # The following configuration is for HAProxy 1.8 and newer
    server-template mothership 5 agent-http-intake.logs.datadoghq.com:443 check port 443 ssl verify required ca-file '/etc/ssl/certs/ca-certificates.crt' check resolvers my-dns init-addr none resolve-prefer ipv4
これだけです。簡単ですね。
メトリクスも違うOrgに送れるようにする
実はメトリクスは、APIキーの書きかえだけではうまく転送されません。
リクエストする際にHTTPクエリパラメータ api_key がひっついており、こいつも上書きしてやる必要があるのです。
ということで、メトリクスの場合はhttp-request set-queryを追加します。
Use
http-request set-queryto change the requested URL's query string.
backend datadog-metrics
    http-request set-header DD-API-KEY <送信したいOrgのAPIキー> #追加
    http-request set-query api_key=<送信したいOrgのAPIキー>     #これも追加
    balance roundrobin
    mode http
    # The following configuration is for HAProxy 1.8 and newer
    server-template mothership 5 haproxy-app.agent.datadoghq.com:443 check port 443 ssl verify required ca-file '/etc/ssl/certs/ca-certificates.crt' check resolvers my-dns init-addr none resolve-prefer ipv4
これで無事、ログもメトリクスもエージェントで指定したOrgと違うOrgにデータを送れるようになりました。
ちなみに、Datadogのエンドポイントを書き換えれば違うDatadogサイトにも送れます。
たとえば今回の例で使ったUS1サイトのログのエンドポイントは
agent-http-intake.logs.datadoghq.com
ですが、これを
agent-http-intake.logs.datadoghq.eu
にするとDatadogのEUサイトに送ることができるようになります。
もちろん、送り先の方にアカウントがあること、APIキーを払い出していることが前提なのでご留意を。
留意点
Datadogサポートに問い合わせをする場合、サポートチームからAgent フレアの送付を求められることがあります。
ですが、この記事にしたがってHTTPヘッダーにAPI Keyを入れると、下記のようなエラーが発生してうまく送ることができません。
"HTTP 400" Bad Request. "Invalid authentication syntax: keys cannot be passed in both headers and query params"
フレアを送ろうとすると、送信先のURLを作る際にクエリパラメーターにAPIキーがセットされるのですが、これがヘッダーのAPIキーとバッティングしてしまうのです。1
そのため、サポート問い合わせをする場合は設定を削除する必要がありますのでご注意ください。