やりたいこと
IBM Cloud Kubernetes Service (IKS) でマルチゾーンのプライベート・クラスターを構成した際に、アプリケーションをプライベートにしたい。その際、Ingressを使って複数ゾーンにまたがって負荷分散させたい。
前提
- VRFの有効化
- マルチゾーン構成のプライベート・クラスターが作成されている
- アプリのPodがデプロイ済み
Private Ingress (ALB) の有効化
IKSではIngressはApplication Load Balancer (ALB)という名前で構成されています。
まずはクラスターのALBの状態を確認しておきます。
$ ibmcloud ks albs --cluster <CLUSTER NAME>

OK
ALB ID                                            Enabled   Status     Type      ALB IP           Zone    Build                          ALB VLAN ID
private-crdd8ac0808d044cd391c37ccefdb2230e-alb1   false     disabled   private   -                tok05   ingress:477/ingress-auth:331   2513623
private-crdd8ac0808d044cd391c37ccefdb2230e-alb2   false     disabled   private   -                tok04   ingress:477/ingress-auth:331   2497941
private-crdd8ac0808d044cd391c37ccefdb2230e-alb3   false     disabled   private   -                tok02   ingress:477/ingress-auth:331   2513627
public-crdd8ac0808d044cd391c37ccefdb2230e-alb1    true      enabled    public    165.192.xx.xxx   tok05   ingress:477/ingress-auth:331   2513621
public-crdd8ac0808d044cd391c37ccefdb2230e-alb2    true      enabled    public    128.168.xx.xxx   tok04   ingress:477/ingress-auth:331   2497939
public-crdd8ac0808d044cd391c37ccefdb2230e-alb3    true      enabled    public    161.202.xxx.x    tok02   ingress:477/ingress-auth:331   2513625
デフォルトの状態だと上のようにpublic-xxxという名前のパブリックIngressのみ有効化されている状態です。プライベートで負荷分散できるようにするために、プライベートALBを有効化します。
$ ibmcloud ks alb-configure --albID private-crdd8ac0808d044cd391c37ccefdb2230e-alb1 --enable
ALB を構成中...
OK
少しまつと、有効化されます。
$ ibmcloud ks albs --cluster <CLUSTER NAME>
OK
ALB ID                                            有効化   状況      タイプ    ALB IP           ゾーン   ビルド                         ALB VLAN ID
private-crdd8ac0808d044cd391c37ccefdb2230e-alb1   true     enabled   private   10.193.9.18      tok05    ingress:477/ingress-auth:331   2513623
private-crdd8ac0808d044cd391c37ccefdb2230e-alb2   true     enabled   private   10.192.17.124    tok04    ingress:477/ingress-auth:331   2497941
private-crdd8ac0808d044cd391c37ccefdb2230e-alb3   true     enabled   private   10.129.82.82     tok02    ingress:477/ingress-auth:331   2513627
public-crdd8ac0808d044cd391c37ccefdb2230e-alb1    true     enabled   public    165.192.xx.xxx   tok05    ingress:477/ingress-auth:331   2513621
public-crdd8ac0808d044cd391c37ccefdb2230e-alb2    true     enabled   public    128.168.xx.xxx   tok04    ingress:477/ingress-auth:331   2497939
public-crdd8ac0808d044cd391c37ccefdb2230e-alb3    true     enabled   public    161.202.xxx.x    tok02    ingress:477/ingress-auth:331   2513625
プライベートIngressが10.x.x.xで公開されました。
IBM Cloud Load Balancerを構成する
サービスの作成
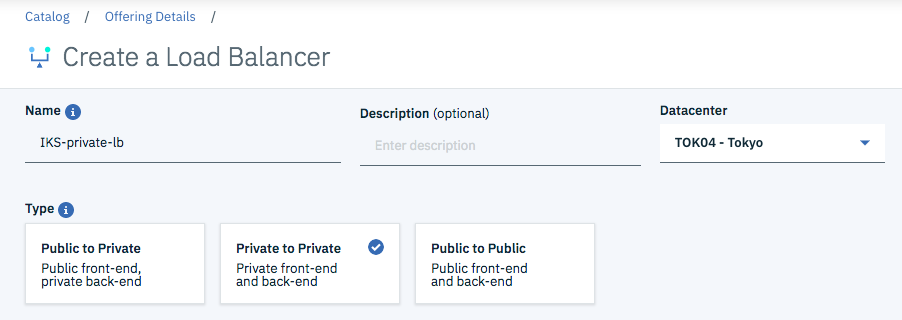
https://cloud.ibm.com/classic/network/loadbalancing/cloud/create から作成します。
TypeはPrivate to Privateにしておきます。
負荷分散するServerの部分は後ほど登録するのでここでは何も登録しません。

IBM Cloud Load Balancerにprivate ALBを登録する
こちらのDocsに沿って登録します。
https://cloud.ibm.com/docs/infrastructure/loadbalancer-service?topic=loadbalancer-service-api-reference&locale=ja#updating-a-load-balancer
ロードバランサーUUIDはコンソール画面のURLからも確認できます。

import SoftLayer
from pprint import pprint

# Your load balancer UUID
uuid = 'XXXXXXXXXXXXXXXXXXXXXXXXXXXXX'

# Update with the correct IP addresses
# ここにprivate ALBのIPを記入します。
serverInstances = [
    { "privateIpAddress": "10.193.9.18" },
    { "privateIpAddress": "10.192.17.124"},
    { "privateIpAddress": "10.129.82.82" } # Default weight=50
]

# Create the api client
# client = SoftLayer.Client()
client = SoftLayer.Client(username='XXXXXXXXXXXXXXXXXx', api_key='XXXXXXXXXXXXXXX')
member_service = client['Network_LBaaS_Member']

_mask = "mask[members]"

try:
    response = member_service.addLoadBalancerMembers(uuid, serverInstances, mask=_mask)
    pprint(response)
except SoftLayer.SoftLayerAPIError as e:
    print("Unable to add members: %s, %s" % (e.faultCode, e.faultString))
上記のコードを実行すると登録が行われます。
$ python add_alb.py
{'accountId': xxxxxxx,
 'address': 'private-k8s-lb-xxxxxxx-tok05.lb.bluemix.net',
 'createDate': '2019-06-26T23:04:10-06:00',
 'id': xxxxxx,
 'isPublic': 0,
 'locationId': 2344397,
 'members': [{'address': '10.193.9.18',
              'createDate': '2019-06-26T23:33:54-06:00',
              'id': 981887,
              'modifyDate': '',
              'provisioningStatus': 'CREATE_PENDING',
              'uuid': '82a2c062-0ab4-4bbe-a8e3-79ebd7ce2445',
              'weight': ''},
             {'address': '10.192.17.124',
              'createDate': '2019-06-26T23:33:54-06:00',
              'id': 981889,
              'modifyDate': '',
              'provisioningStatus': 'CREATE_PENDING',
              'uuid': 'ab8757ce-59df-46ca-898c-b9e78dab3e66',
              'weight': ''},
             {'address': '10.129.82.82',
              'createDate': '2019-06-26T23:33:54-06:00',
              'id': 981891,
              'modifyDate': '',
              'provisioningStatus': 'CREATE_PENDING',
              'uuid': '30a0cf07-5bb8-4b8b-93c0-e57a2dac8d07',
              'weight': ''}],
 'modifyDate': '2019-06-26T23:33:54-06:00',
 'name': 'private-k8s-lb',
 'operatingStatus': 'ONLINE',
 'provisioningStatus': 'UPDATE_PENDING',
 'type': 0,
 'useSystemPublicIpPool': 1,
 'uuid': 'xxxxxxxxxxxxxxxxxxxxxx'}
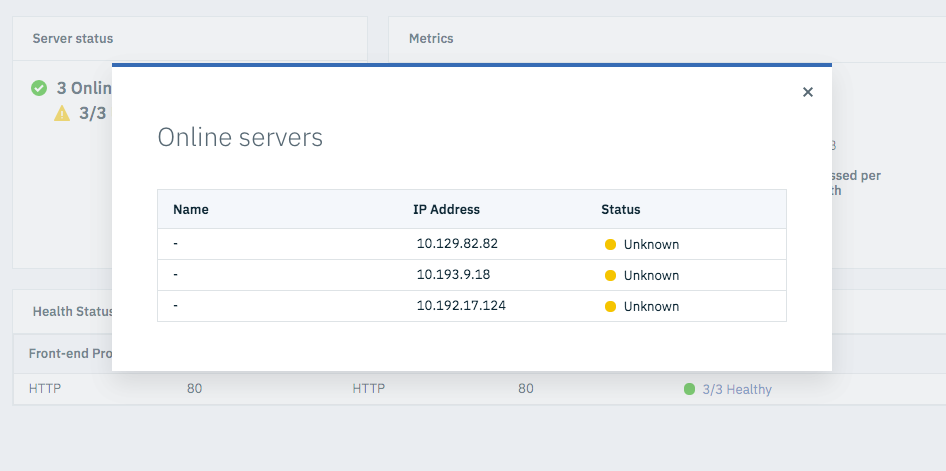
IBM Cloud Load Balancerの画面で確認すると、確かに振り分け先として登録されています。(ステータスがUnknownですが気にしなくて大丈夫です)

Ingressの構成
最後に、IKSクラスター側でIngressの作成をします。
以下のようにyamlを作成してください。
- annotationsのところにはPrivate ALB IDを記載(複数ゾーンの場合はすべて記載)
- host はIBM Cloud Load Balancerで割り当てられたもの
apiVersion: extensions/v1beta1
kind: Ingress
metadata:
  name: myingressresource
  annotations:
    ingress.bluemix.net/ALB-ID: "private-crdd8ac0808d044cd391c37ccefdb2230e-alb1;private-crdd8ac0808d044cd391c37ccefdb2230e-alb2;private-crdd8ac0808d044cd391c37ccefdb2230e-alb3"
spec:
  rules:
  - host: private-k8s-lb-xxxxxxx-tok05.lb.bluemix.net
    http:
      paths:
      - path: /
        backend:
          serviceName: myApp
          servicePort: 8080
あとはこのyamlをapplyすれば完了です。
