📅 note公開日:2025-08-30 08:48
🔁 この記事はnoteで公開していた内容をQiitaへ移行・再掲したものです。(必要に応じて加筆修正しています)
今回のApprenticeShip10期生QuestはJavaScriptを使用してじゃんけんゲームを作成🎮
実装完了するまでの奮闘記となりそうです。。。
この章では「Questじゃんけんゲームステップ1」をさらに「やることリスト」として分解し、
小さく実装&テストの繰り返しを行いステップ1完成までを記録に残します。
- やることリスト1:ボタンをクリックするとイベントが起こる
- やることリスト2:ボタンを押したら画面に押したボタンのテキストが表示される。
- やることリスト3:じゃんけん結果を表示させる。(あいこ=あいこ)
- やることリスト4:ランダムな手をだすCPUを作成する
- やることリスト5:人間の手を「ボタンを押して決める」に変更する
- やることリスト6:見本通り、人間とCPUの手を表示させる。
Since,2025.08.26
ステップ1
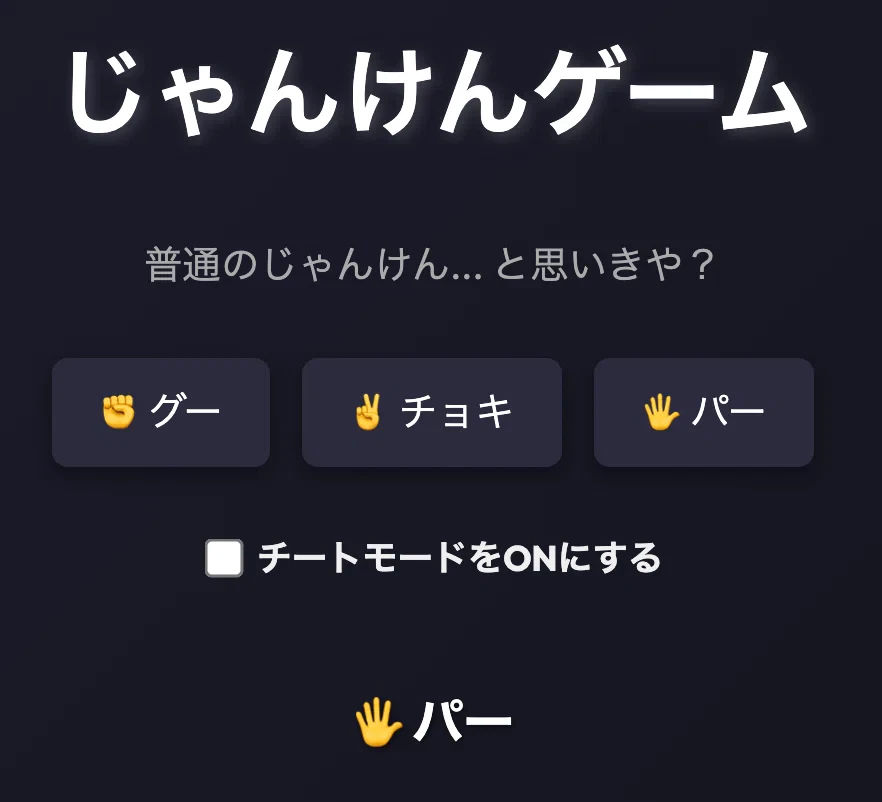
基本のじゃんけんゲームを実装してください。
以下の要件を達成してください👇
- "グー / チョキ / パー" のボタンを押すと、相手(CPU)がランダムな手を出す
- 勝敗を画面に表示する
尚、今回はhtml/CSSは用意していただきました。
<!DOCTYPE html>
<html lang="ja">
<head>
  <meta charset="UTF-8">
  <title>じゃんけんゲーム with チートモード</title>
  <link href="https://fonts.googleapis.com/css2?family=Outfit:wght@400;700&display=swap" rel="stylesheet">
  <style>
    /* 基本設定 */
    * {
      box-sizing: border-box;
    }

    body {
      margin: 0;
      padding: 0;
      font-family: 'Outfit', sans-serif;
      background: linear-gradient(135deg, #1e1e2f, #12121a);
      color: #fff;
      height: 100vh;
      display: flex;
      flex-direction: column;
      align-items: center;
      justify-content: center;
      overflow: hidden;
    }

    h1 {
      font-size: 3rem;
      margin-bottom: 1rem;
      color: #fff;
      text-shadow: 2px 2px 8px rgba(255, 255, 255, 0.2);
    }

    .subtitle {
      font-size: 1.2rem;
      margin-bottom: 2rem;
      color: #aaa;
    }

    .button-group {
      display: flex;
      gap: 1rem;
      margin-bottom: 2rem;
    }

    button {
      padding: 0.8rem 1.5rem;
      font-size: 1.2rem;
      border: none;
      border-radius: 8px;
      background: #2c2c3d;
      color: #fff;
      cursor: pointer;
      box-shadow: 0 4px 10px rgba(0, 0, 0, 0.4);
      transition: all 0.3s ease;
    }

    button:hover {
      background: #5c00ff;
      color: #fff;
      transform: translateY(-2px) scale(1.05);
      box-shadow: 0 0 10px #5c00ff, 0 0 20px #5c00ff33;
    }

    #cheatMode {
      transform: scale(1.5);
      margin-right: 10px;
    }

    label {
      display: flex;
      align-items: center;
      font-weight: bold;
      font-size: 1.1rem;
      margin-bottom: 1.5rem;
      color: #eee;
    }

    #result {
      font-size: 1.6rem;
      font-weight: bold;
      min-height: 2em;
      transition: color 0.3s ease;
      text-shadow: 1px 1px 3px rgba(0,0,0,0.5);
    }

    /* 勝敗の結果をネオンカラーで表示するためのクラスたち */
    /* JavaScriptで .win / .lose / .draw を result 要素に追加することで色が変わる */
    .win { color: #57aaff; }
    .lose { color: #ff5555; }
    .draw { color: #00ff99; }

    /* 背景に敷かれたアニメーション用レイヤー */
    /* 通常時はグラデ背景、チートモード時にアニメが発動 */
    .overlay {
      position: fixed;
      top: 0;
      left: 0;
      width: 100%;
      height: 100%;
      z-index: -1;
      pointer-events: none;
      background: linear-gradient(135deg, #1e1e2f, #12121a);
      transition: background 1s ease;
    }

    /* チートモードがONになったときに適用されるアニメーション */
    /* bodyに .cheat-active がつくと .overlay にこのアニメが発動 */
    .cheat-active .overlay {
      animation: cheatGlow 1s infinite alternate;
    }
    /* 背景が変化する演出(紫色) */
    @keyframes cheatGlow {
      0%   { background: #2e003e; }
      100% { background: #5e00a0; }
    }
  </style>
</head>
<body>
  <!-- チートモードON時に背景を変化させるための専用要素。CSSで制御されます -->
  <div class="overlay"></div>

  <h1>じゃんけんゲーム</h1>
  <p class="subtitle">普通のじゃんけん... と思いきや?</p>

  <div class="button-group">
    <button>✊ グー</button>
    <button>✌️ チョキ</button>
    <button>🖐 パー</button>
  </div>

  <!-- チートモードのON/OFFを切り替えるチェックボックス -->
  <!-- JavaScriptでこのチェック状態を取得するには getElementById('cheatMode') を使います -->
  <label>
    <input type="checkbox" id="cheatMode"> チートモードをONにする
  </label>

  <!-- 勝敗の結果を表示するエリア -->
  <!-- JavaScriptでここにテキストを表示するには getElementById('result') を使います -->
  <p id="result"></p>

  <script>
  // =========================================
  //
  // ここにじゃんけんゲームのロジックを実装してください
  //
  // =========================================
  </script>
</body>
</html>
やることリスト1:ボタンをクリックするとイベントが起こる
- 要素取得
- イベントハンドラー設定
- 確認用のアラート表示
const btnGroup = document.querySelector('.button-group');
btnGroup.addEventListener('click', (e) => {
  const btn = e.target.closest('button');
  //if (!btn) return;
  alert('成功');
});
解説
const btnGroup = document.querySelector('.button-group');
→要素の取得。htmlでボタンの要素はclassで作られていたため↓
<div class="button-group">
  <button>✊ グー</button>
  <button>✌️ チョキ</button>
  <button>🖐 パー</button>
</div>
getElementByIdではなく、querySelectorで要素を取得しました。
btnGroup.addEventListener('click', (e) => {
→取得したボタングループにクリックすればイベントが発生する addEventListener を設定。
const btn = e.target.closest('button');
→クリックイベントの発生源(実際にクリックされた要素)から一番近い button 要素を見つける。
buttonが見つからなければ null が返される。
//if (!btn) return;
→ボタンじゃない場所が押されたらなにも処理されないようにこの行を入れたんですが、
一旦コメントアウトしておきます。
alert('成功');
→ここまでの処理が実行されているか確認するために alert を使って確かめます。
console.log() を使用しても良いですが、ポップアップさせたい気分だったのでalertにしてみました:)))b
やることリスト2:ボタンを押したら画面に押したボタンのテキストが表示される
イメージ:パーを押した時、「パー」と表示される。
const btnGroup = document.querySelector('.button-group');
const result = document.getElementById('result');

btnGroup.addEventListener('click', (e) => {
  const btn = e.target.closest('button');
  //if (!btn) return;
  //alert('成功');
  result.innerHTML = btn.textContent
});
解説
const result = document.getElementById('result');
→結果表示の要素 result を取得。
result.innerHTML = btn.textContent
→各ボタンのテキストをresultに表示させる。
やることリスト3:じゃんけん結果を表示させる。(あいこ=あいこ)
const btnGroup = document.querySelector('.button-group');
const result = document.getElementById('result');

btnGroup.addEventListener('click', (e) => {
  const btn = e.target.closest('button');
  //if (!btn) return;
  //alert('成功');

  //じゃんけんCPU
  let plHand = 0;
  let cpHand = 0;
  if ( plHand === cpHand ) {
    result.textContent = 'あいこ'
  }
  //result.innerHTML = btn.textContent
});
解説
let plHand = 0; / let cpHand = 0;
→plHandは人、cpHandはコンピューターの手。
if文で人の手とコンピューターの手がイコールなら、結果のテキストを「あいこ」と表示するように実装。
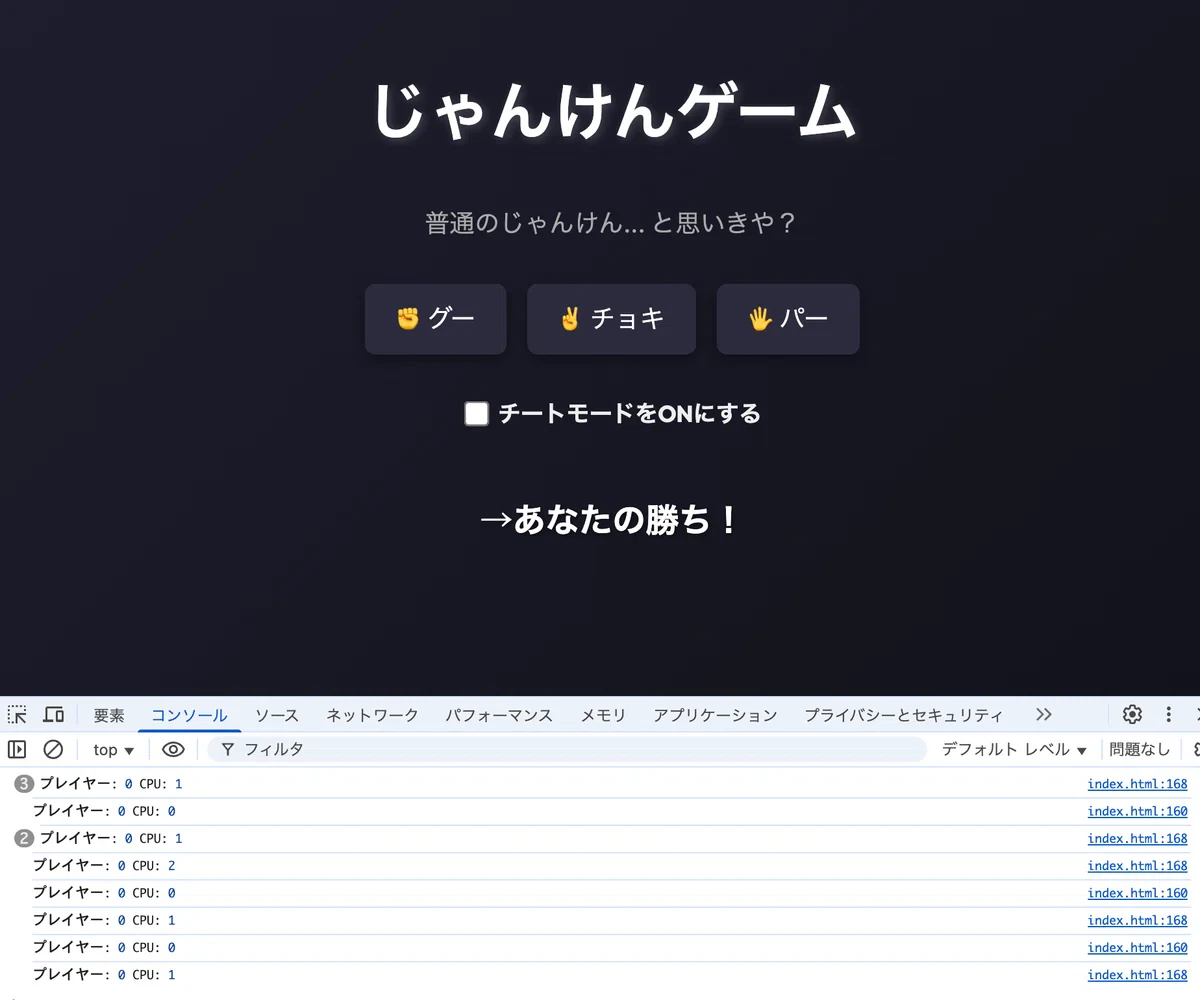
やることリスト4:ランダムな手をだすCPUを作成する
const btnGroup = document.querySelector('.button-group');
const result = document.getElementById('result');

btnGroup.addEventListener('click', (e) => {
  const btn = e.target.closest('button');
  //if (!btn) return;
  //alert('成功');

  // じゃんけんCPU
  // グー=0, チョキ=1, パー=2
  let plHand = 0; // ★ 今はプレイヤー固定でグー
  const cpuHand = Math.floor(Math.random() * 3);

  // 勝敗判定
  if (plHand === cpuHand) {
    result.textContent = "あいこ!";
    console.log("プレイヤー:", plHand, "CPU:", cpuHand);

  } else if (plHand === 0) { // プレイヤーがグー
    if (cpuHand === 1) { // CPUがチョキ
      result.textContent = "→あなたの勝ち!";
    } else { // CPUがパー
      result.textContent = "→あなたの負け!";
    }
    console.log("プレイヤー:", plHand, "CPU:", cpuHand);

  } else if (plHand === 1) { // プレイヤーがチョキ
    if (cpuHand === 2) { // CPUがパー
      result.textContent = "→あなたの勝ち!";
    } else { // CPUがグー
      result.textContent = "→あなたの負け!";
    }
    console.log("プレイヤー:", plHand, "CPU:", cpuHand);

  } else { // プレイヤーがパー
    if (cpuHand === 0) { // CPUがグー
      result.textContent = "→あなたの勝ち!";
    } else { // CPUがチョキ
      result.textContent = "→あなたの負け!";
    }
    console.log("プレイヤー:", plHand, "CPU:", cpuHand);
  }

  //result.innerHTML = btn.textContent
  //result.innerHTML = result.textContent
});
解説
let plHand = 0;
→とりあえず人間側は常にグーで固定、CPUの方が動けるように書く。CPUができたら人間も動かす。
const cpuHand = Math.floor(Math.random() * 3);
- Math.random() … 0以上1未満の数をランダムで作る(1は出ない)
-
- 3 … 0〜2.999... にする
- Math.floor … 小数を切り捨てて整数にする
→ 0,1,2のどれかをランダムに作る
console.log("プレイヤー:", plHand, "CPU:", cpuHand);
→コンソールで確認すると、人間は常にグー(0)、CPUはランダムに0〜2までが出力されているのがわかる。
やることリスト5:人間の手を「ボタンを押して決める」に変更する
変更した箇所のみ(変更前後比較)
変更前
// グー=0, チョキ=1, パー=2
let plHand = 0; // ★ 今はプレイヤー固定でグー
変更後
// グー=0, チョキ=1, パー=2
let plHand;
if (btn.textContent.includes("グー")) {
  plHand = 0;
} else if (btn.textContent.includes("チョキ") ){
  plHand = 1;
} else {
  plHand = 2;
}
解説
ここもif文使用。
取得済みbtnのテキストに「グー」が含まれていたら、plHandは0ですよ。という指示。
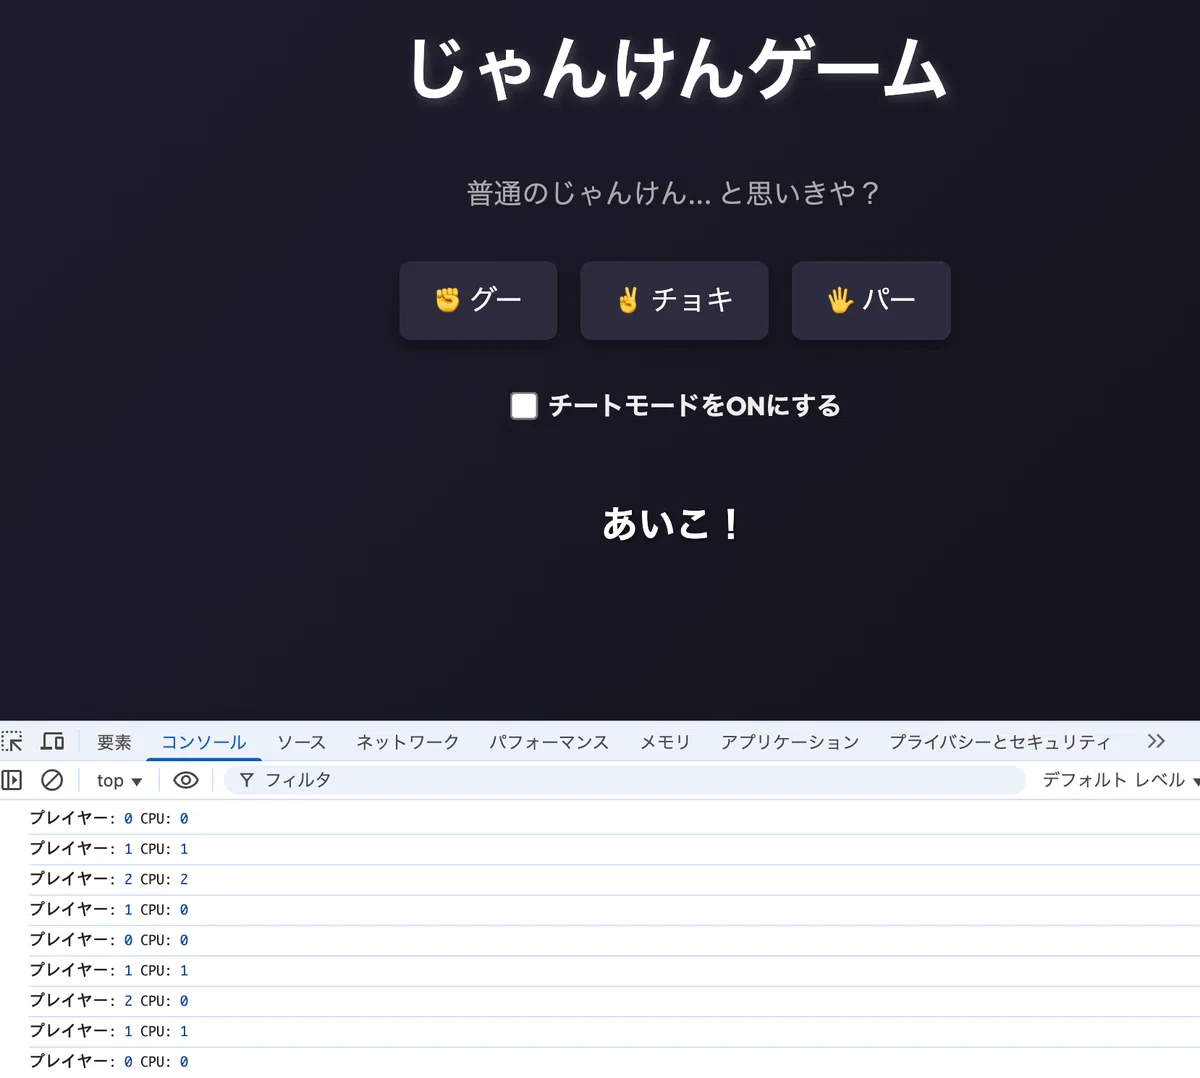
コンソールを見るとプレイヤーの手がちゃんと変わってますね!嬉し〜☺️
やることリスト6:見本通り、人間とCPUの手を表示させる
見本:
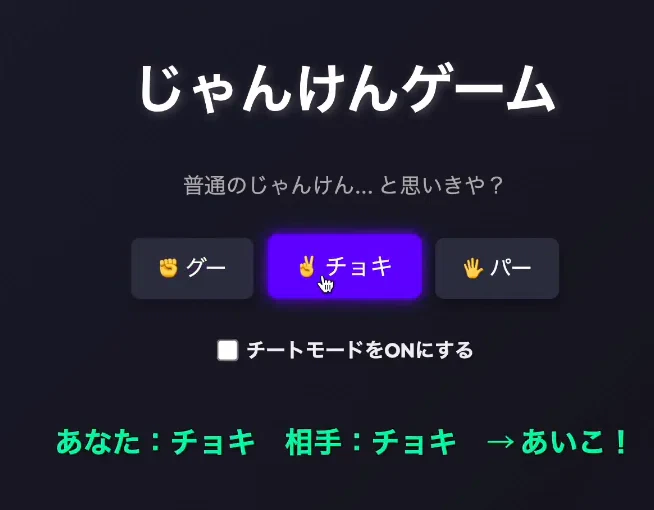
「あなた:チョキ 相手:チョキ →あいこ!」これと同じ表示にする。
変更前のコードはコメントアウトして、新しいコードの下に置いたままにしてみました。
見にくくてすみません🙇💦
// グー=0, チョキ=1, パー=2
// 勝敗判定
if (plHand === 0) {
  if (cpuHand === 0) {
    result.textContent ="あなた:グー 相手:グー あいこ!";
  } else if (cpuHand === 1){
    result.textContent = "あなた:グー 相手:チョキ →あなたの勝ち!";
  } else {
    result.textContent = "あなた;グー 相手:パー →あなたの負け!";
  }

  //if (plHand === cpuHand) {
  //result.textContent = "あいこ!";
  //console.log("プレイヤー:", plHand, "CPU:", cpuHand);
  //} else if (plHand === 0) { // プレイヤーがグー
  //if (cpuHand === 1) { // CPUがチョキ
  //result.textContent = "あなた:グー 相手:チョキ →あなたの勝ち!";
  //}else { // CPUがパー
  //result.textContent = "あなた;グー 相手:パー →あなたの負け!";
  //}
  //console.log("プレイヤー:", plHand, "CPU:", cpuHand);

} else if (plHand === 1) { // プレイヤーがチョキ
  if (cpuHand === 1) {
    result.textContent = "あなた:グー 相手:グー あいこ!";
  } else if (cpuHand === 2){
    result.textContent = "あなた:チョキ 相手:パー →あなたの勝ち!";
  } else {
    result.textContent = "あなた:チョキ 相手:グー →あなたの負け!";
  }

} else { // プレイヤーがパー
  if (cpuHand === 2) {
    result.textContent = "あなた:パー 相手:パー あいこ!";
  } else if (cpuHand === 0){
    result.textContent = "あなた:パー 相手:グー →あなたの勝ち!";
  } else {
    result.textContent = "あなた:パー 相手:チョキ →あなたの負け!";
  }
}
解説
冒頭に「あいこ」だけを定義していたコードを、各じゃんけんのアクション毎にあいこを追加するために削除。
それぞれグー、チョキ、パーの動きの中に「あいこ」を追加。
エラー
index.html:154 Uncaught TypeError: Cannot read properties of null (reading 'textContent')
    at HTMLDivElement.<anonymous> (index.html:154:9)

154. if (btn.textContent.includes("グー")) {
解説
Cannot read properties of null (reading 'textContent')
→ btn が null の状態で btn.textContent を読みに行って落ちている。
ボタン以外の場所をクリックした時にこのエラーが出ることがある。
やること1でイベントハンドラーを設定した時に if (!btn) return; をコメントアウトしたのが原因だった。
コメントアウトを外したらエラー出なくなりました👌
嬉しい☺️✨
まとめ(Conclusion)
- まずは クリックイベントが発火するか を
alertやconsole.logで確認すると進めやすい -
e.target.closest('button')を使うと、ボタン内のどこをクリックしても拾える if (!btn) return;は “ボタン以外クリック事故” を防ぐ保険- CPUの手は
Math.floor(Math.random() * 3)で 0〜2の乱数 を作ればOK - 「固定 → ランダム → 人間も動かす」の順で作ると、頭が壊れにくい
ステップ1は以上です。
ステップ2も頑張りましょう💪✨