はじめに
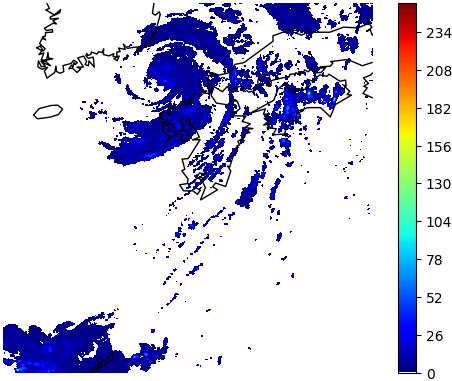
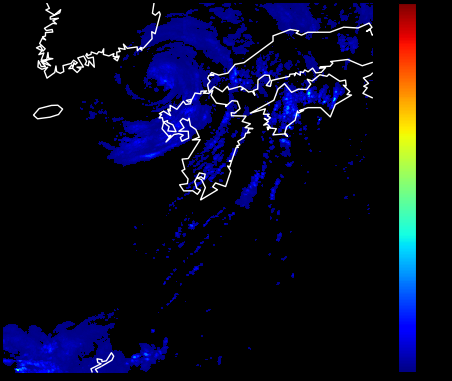
本記事では,気象庁が提供する1km メッシュ全国合成レーダーエコー強度 GPV を用いて下図のようなレーダーエコー強度画像を作成する手順を示します.
全コードは**github**にあります.
| detail | image(2018/07/03 11:00:00) |
|---|---|
| 背景: 白 カラーバー: 有 カラーマップ: jet 海岸線: 有 海岸線の質: low |
 |
| 背景: 黒 カラーバー: 有 カラーマップ: jet 海岸線: 有 海岸線の質: low |
 |
本記事で紹介する全体的な処理手順を示します.
- 1km メッシュ全国合成レーダーエコー強度 GPVを取得する.(本記事)
2. 1km メッシュ全国合成レーダーエコー強度 GPVをwgrib2を使って読み取り,Basemapを使って描画する.(次回記事)
1番目の処理について本記事で解説したいと思います.
注:私は情報系の学生です.気象分野に精通しているわけではないことをご了承ください.
扱うデータについて
下記資料を参考にしてください.
レーダーエコー強度画像
気象庁 | 気象レーダー
http://www.jma.go.jp/jma/kishou/know/radar/kaisetsu.html
デジタル台風:最新気象レーダー画像 - レーダーエコー強度、レーダーエコー頂高度
http://agora.ex.nii.ac.jp/digital-typhoon/radar/graphics/
1km メッシュ全国合成レーダーエコー強度 GPV
1kmメッシュ全国合成レーダーGPV
http://www.jmbsc.or.jp/jp/online/file/f-online30100.html
配信資料に関する技術情報(気象編)第 162 号
https://www.data.jma.go.jp/add/suishin/catalogue/format/ObdObs001_format.pdf
1km メッシュ全国合成レーダーエコー強度 GPVを取得する
今回は京都大学生存圏研究所よりデータをお借りします.
学術目的であれば無償でデータを利用できます.
取得できるファイルの構造は下記のようになっています.
このうちZ__C_RJTD_yyyyMMddhhmmss_RDR_JMAGPV_Ggis1km_Prr10lv_ANAL_grib2.binのみを利用します.
Z__C_RJTD_yyyyMMddhhmmss_RDR_JMAGPV__grib2.tar
  ├ Z__C_RJTD_yyyyMMddhhmmss_RDR_JMAGPV_Ggis1km_Prr10lv_ANAL_grib2.bin
  └ Z__C_RJTD_yyyyMMddhhmmss_RDR_JMAGPV_Gll2p5km_Phhlv_ANAL_grib2.bin
全体的な流れ
- 日時からURLを指定し,.tarファイルをwgetする
- .tarファイル内から目的の.binファイルのみを取り出す
- .tarファイルを削除
- 日時を進める
上記1--4をループさせます.
環境
ubuntu 18.04.1 LTS (on VMware Workstation 15 Player (on windows10 x64))
Anaconda3-5.3.1
コード全体
configparserを用いて,設定する必要がある箇所はconfig.iniから読み込んでいます.
最新コードはgithubでご確認ください.
**Ggis1km_downloder.py**
import os
import datetime
import subprocess
import re
import configparser

class Downloader:
    def __init__(self, tar_path, bin_path):
        self.tar_path = tar_path
        self.bin_path = bin_path
        subprocess.run(['mkdir', '-p', self.tar_path])
        subprocess.run(['mkdir', '-p', self.bin_path])

    def set_date(self, dt):
        # URLを指定
        directory = 'http://database.rish.kyoto-u.ac.jp/arch/jmadata/data/jma-radar/synthetic/original'
        date = dt.strftime('%Y/%m/%d')
        self.timestamp = dt.strftime('%Y%m%d%H%M%S')
        tar_filename = 'Z__C_RJTD_'+self.timestamp+'_RDR_JMAGPV__grib2.tar'
        self.URL = directory +'/'+ date +'/'+ tar_filename
        self.tar_file_path = self.tar_path + '/' + tar_filename
        self.bin_path_year = self.bin_path + '/' + dt.strftime('%Y')
        subprocess.run(['mkdir', '-p', self.bin_path_year])

    def get_bin_file(self):
        # binファイルがあるかを確認
        bin_file_path = self.bin_path_year+'/Z__C_RJTD_'+self.timestamp+'_RDR_JMAGPV_Ggis1km_Prr10lv_ANAL_grib2.bin'
        if os.path.exists(bin_file_path):
            print('already exist: ',bin_file_path)
        else:
            # tarファイルを~/tarに保存
            wget_result = subprocess.getstatusoutput('wget -nc -P '+self.tar_path+' '+self.URL)  # getstatusoutputは(exitcode, output)を返す
            if wget_result[0] != 0:  # ダウンロードエラーの場合
                error_detail = re.findall(r'エラー.*', wget_result[1])[0]
                self.out_error_URL('download', error_detail)
            else:
                # tarファイルから1kmメッシュデータのみを取り出す
                filelist = subprocess.getstatusoutput('tar -tf '+self.tar_file_path)[1].split('\n')  # tarファイル内ファイル名リスト
                ggis_name = [s for s in filelist if 'Ggis1km' in s]  # ファイル名を取得
                if ggis_name:  # リストが空でなければTrueを返す
                    ggis_name = ggis_name[0]
                    subprocess.run(['tar', '-C', self.bin_path_year, '-xvf', self.tar_file_path, ggis_name]) # tarファイルから/binに取り出す
                    subprocess.run(['rm', self.tar_file_path])  # tarファイルは不要なので削除
                    self.out_available(1)
                else:
                    self.out_error_URL('tarfile', 'no file')

    def out_error_URL(self, error_type, error_detail):
        print(error_type+': '+self.URL)
        with open(self.bin_path+'/error_URL_'+self.timestamp[:4]+'.csv', 'a', encoding="utf_8_sig") as f:
            f.write(error_type+','+str(error_detail)+','+self.URL+'\n')
        self.out_available(0)

    def out_available(self, n):  # 1なら存在する,0なら存在しない
        with open(self.bin_path+'/available_'+self.timestamp[:4]+'.csv', 'a', encoding="utf_8_sig") as f:
            f.write(self.timestamp+','+str(n)+'\n')

if __name__ == '__main__':
    # 設定読み込み
    inifile = configparser.ConfigParser()
    inifile.read('./config.ini', 'UTF-8')

    start = inifile.get('period', 'start')
    end = inifile.get('period', 'end')
    num = inifile.get('interval', 'num')
    timescale = inifile.get('interval', 'timescale')
    tar_path = inifile.get('download_path', 'tar_path')
    bin_path = inifile.get('download_path', 'bin_path')

    dt = datetime.datetime.strptime(start, '%Y/%m/%d %H:%M:%S')
    dt_limit = datetime.datetime.strptime(end, '%Y/%m/%d %H:%M:%S')

    # インスタンスを作成しダウンロード開始
    downloader = Downloader(tar_path, bin_path)
    while dt < dt_limit:
        downloader.set_date(dt)
        downloader.get_bin_file()
        dt = dt + eval('datetime.timedelta(' + timescale + '=' + num + ')')
**config.ini**
[period]
# format
#    start = YYYY/mm/dd HH:MM:SS
#    end   = YYYY/mm/dd HH:MM:SS
start = 2018/01/01 00:00:00
end   = 2019/01/01 00:00:00

[interval]
# format
#    num ... time interval number
#    timescale: {'minutes', 'hours', 'days', 'weeks'}
# caution: minimum interval is 10 minutes!
num = 10
timescale = minutes

[download_path]
# format
#    tar_path ... temporary save location for downloaded tar file
#    bin_path ... save location for bin file
tar_path = ./tar
bin_path = /mnt/hgfs/bin
コンフィグ説明
config.iniに簡単な説明は記述していますが,ここでより詳細な説明をします
config.ini内の記述を変更するのみで,ソースコードを実行できると思います.
[period]
# format
#    start = YYYY/mm/dd HH:MM:SS
#    end   = YYYY/mm/dd HH:MM:SS
start = 2018/01/01 00:00:00
end   = 2019/01/01 00:00:00
- period -> ダウンロードする期間に関するセクション
- start -> 期間の始まり
- end -> 期間の終わり
[interval]
# format
#    num ... time interval number
#    timescale: {'minutes', 'hours', 'days', 'weeks'}
# caution: minimum interval is 10 minutes!
num = 10
timescale = minutes
- interval -> ダウンロードする間隔に関するセクション
- num -> 時間の数字部分
- timescale -> 時間スケールを指定(下記が使えます)timedeltaの引数に準拠
- minutes
- hours
- days
- weeks
num = 20, timescale = daysとすると,20日間隔でデータを取得する.
データ自体が10分間隔で取得されているので,それより細かい時間指定は不可能
[download_path]
# format
#    tar_path ... temporary save location for downloaded tar file
#    bin_path ... save location for bin file
tar_path = ./tar
bin_path = /mnt/hgfs/bin
- download_path -> ファイルパスに関するセクション
- tar_path -> 取得した.tarファイルの保存先(逐次削除するので一時的にしかファイルはありません)
- bin_path -> 取り出した.binファイルの保存先
コード解説
コード中の処理を簡単に説明します.
if __name__ == '__main__':
    # 設定読み込み
    inifile = configparser.ConfigParser()
    inifile.read('config.ini', 'UTF-8')

    ~~~~~(略)~~~~~

    # インスタンスを作成しダウンロード開始
    downloader = Downloader(tar_path, bin_path)
    while dt < dt_limit:
        downloader.set_date(dt)
        downloader.get_bin_file()
        dt = dt + eval('datetime.timedelta(' + timescale + '=' + num + ')')
上記mainでは,各設定(指定期間,間隔,path)を読み込み,ダウンロードの準備をします.
また,指定した間隔で時間を進めるためにdatetime.timedeltaの引数を動的に指定する必要があったのでeval()を用いています.
■【python】execを使って変数名を動的に変える方法についての考察 - 静かなる名辞
https://www.haya-programming.com/entry/2018/08/10/202940
class Downloader:
    def __init__(self, tar_path, bin_path):
      # 各pathを定義

    def set_date(self, dt):
      # 取得する.tarファイルのURLを指定

    def get_bin_file(self):
      # 指定の.binファイルがなければ .tarファイルを取得,
      # .binファイルを取り出し .tarファイルを削除

    def out_error_URL(self, error_type, error_detail):
      # エラーが発生したURLを.csvに書き出す
      # ここでは,URLからファイルを取得できないエラーと
      # .tarファイルの展開に関するエラーを対象としている.

    def out_available(self, n):
      # 一連の処理で.binファイルを取得できたかどうかを.csvに書き出す
Downloaderクラスは,上記のようなメソッドを持ちます.
クラス内では,subprocessを用いてtarやmkdir,rmを実行しています.
まとめ
本記事では,京都大学生存圏研究所から1kmメッシュ全国合成レーダーエコー強度GPVデータを取得する方法を解説しました.
次回は取得した1kmメッシュ全国合成レーダーエコー強度GPVデータから,レーダーエコー強度画像を作成する方法を解説します.
最新コードは**github**でご確認ください.
参考
[Python] listが空かどうか判定する方法2つ
https://qiita.com/yonedaco/items/d0f65ca3dad2e085a51d
tarコマンドについて詳しくまとめました 【Linuxコマンド集】
https://eng-entrance.com/linux-command-tar
【python】execを使って変数名を動的に変える方法についての考察 - 静かなる名辞
https://www.haya-programming.com/entry/2018/08/10/202940
Pythonで設定ファイルを扱う方法:ConfigParser | UX MILK
https://uxmilk.jp/20599
subprocessの使い方(Python3.6)
https://qiita.com/caprest/items/0245a16825789b0263ad
grib2をpython(matplotlib)で地図上で可視化
https://qiita.com/mhangyo/items/f06debce3975a269a658#_reference-4fcb929ee74be8368be2