はじめに
Pythonには機械学習をはじめとする優れたライブラリがたくさんある。一方C#はGUIアプリケーションの開発に広く利用されている言語である。したがってPythonスクリプトをC#アプリケーションから呼び出すことができれば、C#アプリケーション開発者にとって便利であるし、何よりGUIアプリケーションの幅も広がるはずだ。そこで今回、C#のGUIアプリケーションからPythonスクリプトを呼び出す方法について調べ、プロトタイプを作成してみた。
環境
- Windows10
- C#
- Python
開発したいプロトタイプ
開発したいプロトタイプの要件を以下に洗い出してみた。
- Pythonのパス、実行ディレクトリ(Working Directory)、Pythonスクリプトを指定し、実行することができる。
- 実行に長時間かかる場合を考慮し、途中で処理をキャンセルすることができる。
- 実行に長時間かかる場合に進捗状況が分かるよう、全ての標準出力、標準エラー出力をGUIのTextBoxに表示する。
- 以前に書いた 標準入出力を介してMOLファイルをSMILESに変換する のように、標準入力を受け取るPythonスクリプトの場合、ファイルを介さずにGUI側のデータをPythonスクリプトに渡すことにより、実行結果を手軽に受け取ることができる。このため標準入力も指定できるようにしたい。
- Pythonスクリプトの終了コードにより、正常終了かエラー終了かを判定し、MessageBoxにより表示する。
できたもの
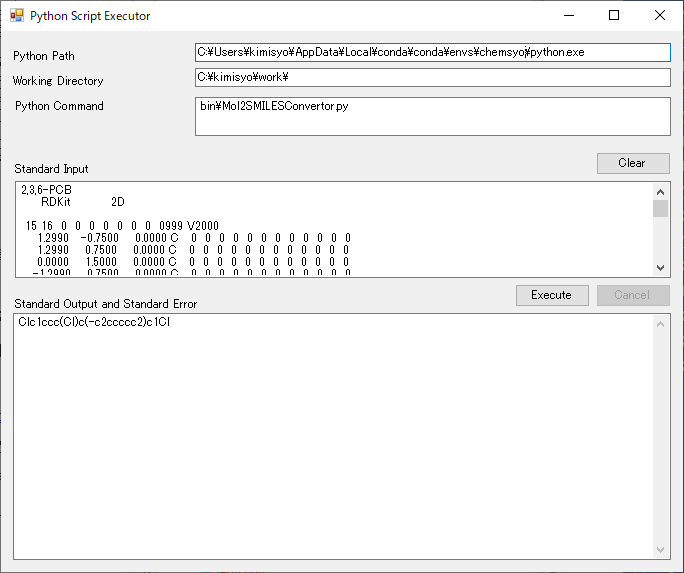
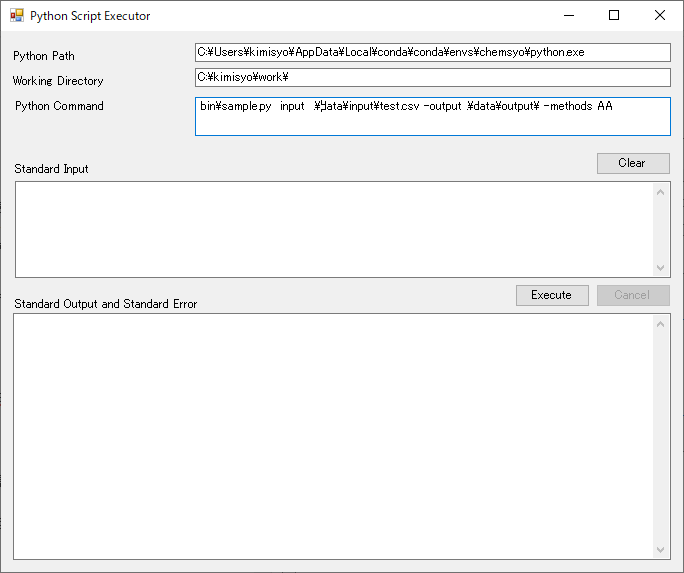
画面
画面の説明
- Python Pathには、python.exeの場所をフルパスで指定する。Anacondaの場合は、Anacondaの仮想環境のpython.exeの場所を調べて指定する。
- Working Directoryには、Pythonスクリプトの実行ディレクトリを指定する。引数にファイルパスを指定する場合は、ここを起点とする相対パスで記載することもできる。
- Python Commandには、Pythonスクリプトの場所をフルパスで指定する。また引数があればそれも指定する。
- Standard Input には、Pythonスクリプトの標準入力に渡したいデータを入力する。標準入力を使わないPythonスクリプトの場合、無視される。
- Standard Output and Standard Errorには、Pythonスクリプトの全ての標準出力、標準エラー出力が表示される。
- 「Execute」ボタンにより処理を開始し、「Cancel」ボタンにより処理をキャンセルすることができる。
ソース
ソースは以下の通りだ。とても長くなったが、編集が面倒なためそのまま張り付ける(手抜き)。デザイン側のコードは両略した。GUI部品のオブジェクトの変数名は、コードから読み取ってほしい。ソースの解説は次項で説明する。
using System;
using System.Diagnostics;
using System.IO;
using System.Text;
using System.Threading;
using System.Windows.Forms;

namespace PythonCommandExecutor
{

    public partial class Form1 : Form
    {
        private Process currentProcess;
        private StringBuilder outStringBuilder = new StringBuilder();
        private int readCount = 0;
        private Boolean isCanceled = false;

        public Form1()
        {
            InitializeComponent();
        }

        /// <summary>
        /// Textboxに文字列追加
        /// </summary>
        public void AppendText(String data, Boolean console)
        {
            textBox1.AppendText(data);
            if (console)
            {
                textBox1.AppendText("\r\n");
                Console.WriteLine(data);
            }
        }

        /// <summary>
        /// 実行ボタンクリック時の動作
        /// </summary>
        private void button1_Click(object sender, EventArgs e)
        {
            // 前処理
            button1.Enabled = false;
            button2.Enabled = true;
            isCanceled = false;
            readCount = 0;
            outStringBuilder.Clear();
            this.Invoke((MethodInvoker)(() => this.textBox1.Clear()));

            // 実行
            RunCommandLineAsync();
        }

        /// <summary>
        /// コマンド実行処理本体
        /// </summary>
        public void RunCommandLineAsync()
        {

            ProcessStartInfo psInfo = new ProcessStartInfo();
            psInfo.FileName = this.textBox2.Text.Trim();
            psInfo.WorkingDirectory = this.textBox3.Text.Trim();
            psInfo.Arguments = this.textBox4.Text.Trim();

            psInfo.CreateNoWindow = true;
            psInfo.UseShellExecute = false;
            psInfo.RedirectStandardInput = true;
            psInfo.RedirectStandardOutput = true;
            psInfo.RedirectStandardError = true;

            // Process p = Process.Start(psInfo);
            Process p = new System.Diagnostics.Process();
            p.StartInfo = psInfo;

            p.EnableRaisingEvents = true;
            p.Exited += onExited;
            p.OutputDataReceived += p_OutputDataReceived;
            p.ErrorDataReceived += p_ErrorDataReceived;

            p.Start();

            // 標準入力への書き込み
            using (StreamWriter sw = p.StandardInput)
            {
                sw.Write(this.textBox5.Text.Trim());
            }

            //非同期で出力とエラーの読み取りを開始
            p.BeginOutputReadLine();
            p.BeginErrorReadLine();

            currentProcess = p;
        }

        void onExited(object sender, EventArgs e)
        {
            int exitCode;

            if (currentProcess != null)
            {
                currentProcess.WaitForExit();

                // 吐き出されずに残っているデータの吐き出し
                this.Invoke((MethodInvoker)(() => AppendText(outStringBuilder.ToString(), false)));
                outStringBuilder.Clear();

                exitCode = currentProcess.ExitCode;
                currentProcess.CancelOutputRead();
                currentProcess.CancelErrorRead();
                currentProcess.Close();
                currentProcess.Dispose();
                currentProcess = null;

                this.Invoke((MethodInvoker)(() => this.button1.Enabled = true));
                this.Invoke((MethodInvoker)(() => this.button2.Enabled=false));


                if (isCanceled)
                {
                    // 完了メッセージ
                    this.Invoke((MethodInvoker)(() => MessageBox.Show("処理をキャンセルしました")));
                }
                else
                {
                    if (exitCode == 0)
                    {
                        // 完了メッセージ
                        this.Invoke((MethodInvoker)(() => MessageBox.Show("処理が完了しました")));
                    }
                    else
                    {
                        // 完了メッセージ
                        this.Invoke((MethodInvoker)(() => MessageBox.Show("エラーが発生しました")));
                    }
                }
            }
        }

        /// <summary>
        /// 標準出力データを受け取った時の処理
        /// </summary>
        void p_OutputDataReceived(object sender,
            System.Diagnostics.DataReceivedEventArgs e)
        {
            processMessage(sender, e);
        }

        /// <summary>
        /// 標準エラーを受け取った時の処理
        /// </summary>
        void p_ErrorDataReceived(object sender,
            System.Diagnostics.DataReceivedEventArgs e)
        {
            processMessage(sender, e);
        }

        /// <summary>
        /// CommandLineプログラムのデータを受け取りTextBoxに吐き出す
        /// </summary>
        void processMessage(object sender, System.Diagnostics.DataReceivedEventArgs e)
        {
            if (e != null && e.Data != null && e.Data.Length > 0)
            {
                outStringBuilder.Append(e.Data + "\r\n");
            }
            readCount++;
            // まとまったタイミングで吐き出し
            if (readCount % 5 == 0)
            {
                this.Invoke((MethodInvoker)(() => AppendText(outStringBuilder.ToString(), false)));
                outStringBuilder.Clear();
                // スレッドを占有しないようスリープを入れる
                if (readCount % 1000 == 0)
                {
                    Thread.Sleep(100);
                }
            }
        }

        /// <summary>
        /// キャンセルボタンクリック時の動作
        /// </summary>
        private void button2_Click(object sender, EventArgs e)
        {
            if (currentProcess != null)
            {
                try
                {
                    currentProcess.Kill();
                    isCanceled = true;
                }
                catch (Exception e2)
                {
                    Console.WriteLine(e2);
                }
            }
        }

        private void button3_Click(object sender, EventArgs e)
        {
            // 標準入力エリアのクリア
            this.textBox5.Clear();
            // 標準出力エリアのクリア
            this.textBox1.Clear();
        }
    }
}
ソース解説
基本的には参考文献の寄せ集めになるのだが、説明を以下に記載する。
- RunCommandLineAsyncメソッド内でProcessクラスによりPythonスクリプトを実行している。
p.Start()以降は処理が非同期になるため、これ以降UIを操作する場合は、UIスレッドから実行しないと怒られてしまう。this.Invoke((MethodInvoker)(() => AppendText(outStringBuilder.ToString(), false)));のような呼び出しがところどころあるのはこのためである。 -
p.EnableRaisingEvents = true;,p.Exited += onExited;により、プロセス終了時にonExitイベントハンドラが実行されるため、ここに後始末的な処理や、終了コードの判定、完了ダイアログの表示等を記載している。 - キャンセルについては、キャンセル時に実行されるイベントハンドラの中でProcessクラスのKillメソッドを呼び出している。するとonExitイベントハンドラが実行され、通常終了時と同じになるため、それ以外に特別なことはしていない。
- 標準入力にデータを食わせるところは、
using (StreamWriter sw = p.StandardInput)から始まるところでやっている。 - 標準出力、標準エラー出力の取り出しについては、
p.OutputDataReceived += p_OutputDataReceived;,ErrorDataReceived += p_ErrorDataReceived;によりそれぞれのイベントハンドラで受け取った標準出力、標準エラー出力を処理するようにしている。
p.BeginOutputReadLine();,p.BeginErrorReadLine();により1行出力がある度にそれぞれのイベントハンドラが実行されるため、その中でTextBoxへの出力を行っている。1行毎にTextBoxに書き出すと大量の出力があるアプリの場合にGUIの処理に時間がかかる可能性もあるため、ある程度まとめて出力する等の工夫を行っている。
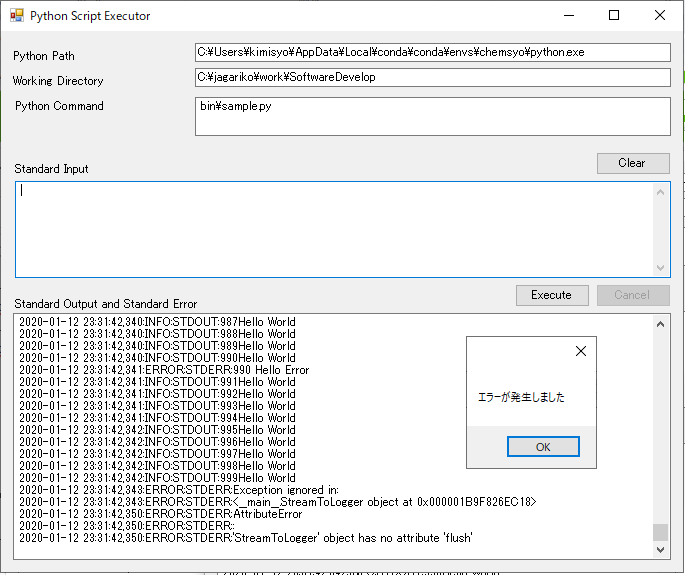
実行例① 出力の多いPythonスクリプト(途中でエラー)を実行する
以下はサンプルとして作成した、ある程度標準出力や標準エラー出力の多いPythonスクリプトを実行した例である。標準エラーに出力されたエラーメッセージもTextBoxに出力され、かつ終了コードによりエラーのMessageBoxが表示されていることが分かる。
実行例② 標準入力を介してPythonスクリプトを実行する
以下は、「標準入出力を介してMOLファイルをSMILESに変換する 」のスクリプトを本GUIを通して実行した図である。簡単なPythonスクリプトを書くだけでC#とPythonの処理結果の受け渡しができることを実感してもらえると思う。

おわりに
- async/awaitを使った方法で当初進めていたが、UIのデッドロックらしき現象が発生し、丸一日かけても解決できなかったため断念した。
- Pythonスクリプトの標準出力に進捗情報を出力することによって、C#側でプログレスバーによる進捗表示も簡単に行えると思う。
- 動作もまずまず安定しているため、このプロトタイプをベースに今後、C#からPythonの便利な機能をガンガン使い、魅力的なアプリを作ってみたい。
2020/2/24 修正
プロセスを2回スタートさせるという致命的バグがあったため以下の通り修正。ご迷惑おかけしました。
            // Process p = Process.Start(psInfo);
            Process p = new System.Diagnostics.Process();
            p.StartInfo = psInfo;

