Keyless SSL とは
顧客から外部(Cloudflare)にプライベートキー(秘密鍵)をアップロードすることなく、SSL 終端を行えるサービスです。
キーレスSSLは、CloudflareのSSLサービスを使用しながら、顧客がプライベートキーをオンプレミスで保持することができるようになりました。
標準的なCloudflare SSLサービスでは、顧客は自分のサイトのSSLキーをCloudflareと共有する必要があります。 Cloudflareは顧客のキー情報を保護するために広範囲な技術的措置を講じています。ただし、一部の顧客にはポリシーや技術上の障壁があるため、自分のサイトのSSLキーをCloudflareと共有することができません。このため、「Keyless SSL」を紹介することに興奮しています。
キーレスSSLはエンタープライズプランのお客様のみ利用可能です。エンタープライズプランとキーレスSSLに関する詳細情報については、Cloudflare 営業チームまでお問い合わせください。
プライベートキー(秘密鍵)に関して整理すると、以下の表のようになります。
プライベートキー(秘密鍵)を自社で持ちたくない・運用管理したくないという場合は、代わりに Cloudflare が保管・運用管理するモデルが良いでしょう。
逆にプライベートキー(秘密鍵)を外部に出したくない・出せない(業界セキュリティ標準の要請などの)場合には Keyless SSL が良いでしょう。
| プライベートキーの生成 | プライベートキーの保管場所 | プライベートキーの管理主体 (鍵更新などの運用) |
|
|---|---|---|---|
| Cloudflare 管理の証明書 (Universal, Advanced) |
Cloudflare | Cloudflare 内で完結 | Cloudflare |
|
持ち込み証明書 (カスタムCSR利用) |
Cloudflare | Cloudflare 内で完結 | Cloudflare |
| 持ち込み証明書 | 顧客 | 顧客側で生成したものを Cloudflare にアップロードし、顧客側でも保管 | 顧客 |
| Keyless SSL | 顧客 | 顧客側で完結 | 顧客 |
Keyless SSL 通信フロー詳細
以下のブログで詳細が公開されています。
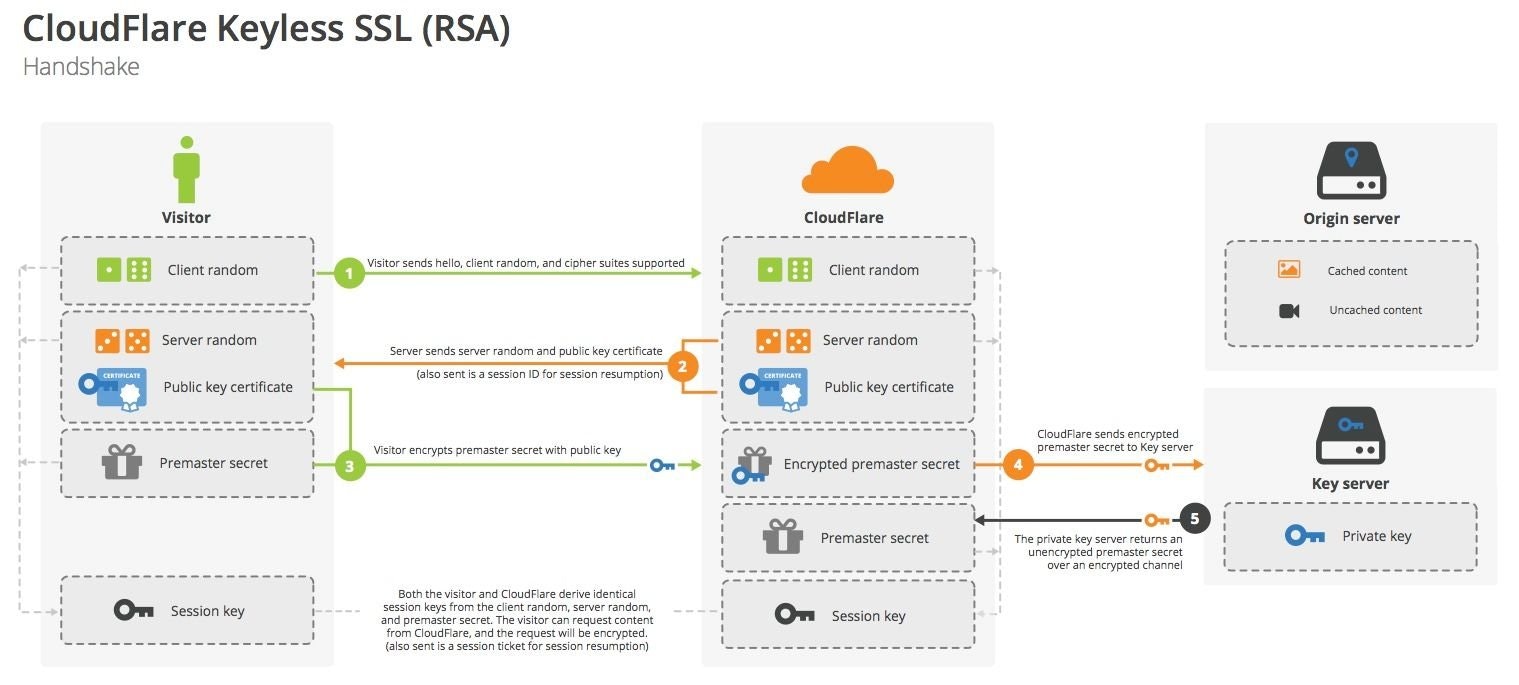
セッション開始時には以下のような通信となり、Cloudflare からキーサーバーへの通信が発生します。
ハンドシェイクシークエンス図から得られる教訓の1つは、プライベートキーが各ハンドシェイクで一度しか使用されないことです。これにより、TLSハンドシェイクを地理的に分割し、CloudFlareのエッジでほとんどのハンドシェイクを行いながら、プライベートキー操作をリモートキーサーバーに移動することができます。このキーサーバーは顧客のインフラストラクチャに配置されるため、彼らだけがプライベートキーに独占的アクセス権を持つことができます。
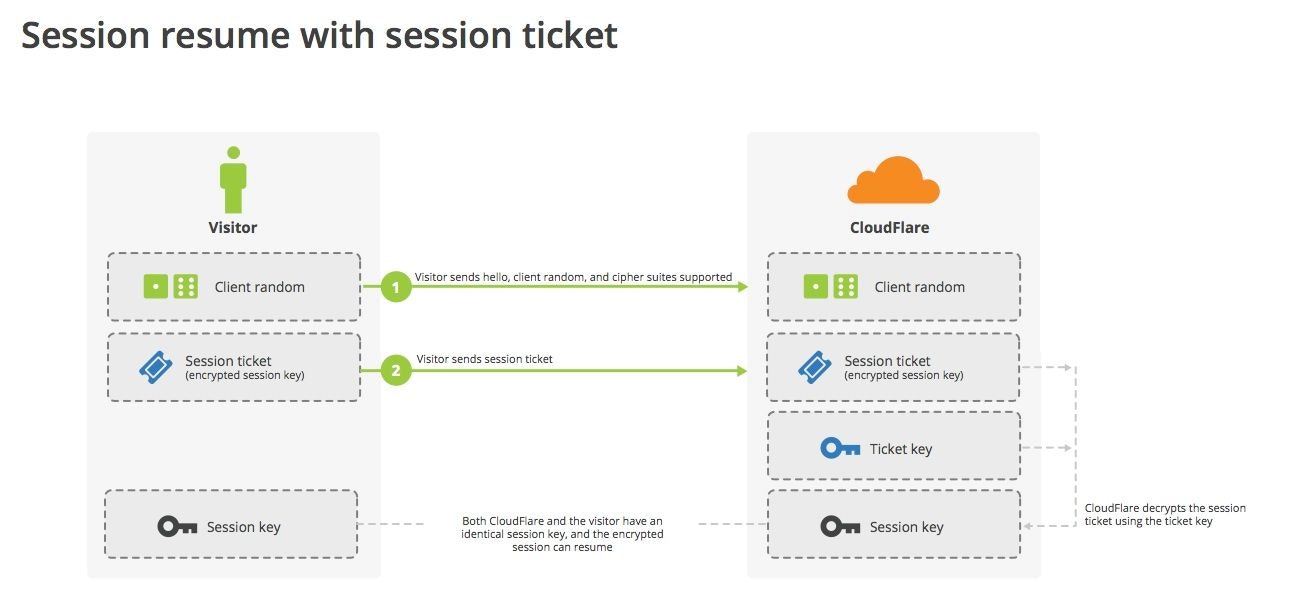
続いて、TLS session resumption の仕組みを使ってセッションの状態を再開する場合の通信フローです。
直近のNewSessionTicketでサーバからクライアントに送り出されたSession Ticketを、今度はClientHelloのSession Ticket拡張のパラメータに詰めてクライアントからサーバへと送ります。
サーバ側ではこれを解読し、有効な内容と認められれば、それを使って「セッション再開」手順によるハンドシェイクを行います。
省略されたハンドシェイク処理によって、キーサーバーへの通信が発生しない形で処理が可能になります。
Cloudflare の場合、セッションチケットの有効期限は 18 時間に設定されています。
また、セッションチケットの有効期限ヒントを18時間に設定しました。これはSSLセッションタイムアウトと同じ値です。各サーバーは、過去18時間のチケット復号化のためにチケットキーを保持しています。
以下のコマンドで TLS session ticket lifetime hint: 64800 (seconds) となっていることが確認できます。
% echo Q | openssl s_client -connect www.cloudflare.com:443 -tls1_2 -debug -msg
CONNECTED(00000005)

...

---
New, TLSv1.2, Cipher is ECDHE-ECDSA-CHACHA20-POLY1305
Server public key is 256 bit
Secure Renegotiation IS supported
Compression: NONE
Expansion: NONE
No ALPN negotiated
SSL-Session:
    Protocol  : TLSv1.2
    Cipher    : ECDHE-ECDSA-CHACHA20-POLY1305
    Session-ID: C58FE073B09D73C1D9B1369E8D5902C4B4D88CA0BF686EDFA5B94FCB2D207056
    Session-ID-ctx:
    Master-Key: FE0C8A5884F1398EB15B1C5578B0373081B6077BD9292E54C7807523617498A0C5970EEF6921A28F729A80CF4DD8A4B4
    PSK identity: None
    PSK identity hint: None
    SRP username: None
    TLS session ticket lifetime hint: 64800 (seconds)
    TLS session ticket:
    0000 - ec d7 3d 0f 69 7d 6d e8-04 69 59 89 61 97 42 28   ..=.i}m..iY.a.B(
    0010 - 8e 2a 11 59 0b 09 93 66-d9 e5 ce 9a 56 59 41 99   .*.Y...f....VYA.
    0020 - 5d 62 2c fc 63 2b 1a 06-f2 f8 04 5e 3a 35 c9 f4   ]b,.c+.....^:5..
    0030 - 21 ef 8e 3f 50 22 ef 44-6f 73 f4 1d e7 ad f3 ee   !..?P".Dos......
    0040 - 40 ae 96 fb d4 3d 31 92-46 15 aa e2 6f 31 b7 5e   @....=1.F...o1.^
    0050 - 64 e6 03 1b f3 d5 68 b6-4d b9 0c 5c 55 ff 41 90   d.....h.M..\U.A.
    0060 - c5 9f 30 3a d9 96 c4 9b-f9 cd f3 a4 24 98 2f 58   ..0:........$./X
    0070 - f8 38 80 25 82 4a 07 44-62 d7 6a 92 8b 80 64 c3   .8.%.J.Db.j...d.
    0080 - 6c be 61 41 52 ae cd ee-06 15 85 80 8a fc 91 bf   l.aAR...........
    0090 - 69 59 0d cf 23 c8 d8 1d-7b 3f 75 be cc e0 97 50   iY..#...{?u....P
    00a0 - 5e 9f ad ea 7d 65 2a 41-cd 3e 49 f6 11 a3 ee ce   ^...}e*A.>I.....
    00b0 - ff e8 96 c6 a4 a6 b3 ac-b8 d9 3c c7 88 aa 1a 5f   ..........<...._

    Start Time: 1682350487
    Timeout   : 7200 (sec)
    Verify return code: 0 (ok)
    Extended master secret: yes
---

...
また、セッションチケットを利用した TLS session resumption の様子も reconnect オプションでの複数回接続試行の結果で Reused により確認できます。
% echo Q |  openssl s_client -connect www.cloudflare.com:443 -reconnect -tls1_2  | grep -ie New -ie Reuse
depth=2 C = IE, O = Baltimore, OU = CyberTrust, CN = Baltimore CyberTrust Root
verify return:1
depth=1 C = US, O = "Cloudflare, Inc.", CN = Cloudflare Inc ECC CA-3
verify return:1
depth=0 C = US, ST = California, L = San Francisco, O = "Cloudflare, Inc.", CN = www.cloudflare.com
verify return:1
New, TLSv1.2, Cipher is ECDHE-ECDSA-CHACHA20-POLY1305
Reused, TLSv1.2, Cipher is ECDHE-ECDSA-CHACHA20-POLY1305
Reused, TLSv1.2, Cipher is ECDHE-ECDSA-CHACHA20-POLY1305
Reused, TLSv1.2, Cipher is ECDHE-ECDSA-CHACHA20-POLY1305
Reused, TLSv1.2, Cipher is ECDHE-ECDSA-CHACHA20-POLY1305
DONE
Reused, TLSv1.2, Cipher is ECDHE-ECDSA-CHACHA20-POLY1305
キーサーバーを立てる
こちらの実装を使ってキーサーバーを構築します。
今回は Cloudflare Tunnel を使ったセットアップをします。
- Cloudflare Tunnel setup - Keyless SSL · Cloudflare SSL/TLS docs
- Protect your key server with Keyless SSL and Cloudflare Tunnel integration
gokeyless 、cloudflared インストール
インストール手順は https://pkg.cloudflare.com にあります。
$ lsb_release -a
No LSB modules are available.
Distributor ID:	Debian
Description:	Debian GNU/Linux 11 (bullseye)
Release:	11
Codename:	bullseye
以下のコマンドで gokeyless 、cloudflared がインストールできます。
# Add cloudflare gpg key
sudo mkdir -p --mode=0755 /usr/share/keyrings
curl -fsSL https://pkg.cloudflare.com/cloudflare-main.gpg | sudo tee /usr/share/keyrings/cloudflare-main.gpg >/dev/null

# Add this repo to your apt repositories
echo 'deb [signed-by=/usr/share/keyrings/cloudflare-main.gpg] https://pkg.cloudflare.com bullseye main' | sudo tee /etc/apt/sources.list.d/cloudflared.list

# install gokeyless
git clone https://github.com/cloudflare/gokeyless.git
cd ~/gokeyless/pkg
sudo cp gokeyless.service /etc/systemd/system/
sudo mkdir -p /etc/keyless
sudo cp keyless_cacert.pem /etc/keyless/
cd ~/gokeyless/pkg/debian/
sudo chmod +x *.sh
sudo ./before-install.sh
sudo apt-get update && sudo apt-get install gokeyless
sudo ./after-install.sh

# Add this repo to your apt repositories
echo 'deb [signed-by=/usr/share/keyrings/cloudflare-main.gpg] https://pkg.cloudflare.com/cloudflared bullseye main' | sudo tee /etc/apt/sources.list.d/cloudflared.list

# install cloudflared
sudo apt-get update && sudo apt-get install cloudflared
Cloudflare Tunnel 設定
次に以下の手順で Cloudflare Tunnel を設定します。
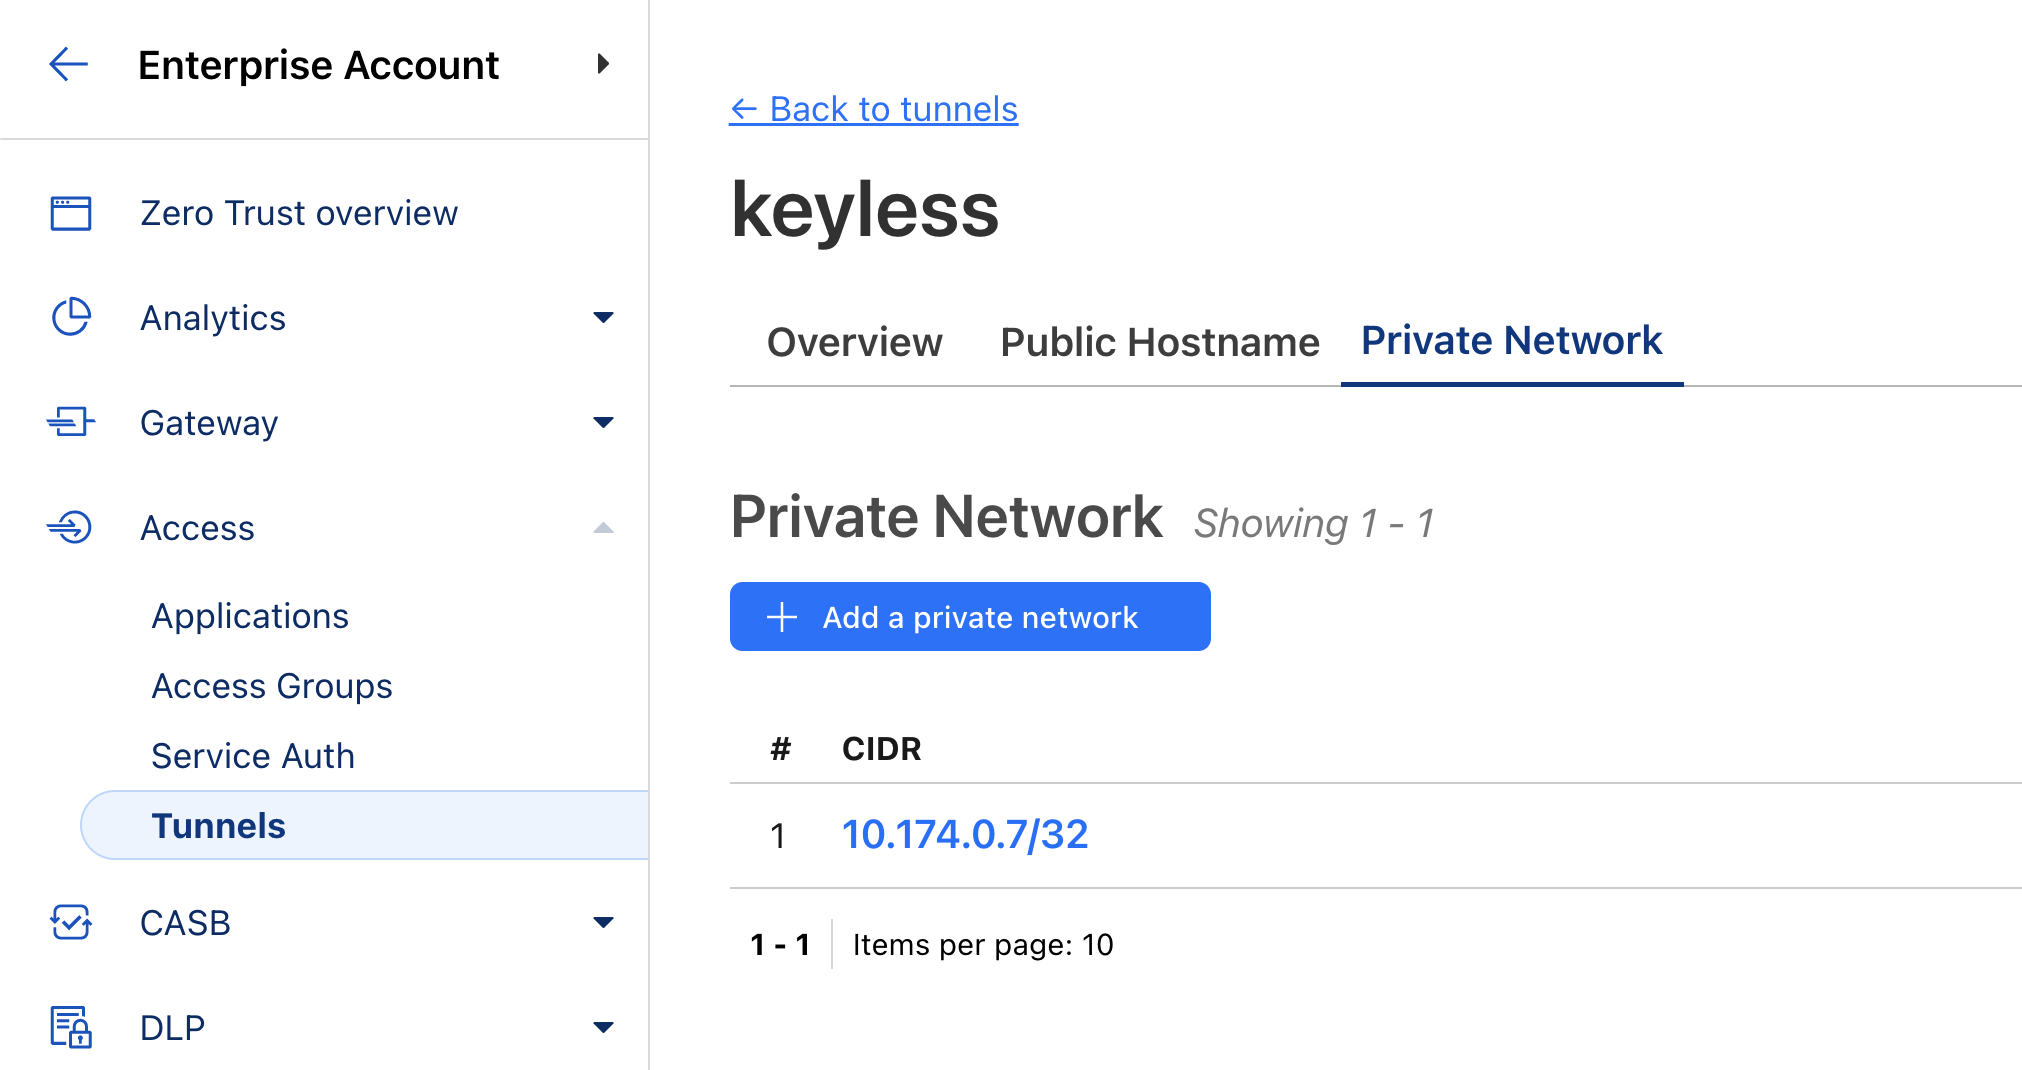
以下の "virtual_network_id" 、"network" パラメータをメモします
export EMAIL='YOUR_EMAIL'
export APIKEY='YOUR_API_KEY'
export ACCOUNT_ID='YOUR_ACCOUNT_ID'

% curl -sX GET "https://api.cloudflare.com/client/v4/accounts/$ACCOUNT_ID/teamnet/routes" \
     -H "X-Auth-Email: $EMAIL" \
     -H "X-Auth-Key: $APIKEY" \
     -H "Content-Type: application/json" | jq '.result[] | select (.tunnel_name == "keyless")'
{
  "network": "10.174.0.7/32",
  "tunnel_id": "9b29c9d0-6d03-4e61-ae43-3b30a0cbc339",
  "comment": "",
  "created_at": "2023-04-24T16:13:08.166254Z",
  "deleted_at": null,
  "virtual_network_id": "604aa865-1642-405c-a745-3d448f69b8f1",
  "tunnel_name": "keyless"
}
証明書準備
検証に使う証明書を acme.sh を使って発行します。
sudo apt-get install socat
curl https://get.acme.sh | sh
cd .acme.sh
./acme.sh --issue --dns -d keyless.example.com \
--yes-I-know-dns-manual-mode-enough-go-ahead-please \
--force --keylength ec-384 --server letsencrypt
# _acme-challenge TXT レコードを追加後
./acme.sh --renew -d keyless.example.com \
--yes-I-know-dns-manual-mode-enough-go-ahead-please \
--force --ecc --server letsencrypt
以下のディレクトリに証明書と鍵のファイルが配置されます。
[Mon Apr 24 16:29:00 UTC 2023] Your cert is in: /home/kyouhei/.acme.sh/keyless.example.com_ecc/keyless.example.com.cer
[Mon Apr 24 16:29:00 UTC 2023] Your cert key is in: /home/kyouhei/.acme.sh/keyless.example.com_ecc/keyless.example.com.key
鍵ファイルは同じものを /etc/keyless/keys に配置します。
sudo mkdir -p /etc/keyless/keys
sudo cp /home/kyouhei/.acme.sh/keyless.example.com_ecc/keyless.example.com.key /etc/keyless/keys/
証明書アップロード
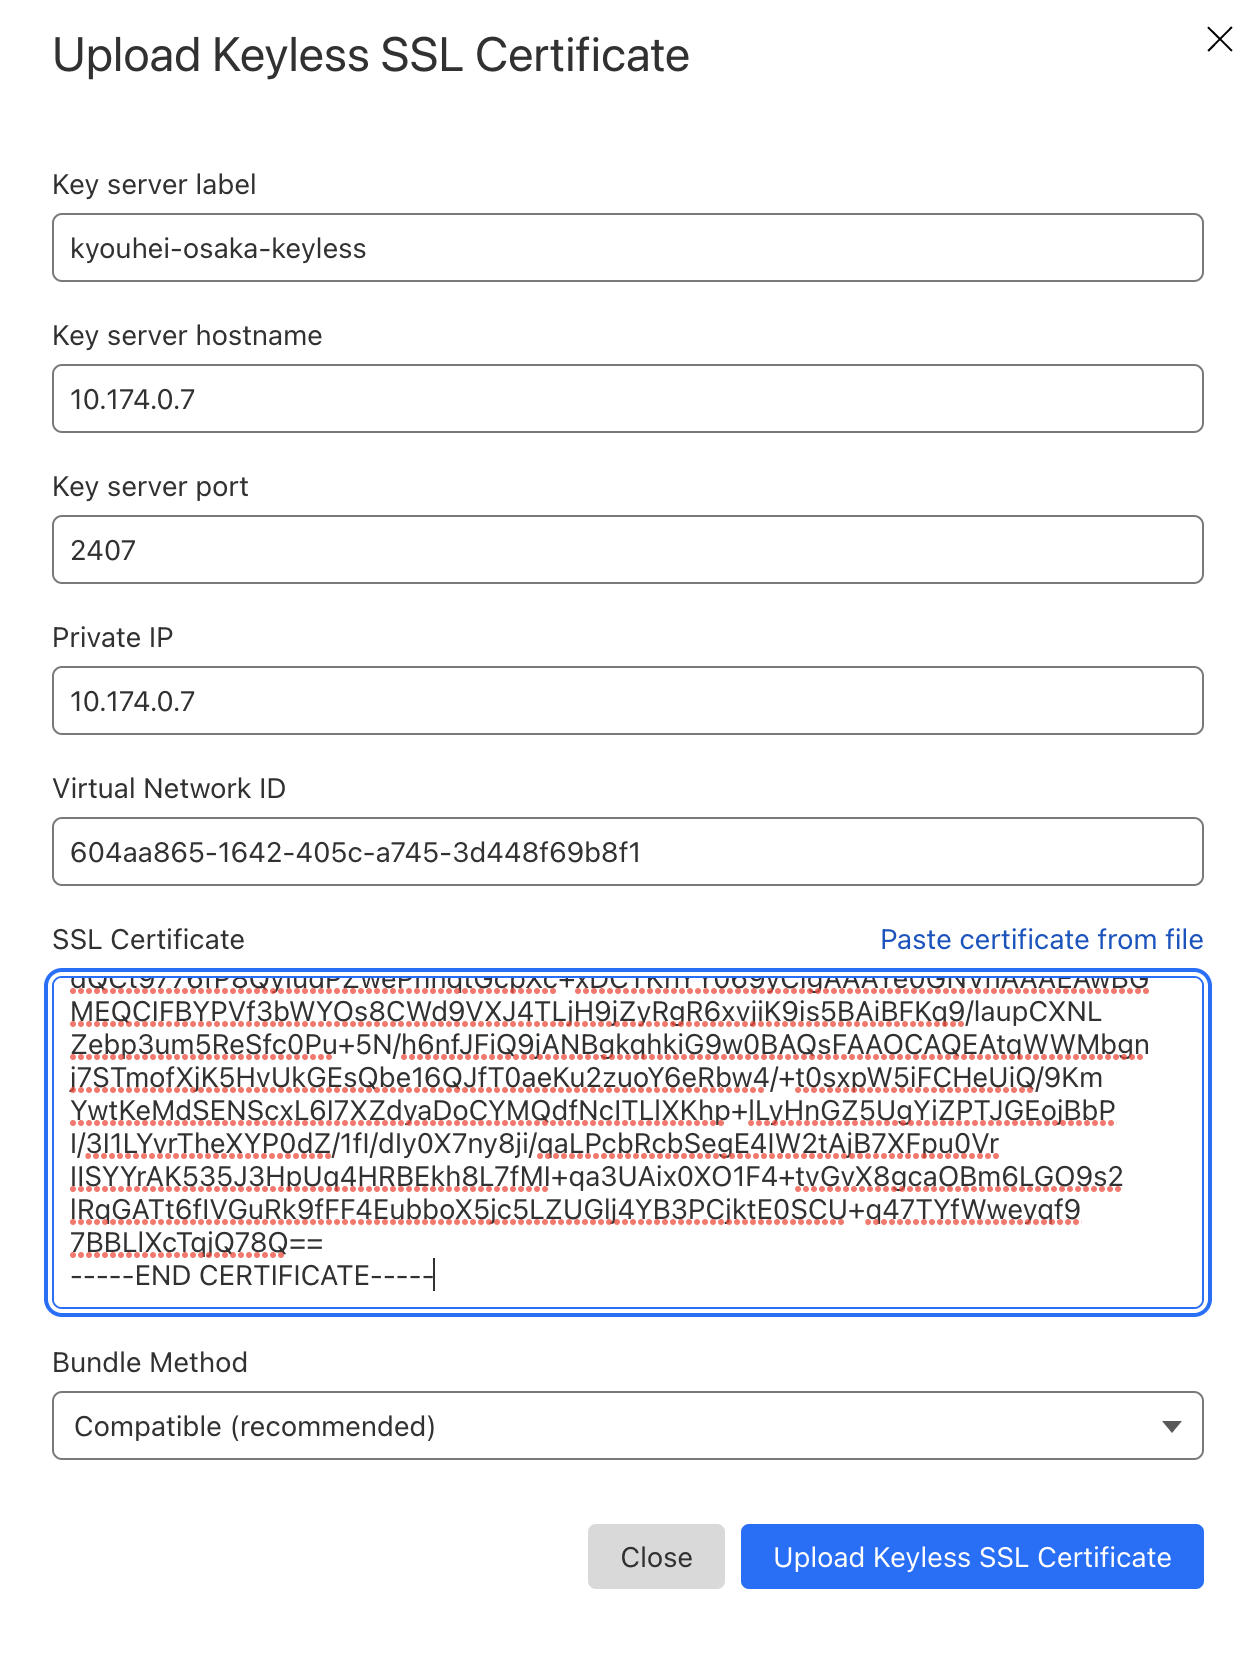
先ほど発行した証明書ファイルを https://dash.cloudflare.com/?to=/:account/:zone/ssl-tls/edge-certificates からアップロードします。
先ほどの "virtual_network_id" 、"network" パラメータを使って以下のように指定します。
キーサーバー設定
gokeyless.yaml を以下のように設定します。
sudo touch /etc/keyless/gokeyless.yaml
cat << EOS | sudo tee /etc/keyless/gokeyless.yaml
# Set the log level (0 = DEBUG, 5 = FATAL).
loglevel: 0

# Hostname must match the key server hostname that was configured in the
# Cloudflare dashboard during custom certificate upload.
hostname: 10.174.0.7

# Zone ID can be found on the Cloudflare dashboard 'Overview' tab.
zone_id: YOUR_ZONE_ID

# Origin CA API Key can be found on the Cloudflare dashboard under the 'My
# Profile' section.
origin_ca_api_key: YOUR_ORIGIN_CA_API_KEY

# Configure one or more private key directories.
private_key_stores:
- dir: /etc/keyless/keys

# Optionally customize the location of the certificates used for mutual
# authentication with Cloudflare keyless clients.
# auth_cert: /etc/keyless/server.pem
# auth_key: /etc/keyless/server-key.pem
# auth_csr: /etc/keyless/server.csr
# cloudflare_ca_cert: /etc/keyless/keyless_cacert.pem

# Optionally customize the listen ports.
port: 2407
metrics_port: 2406

# Optionally write the PID to a file (note that sysv-based systems will
# ignore this value and always use /var/run/gokeyless.pid).
pid_file:
EOS
サービス起動
以下のコマンドでサービスを起動します。
sudo service gokeyless restart
正常に起動したことを確認します。
$ sudo service gokeyless status
● gokeyless.service - gokeyless daemon
     Loaded: loaded (/etc/systemd/system/gokeyless.service; disabled; vendor preset: enabled)
     Active: active (running) since Tue 2023-04-25 05:27:23 UTC; 8min ago
   Main PID: 188376 (gokeyless)
      Tasks: 7 (limit: 4691)
     Memory: 18.2M
        CPU: 88ms
     CGroup: /system.slice/gokeyless.service
             └─188376 /usr/local/bin/gokeyless

Apr 25 05:27:23 kyouhei-osaka-keyless systemd[1]: Started gokeyless daemon.
Apr 25 05:27:23 kyouhei-osaka-keyless gokeyless[188376]: 2023/04/25 05:27:23 [INFO] loading /etc/keyless/keys/keyless.example.com.key...
Apr 25 05:27:23 kyouhei-osaka-keyless gokeyless[188376]: 2023/04/25 05:27:23 [DEBUG] add signer with SKI: f39703813ebc2519d214d5731af56b8a95c7fa6b (https://crt.sh/?ski=f39703813ebc2519d214d5731af56>
Apr 25 05:27:23 kyouhei-osaka-keyless gokeyless[188376]: 2023/04/25 05:27:23 [INFO] Serving metrics endpoint at :2406/metrics
Apr 25 05:27:23 kyouhei-osaka-keyless gokeyless[188376]: 2023/04/25 05:27:23 [INFO] Listening at tcp://[::]:2407
Keyless SSL 通信の確認
キーサーバーで以下のコマンドを打ち、ログを見ながら通信を確認します。
sudo journalctl -f -u gokeyless
以下のように毎回セッションチケットを発行するような通信では、
% echo Q | openssl s_client -connect keyless.example.com:443 -tls1_2 -debug -msg
...
New, TLSv1.2, Cipher is ECDHE-ECDSA-CHACHA20-POLY1305
...
% echo Q | openssl s_client -connect keyless.example.com:443 -tls1_2 -debug -msg
...
New, TLSv1.2, Cipher is ECDHE-ECDSA-CHACHA20-POLY1305
...
% echo Q | openssl s_client -connect keyless.example.com:443 -tls1_2 -debug -msg
...
New, TLSv1.2, Cipher is ECDHE-ECDSA-CHACHA20-POLY1305
...
コマンドを実施するごとに fetch key with SKI でキーサーバーへの通信が発生します。
Apr 25 06:19:20 kyouhei-osaka-keyless gokeyless[188376]: 2023/04/25 06:19:20 [INFO] fetch key with SKI: f39703813ebc2519d214d5731af56b8a95c7fa6b
Apr 25 06:19:21 kyouhei-osaka-keyless gokeyless[188376]: 2023/04/25 06:19:21 [INFO] fetch key with SKI: f39703813ebc2519d214d5731af56b8a95c7fa6b
Apr 25 06:19:22 kyouhei-osaka-keyless gokeyless[188376]: 2023/04/25 06:19:22 [INFO] fetch key with SKI: f39703813ebc2519d214d5731af56b8a95c7fa6b
次にセッションチケットを利用してハンドシェイクが省略されているかどうかを確認するために reconnect オプションで何度か接続を試みます。
新規接続(New)からセッション再利用(Reuse)の出力を確認できますが、
% openssl s_client -reconnect -host keyless.example.com -port 443
...
New, TLSv1.2, Cipher is ECDHE-ECDSA-CHACHA20-POLY1305
...
Reused, TLSv1.2, Cipher is ECDHE-ECDSA-CHACHA20-POLY1305
...
Reused, TLSv1.2, Cipher is ECDHE-ECDSA-CHACHA20-POLY1305
...
Reused, TLSv1.2, Cipher is ECDHE-ECDSA-CHACHA20-POLY1305
...
Reused, TLSv1.2, Cipher is ECDHE-ECDSA-CHACHA20-POLY1305
...
Reused, TLSv1.2, Cipher is ECDHE-ECDSA-CHACHA20-POLY1305
...
closed
...
キーサーバーのログから確認できた fetch key with SKI は1度だけでした。
これで省略されたハンドシェイク処理によって、キーサーバーへの通信が発生しない形で処理されていることを確認できました。
Apr 25 06:18:23 kyouhei-osaka-keyless gokeyless[188376]: 2023/04/25 06:18:23 [INFO] fetch key with SKI: f39703813ebc2519d214d5731af56b8a95c7fa6b
感想
Cloudflare のようなエッジサービスを使いながらも、プライベートキー(秘密鍵)は外部に出さない運用ができることがわかりました。
キーサーバーもステートレスに増やしていけるため、柔軟に構成が可能です。
Hardware Security Module (HSM) でプライベートキー(秘密鍵)運用をされている場合は、その要件を満たすことができ、設定も容易です。
2023年3月にサポートされた、Keyless SSL と Cloudflare Tunnel の構成を確認でき、よく理解できました。
プライベートキー(秘密鍵)をセキュアに利用させる構成としては、非常に簡単に始められると思います。
![[LOGICAL DIAGRAM SHOWING PRIVATE KEYS STORED ON HSMs BEING USED FOR TLS HANDSHAKE]](https://qiita-user-contents.imgix.net/https%3A%2F%2Fblog.cloudflare.com%2Fcontent%2Fimages%2F2023%2F03%2Fimage1-36.png?ixlib=rb-4.0.0&auto=format&gif-q=60&q=75&s=e93f00a9d3e27d0015c05c8b60feaf3a)


