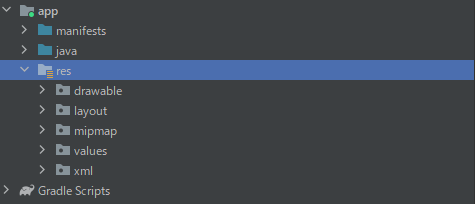
はじめに
androidの学習を始めたので、プロジェクト内にある各フォルダの役割を確認しようと思います。
自分も初学者になりますので、初学者向けの記事になります。
※android studioでnew projectから「Empty Activity」を選択しております。
■環境情報
android studio:Runtime version: 11.0.13+0-b1751.21-8125866 amd64
VM: OpenJDK 64-Bit Server VM by JetBrains s.r.o.
■プロジェクトでの使用言語
Java
manifests
<?xml version="1.0" encoding="utf-8"?>
<manifest xmlns:android="http://schemas.android.com/apk/res/android"
    xmlns:tools="http://schemas.android.com/tools">

    <application
        android:allowBackup="true"
        android:dataExtractionRules="@xml/data_extraction_rules"
        android:fullBackupContent="@xml/backup_rules"
        android:icon="@mipmap/ic_launcher"
        android:label="@string/app_name"
        android:roundIcon="@mipmap/ic_launcher_round"
        android:supportsRtl="true"
        android:theme="@style/Theme.HelloWorld"
        tools:targetApi="31">
        <activity
            android:name=".MainActivity"
            android:exported="true">
            <intent-filter>
                <action android:name="android.intent.action.MAIN" />

                <category android:name="android.intent.category.LAUNCHER" />
            </intent-filter>

            <meta-data
                android:name="android.app.lib_name"
                android:value="" />
        </activity>
    </application>

</manifest>
アプリに関する設定情報などを管理する、AndroidManifest.xmlファイルがあります。
ビルドツールやandroid OSにとっての、アプリの取り扱い説明書的な立ち位置のファイルになるかと思います。
アプリ名/アプリアイコンなどのGoogle Playで用いられる基本情報から、
端末のカメラやSMSなどを使う際のパーミッションについての記述も行ったりします。
マニフェスト内の要素の詳細については、デベロッパー ガイドにてご確認ください。
java
プログラミングのコードを管理するフォルダと、テストを行うためのフォルダで計3フォルダ格納されています。
一番上のフォルダで開発を進めていく形になります。
初期状態では、MainActivityのみが格納されています。
ディレクトリ構成は、採用するアーキテクチャや案件によって変わると思います。
package com.example.sampleapplication;

import androidx.appcompat.app.AppCompatActivity;

import android.os.Bundle;

public class MainActivity extends AppCompatActivity {

    @Override
    protected void onCreate(Bundle savedInstanceState) {
        super.onCreate(savedInstanceState);
        setContentView(R.layout.activity_main);
    }
}
onCreate()をオーバーライドすることで、アプリを立ち上げた際の動きなどを記述することができます。
※MainActivityの内容については今回は省略させていただきます。
res
resフォルダはアプリのリソースを管理するフォルダとなっています。
リソースの呼び出し方は以下になります。
・javaファイルから呼び出し
// R クラスのサブクラスの静的整数を使用。
R.string.sampltText
・xmlファイルから呼び出し
// @{リソースタイプ}/{リソース名}で呼び出し可能。
@string/sampltText
drawable
画像ファイルを管理するフォルダとなっております。
ビットマップ ファイル(PNG、.9.png、JPG、GIF)または XML ファイルが格納可能です。
layout
インターフェース定義用xmlファイルを管理するフォルダとなっております。
こちらでアプリのUIを作成していきます。
mipmap
アプリのアイコンを管理する場所となっております。
values
デフォルトでcolors.xmlやstring.xmlが格納されているフォルダになります。
アプリで使用する色の管理や、文字列リソースの管理を行います。
多言語化する場合など、string.xmlのようなファイルを複数用意するイメージです。
resフォルダに格納するファイル名は、小文字・数字・「_」のみになります。
また、数字から始まるファイル名は使用不可となっておりますので注意してください。
Gradle Script
Gradleとは、Javaのビルドシステムのことを指します。
作成したアプリを実際の端末で使用するためには、プロジェクトをAPKファイルやAABファイルに変換(ビルド)する必要がります。
Gradleはビルドの大部分を行い、要件に合わせてビルドを調整できるようにすると便利なプラグインです。
今回は、設定ファイルを2つほど紹介します。
build.gradle(app内)
plugins {
    id 'com.android.application'
}

android {
    namespace 'com.example.sampleapplication'
    compileSdk 32

    defaultConfig {
        applicationId "com.example.sampleapplication"
        minSdk 21
        targetSdk 32
        versionCode 1
        versionName "1.0"

        testInstrumentationRunner "androidx.test.runner.AndroidJUnitRunner"
    }

    buildTypes {
        release {
            minifyEnabled false
            proguardFiles getDefaultProguardFile('proguard-android-optimize.txt'), 'proguard-rules.pro'
        }
    }
    compileOptions {
        sourceCompatibility JavaVersion.VERSION_1_8
        targetCompatibility JavaVersion.VERSION_1_8
    }
}

dependencies {

    implementation 'androidx.appcompat:appcompat:1.6.1'
    implementation 'com.google.android.material:material:1.10.0'
    implementation 'androidx.constraintlayout:constraintlayout:2.1.4'
    testImplementation 'junit:junit:4.13.2'
    androidTestImplementation 'androidx.test.ext:junit:1.1.5'
    androidTestImplementation 'androidx.test.espresso:espresso-core:3.5.1'
}
plugins{} 内⇒アプリケーション or ライブラリの定義
android{} 内⇒ビルドの設定を定義
dependencies{} 内⇒ライブラリの依存関係を定義
settings.gradle
// Gradleが参照するリポジトリの優先順位
pluginManagement {
    repositories {
        gradlePluginPortal()
        google()
        mavenCentral()
    }
}
// マルチプロジェクトの依存解決の際に全プロジェクトで利用するリポジトリを設定。
dependencyResolutionManagement {
    repositoriesMode.set(RepositoriesMode.FAIL_ON_PROJECT_REPOS)
    repositories {
        google()
        mavenCentral()
    }
}
// リポジトリのトップディレクトリの階層
rootProject.name = "Sample Application"
include ':app'
settings.gradleでは、アプリケーション全体で必要な依存関係を定義します。
include ':app'はプロジェクト自身をincludeしており、外部ライブラリなどのサブプロジェクトを使用する場合、include ':app',':{サブプロジェクトの場所}'といった形でincludeする必要があるようです。
終わりに
今回は、androidのアプリ開発で一番の基礎となるフォルダ構成を見ていきました。
android studioには、様々なテンプレートが用意されていますが、
どのテンプレートにおいても使用されるものかと思いますので、役割を覚えておいて損はないと思いました。
Gradle周りのファイルはかなり複雑なので、もっと知識を深める必要がありそうです。
今後は実際にアプリを作成してみて、学んだことを記事にしていければと思います。
参考にさせていただいた記事
・android デベロッパーガイド
https://developer.android.com/guide/topics/resources/providing-resources?hl=ja
・Android Studio の Gradle の備忘録
https://qiita.com/izuki_y/items/5de57db9acb3b24cb77e

