こちらは、「NJC Advent Calendar 2018」 12月14日の記事です。
はじめに
最近、ASP.Net WebApiでAPIを作成したのですがUnitTestの自動化をできないかなぁーと思い調べてみました。
ただ、作成していたAPIは本来のAPIと異なる部分があり難しい。
なので、まず基本的なASP.Net WebApiのUnitTest手法を調べてみました。
学習した内容を忘れないように備忘録として残そうかと思います。
UnitTestとは
そもそも、UnitTestってなに?
簡単に言えば下記の内容だそうです。
・プログラムを構成する比較的小さな単位(ユニット)が個々の機能を正しく果たしているかどうかを検証するテスト
小さい機能の処理(Function,Class,Method)ごとに検証を行うイメージだと思います。
ただ、個々の機能を検証とありますが、実際では検証する範囲は様々です。
色々なサイトに記載されています。
参考:https://www.techmatrix.co.jp/t/quality/unittest.html
※説明はま色々あるようなので調べてみてください。
ASP.NetのUnitTestについて
基本的には下記のUnitTest手法がある。
・NUnitを使用した単体テスト
・MSTestを使用した単体テスト
| NUnit | MSTest | |
|---|---|---|
| 提供 | NUnit.org | Visual Studioに付属 (Microsoft製) |
| テストの作成 | すべて手書き | 製品コードから雛形を自動生成できる ※privateメソッドをテストするためのプロキシクラスも自動生成できる |
| テスト実行 | IDEとは別(GUIまたはコンソール) ※IDE内から実行するためのサードパーティツールはある |
IDE内で実行 ※コンソールからも可能 |
| アサーションの種類 | Assert.That()などもあり、先進的で豊富 | 保守的だが、型指定ができるなど.NET Frameworkの機能を生かしている部分もある |
| パラメタライズドテスト | ○ |
|
| データ駆動テスト | × ※もちろんそういうコードを書けば可能 |
○ ※テストデータの供給は、データベースだけでなくExcelでも可能 |
| テストのデバッグ実行 (注を参照) |
面倒 ※デバッグ対象としてNUnitを起動する |
簡単 |
| ※① | ||
| 最新では、MSTest V2でありパラメタライズテストを行う為の機能が備わっている。 | ||
| それ以前のMSTest V1でもTestContextを利用すればできる。 |
今回は、MSTestを使用して検証する。
参考:https://codezine.jp/article/detail/6382?p=2 ⇒古い資料です。
基本的なMSTestの使い方
環境
Visual Studio Professional 2015
.Net Framework 4.5.2
超簡単なテストの実装
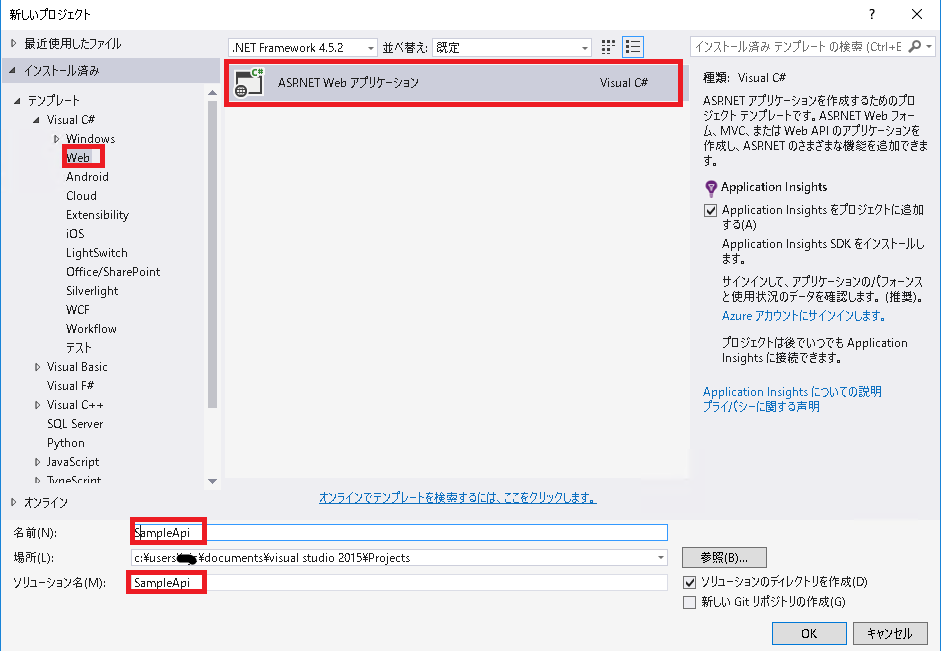
① テスト対象プロジェクトの作成
[ファイル]⇒[新規作成]⇒[プロジェクト]
下記画像のテンプレートでOKを押す。
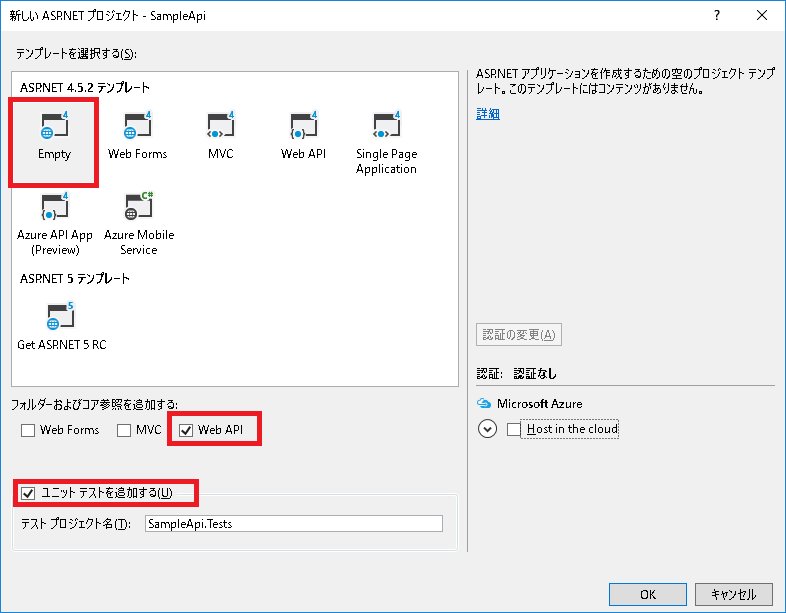
② ASP.Netのテンプレート選択画面で以下を選択する。
この時に、テストプロジェクトも作成する。
③ SampleApi.Testsプロジェクト内のUnitTest1.csを確認して以下がUsingされていることを確認する。
using Microsoft.VisualStudio.TestTools.UnitTesting;
これで、テストコードを書く準備ができました。
④ SampleApi.TestsプロジェクトのUnitTest1.csファイルに下記ソースを作成。
今回は、テスト対象のクラスをテストクラスと同じファイルに作成する。
本来ならば、usingでテスト対象を設定してクラスを呼び出すようにする。
using System;
using Microsoft.VisualStudio.TestTools.UnitTesting;

namespace SampleApi.Tests
{
    /// <summary>
    /// テストクラス
    /// </summary>
    [TestClass]
    public class UnitTest1
    {
        // テストメソッド
        [TestMethod]
        public void TestMethod1()
        {
            // 期待値を設定
            var expected = 3;

            // テスト対象クラスを呼び出す
            TestSampleTargetClass1 testTarget = new TestSampleTargetClass1();
            // IntNumBackを実行
            var actual = testTarget.IntNumBack();

            // 検証する
            Assert.AreEqual(expected, actual);
        }
    }

    /// <summary>
    /// テスト対象クラス
    /// </summary>
    public class TestSampleTargetClass1
    {
        public int X { get; set; }
        public int Y { get; set; }

        // 加算して返却する
        public int IntNumBack()
        {
            this.X = 1;
            this.Y = 2;

            return X+Y;
        }
    }
}
⑤ テストの実行
「テスト」⇒「実行」⇒「全てのテスト」
※デバッグも出来る。
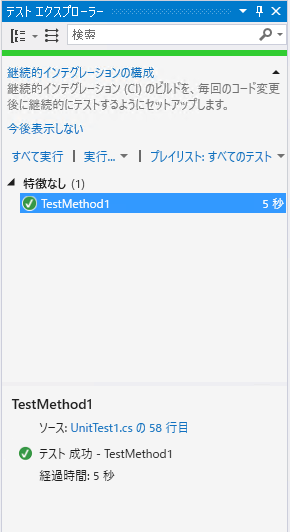
テストエクスプローラーにテスト結果が出る
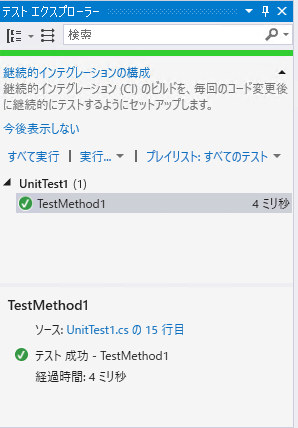
以上、超簡単なテストの実装です。
他にも、様々なAssert機能やテストケースの初期処理、終了処理の共通化ができたりします。
下記の記事に応用なども記載されています。とてもわかり易いので参考にしてください。
参考:MsTestによるユニットテストの解説
自分が試したこと
今回、試したかったことは、REST APIで期待するResponseが返却されるかを検証したい。
テスト範囲としては、Class単位ではなくAPI単位で検証を行う。
APIではDBアクセスなど行っている場合があるので、単体テストより統合テスト(結合テスト)に近いテストをMSTestで検証する。
前提
「超簡単なテストの実装」ができていること
実装
①SampleApiプロジェクトで簡単なWebApiを作成
・Controllerの追加
「Controllers」で右クリック⇒「追加」⇒「コントローラー」で下記画像のコントローラーを追加する。
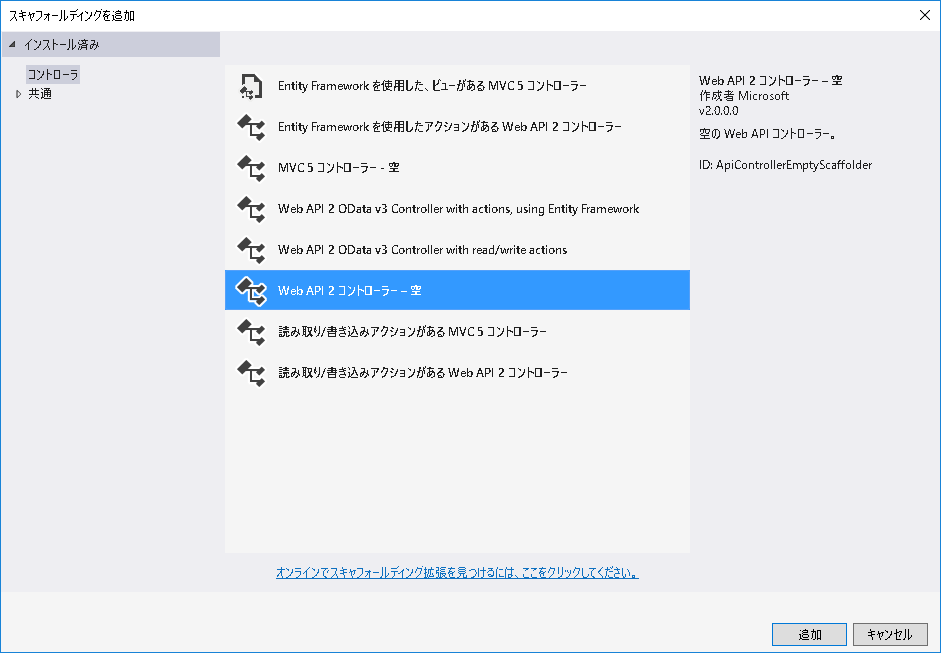
コントローラ名は「SampleApiController」とする。

SampleApiController.csに以下コードを記載
using System;
using System.Collections.Generic;
using System.Linq;
using System.Net;
using System.Net.Http;
using System.Web.Http;
using System.Text;                    // 新規追加
using System.Threading.Tasks;         // 新規追加
using SampleApi.Models;               // 新規追加
using Newtonsoft.Json;                // 新規追加

namespace SampleApi.Controllers
{
    public class SampleApiController : ApiController
    {
        [Route("api/getsample")]
        [HttpGet]
        public async Task<HttpResponseMessage> GetSample(string id, string name)
        {
            // 返却用レスポンスクラスを作成
            SampleResModel res = new SampleResModel(id, name);

            // Json形式のHttpResponseMessageを作成して返却する
            return CreateResponse(res);
        }


        /// <summary>
        /// Json形式のHttpResponseMessageを作成
        /// </summary>
        /// <param name="res"></param>
        /// <returns></returns>
        protected HttpResponseMessage CreateResponse(object res)
        {

            // レスポンステキスト
            var text = String.Empty;

            var settings = new JsonSerializerSettings();
            settings.NullValueHandling = NullValueHandling.Include;

            // JSON シリアライズ
            text = JsonConvert.SerializeObject(res, Newtonsoft.Json.Formatting.Indented, settings);


            var response = this.Request.CreateResponse(HttpStatusCode.OK);
            response.Content = new StringContent(text, Encoding.UTF8, @"application/json");

            return response;
        }
    }
}
・Modelの追加
「Models」⇒「追加」⇒「新しい項目…」で下記画面で追加する。
ファイル名はSampleResModel.csに変更する。
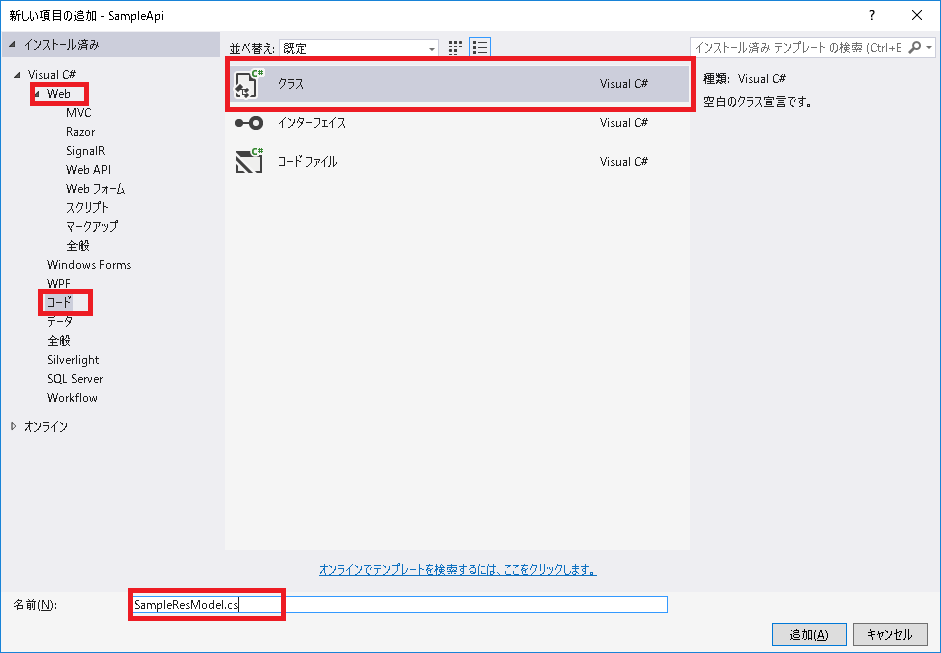
作成したSampleResModel.csに下記コードを記載する。
using System;
using System.Collections.Generic;
using System.Linq;
using System.Web;

namespace SampleApi.Models
{
    public class SampleResModel
    {
        public string Id { get; set; }
        public string Name { get; set; }
        public string BirthDay { get; set; }

        public SampleResModel(string id, string name)
        {
            this.Id = id;
            this.Name = name;
            this.BirthDay = DateTime.Today.ToString("yyyy/MM/dd");
        }
    }
}
②テストコードの作成
SampleApi.TestsプロジェクトのUnitTest1.csに下記コードを上書き。
using System;
using Microsoft.VisualStudio.TestTools.UnitTesting;
using System.Diagnostics;                 // 新規追加
using System.IO;                          // 新規追加
using System.Net;                         // 新規追加
using System.Net.Http;                    // 新規追加→参照設定されていなかったらそちらでも追加
using System.Net.Http.Headers;            // 新規追加→参照設定されていなかったらそちらでも追加
using System.Net.Http.Formatting;         // 新規追加→NuGetからSystem.Net.Http.Formatting.Extensionをインストール

namespace SampleApi.Tests
{
    /// <summary>
    /// テストクラス
    /// </summary>
    [TestClass]
    public class UnitTest1
    {
        // IIS Express のプロセス
        private static Process _iisProcess;
        // IIS のポート
        private const int Port = 9000;
        // リクエストUrl
        private const string UrlBase = "http://localhost:9000/";

        /// <summary>
        /// 初期起動処理
        /// </summary>
        [TestInitialize]
        public void TestInitialize()
        {
            // IIS Express のプロセスStart
            if (_iisProcess == null)
            {
                var applicationPath = GetApplicationPath("SampleApi");
                var programFiles = Environment.GetFolderPath(Environment.SpecialFolder.ProgramFiles);
                var iisPath = Path.Combine(programFiles, "IIS Express", "iisexpress.exe");
                var startInfo = new ProcessStartInfo
                {
                    FileName = iisPath,
                    Arguments = $"/path:\"{applicationPath}\" /port:{Port}",
                };
                _iisProcess = Process.Start(startInfo);
            }
        }

        /// <summary>
        /// 終了処理
        /// </summary>
        [ClassCleanup]
        public static void ClassCleanup()
        {
            StopIIS();
        }

        // テストメソッド
        [TestMethod]
        public void TestMethod1()
        {
            // リクエストの作成
            HttpClient client = new HttpClient();
            var request = CreateRequest(
                "api/getsample?id=1&name=2",
                 "*/*",
                 HttpMethod.Get
                );

            // API実行
            using (var response = client.SendAsync(request).Result)
            {
                // Responseがあるかの検証
                Assert.IsNotNull(response);
                // StatusCodeが正しいかの検証
                Assert.AreEqual(HttpStatusCode.OK, response.StatusCode);
            }
        }

        /// <summary>
        /// ソリューションフォルダ直下にあるテスト対象アプリのフォルダパスを取得します。
        /// </summary>
        /// <returns>テスト対象アプリのフォルダパス</returns>
        private static string GetApplicationPath(string applicationName)
        {
            var solutionFolder = Path.GetDirectoryName(
                Path.GetDirectoryName(
                    Path.GetDirectoryName(AppDomain.CurrentDomain.BaseDirectory)));
            return Path.Combine(solutionFolder, applicationName);
        }

        /// <summary>
        /// IIS Express を停止します。
        /// </summary>
        private static void StopIIS()
        {
            if (_iisProcess != null &&
                _iisProcess.HasExited == false)
            {
                _iisProcess.Kill();
            }
        }

        /// <summary>
        /// リクエストの作成
        /// </summary>
        /// <param name="url"></param>
        /// <param name="mthv"></param>
        /// <param name="method"></param>
        /// <returns></returns>
        private HttpRequestMessage CreateRequest(string url, string mthv, HttpMethod method)
        {
            var request = new HttpRequestMessage();
            request.RequestUri = new Uri(UrlBase + url);
            request.Headers.Accept.Add(new MediaTypeWithQualityHeaderValue(mthv));
            request.Method = method;
            return request;
        }

        /// <summary>
        /// リクエストの作成
        /// </summary>
        /// <param name="url"></param>
        /// <param name="mthv"></param>
        /// <param name="method"></param>
        /// <returns></returns>
        private HttpRequestMessage CreateRequest<T>(string url, string mthv, HttpMethod method, T content, MediaTypeFormatter formatter) where T : class
        {
            HttpRequestMessage request = CreateRequest(url, mthv, method);
            request.Content = new ObjectContent<T>(content, formatter);
            return request;
        }
    }
}
説明
・テストコードの主な流れ
①初期処理時にIIS Express Start処理でWebAPIを起動
②リクエストをテストコード内で作成してAPIを叩く
③返却されたResponseが正しいか検証
④終了処理時、IIS Express Close処理でWebApi停止
これでAPIのレスポンスが返却され、結果の確認を行うことができる。
最後に
今回はHttpResponseのStatusCodeの確認しか行っていません。
Json.Netなどを利用すれば返却されるJsonの検証も行うことができるかと思います。
(Jsonの検証に関しては、まだ実装できていないですが…![]() )
)
また、テストコード内の処理はNUnitとあまり変わらないようです。
NUnitのテストコードも参考にできる印象でした。
その他参考
公式リファレンス
・https://docs.microsoft.com/ja-jp/aspnet/web-api/overview/testing-and-debugging/
・https://docs.microsoft.com/ja-jp/dotnet/core/testing/unit-testing-with-mstest
その他
・http://www.atmarkit.co.jp/fdotnet/aspnetmvc3/index/index.html
・https://monobook.org/wiki/ASP.NET_Web_API/NUnit%E3%81%A7%E3%83%A6%E3%83%8B%E3%83%83%E3%83%88%E3%83%86%E3%82%B9%E3%83%88%E3%82%92%E8%A1%8C%E3%81%86#.E3.81.8A.E3.82.8F.E3.82.8A
・https://netweblog.wordpress.com/2016/10/24/json-net-newtonsoft-json-usage/
・https://www.newtonsoft.com/json/help/html/Introduction.htm
