もはや何十番煎じどころか、何百番煎じか分かりませんが、Raspberry Pi 4 で、おうちKubernetesを作ったので、そのメモを残しておきます。
ググると、先達の皆様の記事がたくさん出てきますが、そんな記事に比べて、新しめな箇所は以下の通りです。
- Raspberry Pi 3 ではなく、Raspberry Pi 4 を使う
- Raspbian Stretch Lite ではなく、後継の Raspbian Buster Lite を使う
おうちKubernetes とは
明確な定義はありませんが、Raspberry Pi を複数台使って、Kubernetesが稼働する手のひらサイズのハードウェアを指します。多分。
サイバーエージェント青山さんが書かれたこちらの記事が有名ですよね。
3日間クッキング【Kubernetes のラズペリーパイ包み “サイバーエージェント風”】
https://developers.cyberagent.co.jp/blog/archives/14721/
Raspberry Pi とは
イギリスのRaspberry Pi財団が開発しているARMプロセッサを搭載した小型コンピューターです。三千円ぐらいから入手できるので、主に、教育用途や、IOT・組み込み用途に使われています。
Raspberry Pi
https://ja.wikipedia.org/wiki/Raspberry_Pi
CPU・メモリ・各種インターフェイス(USB/HDMI/有線・無線LAN)はついていますが、ストレージ(MicroSDカード)、外付けディスプレイ、キーボード・マウスなどは別途必要です。
昨年11月に、Raspberry Pi 4 の国内販売が始まりました。
材料
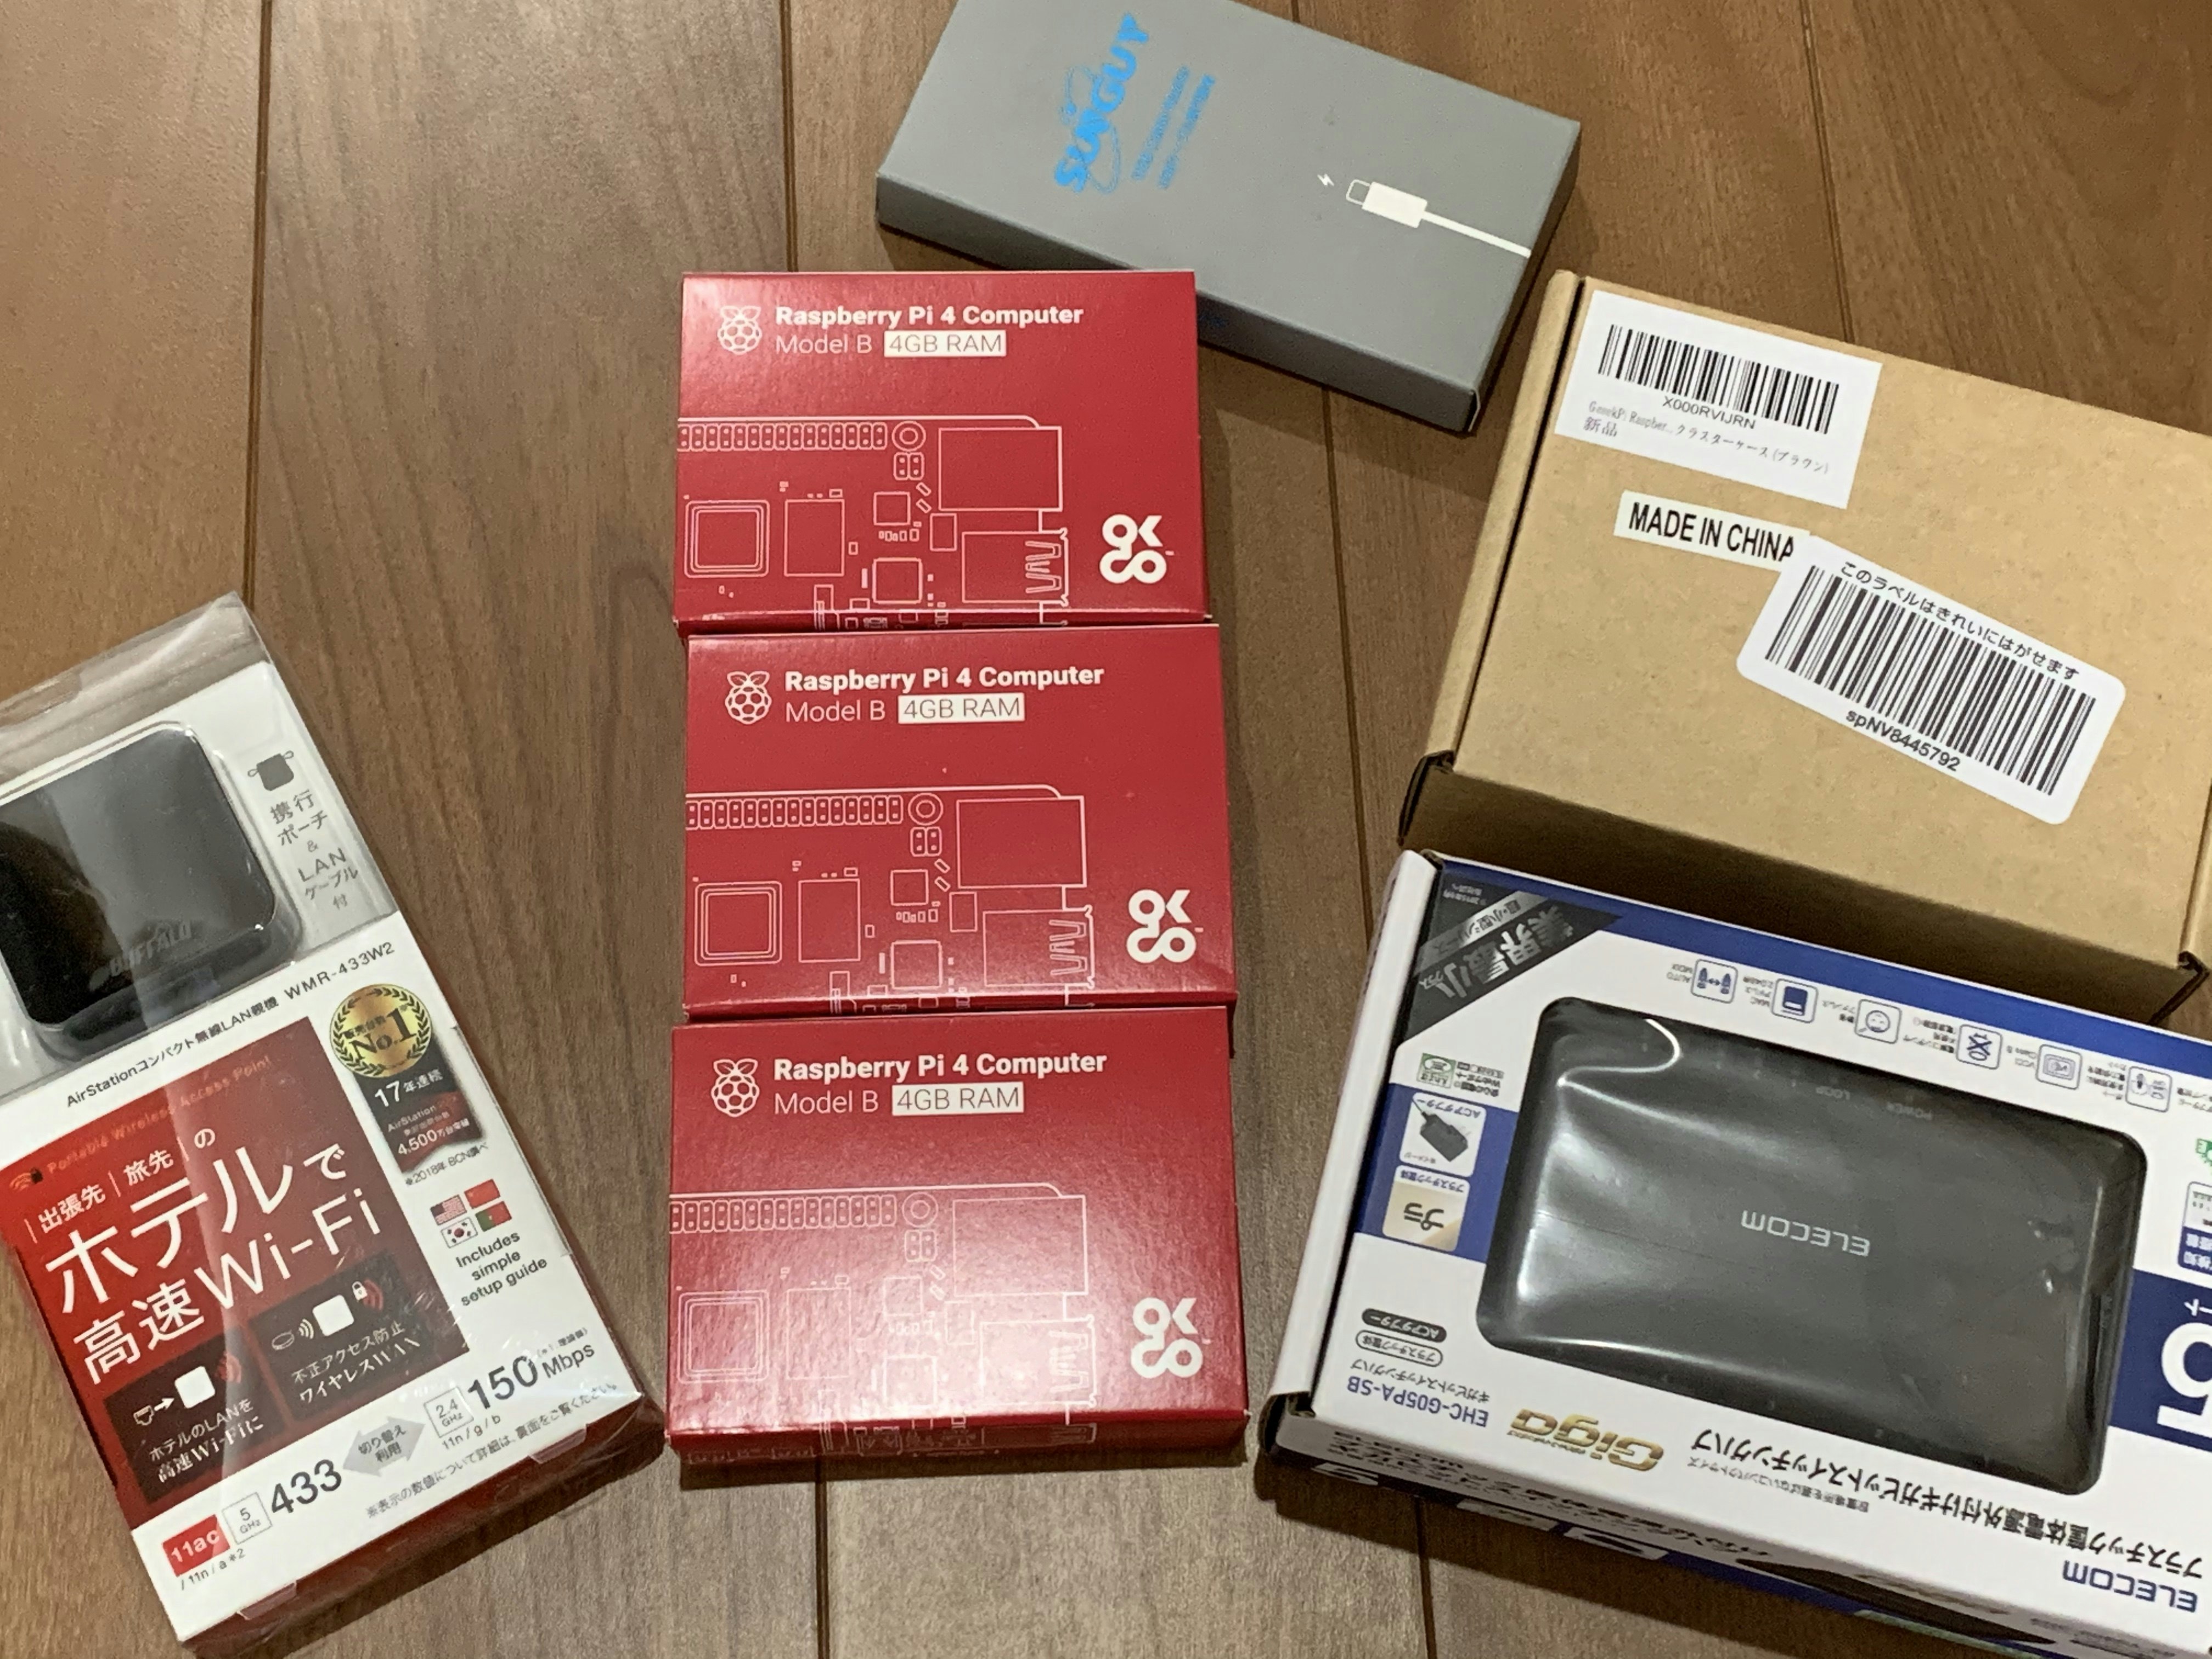
おうちKubernetes作成に使った材料一覧です。
Raspberry PiはKSYから、その他はAmazonとヨドバシで調達しました。
安くあげるために、どこのご家庭でも冷蔵庫の奥にいくつか転がっているであろう不要なSDカードやUSB電源・変換コネクタを流用しています。
(材料の一部)
| 材料 | 備考 |
|---|---|
| Raspberry Pi 4 Model B/4GB | |
| Raspberry Pi スタッカブルケース 冷却ファン付き | |
| Samsung microSDカード32GB * 3枚 | 家に転がってた Class10 UHS-I対応 |
| BUFFALO トラベルルーター WMR-433W2 | micro USB給電 |
| エレコム ギガビットスイッチングハブ EHC-G05PA-SB | micro USB給電 |
| USB Type-A - USB Type-C ケーブル 30cm * 3本 | |
| USB Type-A - micro USB Type-B ケーブル 30cm * 2本 | |
| スリムLANケーブル CAT.6 0.3m * 3本 | |
| スリムLANケーブル CAT.6 0.15m * 1本 | |
| Anker PowerPort+ 5 60W 5ポート | 家に転がってた |
| USB Type-A - USB Type-C 変換コネクタ | 家に転がってた |
| 耐震ジェル | 家に転がってた スイッチと無線ルータ固定に利用 |
| ステンレス製ピンセット 5本組セット | 家に転がってた ヒートシンク貼り付ける際にあると便利 |
Raspberry Pi 4 の考慮点
Raspberry Pi3 と比べた場合のRaspberry Pi4 の考慮点は以下の通りです。
- 発熱が大きいので、大型ヒートシンクか冷却ファンが必要
- 電源端子が、micro USB Type-B から USB Type-C に変更
- 必要な電源が5V/2.5A から 5V/3A に変更
他のおうちKubernetesな記事で使っているような ファンレス&小型ヒートシンクな積層型ケース は使えないことに注意が必要です。
また、Raspberry Pi 4 は 5V/3A を電源として要求します。
一方、本環境では、電源としてAnker PowerPort+ 5 60W 5ポートを使っています。こちら 5V/2.4Aです。
今のところ、電源不足のログが出力されることもなく、動いているようなので、ひとまずこちらを使うことにしています。今後問題が出てくるようだったら、こんなのに買い換える予定です。
ルーター設定
まず、トラベルルーターのセットアップをします。
想定している構成図はこんな感じです。(論理・物理ごっちゃに書いてますが。。)

まず、トラベルルーターのみ電源を入れて起動し、操作端末であるMacをトラベルルーターの無線LANに参加した上で、管理画面に接続します。
管理画面
http://192.168.13.1/
ワイヤレスワンモードを選択し、トラベルルーターを自宅の無線LANに接続します。
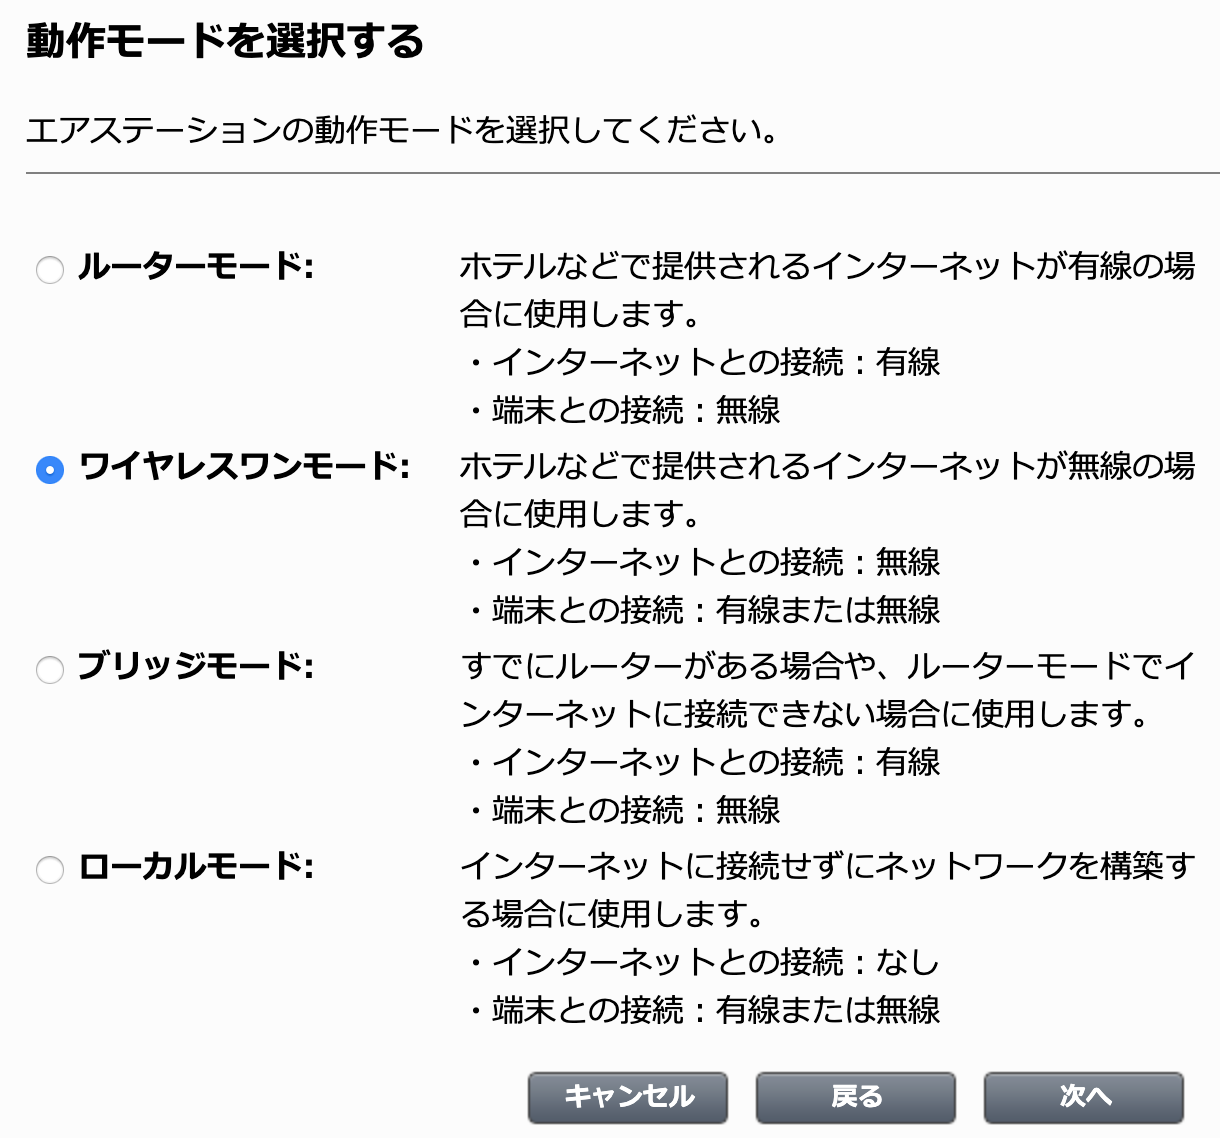
このトラベルルーターのDHCPサーバ機能の仕様として、192.168.13.2〜192.168.13.64を払い出します。(変更不可。安価なので割り切った仕様ですね)
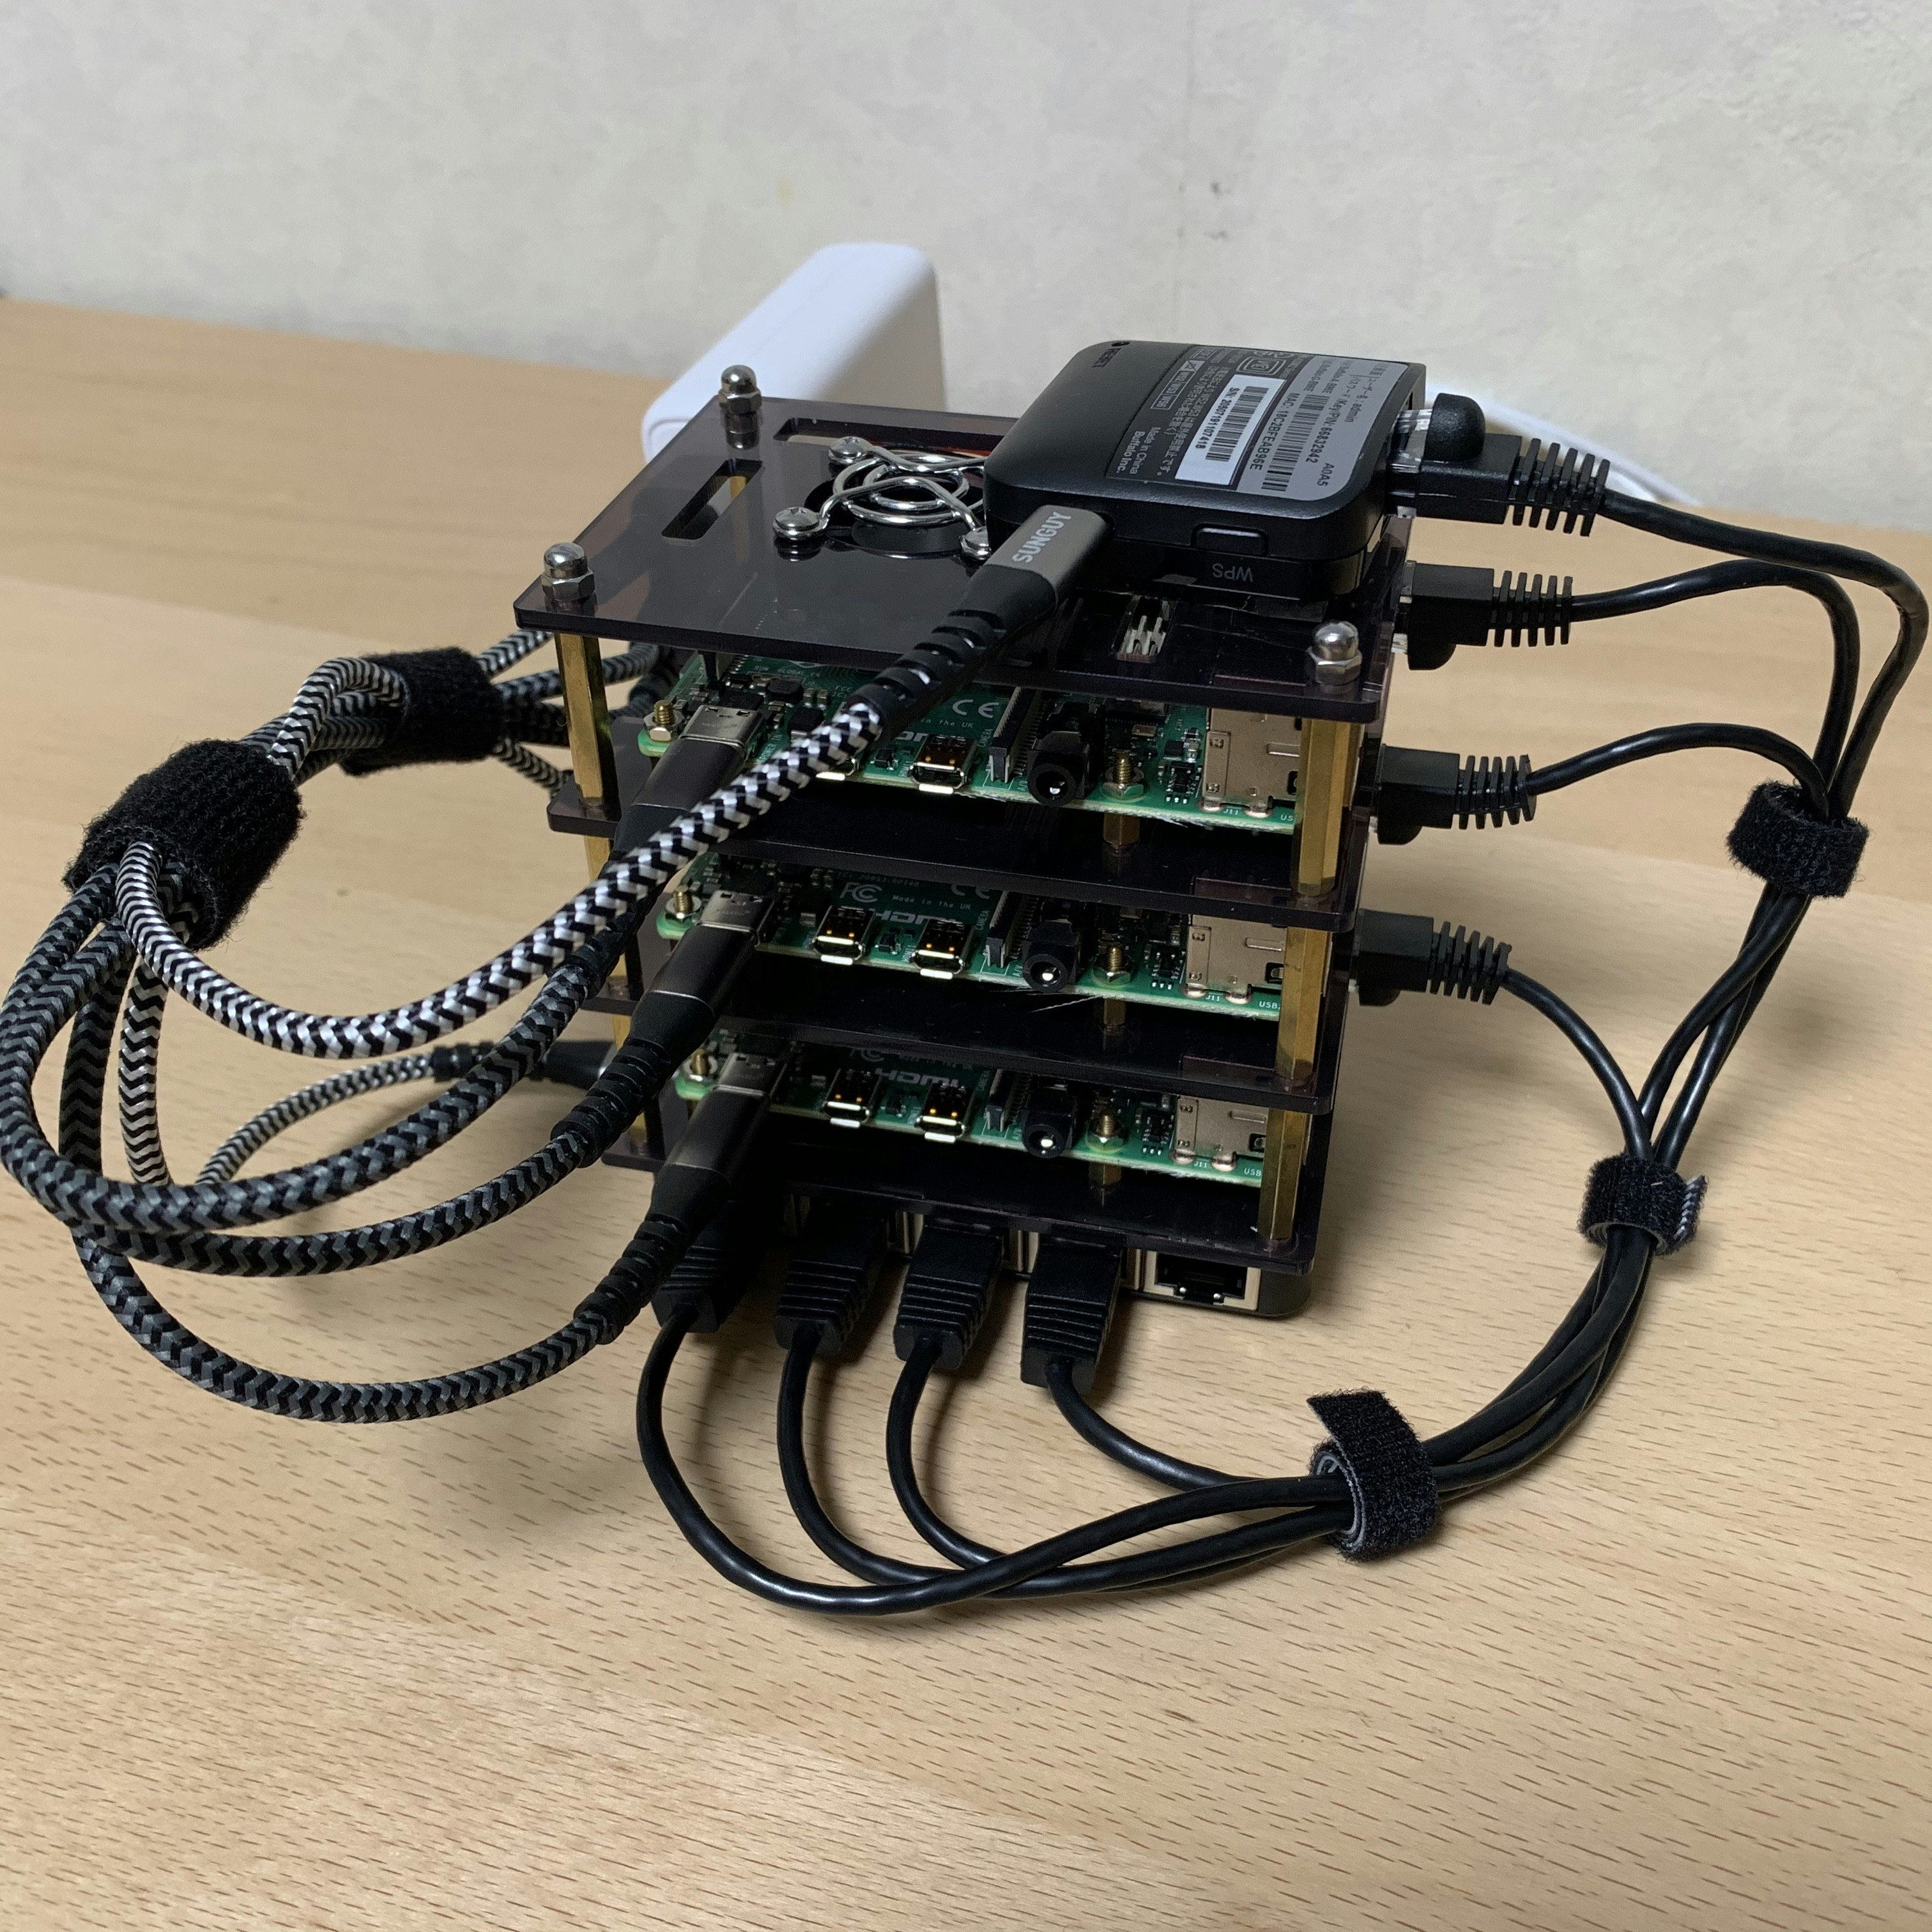
組み立て
トラベルルータ設定後、ラック組み立て・Raspberry Pi配置・ケーブリングを経て、こんな感じに組み立て上がりました。手のひらサイズの空冷サーバラックです。良かったですね。
ケーブル取り回しは今後もう少し綺麗にできると良いですね。写真が残念なので分かりづらいですが、電源として使っている Anker PowerPort+は、今後変更になる可能性があるので固定していません。
OS導入・Raspberry Pi起動と接続
次に、Raspberry Pi に Raspbian OS を導入していきます。全Raspberry Piに対して作業が必要です。
OSイメージの書き込み
まず、MicroSDカードをMacに差し込み、OSイメージを書き込んでいきます。
以下から Raspbian Buster Lite をダウンロードします。2019-09-26版を使いました。
以下の手順に従い、MacからSDカードに、Raspbian OS の OSイメージを書き込んでいきます。
$ cd ~/Desktop/
$ unzip 2019-09-26-raspbian-buster-lite.zip
Archive:  2019-09-26-raspbian-buster-lite.zip
  inflating: 2019-09-26-raspbian-buster-lite.img

$ diskutil list
(中略)
/dev/disk3 (external, physical):
   #:                       TYPE NAME                    SIZE       IDENTIFIER
   0:     FDisk_partition_scheme                        *32.0 GB    disk3
   1:             Windows_FAT_32 NO NAME                 32.0 GB    disk3s1

$ sudo diskutil umountDisk /dev/disk3
Unmount of all volumes on disk3 was successful

$ sudo dd bs=1m if=2019-09-26-raspbian-buster-lite.img of=/dev/rdisk3 conv=sync
2144+0 records in
2144+0 records out
2248146944 bytes transferred in 67.937427 secs (33091435 bytes/sec)
$
OSイメージへの追加設定
Raspbian では、セキュリティを考慮してデフォルトでは sshd が無効になっています。ボリュームの root直下にsshという名前の空ファイルを作成すると、Raspbian OS起動時に sshd が有効になります。
SSH (Secure Shell)
https://www.raspberrypi.org/documentation/remote-access/ssh/
$ cd /Volumes/boot
$ touch ssh
次にcgroupsを有効にします。
cmdline.txt の 末尾に cgroup_enable=cpuset cgroup_enable=memory cgroup_memory=1 を追加します。
enabling cgroup memory doesn't take effect
https://www.raspberrypi.org/forums/viewtopic.php?t=203128
$ cd /Volumes/boot
$ cat cmdline.txt
console=serial0,115200 console=tty1 root=PARTUUID=6c586e13-02 rootfstype=ext4 elevator=deadline fsck.repair=yes rootwait quiet init=/usr/lib/raspi-config/init_resize.sh cgroup_enable=cpuset cgroup_enable=memory cgroup_memory=1
$
Raspberry Piの起動
まず、1番上のRaspberry Piに OS書き込み済みの MicroSDカード を挿し込んで電源を入れます。一連の起動シーケンスの中で、Raspberry PiはトラベルルーターからIPを払い出されているはずです。
トラベルルーターの無線LANに接続した Mac 上で、arp -a を打つなどして、起動してきた Raspberry Pi に払い出されたIPにあたりをつけましょう。Ping で返事が返ってくることを確認するとよいでしょう。下記の例だと 192.168.13.3 ですね。192.168.13.2 は arp -a 実行してるMacです。
$ arp -a
? (192.168.13.1) at 18:c2:bf:ea:b9:6e on en0 permanent [ethernet]
? (192.168.13.2) at 38:f9:d3:2b:de:3 on en0 ifscope permanent [ethernet]
? (192.168.13.3) at dc:a6:32:71:16:47 on en0 ifscope [ethernet]
? (192.168.13.255) at ff:ff:ff:ff:ff:ff on en0 ifscope [ethernet]
? (224.0.0.251) at 1:0:5e:0:0:fb on en0 ifscope permanent [ethernet]
? (239.255.255.250) at 1:0:5e:7f:ff:fa on en0 ifscope permanent [ethernet]
Pingが返ってきたら、おそらくそれは一番上の Raspberry Pi に割り振られたIPなので、そのIPに対してSSHします。Defaultのユーザ名とパスワードは pi と raspberry です。
$ ssh pi@192.168.13.3
The authenticity of host '192.168.13.3 (192.168.13.3)' can't be established.
ECDSA key fingerprint is SHA256:tvA3Tz4At5mfA+23lkUq/lRv43gGghfbq0Dlgami+fE.
Are you sure you want to continue connecting (yes/no)? yes
Warning: Permanently added '192.168.13.3' (ECDSA) to the list of known hosts.
kentarok@192.168.13.3's password:
Linux k8s-node1 4.19.75-v7l+ #1270 SMP Tue Sep 24 18:51:41 BST 2019 armv7l

The programs included with the Debian GNU/Linux system are free software;
the exact distribution terms for each program are described in the
individual files in /usr/share/doc/*/copyright.

Debian GNU/Linux comes with ABSOLUTELY NO WARRANTY, to the extent
permitted by applicable law.
(今気づきましたが時刻がおかしくなってますね。。NTP設定見直さないと。)
IP固定化
ログインしたら固定IPを設定します。今回は以下のように設定します。
| 役割 | IP | ホスト名 |
|---|---|---|
| Master Node | 192.168.13.101 | k8s-master |
| Worker Node | 192.168.13.102 | k8s-node1 |
| Worker Node | 192.168.13.103 | k8s-node2 |
$ sudo vi /etc/dhcpcd.conf

interface eth0
static ip_address=192.168.13.101/24
static routers=192.168.13.1
static domain_name_servers=192.168.13.1 8.8.8.8
$
これをRaspberry Pi 3台分繰り返して、ネットワーク周りの設定は完了です。
OS初期設定
次に、Kubernetes導入前の下準備をOSに対して設定します。この作業は全てのNodeに対して必要です。
OS更新
Raspbian OS を最新化します。
$ sudo apt-get update \
  && sudo apt-get -y dist-upgrade \
  && sudo apt-get -y autoremove \
  && sudo apt-get autoclean
ホスト名変更
事前に予定していた通りに、ホスト名をそれぞれ設定していきます。
ついでに自分以外のNodeの名前も教えます。
$ sudo hostnamectl set-hostname k8s-master
$ sudo vi /etc/hosts
127.0.1.1       k8s-master
192.168.13.101  k8s-master
192.168.13.102  k8s-node1
192.168.13.103  k8s-node2
iptables バージョン変更
Installing kubeadm に記述があったので、先行してやっておきます。
Ensure iptables tooling does not use the nftables backend
https://kubernetes.io/docs/setup/production-environment/tools/kubeadm/install-kubeadm/#ensure-iptables-tooling-does-not-use-the-nftables-backend
$ sudo update-alternatives --set iptables /usr/sbin/iptables-legacy
Swap無効化
kubelet の要件で、swap は無効化します。
$ sudo dphys-swapfile swapoff
$ sudo systemctl stop dphys-swapfile
$ sudo systemctl disable dphys-swapfile
ssh 鍵交換(オプション)
Macから各Nodeにログインしやすくするために、Mac上で作った公開鍵をそれぞれのNodeに登録します。(これはMacから各Nodeに対して行います。)
$ ssh-copy-id -i /Users/kentarok/.ssh/sl_rsa.pub pi@192.168.13.101
パスワードログイン無効化(オプション)
公開鍵認証にしたので、パスワードログインは無効化します
$ sudo vi /etc/ssh/sshd_config
PasswordAuthentication no
おまけに pi ユーザーのパスワードも削除しておきます。
$ sudo passwd -d pi
電源ログ調査
前述の通り、5V-3A を要求するラズパイに 5V-2.4A しか供給していないので、電源異常がログされていないか確認します。
$ vcgencmd get_throttled
0x0
0x0 と表示されればとりあえず大丈夫なようです。
詳しくはこちらのサイトで。
ラズパイの電源不足を調べてみました。
https://raspberrypi.mongonta.com/underpower/
Kubernetes関連パッケージの導入
OS側の設定が終わったので、いよいよKubernetesのコンポーネントを導入していきます。この作業は全てのNodeに対して必要です。
Docker導入
最新のKubernetesでサポートされているDockerのバージョンについて記述があったので、こちらに従って19.03を導入します。
"Update the latest validated version of Docker to 19.03 (#84476, @neolit123)"
記事執筆時点で、Raspbian OSの 最新版 Raspbian Buster Lite では、提供されているレポジトリにいまだDockerが登録されていません。そのため、直接パッケージをダウンロードしてきて導入します。
$ sudo -i
$ wget https://download.docker.com/linux/debian/dists/buster/pool/stable/armhf/containerd.io_1.2.6-3_armhf.deb
$ wget https://download.docker.com/linux/debian/dists/buster/pool/stable/armhf/docker-ce-cli_19.03.5~3-0~debian-buster_armhf.deb
$ wget https://download.docker.com/linux/debian/dists/buster/pool/stable/armhf/docker-ce_19.03.5~3-0~debian-buster_armhf.deb
$
$ dpkg -i containerd.io_1.2.6-3_armhf.deb
$ dpkg -i docker-ce-cli_19.03.5~3-0~debian-buster_armhf.deb
$ dpkg -i docker-ce_19.03.5~3-0~debian-buster_armhf.deb
導入したDockerのバージョンを確認します。
$ docker version
Client: Docker Engine - Community
 Version:           19.03.5
 API version:       1.40
 Go version:        go1.12.12
 Git commit:        633a0ea
 Built:             Wed Nov 13 07:40:15 2019
 OS/Arch:           linux/arm
 Experimental:      false

Server: Docker Engine - Community
 Engine:
  Version:          19.03.5
  API version:      1.40 (minimum version 1.12)
  Go version:       go1.12.12
  Git commit:       633a0ea
  Built:            Wed Nov 13 07:34:13 2019
  OS/Arch:          linux/arm
  Experimental:     false
 containerd:
  Version:          1.2.6
  GitCommit:        894b81a4b802e4eb2a91d1ce216b8817763c29fb
 runc:
  Version:          1.0.0-rc8
  GitCommit:        425e105d5a03fabd737a126ad93d62a9eeede87f
 docker-init:
  Version:          0.18.0
  GitCommit:        fec3683
$
Dockerのバージョンを固定します。
$ sudo apt-mark hold docker-ce
最後に、piユーザーにDockerコマンド実行権限を付与します。
$ usermod -aG docker pi
kubeadm、kubectl、kubelet 導入
Raspbian OS は Debian ベースとのことで、以下の手順に従って、作業を実施します。
$ sudo -i
$ apt-get update && apt-get install -y apt-transport-https curl
Hit:1 http://archive.raspberrypi.org/debian buster InRelease
Hit:2 http://raspbian.raspberrypi.org/raspbian buster InRelease
Reading package lists... Done
Reading package lists... Done
Building dependency tree
Reading state information... Done
apt-transport-https is already the newest version (1.8.2).
curl is already the newest version (7.64.0-4).
0 upgraded, 0 newly installed, 0 to remove and 0 not upgraded.
Kubernetes を提供しているリポジトリの設定をします。
$ curl -s https://packages.cloud.google.com/apt/doc/apt-key.gpg | apt-key add -
$ cat <<EOF | tee /etc/apt/sources.list.d/kubernetes.list
deb https://apt.kubernetes.io/ kubernetes-xenial main
EOF
kubelet、kubeadm、kubectlを導入します。
$ apt-get update
$ apt-get install -y kubelet kubeadm kubectl
導入したバージョンを確認し、固定します。
$ kubeadm version -o yaml
clientVersion:
  buildDate: "2019-12-07T21:17:50Z"
  compiler: gc
  gitCommit: 70132b0f130acc0bed193d9ba59dd186f0e634cf
  gitTreeState: clean
  gitVersion: v1.17.0
  goVersion: go1.13.4
  major: "1"
  minor: "17"
  platform: linux/arm

$ apt-mark hold kubelet kubeadm kubectl
kubelet set on hold.
kubeadm set on hold.
kubectl set on hold.
Master Nodeの構築
Master Nodeの初期化設定を行います。この手順はMaster Nodeでのみ実施します。
他の先人たちの例に従い、ネットワークAddon は Flannel を使用します。
もう一つ有名なネットワークAddonとして Calico もありますが、こちらはAMD64プロセッサが動作要件にあるようで、Raspbianは32bitなので候補から除外しました。
要件として記載されている /proc/sys/net/bridge/bridge-nf-call-iptables の値は私の環境では最初から満たしていたので特に何もしていません。
$ cat /proc/sys/net/bridge/bridge-nf-call-iptables
1
クラスタの初期化
Flannelを使用するため、Podネットワークは 10.244.0.0/16 を指定します。
最後に表示される kubeadm join コマンドは後で使うのでメモしておきます。
$ kubeadm init --pod-network-cidr=10.244.0.0/16
実行ログです。
$ kubeadm init --pod-network-cidr=10.244.0.0/16
W1228 06:06:27.607623    2273 validation.go:28] Cannot validate kube-proxy config - no validator is available
W1228 06:06:27.607962    2273 validation.go:28] Cannot validate kubelet config - no validator is available
[init] Using Kubernetes version: v1.17.0
[preflight] Running pre-flight checks
	[WARNING IsDockerSystemdCheck]: detected "cgroupfs" as the Docker cgroup driver. The recommended driver is "systemd". Please follow the guide at https://kubernetes.io/docs/setup/cri/
[preflight] Pulling images required for setting up a Kubernetes cluster
[preflight] This might take a minute or two, depending on the speed of your internet connection
[preflight] You can also perform this action in beforehand using 'kubeadm config images pull'
[kubelet-start] Writing kubelet environment file with flags to file "/var/lib/kubelet/kubeadm-flags.env"
[kubelet-start] Writing kubelet configuration to file "/var/lib/kubelet/config.yaml"
[kubelet-start] Starting the kubelet
[certs] Using certificateDir folder "/etc/kubernetes/pki"
[certs] Generating "ca" certificate and key
[certs] Generating "apiserver" certificate and key
[certs] apiserver serving cert is signed for DNS names [k8s-master kubernetes kubernetes.default kubernetes.default.svc kubernetes.default.svc.cluster.local] and IPs [10.96.0.1 192.168.13.101]
[certs] Generating "apiserver-kubelet-client" certificate and key
[certs] Generating "front-proxy-ca" certificate and key
[certs] Generating "front-proxy-client" certificate and key
[certs] Generating "etcd/ca" certificate and key
[certs] Generating "etcd/server" certificate and key
[certs] etcd/server serving cert is signed for DNS names [k8s-master localhost] and IPs [192.168.13.101 127.0.0.1 ::1]
[certs] Generating "etcd/peer" certificate and key
[certs] etcd/peer serving cert is signed for DNS names [k8s-master localhost] and IPs [192.168.13.101 127.0.0.1 ::1]
[certs] Generating "etcd/healthcheck-client" certificate and key
[certs] Generating "apiserver-etcd-client" certificate and key
[certs] Generating "sa" key and public key
[kubeconfig] Using kubeconfig folder "/etc/kubernetes"
[kubeconfig] Writing "admin.conf" kubeconfig file
[kubeconfig] Writing "kubelet.conf" kubeconfig file
[kubeconfig] Writing "controller-manager.conf" kubeconfig file
[kubeconfig] Writing "scheduler.conf" kubeconfig file
[control-plane] Using manifest folder "/etc/kubernetes/manifests"
[control-plane] Creating static Pod manifest for "kube-apiserver"
[control-plane] Creating static Pod manifest for "kube-controller-manager"
W1228 06:08:56.859476    2273 manifests.go:214] the default kube-apiserver authorization-mode is "Node,RBAC"; using "Node,RBAC"
[control-plane] Creating static Pod manifest for "kube-scheduler"
W1228 06:08:56.868671    2273 manifests.go:214] the default kube-apiserver authorization-mode is "Node,RBAC"; using "Node,RBAC"
[etcd] Creating static Pod manifest for local etcd in "/etc/kubernetes/manifests"
[wait-control-plane] Waiting for the kubelet to boot up the control plane as static Pods from directory "/etc/kubernetes/manifests". This can take up to 4m0s
[kubelet-check] Initial timeout of 40s passed.
[apiclient] All control plane components are healthy after 48.007975 seconds
[upload-config] Storing the configuration used in ConfigMap "kubeadm-config" in the "kube-system" Namespace
[kubelet] Creating a ConfigMap "kubelet-config-1.17" in namespace kube-system with the configuration for the kubelets in the cluster
[upload-certs] Skipping phase. Please see --upload-certs
[mark-control-plane] Marking the node k8s-master as control-plane by adding the label "node-role.kubernetes.io/master=''"
[mark-control-plane] Marking the node k8s-master as control-plane by adding the taints [node-role.kubernetes.io/master:NoSchedule]
[bootstrap-token] Using token: ul0n5s.x4ukjc7en79vt4o7
[bootstrap-token] Configuring bootstrap tokens, cluster-info ConfigMap, RBAC Roles
[bootstrap-token] configured RBAC rules to allow Node Bootstrap tokens to post CSRs in order for nodes to get long term certificate credentials
[bootstrap-token] configured RBAC rules to allow the csrapprover controller automatically approve CSRs from a Node Bootstrap Token
[bootstrap-token] configured RBAC rules to allow certificate rotation for all node client certificates in the cluster
[bootstrap-token] Creating the "cluster-info" ConfigMap in the "kube-public" namespace
[kubelet-finalize] Updating "/etc/kubernetes/kubelet.conf" to point to a rotatable kubelet client certificate and key
[addons] Applied essential addon: CoreDNS
[addons] Applied essential addon: kube-proxy

Your Kubernetes control-plane has initialized successfully!

To start using your cluster, you need to run the following as a regular user:

  mkdir -p $HOME/.kube
  sudo cp -i /etc/kubernetes/admin.conf $HOME/.kube/config
  sudo chown $(id -u):$(id -g) $HOME/.kube/config

You should now deploy a pod network to the cluster.
Run "kubectl apply -f [podnetwork].yaml" with one of the options listed at:
  https://kubernetes.io/docs/concepts/cluster-administration/addons/

Then you can join any number of worker nodes by running the following on each as root:

kubeadm join 192.168.13.101:6443 --token ul0n5s.x4ukjc7en79vt4o7 \
    --discovery-token-ca-cert-hash sha256:c4d3698d75c1584e78a27d4e0e2755fd79f3c78bebbe05dddf698fb4095a3ca2
kubectlの設定
kubectl の設定ファイルを配置します。
$ mkdir -p $HOME/.kube
$ sudo cp -i /etc/kubernetes/admin.conf $HOME/.kube/config
$ sudo chown $(id -u):$(id -g) $HOME/.kube/config
kubectl がちゃんと動くか確認します。
$ kubectl get node
NAME         STATUS     ROLES    AGE     VERSION
k8s-master   NotReady   master   7m10s   v1.17.0
$
(オプション) kubectlコマンドの補完も有効にしておくとはかどります。
$ source <(kubectl completion bash)                      # 現在のシェルに対して設定
$ echo "source <(kubectl completion bash)" >> ~/.bashrc  # 次回のシェル起動時に有効になるように設定
PodネットワークAddonのインストール
以下を参考にFlannelをインストールします。
$ kubectl apply -f https://raw.githubusercontent.com/coreos/flannel/2140ac876ef134e0ed5af15c65e414cf26827915/Documentation/kube-flannel.yml
podsecuritypolicy.policy/psp.flannel.unprivileged created
clusterrole.rbac.authorization.k8s.io/flannel created
clusterrolebinding.rbac.authorization.k8s.io/flannel created
serviceaccount/flannel created
configmap/kube-flannel-cfg created
daemonset.apps/kube-flannel-ds-amd64 created
daemonset.apps/kube-flannel-ds-arm64 created
daemonset.apps/kube-flannel-ds-arm created
daemonset.apps/kube-flannel-ds-ppc64le created
daemonset.apps/kube-flannel-ds-s390x created
Worker Nodeのクラスタ参加
クラスタに Worker Node k8s-node1 k8s-node2 を参加させます。
先程、kubeadm init した際にメモした kubeadm join コマンドを実行します。
$ kubeadm join 192.168.13.101:6443 --token ul0n5s.x4ukjc7en79vt4o7 \
>     --discovery-token-ca-cert-hash sha256:c4d3698d75c1584e78a27d4e0e2755fd79f3c78bebbe05dddf698fb4095a3ca2
W1228 06:21:59.043224    3046 join.go:346] [preflight] WARNING: JoinControlPane.controlPlane settings will be ignored when control-plane flag is not set.
[preflight] Running pre-flight checks
	[WARNING IsDockerSystemdCheck]: detected "cgroupfs" as the Docker cgroup driver. The recommended driver is "systemd". Please follow the guide at https://kubernetes.io/docs/setup/cri/
[preflight] Reading configuration from the cluster...
[preflight] FYI: You can look at this config file with 'kubectl -n kube-system get cm kubeadm-config -oyaml'
[kubelet-start] Downloading configuration for the kubelet from the "kubelet-config-1.17" ConfigMap in the kube-system namespace
[kubelet-start] Writing kubelet configuration to file "/var/lib/kubelet/config.yaml"
[kubelet-start] Writing kubelet environment file with flags to file "/var/lib/kubelet/kubeadm-flags.env"
[kubelet-start] Starting the kubelet
[kubelet-start] Waiting for the kubelet to perform the TLS Bootstrap...

This node has joined the cluster:
* Certificate signing request was sent to apiserver and a response was received.
* The Kubelet was informed of the new secure connection details.

Run 'kubectl get nodes' on the control-plane to see this node join the cluster.
Worker Node がちゃんとクラスタに参加したか確認します。
$ kubectl get node
NAME         STATUS   ROLES    AGE    VERSION
k8s-master   Ready    master   14m    v1.17.0
k8s-node1    Ready    <none>   103s   v1.17.0
k8s-node2    Ready    <none>   92s    v1.17.0
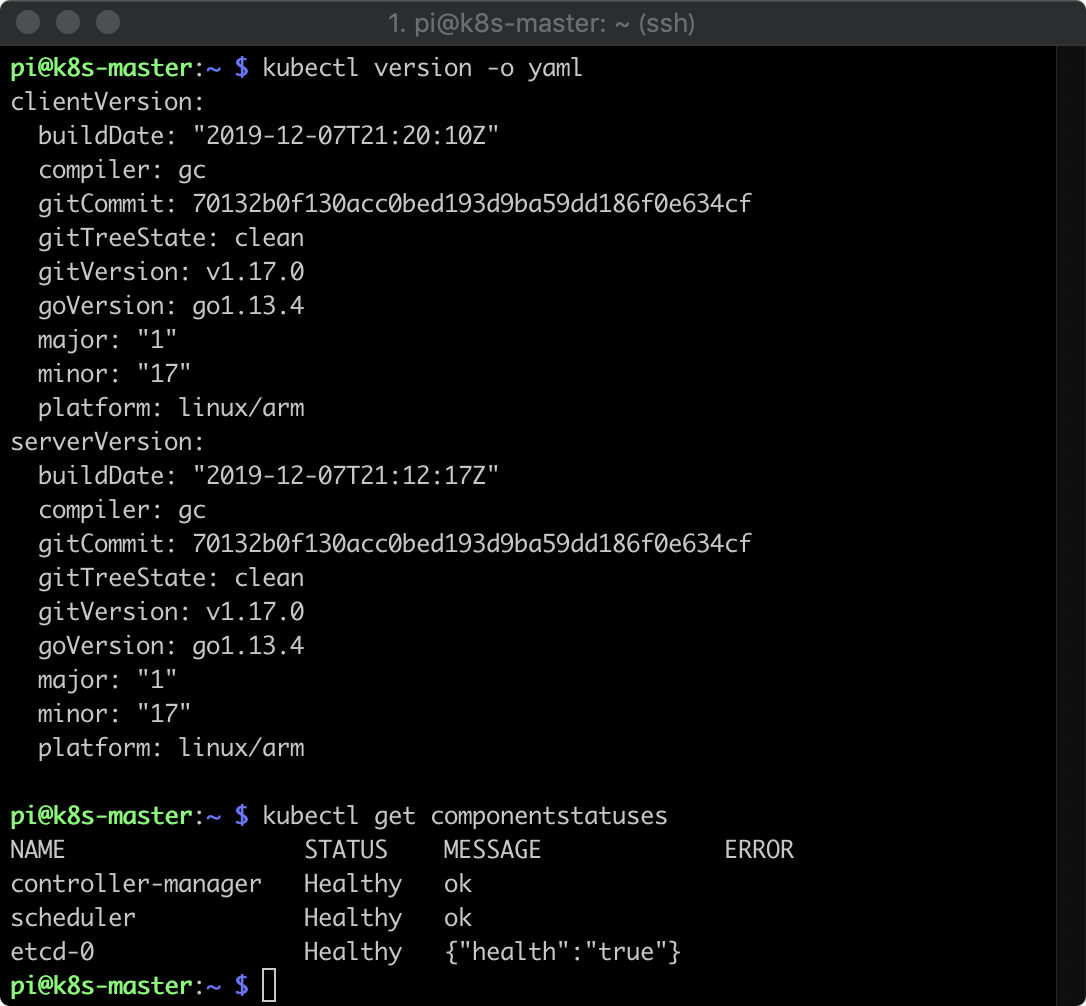
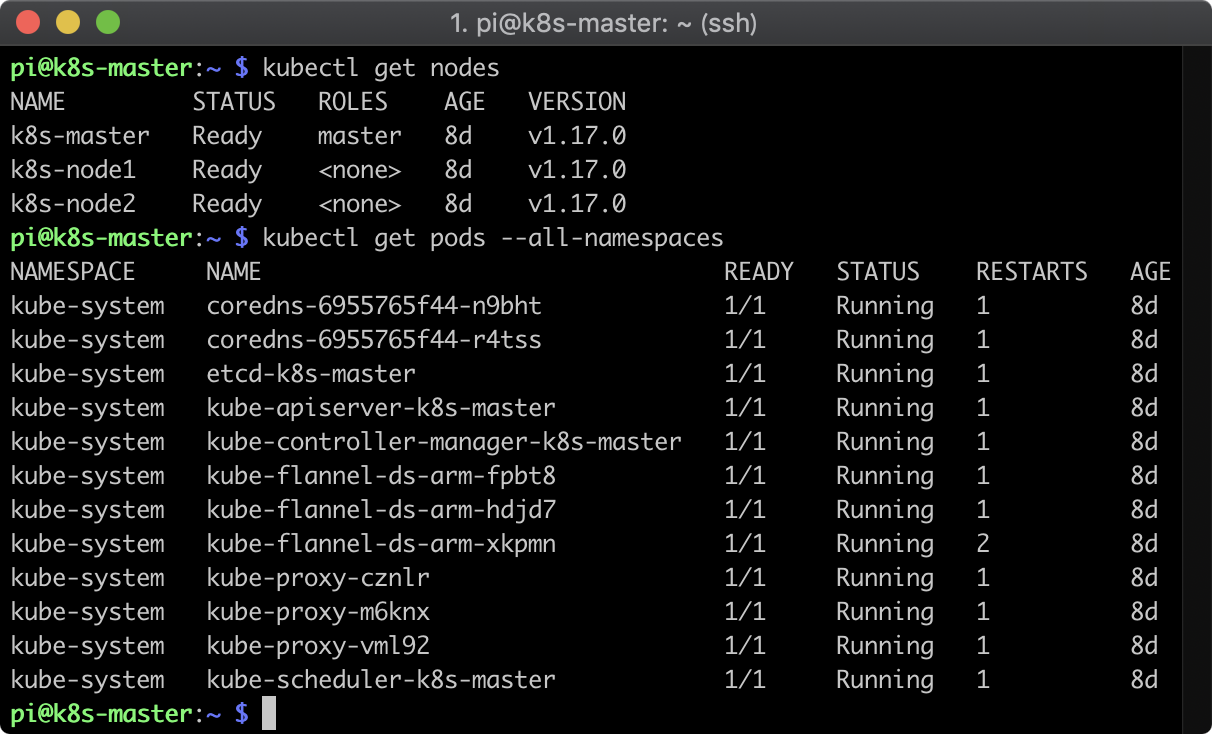
稼働状況の確認
まだ中身空っぽですが、Kubernetesとしてはちゃんと稼働しています。
最後に
今後、アプリだのツールだのいろいろ試してみたいと思います。メモリ4GBもあるので、ある程度まともに動いてくれることを期待しています。Kubernetes The Hard Way を Raspberry Pi上でやっている人もいる模様。楽しみ。
ただ、今は、SDカードを入れ替えて、数百円のキーボード&マウスつなげて、HDMIでテレビにつなげて、娘がマイクラを遊んでいる状況です。良かったですね。
参考記事
以下の先人の皆様の記事を参考にさせていただきました。ありがとうございました。