もはや何十番煎じかわかりませんが、自分もラズパイKubernetesクラスタを作成してみたのでそのメモです。
参考リンク
以下などたくさんの先人の資料を参考にさせていただきました。
- (書籍)入門 Kubernetes
- 付録にラズパイKubernetesクラスタの構築方法が載っています。HypriotOSを使用しています。
- 3日間クッキング【Kubernetes のラズペリーパイ包み “サイバーエージェント風”】
- 33時間クッキング【Kubernetesのラズベリーパイ包み〜ウエパ風〜】
- ラズパイでKubernetesクラスタを構築する(物理編)
-
ラズパイクラスタにKubernetesをインストール(失敗編)
- CentOSにチャレンジしたがDockerパッケージがなく断念している記事です。
-
ラズパイクラスタにKubernetesをインストール(成功編)
- Ubuntuを使用しています。
-
ラズパイでKubernetesを動かして見たら、驚いた!
- HypriotOSを使用しています。
- Raspberry PiでおうちKubernetes構築【物理編】
- Raspberry PiでおうちKubernetes構築【論理編】
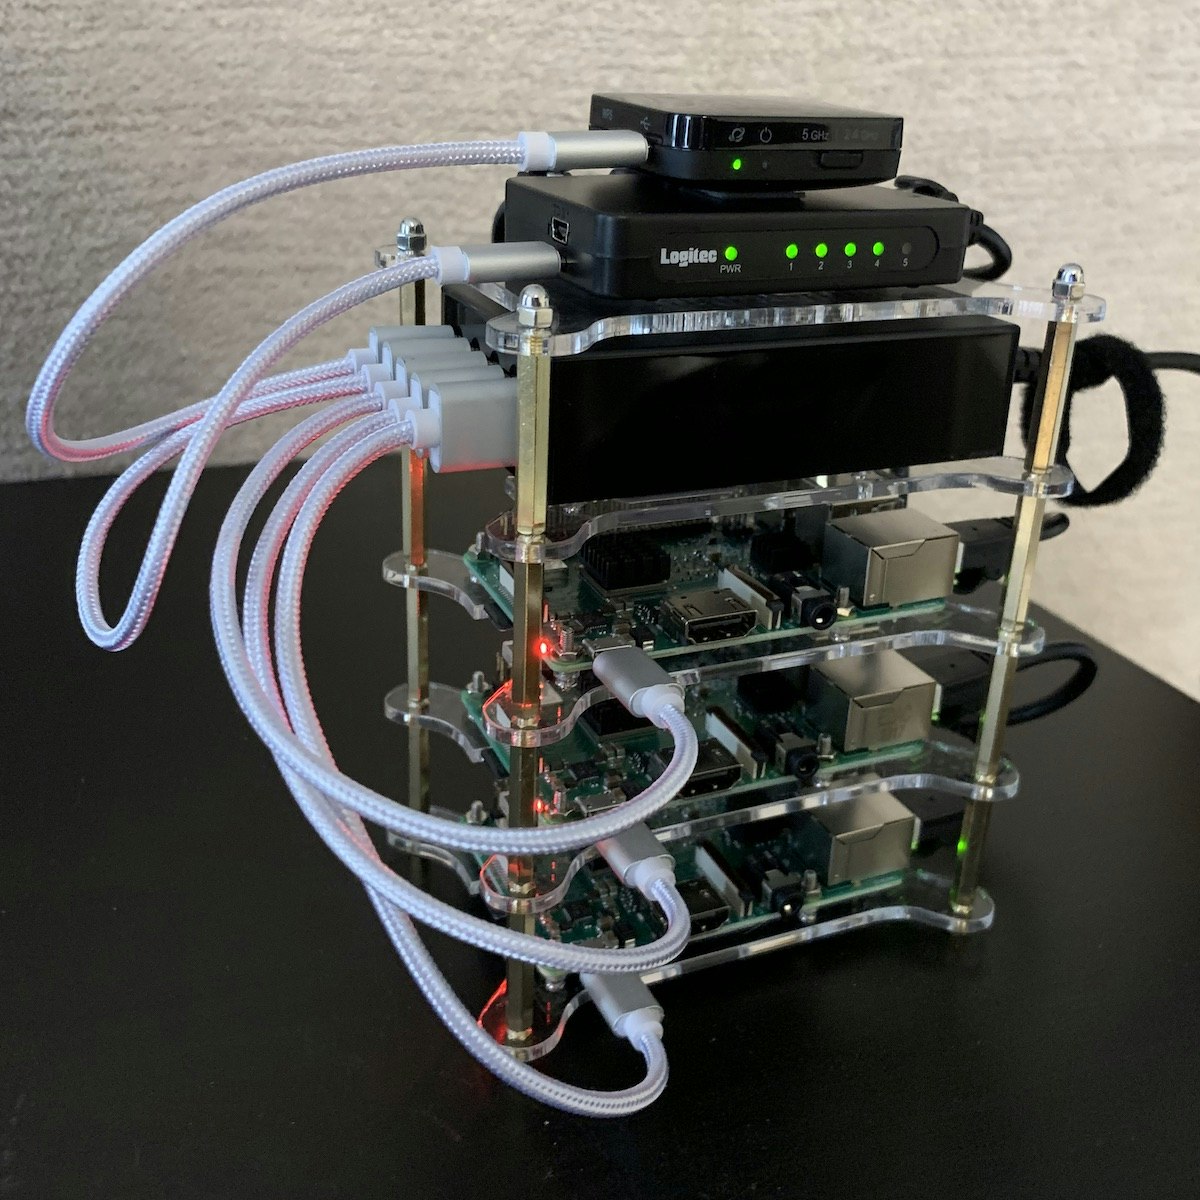
材料の準備と組み立て
以下の材料を用意します。
| 最良 | 備考 |
|---|---|
| Raspberry Pi 3 Model B+ x3 | KSYから購入。 |
| 4段積層式ケース | フィルムを剥がすのが大変です。 |
| MicroSD 32GB x3 | 16GBでも充分と思います。 |
| 無線ルーター(WMR-433W-BK) | 上流のルーターに無線で接続するために使用します。有線で接続するなら不要です。 |
| 5ポート スイッチングハブ(SW05PSBE) | ラズパイ3B+からギガビットイーサに対応していますが、このハブは対応していません。しかしMicro USBで給電できるのでこの機種を選択しています。 |
| 5ポート 50W USB充電器 | ラズパイx3、ルーター、ハブに給電するので5ポート必要です。ラズパイ3B+は推奨2.5Aなので足りてませんがUSBバスパワー機器をつないだりしないので大丈夫と思います。 |
| 20cm 2.4A Micro USBケーブル x5 | |
| 15cm LANケーブル x1 | |
| 30cm LANケーブル x3 | |
| 両面テープ |
組み立てについては先人の記事が参考になります。私はこのように組み上げました!
OSのセットアップ
先人の記事をみるとHypriotOS、Ubuntuでやっている人もいますがRaspbianが多そうです。HypriotOSというのはDockerに最適化されたRaspberry Pi向けLinuxディストリビューションのようです。公式のkubeadmでのインストール手順にHypriotOSは載っていますがRaspbianは載っていません。
今回はRaspbianでやってみます。
SDカードの準備
以下からRaspbian Stretch Liteをダウンロードします。
以下手順を参考にOSイメージを書き込みます。
$ cd ~/Downloads
$ unzip 2018-11-13-raspbian-stretch-lite.zip
Archive:  2018-11-13-raspbian-stretch-lite.zip
  inflating: 2018-11-13-raspbian-stretch-lite.img
$ diskutil list
/dev/disk0 (internal, physical):
   #:                       TYPE NAME                    SIZE       IDENTIFIER
   0:      GUID_partition_scheme                        *251.0 GB   disk0
   1:                        EFI EFI                     209.7 MB   disk0s1
   2:                 Apple_APFS Container disk1         250.8 GB   disk0s2

/dev/disk1 (synthesized):
   #:                       TYPE NAME                    SIZE       IDENTIFIER
   0:      APFS Container Scheme -                      +250.8 GB   disk1
                                 Physical Store disk0s2
   1:                APFS Volume Macintosh HD            218.2 GB   disk1s1
   2:                APFS Volume Preboot                 47.5 MB    disk1s2
   3:                APFS Volume Recovery                517.0 MB   disk1s3
   4:                APFS Volume VM                      2.1 GB     disk1s4

/dev/disk2 (internal, physical):
   #:                       TYPE NAME                    SIZE       IDENTIFIER
   0:     FDisk_partition_scheme                        *15.5 GB    disk2
   1:             Windows_FAT_32 NO NAME                 15.5 GB    disk2s1

$ sudo diskutil unmountDisk /dev/disk2
Password:
Unmount of all volumes on disk2 was successful
$ sudo dd bs=1m if=2018-11-13-raspbian-stretch-lite.img of=/dev/rdisk2 conv=sync
Password:
1780+0 records in
1780+0 records out
1866465280 bytes transferred in 173.401566 secs (10763832 bytes/sec)
$
OSイメージのカスタマイズ
SSHを有効にするために以下のファイルを作成します。
$ cd /Volumes/boot
$ touch ssh
$
cgroupsを有効にするため、cmdline.txtを編集してcgroup_enable=cpuset cgroup_enable=memory cgroup_memory=1を追加します。
- dwc_otg.lpm_enable=0 console=serial0,115200 console=tty1 root=PARTUUID=7ee80803-02 rootfstype=ext4 elevator=deadline fsck.repair=yes rootwait quiet init=/usr/lib/raspi-config/init_resize.sh
+ dwc_otg.lpm_enable=0 console=serial0,115200 console=tty1 root=PARTUUID=7ee80803-02 rootfstype=ext4 elevator=deadline fsck.repair=yes rootwait quiet init=/usr/lib/raspi-config/init_resize.sh cgroup_enable=cpuset cgroup_enable=memory cgroup_memory=1
ラズパイの起動
SDカードをラズパイに差し込み、Wifiルーターのスイッチで5GHzか2.4GHzかを選び、電源をつないでクラスタ全体を起動します。
ラズパイへの接続
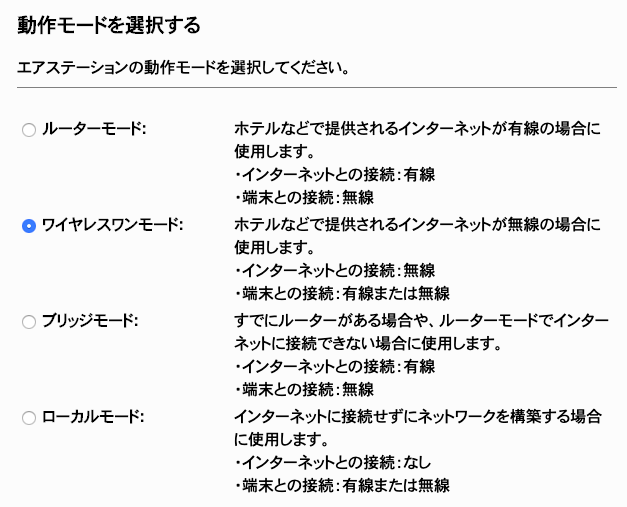
PCをルーターのWifiにつなげてから、管理画面(http://192.168.13.1/)にアクセスします。動作モードはワイヤレスワンモードを設定し、上流へ無線で接続します。
このルーターは192.168.13.2から64台までDHCPで割り振る仕様で、各ラズパイにはDHCPでアドレスが割り振られます。PCでarpコマンドで確認します。
$ arp -an
? (192.168.13.1) at 60:84:bd:74:74:6a on en0 ifscope [ethernet]
? (192.168.13.2) at b8:27:eb:af:5a:38 on en0 ifscope [ethernet]
? (192.168.13.3) at b8:27:eb:af:64:f7 on en0 ifscope [ethernet]
? (192.168.13.4) at b8:27:eb:12:e1:5b on en0 ifscope [ethernet]
? (192.168.13.5) at c4:b3:1:ac:20:e0 on en0 ifscope permanent [ethernet]
? (224.0.0.251) at 1:0:5e:0:0:fb on en0 ifscope permanent [ethernet]
? (239.255.255.250) at 1:0:5e:7f:ff:fa on en0 ifscope permanent [ethernet]
$
192.168.13.2〜4がラズパイです。
ラズパイの初期設定
ラスパイを初期設定をします。以下の操作は3台全てに対して行います。
ログイン
sshでラズパイにログインします。初期パスワードはraspberryです。
$ ssh pi@192.168.13.2
The authenticity of host '192.168.13.2 (192.168.13.2)' can't be established.
ECDSA key fingerprint is SHA256:YbUMoprPRH6/fJj7t+N0XPGq0BS7vU3Zklw4eWTaBec.
Are you sure you want to continue connecting (yes/no)? yes
Warning: Permanently added '192.168.13.2' (ECDSA) to the list of known hosts.
pi@192.168.13.2's password:
Linux raspberrypi 4.14.79-v7+ #1159 SMP Sun Nov 4 17:50:20 GMT 2018 armv7l

The programs included with the Debian GNU/Linux system are free software;
the exact distribution terms for each program are described in the
individual files in /usr/share/doc/*/copyright.

Debian GNU/Linux comes with ABSOLUTELY NO WARRANTY, to the extent
permitted by applicable law.

SSH is enabled and the default password for the 'pi' user has not been changed.
This is a security risk - please login as the 'pi' user and type 'passwd' to set a new password.


Wi-Fi is disabled because the country is not set.
Use raspi-config to set the country before use.

pi@raspberrypi:~ $
パスワード変更
piユーザーのパスワードを変更します。
sudo passwd pi
OS更新
とりあえずOSを更新します。
sudo apt-get update \
  && sudo apt-get -y dist-upgrade \
  && sudo apt-get -y autoremove \
  && sudo apt-get autoclean
viを使いやすく(オプション)
デフォルト状態だとvim-tinyが導入されていますが、vimを導入しておきます。
sudo apt-get -y purge vim-common vim-tiny
sudo apt-get -y install vim
IPアドレスを固定
どれがどのラズパイかは一つずつshutdown -r nowすればそのときのLEDの点滅でわかります。
/etc/dhcpcd.confの末尾に以下を追加し、固定のIPアドレスを割り当てます。
sudo vi /etc/dhcpcd.conf
interface eth0
static ip_address=192.168.13.102/24
static routers=192.168.13.1
static domain_name_servers=192.168.13.1 8.8.8.8
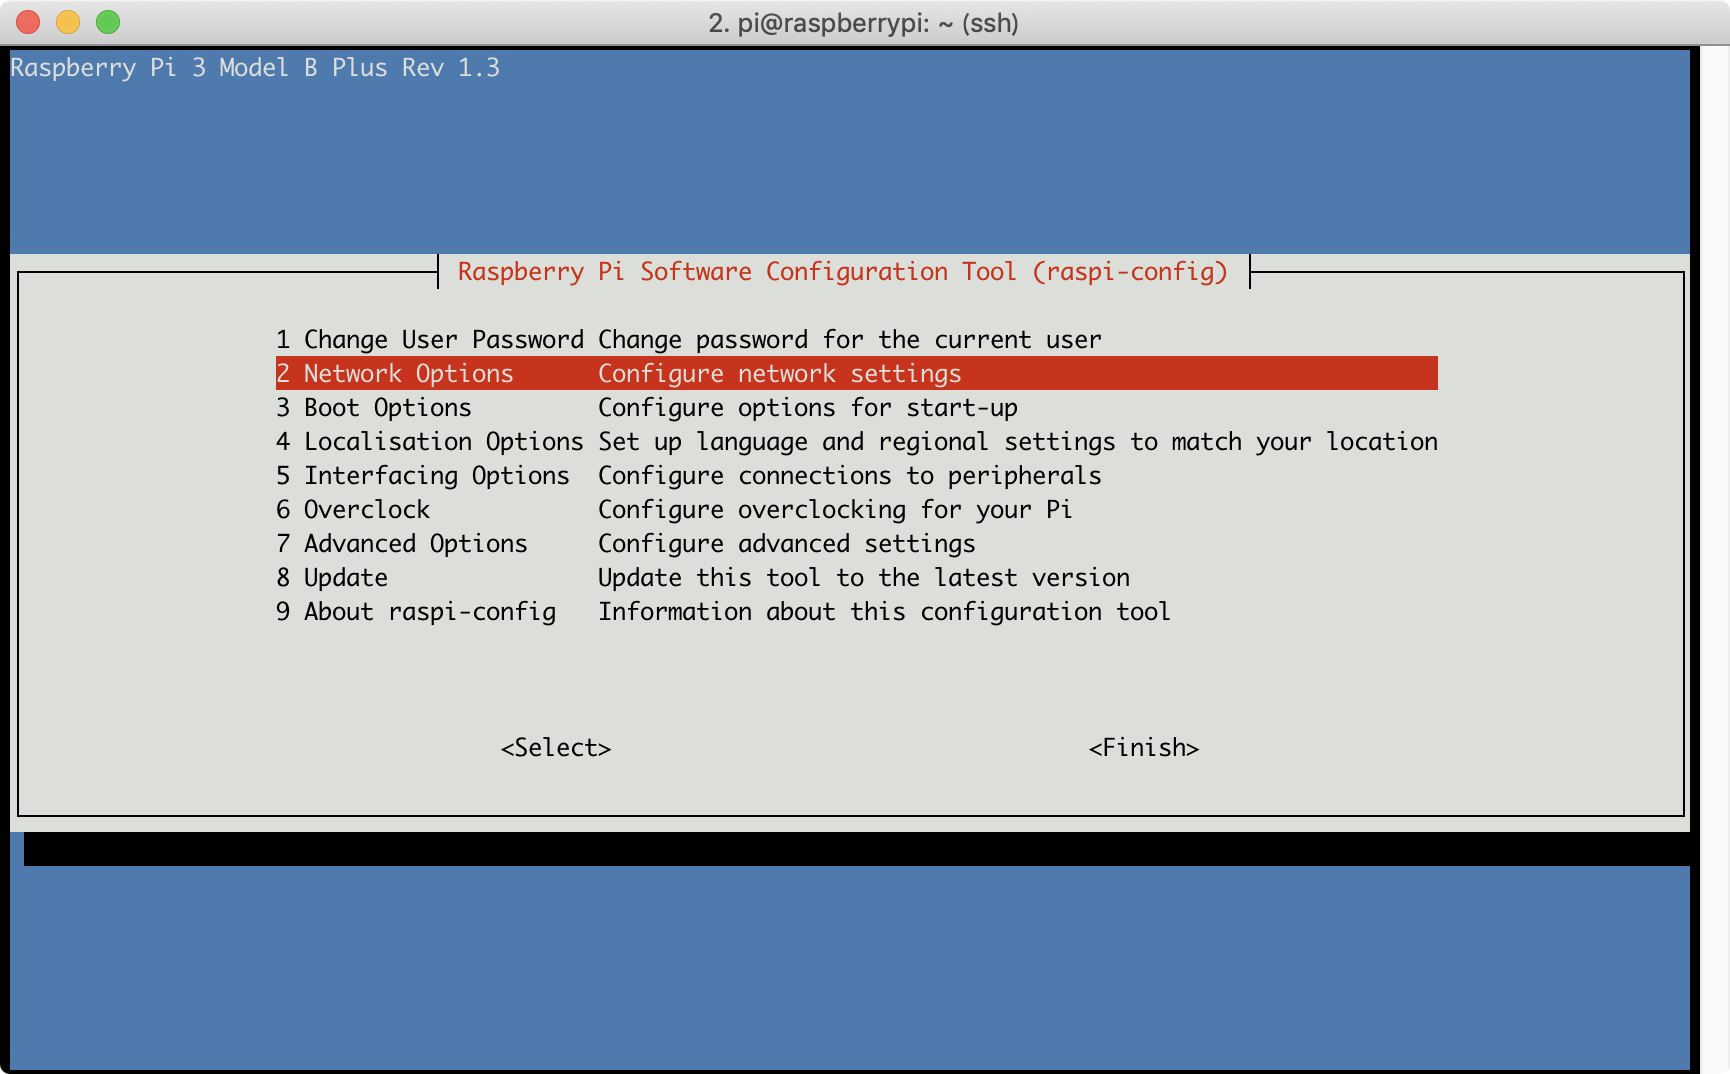
ホスト名の変更
/etc/hostnameと/etc/hostsを編集してもよいですが、以下コマンドでTUIでホスト名を変更できます。
sudo raspi-config
「2 Network Options > N1 Hostname」から変更します。今回はk8s-master、k8s-node1、k8s-node2にします。
/etc/hostsに他のラズパイのホスト名も追記します。
sudo vi /etc/hosts
127.0.0.1	localhost
::1		localhost ip6-localhost ip6-loopback
ff02::1		ip6-allnodes
ff02::2		ip6-allrouters

127.0.1.1	k8s-master

192.168.13.101  k8s-master
192.168.13.102  k8s-node1
192.168.13.103  k8s-node2
タイムゾーンの変更(オプション)
raspi-configからタイムゾーンをAsia/Tokyoに変更します。
sudo raspi-config
鍵認証によるログイン(オプション)
鍵ペアを生成します(PCで1回だけ実施)。
$ ssh-keygen
Generating public/private rsa key pair.
Enter file in which to save the key (/Users/sotoiwa/.ssh/id_rsa): <秘密鍵ファイル名>
Enter passphrase (empty for no passphrase): <パスフレーズ>
Enter same passphrase again: <パスフレーズ>
Your identification has been saved in <秘密鍵ファイル名>.
Your public key has been saved in <秘密鍵ファイル名>.pub.
The key fingerprint is:
SHA256:0URn/F3bwlGkGHYD1xTTAyg8Dm80sktktuPsUNxfqL4 sotoiwa@SotonoMacBook-Pro.local
The key's randomart image is:
+---[RSA 2048]----+
|        ..o.Bo=B*|
|       * O =.=.+=|
|      = @ = oo.o=|
|       B * . .+.o|
|      = S o .  . |
|     . + . .     |
|      o .        |
|       . .       |
|         E.      |
+----[SHA256]-----+
$
作成した鍵ペアの公開鍵を、ssh-copy-idコマンドでラズパイの~/.ssh/authorized_keysに追加します(各ラズパイに対して実施)。
$ ssh-copy-id -i <秘密鍵のパス> pi@192.168.13.101
/usr/bin/ssh-copy-id: INFO: Source of key(s) to be installed: "<秘密鍵のパス>.pub"
/usr/bin/ssh-copy-id: INFO: attempting to log in with the new key(s), to filter out any that are already installed
/usr/bin/ssh-copy-id: INFO: 1 key(s) remain to be installed -- if you are prompted now it is to install the new keys
pi@192.168.13.101's password:

Number of key(s) added:        1

Now try logging into the machine, with:   "ssh 'pi@192.168.13.101'"
and check to make sure that only the key(s) you wanted were added.

sotoiwa@sotonombp:~
$
PCの~/.ssh/configに以下のように書いておくとログインが楽です。
Host k8s-master
    HostName 192.168.13.101
    User pi
    Port 22
    IdentityFile "<秘密鍵のパス>"
$ ssh k8s-master
Linux k8s-master 4.14.98-v7+ #1200 SMP Tue Feb 12 20:27:48 GMT 2019 armv7l

The programs included with the Debian GNU/Linux system are free software;
the exact distribution terms for each program are described in the
individual files in /usr/share/doc/*/copyright.

Debian GNU/Linux comes with ABSOLUTELY NO WARRANTY, to the extent
permitted by applicable law.
Last login: Mon Feb 25 12:18:38 2019 from 192.168.13.2

Wi-Fi is disabled because the country is not set.
Use raspi-config to set the country before use.

pi@k8s-master:~ $
パスワードによるログインの無効化(オプション)
パスワードによるログインを無効化する場合は/etc/ssh/sshd_configを編集します。
sudo vi /etc/ssh/sshd_config
- #PasswordAuthentication yes
+ PasswordAuthentication no
設定を有効化するためsshを再起動します。
sudo systemctl restart ssh
スワップの無効化
Swapが有効になっているとKubeletが起動しないため、Swapを無効化しておきます。
sudo dphys-swapfile swapoff
sudo systemctl stop dphys-swapfile
sudo systemctl disable dphys-swapfile
Kubernetesクラスタの構築
今回はkubeadmを使ってクラスタを構築します。kubeadmを使う手順は他の環境でもやったことがあり、それらとほぼ同じ手順です。
Kubernetes The Hard Wayをラズパイでやっている人もいるのでそのうちやってみたいです。あとk3sというのも試してみたいところです。
- https://github.com/robertojrojas/kubernetes-the-hard-way-raspberry-pi
- https://github.com/danisla/kube-pi
- https://medium.com/@mabrams_46032/kubernetes-on-raspberry-pi-c246c72f362f
Dockerのインストール
以下の手順に従ってDockerをインストールします。
この手順ではダウンロードしたインストールスクリプトを実行します。なお、普通にリポジトリを追加する方法はサポートされていないとあります。
For Raspbian, installing using the repository is not yet supported. You must instead use the convenience script.
convenience scriptを実行します。
curl -sSL https://get.docker.com | sh
pi@k8s-master:~ $ curl -sSL https://get.docker.com | sh
# Executing docker install script, commit: 40b1b76
+ sudo -E sh -c apt-get update -qq >/dev/null
+ sudo -E sh -c apt-get install -y -qq apt-transport-https ca-certificates curl >/dev/null
+ sudo -E sh -c curl -fsSL "https://download.docker.com/linux/raspbian/gpg" | apt-key add -qq - >/dev/null
Warning: apt-key output should not be parsed (stdout is not a terminal)
+ sudo -E sh -c echo "deb [arch=armhf] https://download.docker.com/linux/raspbian stretch edge" > /etc/apt/sources.list.d/docker.list
+ sudo -E sh -c apt-get update -qq >/dev/null
+ sudo -E sh -c apt-get install -y -qq --no-install-recommends docker-ce >/dev/null
+ sudo -E sh -c docker version
Client:
 Version:           18.09.0
 API version:       1.39
 Go version:        go1.10.4
 Git commit:        4d60db4
 Built:             Wed Nov  7 00:57:21 2018
 OS/Arch:           linux/arm
 Experimental:      false

Server: Docker Engine - Community
 Engine:
  Version:          18.09.0
  API version:      1.39 (minimum version 1.12)
  Go version:       go1.10.4
  Git commit:       4d60db4
  Built:            Wed Nov  7 00:17:57 2018
  OS/Arch:          linux/arm
  Experimental:     false
If you would like to use Docker as a non-root user, you should now consider
adding your user to the "docker" group with something like:

  sudo usermod -aG docker pi

Remember that you will have to log out and back in for this to take effect!

WARNING: Adding a user to the "docker" group will grant the ability to run
         containers which can be used to obtain root privileges on the
         docker host.
         Refer to https://docs.docker.com/engine/security/security/#docker-daemon-attack-surface
         for more information.

** DOCKER ENGINE - ENTERPRISE **

Test drive additional security features by activating Docker Engine - Enterprise.

  * Leverage FIPS 140-2 validated encryption
  * Run only trusted images with digital signature enforcement

** Learn more at https://dockr.ly/engine1 **

ACTIVATE your own engine to Docker Engine - Enterprise using:

  sudo docker engine activate

pi@k8s-master:~ $
この方法では、edgeチャンネルの最新バージョンがインストールされます。
The script does not provide options to specify which version of Docker to install, and installs the latest version that is released in the “edge” channel.
しかし、Kubernetes v1.13がサポートしているDockerのバージョンは18.06までとなっています。
kubeadm init時に警告が出るくらいで特に問題ないかもしれませんが、念のためバージョンをダウングレードすることにします。インストール可能なバージョンを確認します。
pi@k8s-master:~ $ apt-cache madison docker-ce
 docker-ce | 5:18.09.0~3-0~raspbian-stretch | https://download.docker.com/linux/raspbian stretch/edge armhf Packages
 docker-ce | 18.06.3~ce~3-0~raspbian | https://download.docker.com/linux/raspbian stretch/edge armhf Packages
 docker-ce | 18.06.2~ce~3-0~raspbian | https://download.docker.com/linux/raspbian stretch/edge armhf Packages
 docker-ce | 18.06.1~ce~3-0~raspbian | https://download.docker.com/linux/raspbian stretch/edge armhf Packages
 docker-ce | 18.06.0~ce~3-0~raspbian | https://download.docker.com/linux/raspbian stretch/edge armhf Packages
 docker-ce | 18.05.0~ce~3-0~raspbian | https://download.docker.com/linux/raspbian stretch/edge armhf Packages
 docker-ce | 18.04.0~ce~3-0~raspbian | https://download.docker.com/linux/raspbian stretch/edge armhf Packages
 docker-ce | 18.03.1~ce-0~raspbian | https://download.docker.com/linux/raspbian stretch/edge armhf Packages
 docker-ce | 18.03.0~ce-0~raspbian | https://download.docker.com/linux/raspbian stretch/edge armhf Packages
 docker-ce | 18.02.0~ce-0~raspbian | https://download.docker.com/linux/raspbian stretch/edge armhf Packages
 docker-ce | 18.01.0~ce-0~raspbian | https://download.docker.com/linux/raspbian stretch/edge armhf Packages
 docker-ce | 17.12.1~ce-0~raspbian | https://download.docker.com/linux/raspbian stretch/edge armhf Packages
 docker-ce | 17.12.0~ce-0~raspbian | https://download.docker.com/linux/raspbian stretch/edge armhf Packages
 docker-ce | 17.11.0~ce-0~raspbian | https://download.docker.com/linux/raspbian stretch/edge armhf Packages
 docker-ce | 17.10.0~ce-0~raspbian | https://download.docker.com/linux/raspbian stretch/edge armhf Packages
 docker-ce | 17.09.1~ce-0~raspbian | https://download.docker.com/linux/raspbian stretch/edge armhf Packages
 docker-ce | 17.09.0~ce-0~raspbian | https://download.docker.com/linux/raspbian stretch/edge armhf Packages
pi@k8s-master:~ $
Dockerを一度削除し、バージョンを指定してインストールします。
sudo apt-get purge -y docker-ce
sudo apt-get autoremove -y
sudo apt-get install -y --no-install-recommends docker-ce=18.06.3~ce~3-0~raspbian
(補足)
上記のapt-get install時、post-installation scriptでエラーが発生してしまいました。もう一度purgeしてautoremoveしてinstallをやり直したら上手くいきましたが対応として正しいのか不明です。
piユーザーでもdockerコマンドを実行できるようにします。
sudo usermod -aG docker pi
一度ログアウトしてログインし、バージョンを確認します。
pi@k8s-master:~ $ docker version
Client:
 Version:           18.06.3-ce
 API version:       1.38
 Go version:        go1.10.3
 Git commit:        d7080c1
 Built:             Wed Feb 20 02:42:54 2019
 OS/Arch:           linux/arm
 Experimental:      false

Server:
 Engine:
  Version:          18.06.3-ce
  API version:      1.38 (minimum version 1.12)
  Go version:       go1.10.3
  Git commit:       d7080c1
  Built:            Wed Feb 20 02:38:25 2019
  OS/Arch:          linux/arm
  Experimental:     false
pi@k8s-master:~ $
Dockerのバージョンを更新してしまわないように固定しておきます。
sudo apt-mark hold docker-ce
kubeadmのインストール
以下の手順に従いインストールします。RaspbianはDebianベースなのでその手順に従います。
以下の手順はrootで実行します。
apt-transport-httpsとcurlはすでに入っているので不要ですが一応実行しておきます。
sudo -i
apt-get update && apt-get install -y apt-transport-https curl
KubernetesのリポジトリのGPGキーを追加します。
curl -s https://packages.cloud.google.com/apt/doc/apt-key.gpg | apt-key add -
Kubernetesのリポジトリ定義をsources.list.dディレクトリ配下に追加します。
cat <<EOF >/etc/apt/sources.list.d/kubernetes.list
deb https://apt.kubernetes.io/ kubernetes-xenial main
EOF
kubelet、kubeadm、kubectlをインストールし、バージョンを固定します。
apt-get update
apt-get install -y kubelet kubeadm kubectl
apt-mark hold kubelet kubeadm kubectl
kubeadmのバージョンを確認します。
root@k8s-master:~# kubeadm version -o yaml
clientVersion:
  buildDate: "2019-02-28T13:35:32Z"
  compiler: gc
  gitCommit: c27b913fddd1a6c480c229191a087698aa92f0b1
  gitTreeState: clean
  gitVersion: v1.13.4
  goVersion: go1.11.5
  major: "1"
  minor: "13"
  platform: linux/arm

root@k8s-master:~#
Masterの構築
3台にdocker-ce、kubelet、kubeadm、kubectlをインストールしたあと、以下手順に従い、Masterの初期化を行います。この作業はMasterのみで実施します。
前提の確認
今回、CNIプラグインはFlannelを使うことにしまます。その場合、kubeadm initの引数で指定するPodネットワーク範囲は--pod-network-cidr=10.244.0.0/16です。また、/proc/sys/net/bridge/bridge-nf-call-iptablesを1にする必要がありますが、既に1であったので特に何もしません。
pi@k8s-master:~ $ cat /proc/sys/net/bridge/bridge-nf-call-iptables
1
pi@k8s-master:~ $
クラスタの初期化
rootユーザーでkubeadm initを実行します。
sudo -i
kubeadm init --pod-network-cidr=10.244.0.0/16
root@k8s-master:~# kubeadm init --pod-network-cidr=10.244.0.0/16
[init] Using Kubernetes version: v1.13.4
[preflight] Running pre-flight checks
[preflight] Pulling images required for setting up a Kubernetes cluster
[preflight] This might take a minute or two, depending on the speed of your internet connection
[preflight] You can also perform this action in beforehand using 'kubeadm config images pull'
[kubelet-start] Writing kubelet environment file with flags to file "/var/lib/kubelet/kubeadm-flags.env"
[kubelet-start] Writing kubelet configuration to file "/var/lib/kubelet/config.yaml"
[kubelet-start] Activating the kubelet service
[certs] Using certificateDir folder "/etc/kubernetes/pki"
[certs] Generating "etcd/ca" certificate and key
[certs] Generating "etcd/healthcheck-client" certificate and key
[certs] Generating "etcd/peer" certificate and key
[certs] etcd/peer serving cert is signed for DNS names [k8s-master localhost] and IPs [192.168.11.101 127.0.0.1 ::1]
[certs] Generating "apiserver-etcd-client" certificate and key
[certs] Generating "etcd/server" certificate and key
[certs] etcd/server serving cert is signed for DNS names [k8s-master localhost] and IPs [192.168.11.101 127.0.0.1 ::1]
[certs] Generating "ca" certificate and key
[certs] Generating "apiserver" certificate and key
[certs] apiserver serving cert is signed for DNS names [k8s-master kubernetes kubernetes.default kubernetes.default.svc kubernetes.default.svc.cluster.local] and IPs [10.96.0.1 192.168.11.101]
[certs] Generating "apiserver-kubelet-client" certificate and key
[certs] Generating "front-proxy-ca" certificate and key
[certs] Generating "front-proxy-client" certificate and key
[certs] Generating "sa" key and public key
[kubeconfig] Using kubeconfig folder "/etc/kubernetes"
[kubeconfig] Writing "admin.conf" kubeconfig file
[kubeconfig] Writing "kubelet.conf" kubeconfig file
[kubeconfig] Writing "controller-manager.conf" kubeconfig file
[kubeconfig] Writing "scheduler.conf" kubeconfig file
[control-plane] Using manifest folder "/etc/kubernetes/manifests"
[control-plane] Creating static Pod manifest for "kube-apiserver"
[control-plane] Creating static Pod manifest for "kube-controller-manager"
[control-plane] Creating static Pod manifest for "kube-scheduler"
[etcd] Creating static Pod manifest for local etcd in "/etc/kubernetes/manifests"
[wait-control-plane] Waiting for the kubelet to boot up the control plane as static Pods from directory "/etc/kubernetes/manifests". This can take up to 4m0s
[kubelet-check] Initial timeout of 40s passed.
[apiclient] All control plane components are healthy after 165.008933 seconds
[uploadconfig] storing the configuration used in ConfigMap "kubeadm-config" in the "kube-system" Namespace
[kubelet] Creating a ConfigMap "kubelet-config-1.13" in namespace kube-system with the configuration for the kubelets in the cluster
[patchnode] Uploading the CRI Socket information "/var/run/dockershim.sock" to the Node API object "k8s-master" as an annotation
[mark-control-plane] Marking the node k8s-master as control-plane by adding the label "node-role.kubernetes.io/master=''"
[mark-control-plane] Marking the node k8s-master as control-plane by adding the taints [node-role.kubernetes.io/master:NoSchedule]
[bootstrap-token] Using token: ymu23t.of9t3pi3o59ye8kw
[bootstrap-token] Configuring bootstrap tokens, cluster-info ConfigMap, RBAC Roles
[bootstraptoken] configured RBAC rules to allow Node Bootstrap tokens to post CSRs in order for nodes to get long term certificate credentials
[bootstraptoken] configured RBAC rules to allow the csrapprover controller automatically approve CSRs from a Node Bootstrap Token
[bootstraptoken] configured RBAC rules to allow certificate rotation for all node client certificates in the cluster
[bootstraptoken] creating the "cluster-info" ConfigMap in the "kube-public" namespace
[addons] Applied essential addon: CoreDNS
[addons] Applied essential addon: kube-proxy

Your Kubernetes master has initialized successfully!

To start using your cluster, you need to run the following as a regular user:

  mkdir -p $HOME/.kube
  sudo cp -i /etc/kubernetes/admin.conf $HOME/.kube/config
  sudo chown $(id -u):$(id -g) $HOME/.kube/config

You should now deploy a pod network to the cluster.
Run "kubectl apply -f [podnetwork].yaml" with one of the options listed at:
  https://kubernetes.io/docs/concepts/cluster-administration/addons/

You can now join any number of machines by running the following on each node
as root:

  kubeadm join 192.168.11.101:6443 --token ymu23t.of9t3pi3o59ye8kw --discovery-token-ca-cert-hash sha256:201b292764e50bdffd2e49effac5c635afacfe05e9b73cab29cdbf50c34a5d4d

root@k8s-master:~#
表示されたkubeadm joinコマンドはあとで使うのでメモしておきます。
kubectlのセットアップ
表示された手順に従い、一般ユーザーでkubectlが実行できるようにセットアップします。
exit  # 一般ユーザーに戻る
mkdir -p $HOME/.kube
sudo cp -i /etc/kubernetes/admin.conf $HOME/.kube/config
sudo chown $(id -u):$(id -g) $HOME/.kube/config
kubecltが実行できることを確認します。
pi@k8s-master:~ $ kubectl get node
NAME         STATUS     ROLES    AGE     VERSION
k8s-master   NotReady   master   5m25s   v1.13.4
pi@k8s-master:~ $
以下コマンドでkubectlコマンドの補完を有効にしておくのがおすすめです。
source <(kubectl completion bash)                      # 現在のシェルに対して設定
echo "source <(kubectl completion bash)" >> ~/.bashrc  # 次回のシェル起動時に有効になるように設定
CNIプラグインのインストール
以下の手順に従い、CNIプラグインのFlannelをインストールします。
kubectl apply -f https://raw.githubusercontent.com/coreos/flannel/a70459be0084506e4ec919aa1c114638878db11b/Documentation/kube-flannel.yml
pi@k8s-master:~ $ kubectl apply -f https://raw.githubusercontent.com/coreos/flannel/a70459be0084506e4ec919aa1c114638878db11b/Documentation/kube-flannel.yml
clusterrole.rbac.authorization.k8s.io/flannel created
clusterrolebinding.rbac.authorization.k8s.io/flannel created
serviceaccount/flannel created
configmap/kube-flannel-cfg created
daemonset.extensions/kube-flannel-ds-amd64 created
daemonset.extensions/kube-flannel-ds-arm64 created
daemonset.extensions/kube-flannel-ds-arm created
daemonset.extensions/kube-flannel-ds-ppc64le created
daemonset.extensions/kube-flannel-ds-s390x created
pi@k8s-master:~ $
MasterノードはReady状態となります。
pi@k8s-master:~ $ kubectl get node
NAME         STATUS   ROLES    AGE   VERSION
k8s-master   Ready    master   18m   v1.13.4
pi@k8s-master:~ $
Nodeの追加
各ノード(k8s-node1、k8s-node2)で先ほど表示されたkubadm joinコマンドをrootユーザーで実行します。
sudo -i
kubeadm join 192.168.11.101:6443 --token ymu23t.of9t3pi3o59ye8kw --discovery-token-ca-cert-hash sha256:201b292764e50bdffd2e49effac5c635afacfe05e9b73cab29cdbf50c34a5d4d
root@k8s-node1:~# kubeadm join 192.168.11.101:6443 --token ymu23t.of9t3pi3o59ye8kw --discovery-token-ca-cert-hash sha256:201b292764e50bdffd2e49effac5c635afacfe05e9b73cab29cdbf50c34a5d4d
[preflight] Running pre-flight checks
[discovery] Trying to connect to API Server "192.168.11.101:6443"
[discovery] Created cluster-info discovery client, requesting info from "https://192.168.11.101:6443"
[discovery] Requesting info from "https://192.168.11.101:6443" again to validate TLS against the pinned public key
[discovery] Cluster info signature and contents are valid and TLS certificate validates against pinned roots, will use API Server "192.168.11.101:6443"
[discovery] Successfully established connection with API Server "192.168.11.101:6443"
[join] Reading configuration from the cluster...
[join] FYI: You can look at this config file with 'kubectl -n kube-system get cm kubeadm-config -oyaml'
[kubelet] Downloading configuration for the kubelet from the "kubelet-config-1.13" ConfigMap in the kube-system namespace
[kubelet-start] Writing kubelet configuration to file "/var/lib/kubelet/config.yaml"
[kubelet-start] Writing kubelet environment file with flags to file "/var/lib/kubelet/kubeadm-flags.env"
[kubelet-start] Activating the kubelet service
[tlsbootstrap] Waiting for the kubelet to perform the TLS Bootstrap...
[patchnode] Uploading the CRI Socket information "/var/run/dockershim.sock" to the Node API object "k8s-node1" as an annotation

This node has joined the cluster:
* Certificate signing request was sent to apiserver and a response was received.
* The Kubelet was informed of the new secure connection details.

Run 'kubectl get nodes' on the master to see this node join the cluster.

root@k8s-node1:~#
Masterノードで全てのNodeがReadyになったことを確認します。
pi@k8s-master:~ $ kubectl get node
NAME         STATUS   ROLES    AGE    VERSION
k8s-master   Ready    master   23m    v1.13.4
k8s-node1    Ready    <none>   106s   v1.13.4
k8s-node2    Ready    <none>   67s    v1.13.4
pi@k8s-master:~ $
全てのPodがちゃんと動いていることを確認します。
pi@k8s-master:~ $ kubectl get pods --all-namespaces
NAMESPACE     NAME                                 READY   STATUS    RESTARTS   AGE
kube-system   coredns-86c58d9df4-79ccl             1/1     Running   0          22m
kube-system   coredns-86c58d9df4-8t7dz             1/1     Running   0          22m
kube-system   etcd-k8s-master                      1/1     Running   0          22m
kube-system   kube-apiserver-k8s-master            1/1     Running   1          23m
kube-system   kube-controller-manager-k8s-master   1/1     Running   0          21m
kube-system   kube-flannel-ds-arm-2gr4n            1/1     Running   0          15m
kube-system   kube-flannel-ds-arm-7gq8q            1/1     Running   0          2m38s
kube-system   kube-flannel-ds-arm-996rz            1/1     Running   1          119s
kube-system   kube-proxy-8mk4m                     1/1     Running   0          2m38s
kube-system   kube-proxy-rzphw                     1/1     Running   0          119s
kube-system   kube-proxy-zczw9                     1/1     Running   0          22m
kube-system   kube-scheduler-k8s-master            1/1     Running   0          21m
pi@k8s-master:~ $
以上でラズパイクラスタは完成です!