はじめに
アニサキスって怖くないですか!?
近年アニサキスという存在を耳にしてから、生魚に対して抵抗感を覚えました。
アニサキスによる食中毒の症状には激痛を伴うものあり、かなり酷いものです。
厚生労働省のホームページにも予防方法として「目視で確認」というものがありますが、目視だけでは分かりづらく個人的には、生魚に対する抵抗感は拭いきれないと思いました。
そこで、もしAIでアニサキスを識別 できれば、この抵抗感を拭い切れるのではないかと考え、今回アニサキス識別アプリを作成しました。
さあ安心して生魚を食べましょう!!
「このブログはAidemy Premiumのカリキュラムの一環で、受講修了条件を満たすために公開しています。本アプリを使用し被害にあわれたとしても責任を一切負いかねます。」
目次
- アプリケーション
- 開発環境
- 学習モデル
- 画像取得
- 学習モデル作成
- モデル評価
- フレーム作成
- Flask
- HTML,CSS
- 考察、今後の展望
アプリケーション
作成したアプリケーションが以下になります。
https://flask-anisakis-app.onrender.com/
本アプリケーションでは、「アニサキスのいる画像」と「アニサキスのいない画像」を識別できることを目的としています。
【結果】
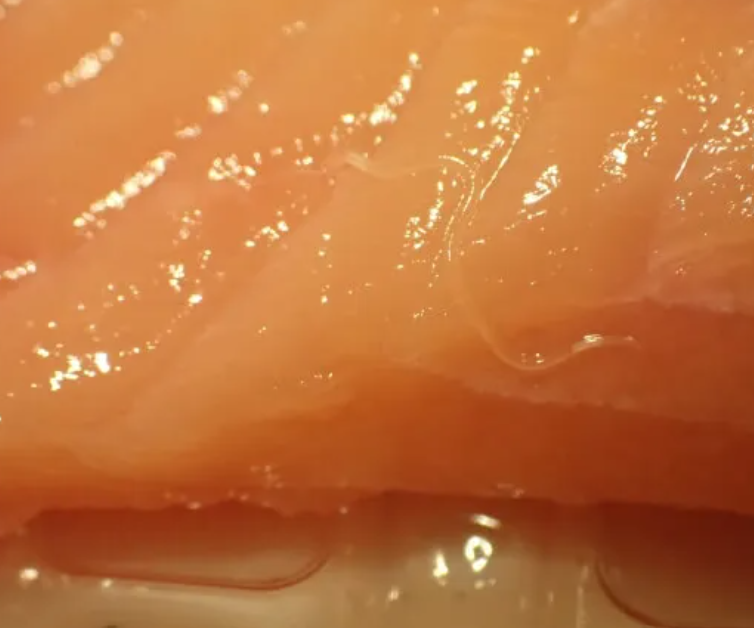
1.アニサキスのいる画像

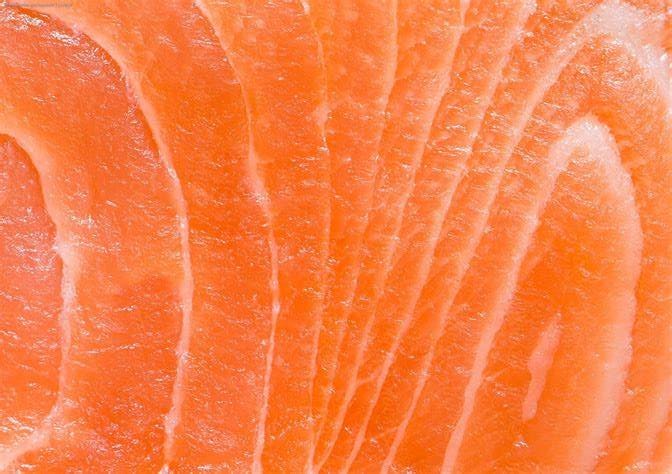
2.アニサキスのいない画像

の一見識別を間違えそうな画像に対しても、それぞれ正解を出すことができました。
開発環境
・Visual Studio Code
・Python 3.11.5
・Google Colaboratory
学習モデル作成
画像取得
画像識別によりGPUを使用するためGoogle Colaboratoryを使用しました。またGoogle Driveに保存した学習用画像データを使用するため下記のコードでマウントを行いました。
from google.colab import drive
drive.mount("/content/drive")
画像を下記コードでicrawlerにより取得しています。
!pip install icrawler

# Google用クローラーのモジュールをインポート
from icrawler.builtin import GoogleImageCrawler

# Google用クローラーの生成
google_crawler = GoogleImageCrawler(
    downloader_threads=4,
    storage={'root_dir': '/content/drive/MyDrive/anisakis_app/datas_ani'})

google_crawler.crawl(keyword='アニサキス 画像', max_num=200)

google_crawler = GoogleImageCrawler(
    downloader_threads=4,
    storage={'root_dir': '/content/drive/MyDrive/anisakis_app/datas_fish'})

google_crawler.crawl(keyword='魚 切り身 ', max_num=200)
学習モデル作成
高い精度を出すためアルゴリズムに、学習済みモデルVGG16を転移学習として使用しました。VGG16は出力ユニットが1000個になるので最後の全結合層は使わないことに注意し学習モデルを作成しています。
ライブラリのインポートから学習データ、検証データ用意までのコードです。
#ライブラリのimport
import os
import cv2
import numpy as np
from tensorflow.keras.applications.vgg16 import VGG16
from keras.utils import to_categorical
from keras.layers import Input
from tensorflow.keras.models import Model, Sequential
from tensorflow.keras import optimizers
from tensorflow.keras.layers import Dense, Dropout, Flatten, Input
import matplotlib.pyplot as plt
import matplotlib

##データの整形
#画像のimport
ani_path = "/content/drive/MyDrive/anisakis_app/datas_ani/" #パスの取得
fish_path = "/content/drive/MyDrive/anisakis_app/datas_fish/"

ani_file = os.listdir(ani_path) #ファイル内の画像をリストとして取得
fish_file = os.listdir(fish_path)

img_ani = [] #画像格納リスト
image_size = 50 #画像サイズの指定
for i in range (len(ani_file)):#len関数で画像の要素数を取得
    img = cv2.imread(ani_path + ani_file[i]) #ファイル内の画像を読み込みNumpy配列へ(ファイルのパスの読み込み+画像データ名)
    if img is not None:        #以下、空の画像以外に反映
      img = cv2.resize(img,(image_size,image_size)) #画像のリサイズ,処理速度向上
      b,g,r = cv2.split(img) #画像読み込み時BGRのため、色を分解
      img = cv2.merge([r,g,b]) #色を分解した画像をRGBとして再結合
    img_ani.append(img) #img_aniリストに格納していく

img_fish = []
image_size = 50
for i in range (len(fish_file)):
    img = cv2.imread(fish_path + fish_file[i])
    if img is not None:
      img = cv2.resize(img,(image_size,image_size))
      b,g,r = cv2.split(img)
      img = cv2.merge([r,g,b])
    img_fish.append(img)

#学習データと検証データの用意
X = np.array(img_ani + img_fish) #画像データ取得
y = np.array([0]*len(img_ani) + [1]*len(img_fish)) #ラベル0をアニサキスの正解ラベル、ラベル1をアニサキスのいない魚の正解ラベルとする
rand_index = np.random.permutation(np.arange(len(X))) #配列ラベルのシャッフル
X = X[rand_index]
y = y[rand_index]
X_train = X[:int(len(X)*0.8)] #画像の8割を学習データとする(最初から8割のデータを使う)
y_train = y[:int(len(X)*0.8)]
X_test = X[int(len(X)*0.8):] #画像の2割を検証データとする(最初から8割より後ろのデータを使う)
y_test = y[int(len(X)*0.8):]

y_train = to_categorical(y_train) #正解ラベルをone-hotベクトル
y_test = to_categorical(y_test)
vgg16を使用した学習モデルです。
過学習を防ぐため、Dropout
活性化関数としてsigmoid関数を使用しています。
##学習モデルの作成
#vgg16での学習モデル作成
input_tensor = Input(shape=(50, 50, 3)) #入力テンソルの指定。画像50*50,RGBの3つのチャンネル
vgg16 = VGG16(include_top=False, weights='imagenet', input_tensor=input_tensor) #最後の結合層除外、学習済みの重みimagenetを使用

# 特徴量抽出部分のモデル作成
top_model = Sequential() #インスタンス作成
top_model.add(Flatten(input_shape=vgg16.output_shape[1:])) #平滑化,vggモデルのインデックス1から次元を取得
top_model.add(Dense(256, activation='sigmoid')) #Dense全結合層、256ノード、非線形での分類
top_model.add(Dropout(0.5)) #過学習を防ぐ
top_model.add(Dense(2, activation='softmax')) #最終レイヤーの処理
# vggとtop_modelを連結
model = Model(inputs=vgg16.input, outputs=top_model(vgg16.output))
# modelの19層目までをvggモデルとして固定
for layer in model.layers[:19]:
    layer.trainable = False
# コンパイル
model.compile(loss='categorical_crossentropy', #損失関数
              optimizer=optimizers.SGD(lr=1e-4, momentum=0.9), #学習率、モーメンタム
              metrics=['accuracy']) #評価指標=正解率

#モデルの学習
history = model.fit(X_train, y_train, batch_size=64, epochs=40, validation_data=(X_test, y_test)) #バッチ数、エポック数

##学習結果の可視化
plt.plot(history.history["accuracy"], label="acc", ls="-", marker="o") #学習データに対する正解率
plt.plot(history.history["val_accuracy"], label="val_acc", ls="-", marker="x") #検証データに対する正解率
plt.ylabel("accuracy")
plt.xlabel("epoch")
plt.suptitle("model", fontsize=12)
plt.legend() #凡例
plt.show()

# 予測(検証データの先頭の10枚)
pred = np.argmax(model.predict(X_test[0:10]), axis=1)
print(pred)

model.summary()

from google.colab import files

result_dir = 'results'
if not os.path.exists(result_dir):
    os.mkdir(result_dir)

model.save(os.path.join(result_dir, 'ani_model.h5'))

files.download( '/content/results/ani_model.h5' )
モデル評価
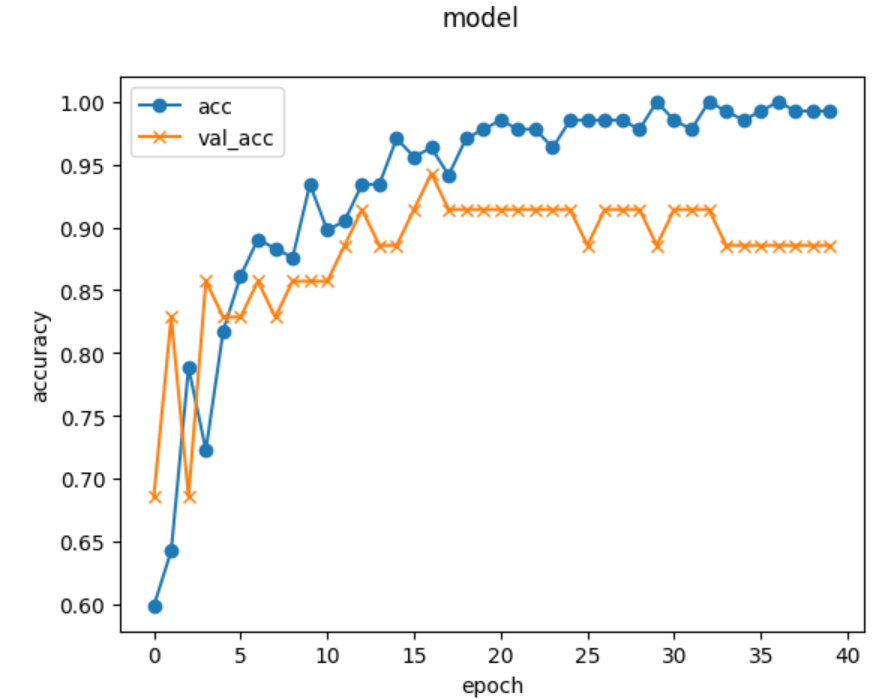
学習結果が以下になります。
横軸:学習回数、縦軸:精度、acc:学習データ精度、val_acc:検証データ精度としたグラフです。
学習回数やバッチサイズを何パターンか試し学習回数:40、バッチサイズ:64としたとき精度が85%以上となったので、こちらのパラメータを使用しました。

Flask
ウェブアプリケーションフレームワークにはFlaskを用いました。
以下コードになります。
import os
from flask import Flask, request, redirect, render_template, flash
from werkzeug.utils import secure_filename
from tensorflow.keras.models import Sequential, load_model
from tensorflow.keras.preprocessing import image

import numpy as np


classes = ["います","いません"]
image_size = 50

UPLOAD_FOLDER = "uploads"
ALLOWED_EXTENSIONS = set(['png', 'jpg', 'jpeg', 'gif'])

app = Flask(__name__)

def allowed_file(filename):
    return '.' in filename and filename.rsplit('.', 1)[1].lower() in ALLOWED_EXTENSIONS

model = load_model('./ani_model.h5',compile=False)#学習済みモデルをロード


@app.route('/', methods=['GET', 'POST'])
def upload_file():
    if request.method == 'POST':
        if 'file' not in request.files:
            flash('ファイルがありません')
            return redirect(request.url)
        file = request.files['file']
        if file.filename == '':
            flash('ファイルがありません')
            return redirect(request.url)
        if file and allowed_file(file.filename):
            filename = secure_filename(file.filename)
            file.save(os.path.join(UPLOAD_FOLDER, filename))
            filepath = os.path.join(UPLOAD_FOLDER, filename)

            #受け取った画像を読み込み、np形式に変換
            img = image.load_img(filepath, grayscale=False, target_size=(image_size,image_size))
            img = image.img_to_array(img)
            data = np.array([img])
            #変換したデータをモデルに渡して予測する
            result = model.predict(data)[0]
            predicted = result.argmax()
            pred_answer = "アニサキス"+classes[predicted]

            return render_template("index.html",answer=pred_answer)

    return render_template("index.html",answer="")


if __name__ == "__main__":
    port = int(os.environ.get('PORT', 8080))
    app.run(host ='0.0.0.0',port = port)
HTML,CSS
HTMLとCSSはFlask入門講座のコードを参考にしています。
以下HTMLコードです。
<!DOCTYPE html>
<html lang="ja">
<head>
<meta charset="UTF-8">
<meta name="viewport" content="width=device-width, initial-scale=1.0">
<meta http-equiv="X-UA-Compatible" content="ie=edge">
<title>Number Classifier</title>
<link rel="stylesheet" href="./static/stylesheet.css">
</head>
<body>
<header>
<img class="header_img" src="https://aidemyexstorage.blob.core.windows.net/aidemycontents/1621500180546399.png" alt="Aidemy">
<a class="header-logo" href="#">AIがアニサキスをチェックします</a>
</header>
<div class="main">
<h2> 食べる前にこちらに画像送信を!</h2>
<p>画像を送信してください</p>
<form method="POST" enctype="multipart/form-data">
<input class="file_choose" type="file" name="file">
<input class="btn" value="submit!" type="submit">
</form>
<div class="answer">{{answer}}</div>
</div>
<footer>
<img class="footer_img" src="https://aidemyexstorage.blob.core.windows.net/aidemycontents/1621500180546399.png" alt="Aidemy">
<small>© 2019 Aidemy, inc.</small>
</footer>
</body>
</html>
以下CSSコードです。
header {
    background-color: #CCFFFF;
    height: 60px;
    margin: -8px;
    display: flex;
    flex-direction: row-reverse;
    justify-content: space-between;}

.header-logo {
    color: #444444;
    font-size: 25px;
    margin: 15px 25px;}

.header_img {
    height: 25px;
    margin: 15px 25px;}

.main {
    height: 370px;}

h2 {
    color: #444444;
    margin: 90px 0px;
    text-align: center;}

p {
    color: #444444;
    margin: 70px 0px 30px 0px;
    text-align: center;}

.answer {
    color: #444444;
    margin: 70px 0px 30px 0px;
    text-align: center;}

form {
    text-align: center;}

footer {
    background-color: #F7F7F7;
    height: 110px;
    margin: -8px;
    position: relative;}

.footer_img {
    height: 25px;
    margin: 15px 25px;}

small {
    margin: 15px 25px;
    position: absolute;
    left: 0;
    bottom: 0;}
考察、今後の展望
今回のアプリの分類の検証においてアプリケーションの【結果】にも述べたように、一見識別を誤りそうな画像に対して正解を出すことができました。しかし実際には目視では認識しづらくく、ブルーライトを当てることで認識できるといったパターンもあり、icrawlerでの画像収集では精度に問題があるとも感じています。画像収集にも少し工夫が必要であると感じました。
今後の展望としてアルゴリズムCNNやYOLOを用いた物体検出を用いてアプリの精度を高めていく予定です。