1.はじめに
先日、マルバツ三目並べ 楽しいねマルバツゲーム という画面対応のAlexaスキルを公開しました。Echo Showなどの画面に対応するためにAPL(Alexa Presentation Language)をいじったので、その作業の一部、APL対応画面を作った流れをご紹介します。
(2019.05.26 スキルの呼び出し名が気に入らなかったので再登録しました)
このページで扱う範囲について
APLを初めて触るかた向けの説明です。
Alexa Presentation Language(APL)オーサリングツール を使って、画面を整えるのが目標です。
Alexaスキル開発の一般的手順や、マルバツゲームのプログラムなどは、ここでは扱いません。
2.Alexa Presentation Language(APL)オーサリングツールを大雑把に理解する
編集画面の呼び出し
まずは、 alexa developer console を開きます。
ビルド画面で、「画面表示」メニューを選択します。

すると、Alexa Presentation Language(APL)オーサリングツールが開きます。
テンプレートの選択
「はじめに、スキルの表示方法を選択してください」という文言とともに、テンプレートが提示されます。
まずは練習ということで、私は「テキストメインのリストのサンプル」を選択しました。

編集画面の構成
現時点(2019.05.05)で、オーサリングツールの画面は次のアイテムから構成されています。
- デバイスの選択
- デバイス画面エミュレータ
- 画面表示サンプル
- JSONデータ
ちょっととっつきにくいですが、3,4に注目です。

大まかな印象としては、「JSONデータ」がデータ部、「画面表示サンプル」がレイアウト指定、というところです。次のステップで簡単に試してみましょう。
デモデータをいじる
簡単な実験として、デモデータをいじってみましょう。
JSONデータ39行目(listTemplate1ListData.listPage.listItems[0].textContent.primaryText.text)の
"Gouda" を "Gouda★★★" に編集しましょう

このように、「JSONデータ」がデータ部分となっています。
ちなみにですが、34行目の listItemIdentifier を変更しても、画面には反映されません。
画面パーツをいじる
次に、画面パーツを何カ所かいじってみましょう。
その1
左側、レイアウトのツリーから、 VerticalListItemを選択します。2つ有るうちの上のほうを選択しましょう。
中央に表示される部分の「primaryText」のEdit欄の冒頭に、文字列"☆"を追加してみましょう。

すると、全部のリストに☆が追加されますね。

その2
次は、レイアウトのツリーから、 下から数えて3つめのTextを選択します。
text*のEditの先頭に、文字列"--"を追加してみましょう。

すると、全部のリストに"--"が追加されますね。

「その1」と「その2」で結果は似ていますね。
レイアウトのツリーでは「VerticalListItem」が2つ登場しますが、2つめが詳細の宣言で、1つめ(上のほう)が呼び出し元となります。
「その2」で"--${primaryText}"と変更しましたが、${primaryText}の中身は「その1」で編集した "☆${data.textContent.primaryText.text}"となっているのです。
その3
理解を進めるために、Container配下のImageやTextを削除などしてみましょう。
オーサリングツールの画面での操作は、開発中のAlexaスキルと独立しているようです。いくら編集してもあとに残りませんので、心置きなく実験できます。
3.EchoShowむけ画面の作成
さて、それでは本番向け作業です。
いったんオーサリングツールの画面を閉じ、新しくオーサリングツールの画面を開きます。
今度は「画像表示サンプル」から出発しましょう。
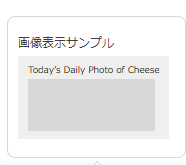
画面用データを用意する
マルバツゲームですので、「マル」「バツ」「空白」の3種類の画像定義が9箇所ある、という形が作りやすそうです。
画像を探すのが面倒なので、先ほどのチーズ画像で代用しちゃいましょう。
「JSONデータ」画面、25行目から43行目あたりを改変すれば良さそうですね。
改変後のJSONデータサンプル
{
    "bodyTemplate7Data": {
        "type": "object",
        "objectId": "bt7Sample",
        "title": "Today's Daily Photo of Cheese",
        "backgroundImage": {
            "contentDescription": null,
            "smallSourceUrl": null,
            "largeSourceUrl": null,
            "sources": [
                {
                    "url": "https://d2o906d8ln7ui1.cloudfront.net/images/BT7_Background.png",
                    "size": "small",
                    "widthPixels": 0,
                    "heightPixels": 0
                },
                {
                    "url": "https://d2o906d8ln7ui1.cloudfront.net/images/BT7_Background.png",
                    "size": "large",
                    "widthPixels": 0,
                    "heightPixels": 0
                }
            ]
        },
        "image": {
            "contentDescription": null,
            "smallSourceUrl": null,
            "largeSourceUrl": null,
            "sources": [
                {
                    "url": "https://d2o906d8ln7ui1.cloudfront.net/images/sm_gouda.png",
                    "size": "small",
                    "widthPixels": 0,
                    "heightPixels": 0
                },
                {
                    "url": "https://d2o906d8ln7ui1.cloudfront.net/images/sm_gouda.png",
                    "size": "small",
                    "widthPixels": 0,
                    "heightPixels": 0
                },
                {
                    "url": "https://d2o906d8ln7ui1.cloudfront.net/images/sm_gouda.png",
                    "size": "small",
                    "widthPixels": 0,
                    "heightPixels": 0
                },
                {
                    "url": "https://d2o906d8ln7ui1.cloudfront.net/images/sm_cheddar.png",
                    "size": "large",
                    "widthPixels": 0,
                    "heightPixels": 0
                },
                {
                    "url": "https://d2o906d8ln7ui1.cloudfront.net/images/sm_cheddar.png",
                    "size": "large",
                    "widthPixels": 0,
                    "heightPixels": 0
                },
                {
                    "url": "https://d2o906d8ln7ui1.cloudfront.net/images/sm_cheddar.png",
                    "size": "large",
                    "widthPixels": 0,
                    "heightPixels": 0
                },
                {
                    "url": "https://d2o906d8ln7ui1.cloudfront.net/images/sm_blue.png",
                    "size": "large",
                    "widthPixels": 0,
                    "heightPixels": 0
                },
                {
                    "url": "https://d2o906d8ln7ui1.cloudfront.net/images/sm_blue.png",
                    "size": "large",
                    "widthPixels": 0,
                    "heightPixels": 0
                },
                {
                    "url": "https://d2o906d8ln7ui1.cloudfront.net/images/sm_blue.png",
                    "size": "large",
                    "widthPixels": 0,
                    "heightPixels": 0
                }
            ]
        },
        "logoUrl": "https://d2o906d8ln7ui1.cloudfront.net/images/cheeseskillicon.png",
        "hintText": "Try, \"Alexa, search for blue cheese\""
    }
}
画面パーツを定義する
マルバツゲームなので、3行3列に画像を並べたいですよね。上から順番に作りましょう。
1行目を作る
でかいのを小さく
「画像表示サンプル」は1つの画像を大きく表示するサンプルです。まずはこの最初の画像を小さくしましょう。
レイアウトのツリー、一番下にあるImageを選択します。

プロパティを削っていきます。
1行目の残り2つを作る
先ほどいじっていたImageの1つ上、Containerを選択します。
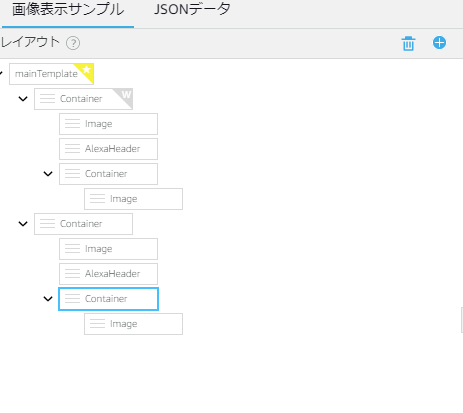
この状態で+マークを押すと、Componentの追加ができます。
Imageを追加しましょう。
source* が赤色で表示されますので、 "${payload.bodyTemplate7Data.image.sources[1].url}"と指定します。
3つめの画像も同じように操作し、 "${payload.bodyTemplate7Data.image.sources[2].url}"と指定します。
2行目を作る
つづいて2行目を作ります。
containerを追加
レイアウトのツリー、mainTemplate直下のcontainer2つのうち下側を選択し、+マークを押してContainerのComponentを追加します。
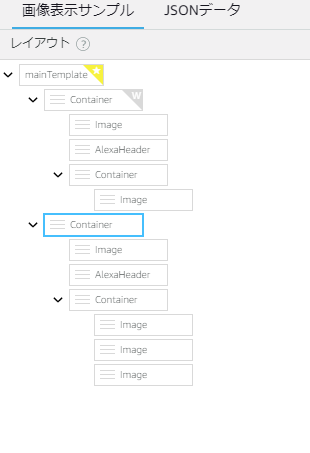
Imageを3つ追加
続いて、作成したcontainerの下にImageを3つ追加します。
それぞれの source* は次のように指定します。
- "${payload.bodyTemplate7Data.image.sources[3].url}"
- "${payload.bodyTemplate7Data.image.sources[4].url}"
- "${payload.bodyTemplate7Data.image.sources[5].url}"
containerの向きなどを整える
2行目のプロパティを調整します。
2行目のcontainerのプロパティを、次のようにします。
- direction に row を設定。これで横並びに変わります。
- justifyContent に center を指定。これで中央寄せになります。
3行目を作る
3行目は、2行目とおなじ要領で作成できます。
データをローカル保存する
ここまでの編集で、EchoShow向けに3×3の画像表示が実現できました。
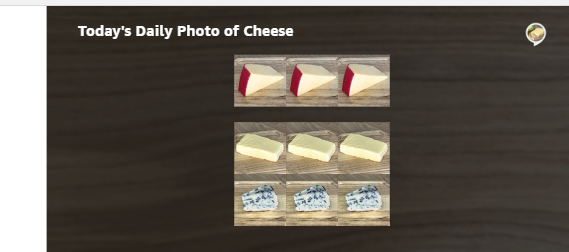
paddingなどを調整することで、綺麗に整えることが可能ですが今は割愛します。
画面右上あたりにある、コードを書き出し  ボタンを押し、結果をダウンロードします。
4.EchoSpotむけ画面の作成
シミュレータで小型デバイスを選択してみましょう。
先ほどまで並べてきたものが全然反映されていません。

これは、mainTemplate直下のcontainerが関係しています。
whenプロパティに ${viewport.shape == 'round'} とありますね。
「画像表示サンプル」の場合、EchoSpotの場合はひとつ目のcontainerを、それ以外の場合はふたつ目のcontainerを利用するように作られているのです。
データをローカルで編集
EchoSpotでも、大きい画像表示の部分を、3×3の画像表示に置き換えましょう。
ただ、オーサリングツールで行うのは面倒なので、ローカル保存したJSONデータを直接編集します。
ダウンロードしたJSONファイルを覗くと、130行目付近にdocument.mainTemplate.itemsが見えます。
document.mainTemplate.items[0]がEchoSpotむけ、document.mainTemplate.items[1]がそれ以外、ですね。
さくっとコピペしましょう。
改変後のサンプル
{
"document": {
"type": "APL",
"version": "1.0",
"theme": "dark",
"import": [
{
"name": "alexa-layouts",
"version": "1.0.0"
}
],
"resources": [
{
"description": "Stock color for the light theme",
"colors": {
"colorTextPrimary": "#151920"
}
},
{
"description": "Stock color for the dark theme",
"when": "${viewport.theme == 'dark'}",
"colors": {
"colorTextPrimary": "#f0f1ef"
}
},
{
"description": "Standard font sizes",
"dimensions": {
"textSizeBody": 48,
"textSizePrimary": 27,
"textSizeSecondary": 23,
"textSizeSecondaryHint": 25
}
},
{
"description": "Common spacing values",
"dimensions": {
"spacingThin": 6,
"spacingSmall": 12,
"spacingMedium": 24,
"spacingLarge": 48,
"spacingExtraLarge": 72
}
},
{
"description": "Common margins and padding",
"dimensions": {
"marginTop": 40,
"marginLeft": 60,
"marginRight": 60,
"marginBottom": 40
}
}
],
"styles": {
"textStyleBase": {
"description": "Base font description; set color",
"values": [
{
"color": "@colorTextPrimary"
}
]
},
"textStyleBase0": {
"description": "Thin version of basic font",
"extend": "textStyleBase",
"values": {
"fontWeight": "100"
}
},
"textStyleBase1": {
"description": "Light version of basic font",
"extend": "textStyleBase",
"values": {
"fontWeight": "300"
}
},
"mixinBody": {
"values": {
"fontSize": "@textSizeBody"
}
},
"mixinPrimary": {
"values": {
"fontSize": "@textSizePrimary"
}
},
"mixinSecondary": {
"values": {
"fontSize": "@textSizeSecondary"
}
},
"textStylePrimary": {
"extend": [
"textStyleBase1",
"mixinPrimary"
]
},
"textStyleSecondary": {
"extend": [
"textStyleBase0",
"mixinSecondary"
]
},
"textStyleBody": {
"extend": [
"textStyleBase1",
"mixinBody"
]
},
"textStyleSecondaryHint": {
"values": {
"fontFamily": "Bookerly",
"fontStyle": "italic",
"fontSize": "@textSizeSecondaryHint",
"color": "@colorTextPrimary"
}
}
},
"layouts": {},
"mainTemplate": {
"parameters": [
"payload"
],
"items": [
{
"when": "${viewport.shape == 'round'}",
"type": "Container",
"direction": "column",
"items": [
{
"type": "Image",
"source": "${payload.bodyTemplate7Data.backgroundImage.sources[0].url}",
"scale": "best-fill",
"position": "absolute",
"width": "100vw",
"height": "100vh"
},
{
"type": "AlexaHeader",
"headerTitle": "${payload.bodyTemplate7Data.title}",
"headerAttributionImage": "${payload.bodyTemplate7Data.logoUrl}"
},
{
"type": "Container",
"direction": "row",
"paddingLeft": "5vw",
"paddingRight": "5vw",
"paddingBottom": "5vh",
"alignItems": "center",
"justifyContent": "center",
"items": [
{
"type": "Image",
"source": "${payload.bodyTemplate7Data.image.sources[0].url}",
"align": "center"
},
{
"type": "Image",
"source": "${payload.bodyTemplate7Data.image.sources[1].url}"
},
{
"type": "Image",
"source": "${payload.bodyTemplate7Data.image.sources[2].url}"
}
]
},
{
"type": "Container",
"direction": "row",
"justifyContent": "center",
"item": [
{
"type": "Image",
"source": "${payload.bodyTemplate7Data.image.sources[3].url}"
},
{
"type": "Image",
"source": "${payload.bodyTemplate7Data.image.sources[4].url}"
},
{
"type": "Image",
"source": "${payload.bodyTemplate7Data.image.sources[5].url}"
}
]
},
{
"type": "Container",
"direction": "row",
"justifyContent": "center",
"item": [
{
"type": "Image",
"source": "${payload.bodyTemplate7Data.image.sources[6].url}"
},
{
"type": "Image",
"source": "${payload.bodyTemplate7Data.image.sources[7].url}"
},
{
"type": "Image",
"source": "${payload.bodyTemplate7Data.image.sources[8].url}"
}
]
}
]
},
{
"type": "Container",
"height": "100vh",
"width": "100vw",
"items": [
{
"type": "Image",
"source": "${payload.bodyTemplate7Data.backgroundImage.sources[0].url}",
"scale": "best-fill",
"position": "absolute",
"width": "100vw",
"height": "100vh"
},
{
"type": "AlexaHeader",
"headerTitle": "${payload.bodyTemplate7Data.title}",
"headerAttributionImage": "${payload.bodyTemplate7Data.logoUrl}"
},
{
"type": "Container",
"direction": "row",
"paddingLeft": "5vw",
"paddingRight": "5vw",
"paddingBottom": "5vh",
"alignItems": "center",
"justifyContent": "center",
"items": [
{
"type": "Image",
"source": "${payload.bodyTemplate7Data.image.sources[0].url}",
"align": "center"
},
{
"type": "Image",
"source": "${payload.bodyTemplate7Data.image.sources[1].url}"
},
{
"type": "Image",
"source": "${payload.bodyTemplate7Data.image.sources[2].url}"
}
]
},
{
"type": "Container",
"direction": "row",
"justifyContent": "center",
"item": [
{
"type": "Image",
"source": "${payload.bodyTemplate7Data.image.sources[3].url}"
},
{
"type": "Image",
"source": "${payload.bodyTemplate7Data.image.sources[4].url}"
},
{
"type": "Image",
"source": "${payload.bodyTemplate7Data.image.sources[5].url}"
}
]
},
{
"type": "Container",
"direction": "row",
"justifyContent": "center",
"item": [
{
"type": "Image",
"source": "${payload.bodyTemplate7Data.image.sources[6].url}"
},
{
"type": "Image",
"source": "${payload.bodyTemplate7Data.image.sources[7].url}"
},
{
"type": "Image",
"source": "${payload.bodyTemplate7Data.image.sources[8].url}"
}
]
}
]
}
]
}
},
"datasources": {
"bodyTemplate7Data": {
"type": "object",
"objectId": "bt7Sample",
"title": "Today's Daily Photo of Cheese",
"backgroundImage": {
"contentDescription": null,
"smallSourceUrl": null,
"largeSourceUrl": null,
"sources": [
{
"url": "https://d2o906d8ln7ui1.cloudfront.net/images/BT7_Background.png",
"size": "small",
"widthPixels": 0,
"heightPixels": 0
},
{
"url": "https://d2o906d8ln7ui1.cloudfront.net/images/BT7_Background.png",
"size": "large",
"widthPixels": 0,
"heightPixels": 0
}
]
},
"image": {
"contentDescription": null,
"smallSourceUrl": null,
"largeSourceUrl": null,
"sources": [
{
"url": "https://d2o906d8ln7ui1.cloudfront.net/images/sm_gouda.png",
"size": "small",
"widthPixels": 0,
"heightPixels": 0
},
{
"url": "https://d2o906d8ln7ui1.cloudfront.net/images/sm_gouda.png",
"size": "small",
"widthPixels": 0,
"heightPixels": 0
},
{
"url": "https://d2o906d8ln7ui1.cloudfront.net/images/sm_gouda.png",
"size": "small",
"widthPixels": 0,
"heightPixels": 0
},
{
"url": "https://d2o906d8ln7ui1.cloudfront.net/images/sm_cheddar.png",
"size": "large",
"widthPixels": 0,
"heightPixels": 0
},
{
"url": "https://d2o906d8ln7ui1.cloudfront.net/images/sm_cheddar.png",
"size": "large",
"widthPixels": 0,
"heightPixels": 0
},
{
"url": "https://d2o906d8ln7ui1.cloudfront.net/images/sm_cheddar.png",
"size": "large",
"widthPixels": 0,
"heightPixels": 0
},
{
"url": "https://d2o906d8ln7ui1.cloudfront.net/images/sm_blue.png",
"size": "large",
"widthPixels": 0,
"heightPixels": 0
},
{
"url": "https://d2o906d8ln7ui1.cloudfront.net/images/sm_blue.png",
"size": "large",
"widthPixels": 0,
"heightPixels": 0
},
{
"url": "https://d2o906d8ln7ui1.cloudfront.net/images/sm_blue.png",
"size": "large",
"widthPixels": 0,
"heightPixels": 0
}
]
},
"logoUrl": "https://d2o906d8ln7ui1.cloudfront.net/images/cheeseskillicon.png",
"hintText": "Try, \"Alexa, search for blue cheese\""
}
}
}
ローカルで編集したデータをアップロードする
新しくオーサリングツールのトップ画面を表示します。
テンプレートの選択の最後にある「コードをアップロード」を選択し、編集後のJSONファイルをアップロードします。
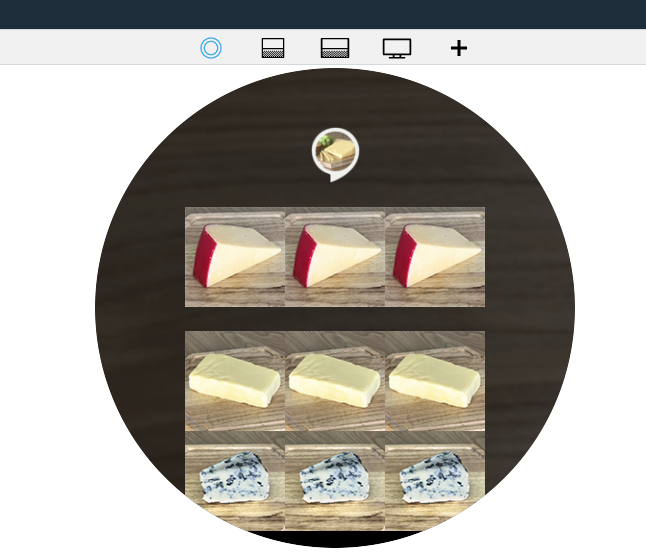
小型デバイスの表示がこのようになります。
5.スキルへの組み込み
組み込み
スキルへの組み込みは、Alexa Presentation Language(APL)スキル 開発チュートリアルを参考にしました。
特に重要な箇所を挙げておきます。
-
- Lambdaの作成 - index.jsの修正
-
- Alexa Presentation Language(APL)の作成 - APL JSONファイル以降
マルバツゲーム用の書き換え
マルバツゲームでは、ゲームが進む度に画面を書き換えます。
3×3の画像データは、画面用データ(datasources.bodyTemplate7Data.image.sources[])で指定しています。なので、handlerInput.responseBuilderのたびにこの中身を書き換えてaddDirectiveすれば良いことになります。
6.参考にした資料
- Alexa Presentation Language(APL)の概要
- Alexa Presentation Language(APL)オーサリングツール
- Alexa Presentation Language(APL)スキル 開発チュートリアル
- #AAJUG 関東支部 APLハンズオン コード解説 #alexa #alexadevs
7.おわりに
APLオーサリングツールを使って画面を作った流れを紹介しました。
とても奥が深く、まだまだ使いこなせていませんが、なにかの助けになれば幸いです。


