手動作業を自動化する
ReactNativeで作成したアプリを内部テスト(TestFlight)する際に、手動でMyAppに上げるところをFastlaneを使用し、自動化します。
android版はこちら↓
FastlaneでReactNativeのデプロイを自動化する(android)
Fastlaneのインストール
iosフォルダへ移動します。
そしてGemfileを作成します。(FastlaneはRuby製のツールです)
sudo gem install bundler
cd ios
bundle init
Gemfileに下記を追加します。
gem "fastlane"
Fastlaneインストールのため、updateします。
bundle update
MyAppの作成
アプリのアップロード先となるMyAppの作成をFastlaneで実行します。
bundle exec fastlane produce
質問に答えていきます。
// Apple IDの入力
Your Apple ID Username:hogehoge@hogehoge.com
Multiple teams found on the Developer Portal, please enter the number of the team you want to use:
// Teamを選択
1) ****** "HOGEHOGE INC." (Company/Organization)
2) ****** "YourStand, inc." (Company/Organization)
1
// Bundle IDの入力
App Identifier (Bundle ID, e.g. com.krausefx.app):
com.hogehoge.app
// アプリ名
-> check the general at ios/ReactNativePlatform.xcodeproj
App Name: テスト
-> you can choose any name
1) "HOGEHOGE INC." (11111111)
2) "YourStand, inc." (2222222)
1
入力が完了すると、apple developer内のMyAppにApp Nameに指定した名前のプロジェクトが作成されます。
Fastlaneの初期化
bundle exec fastlane init
質問に答えます。
1. 📸 Automate screenshots
2. 👩✈️ Automate beta distribution to TestFlight
3. 🚀 Automate App Store distribution
4. 🛠 Manual setup - manually setup your project to automate your tasks
? 3
1. ReactNativePlatform-tvOS
2. ReactNativePlatform
? 2
[18:35:26]: Apple ID Username:
hogehoge@hogehoge.com
Multiple App Store Connect teams found, please enter the number of the team you want to use:
1) ****** "HOGEHOGE INC." (Company/Organization)
2) ****** "YourStand, inc." (Company/Organization)
1
Multiple teams found on the Developer Portal, please enter the number of the team you want to use:
1) "HOGEHOGE INC." (11111111)
2) "YourStand, inc." (2222222)
1
[18:39:54]: Would you like fastlane to manage your app's metadata? (y/n)
y
現在地にfastlaneフォルダができます。
ratingの作成
ios/fastlane/Deliverfileを作成し、下記を記述します(アプリによって、数字は変更してください)
{
    "CARTOON_FANTASY_VIOLENCE": 0,
    "REALISTIC_VIOLENCE": 0,
    "PROLONGED_GRAPHIC_SADISTIC_REALISTIC_VIOLENCE": 0,
    "PROFANITY_CRUDE_HUMOR": 0,
    "MATURE_SUGGESTIVE": 0,
    "HORROR": 0,
    "MEDICAL_TREATMENT_INFO": 0,
    "ALCOHOL_TOBACCO_DRUGS": 0,
    "GAMBLING": 0,
    "SEXUAL_CONTENT_NUDITY": 0,
    "GRAPHIC_SEXUAL_CONTENT_NUDITY": 0,
    "UNRESTRICTED_WEB_ACCESS": 0,
    "GAMBLING_CONTESTS": 0
  }
fastfileの編集
ios/fastlane/Fastfileを下記のように編集します。hogehogeappの部分はアプリ名によって変わってきます。
default_platform(:ios)

platform :ios do
  // descは説明文ですので、任意の文を挿入
  desc "Push a new release build to the App Store"
  // releaseに関する設定
  lane :release do
    // build番号をfastlane実行の度に自動で上げる
    increment_build_number(xcodeproj: "hogehogeapp.xcodeproj")
    match(type: "appstore")
    build_app(scheme: "hogehogeapp")
    upload_to_app_store(
      skip_waiting_for_build_processing: true
    )
    clean_build_artifacts
  end

  // testflightに関する設定
  desc "Push a new release build to TestFlight"
  lane :beta do
    increment_build_number(xcodeproj: "hogehogeapp.xcodeproj")
    match(type: "appstore")
    build_app(scheme: "hogehogeapp")
    upload_to_testflight(
      skip_waiting_for_build_processing: true
    )
    clean_build_artifacts
  end
end
cocoapodsを使用している場合
.xcworkspaceを使用している前提でfastfileを実行したい場合、pod installを実施するコードとbuild_appの記述を書き換えることで対応できます。
default_platform(:ios)

platform :ios do
  desc "Push a new release build to the App Store"
  lane :release do
    # increment機能は.xcworkspaceには使用できないため削除
    # increment_build_number(xcodeproj: "hogehoge.xcodeproj")
    match(type: "appstore")
    # pod installの実行
    cocoapods
    # workspaceを追加
    build_app(workspace: "hogehoge.xcworkspace", scheme: "hogehoge")
    upload_to_app_store(
      skip_waiting_for_build_processing: true
    )
    clean_build_artifacts
  end

  desc "Push a new release build to TestFlight"
  lane :beta do
    # increment機能は.xcworkspaceには使用できないため削除
    # increment_build_number(xcodeproj: "hogehoge.xcodeproj")
    match(type: "appstore")
    # pod installの実行
    cocoapods
    # workspaceを追加
    build_app(workspace: "hogehoge.xcworkspace", scheme: "hogehoge")
    upload_to_app_store(
      skip_waiting_for_build_processing: true
    )
    clean_build_artifacts
  end
end
また、gemfileへの記述を追加します。
gem "fastlane"
gem 'cocoapods'
証明書の作成
iosのデプロイをfastlaneで実施する場合、事前に証明書関連をgithub上に格納しておき、実行する度にレポジトリを参照することになります。
まず、Github上に任意のrepositoryをprivateで作成します(publicは推奨されていません)。
続いて下記コマンドを入力
bundle exec fastlane match init
質問に答えます。
[19:04:30]: fastlane match supports multiple storage modes, please select the one you want to use:
1. git
2. google_cloud
? 1
[19:05:12]: URL of the Git Repo:-> 作成したrepositoryのgit cloneアドレス(SSHの方)
ios/fastlane/Matchfileが作成され、先程回答したgithub等の情報が記載されています。
続いて証明書を作成し、repositoryに格納します。
bundle exec fastlane match development
Githubのパスワードを入力します。
Passphrase for Git Repo: ******
エラーの発生
証明書が制限数超えており、エラーが出る場合があります。
[!] Could not create another Development certificate, reached the maximum number of available Development certificates.
この場合、既に期限が切れている証明書を削除して容量を開ける必要があるのでnukeコマンドを実行します。
公式ドキュメントの説明↓
Nuke
bundle exec fastlane match nuke development
bundle exec fastlane match nuke appstore
Xcode上の設定
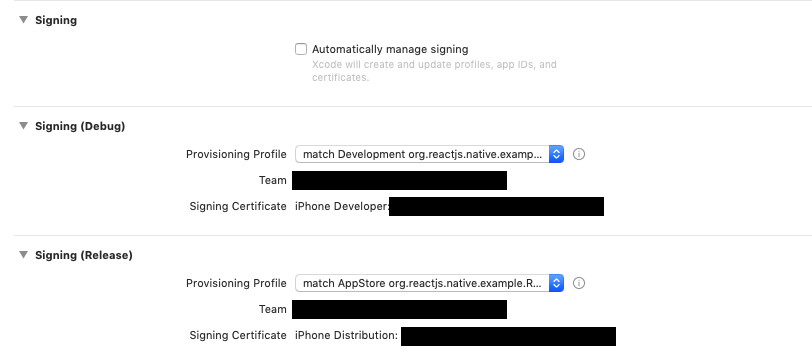
generalに移動します。
-
Automatically manage signingのチェックを外す。 - Signing(Debug) は
match Development ... - Signing(Release)は
match Appstore ...

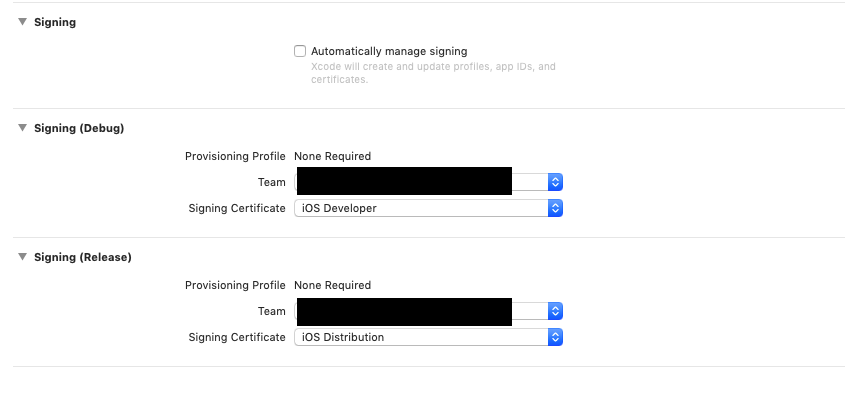
testsについても下記のように変更します。
Signing(Debug)
- Signing Certificate: iOS Developer
Signing(Release)
Build settingsに移動し、code signing identityを検索します。
下記のように編集
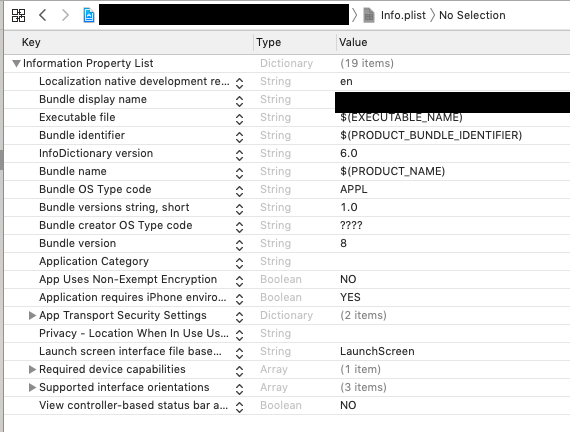
プロジェクト名/info.plistに移動します。
任意の場所で右クリックし、列の追加→ITSAppUsesNonExemptEncryptionを追加します。
入力すると下記のようにApp Uses Non-Exempt Encryptionに変わります。

スクリーンショットの挿入
ios/fastlane/screenshotsにアップするスクリーンショットを格納しておきます。
アプリをMyAppにデプロイする
下記コマンドを実行
bundle exec fastlane beta
終了後MyAppに行くと、アプリがtestflight上にアップされています。
Bitriseへ組み込む
CIツールのBitriseを使用すると、githubにpushした際に自動的にfastlaneを実行することができます。
詳細は下記へ↓
FastlaneのコマンドをBitriseに組み込む(ios,ReactNative)


