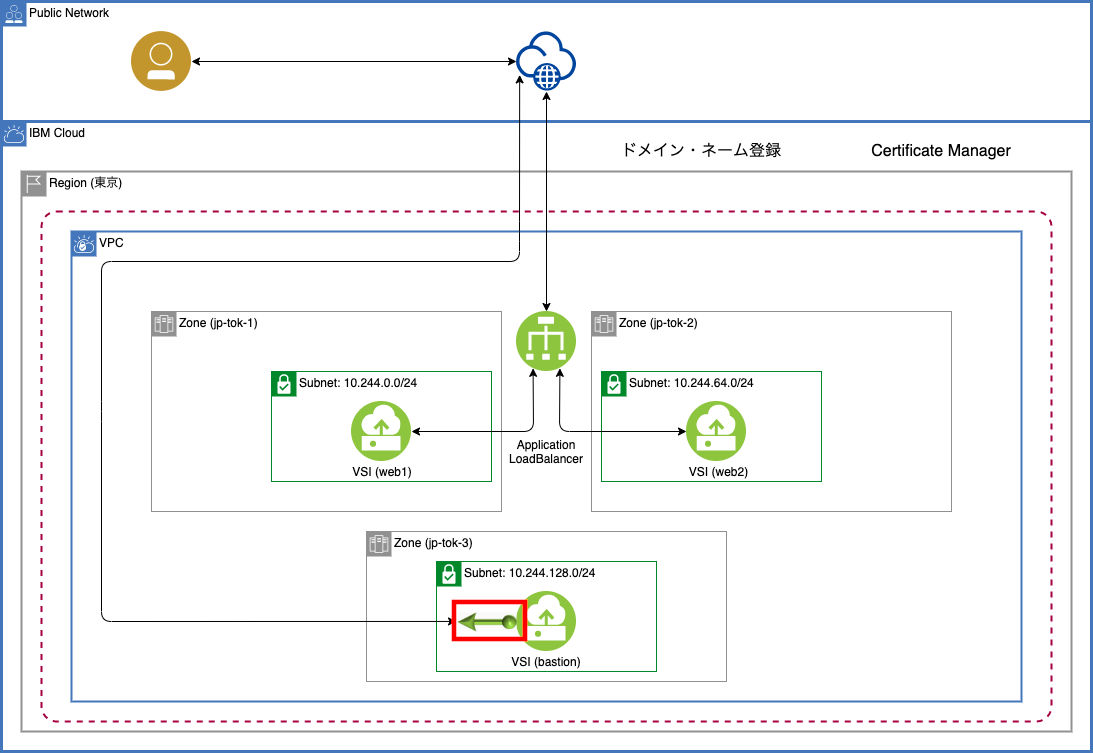
この記事は、IBM Cloud VPCでシンプルなウェブサイト構築を体験するの構築ステップを説明しています。
「3.仮想サーバー・インスタンス作成」で作成したbastionに浮動IPをバインドして、インターネットからログインできるようにします。

ステップ4-1
「VPCインフラストラクチャー」>「ネットワーク」>「浮動IP」をクリックします。
画面右側の「作成」ボタンをクリックします。

ステップ4-2
パラメーター・シートの「浮動IP」のパラメーターを入力します。
浮動IP名の入力、リソース・グループの選択します。さらに設定項目があるため、「浮動IPを予約します」の画面をスクロールさせます。

ロケーションを選択し、バインドするインスタンスとしてbastionを選択します。入力が完了したら、「IPの予約」ボタンをクリックします。

浮動IPを取得し、bastionにバインドされます。

ステップ4-3
ステップ3と4の実施を確認します。
ステップ4-3-1
操作しているローカル端末からbastionへSSHログインします。
$ ssh -i id_rsa vpcuser@(浮動IPのアドレス)
The authenticity of host '(浮動IPのアドレス)' can't be established.
ECDSA key fingerprint is SHA256:u6m3CO+NWDPtKH0OQ7ueXyxfv9Vd/AGXvtDik0Z73zI.
Are you sure you want to continue connecting (yes/no/[fingerprint])? yes
Warning: Permanently added '(浮動IPのアドレス)' (ECDSA) to the list of known hosts.
Enter passphrase for key 'id_rsa':
Welcome to Ubuntu 20.04.2 LTS (GNU/Linux 5.4.0-1033-kvm x86_64)

 * Documentation:  https://help.ubuntu.com
 * Management:     https://landscape.canonical.com
 * Support:        https://ubuntu.com/advantage

  System information as of Tue Mar  2 06:15:26 UTC 2021

  System load:  0.09              Processes:             84
  Usage of /:   1.7% of 96.75GB   Users logged in:       0
  Memory usage: 1%                IPv4 address for ens3: 10.244.128.4
  Swap usage:   0%

0 updates can be installed immediately.
0 of these updates are security updates.

The programs included with the Ubuntu system are free software;
the exact distribution terms for each program are described in the
individual files in /usr/share/doc/*/copyright.

Ubuntu comes with ABSOLUTELY NO WARRANTY, to the extent permitted by
applicable law.
ステップ4-3-2
cloud-initによってセットアップされたnginxの動作確認のため、bastionからwebサーバー1と2にcurlを実行します。
$ curl http://(webサーバー1のIPアドレス)/helloworld.html
<!doctype html>

(中略)

  <body>
    <!-- Modal -->
    <div class="modal fade" id="exampleModalCenter" tabindex="-1" role="dialog" aria-labelledby="exampleModalCenterTitle" aria-hidden="true" data-backdrop="static" data-keyboard="false">
      <div class="modal-dialog modal-dialog-centered" role="document">
        <div class="modal-content">
          <div class="modal-header">
            <h4 class="modal-title" id="exampleModalCenterTitle">Hello World!</h4>
            </button>
          </div>
          <div class="modal-body">
            <h4>これは1台目のウェブサーバーです。</h4>
          </div>
          <div class="modal-footer">
            <button type="button" class="btn btn-primary" id="btnReload">リロード</button>
          </div>
        </div>
      </div>
    </div>

(中略)

    <!-- Modal and Button -->
    <script>
      $(() => {
        $('#exampleModalCenter').modal();
      });
      $('#btnReload').click(() => {location.reload();});
    </script>
  </body>
</html>
$
$ curl http://(webサーバー2のIPアドレス)/helloworld.html
<!doctype html>

(中略)

  <body>
    <!-- Modal -->
    <div class="modal fade" id="exampleModalCenter" tabindex="-1" role="dialog" aria-labelledby="exampleModalCenterTitle" aria-hidden="true" data-backdrop="static" data-keyboard="false">
      <div class="modal-dialog modal-dialog-centered" role="document">
        <div class="modal-content">
          <div class="modal-header">
            <h4 class="modal-title" id="exampleModalCenterTitle">Hello World!</h4>
            </button>
          </div>
          <div class="modal-body">
            <h4>これは2台目のウェブサーバーです。</h4>
          </div>
          <div class="modal-footer">
            <button type="button" class="btn btn-primary" id="btnReload">リロード</button>
          </div>
        </div>
      </div>
    </div>

(中略)

    <!-- Modal and Button -->
    <script>
      $(() => {
        $('#exampleModalCenter').modal();
      });
      $('#btnReload').click(() => {location.reload();});
    </script>
  </body>
</html>
$
ステップ4-3-3(オプション)
VSIがcloud-initの定義通りにセットアップされステップ4-3-1と4-3-2が完了していれば、飛ばして次に進めます。このステップは、webサーバー1と2の動作確認やトラブルシューティングのためのログイン手順を説明しています。
cloud-initによってセットアップされたSSHの動作確認のため、webサーバー1と2にSSHアクセスします。
SSHアクセスには以下の2通りの手段があります。
- bastionにいったんSSHログインし、bastion上でsshコマンドを実行してwebサーバーにSSHアクセス
- bastionにSSHトンネルを張り、SSHトンネル経由でwebサーバーにSSHアクセス
今回はbastionにSSH鍵を転送せずに済む後者の手順を実行します。Windowsを利用されている方は、TeraTermのSSH転送など同等機能の利用が可能です。
ローカル端末からbastionへSSHトンネルを張ります。
$ ssh -i id_rsa -L 10022:(webサーバー1のIPアドレス):22 -N vpcuser@(浮動IPのアドレス)
コマンドが成功するとbastionのプロンプトが出ず実行中状態が続きます。
ローカル端末で別のターミナルを開き、SSHトンネル経由でwebサーバー1にアクセスします。ログイン後hostnameコマンドを実行し、webサーバー1にログインしたことを確認します。
$ ssh -i id_rsa -p 10022 vpcuser@localhost
The authenticity of host '[localhost]:10022 ([::1]:10022)' can't be established.
ECDSA key fingerprint is SHA256:YcmHBzkx15j1EB7ichg8UUVHI+5QPQtB8g58XCL/u3s.
Are you sure you want to continue connecting (yes/no/[fingerprint])? yes
Warning: Permanently added '[localhost]:10022' (ECDSA) to the list of known hosts.
Welcome to Ubuntu 20.04.2 LTS (GNU/Linux 5.4.0-1033-kvm x86_64)

 * Documentation:  https://help.ubuntu.com
 * Management:     https://landscape.canonical.com
 * Support:        https://ubuntu.com/advantage

  System information as of Wed Mar 31 02:13:56 UTC 2021

  System load:  0.0               Processes:             79
  Usage of /:   1.7% of 96.75GB   Users logged in:       0
  Memory usage: 2%                IPv4 address for ens3: 10.244.0.4
  Swap usage:   0%


0 updates can be installed immediately.
0 of these updates are security updates.


The list of available updates is more than a week old.
To check for new updates run: sudo apt update


The programs included with the Ubuntu system are free software;
the exact distribution terms for each program are described in the
individual files in /usr/share/doc/*/copyright.

Ubuntu comes with ABSOLUTELY NO WARRANTY, to the extent permitted by
applicable law.

$ hostname
web1
$
ローカル端末のSSHトンネルをCtrl-Cで終了させます。
同様にwebサーバー2にログインし、hostnameコマンドの結果を確認します。
$ ssh -i id_rsa -L 11022:(webサーバー2のIPアドレス):22 -N vpcuser@(浮動IPのアドレス)
$ ssh -i id_rsa -p 11022 vpcuser@localhost
ログイン後
$ hostname
次に、セキュリティー・グループ作成に進みます。