前回に引き続き、今回はクライアントサイドの情報が取得できる API をいくつか紹介します。元のサンプルはこちらにありますが、この記事では名前を変えています。
クライアントサイド API
コンテキストからはクライアントサイドの情報取得に便利な様々なオブジェクトが取得できます。このサンプルでは、以下の機能を利用します。
- Client
- Mode
- UserSettings
- Formatting
また以前のサンプルで使った Utility も再度このサンプルでも使っています。
Client
現在のアプリケーションが Web/Outlook/モバイルであるか、また実行環境がデスクトップ/タブレットかなどの情報を取得できます。
Client
Mode
カスタムコントロール状態やサイズなどの情報の取得や操作ができます。
Mode
UserSettings
現在ログインしているユーザーの名前や設定が取得できます。
UserSettings
Formatting
現在のフォーマット設定の情報が取得できます。
Formatting
サンプルの概要
今回のサンプルは Client API で取得できる結果の表示やフルスクリーン操作を行います。
プロジェクトの作成
今回も既に作成した SampleSolution に追加するように開発していきます。
1. 前回まで作ってきた PCFControls フォルダに移動して、フィールド用のコントロールを作成。
mkdir ClientAPIControl
cd ClientAPIControl
2. 以下のコマンドを実行してプロジェクトを作成。
- 名前空間とプロジェクト名の指定
- template 引数は field を指定
pac pcf init --namespace SampleNamespace --name TSClientAPI --template field
3. npm パッケージをリストアして任意の IDE でフォルダを開く。ここでは Visual Studio Code を利用。
npm install
code .
コントロールマニフェストの編集とリソースの追加
これまで同様にまずはマニフェストから編集します。
1. ControlManifest.Input.xml を以下の様に編集。
- 文字列フィールドにバインド
- resources に ts と css、既定の画像 を指定
- Utility の利用
<?xml version="1.0" encoding="utf-8" ?>
<manifest>
	<control namespace="SampleNamespace" constructor="TSClientAPI" version="1.0.0" display-name-key="Client API Sample" description-key="Client API Sample" control-type="standard">
		<property name="stringProperty" display-name-key="Client API Sample" description-key="Client API Sample" of-type="SingleLine.Text" usage="bound" required="true" />
		<resources>
			<code path="index.ts" order="1" />
			<css path="css/TS_ClientAPI.css" order="2" />
		</resources>
		<feature-usage>
			<uses-feature name="Utility" required="true" />
		</feature-usage>
	</control>
</manifest>
2. ファイルの作成から css フォルダパスを含めて TS_ClientAPI.css を作成。中身を以下に差し替え。
.SampleNamespace\.TSClientAPI
{
font-family: 'SegoeUI-Semibold', 'Segoe UI Semibold', 'Segoe UI Regular', 'Segoe UI';
}
.SampleNamespace\.TSClientAPI .TSTable_Container
{
overflow-x: auto;
}
.SampleNamespace\.TSClientAPI .SampleControlHtmlTable_HtmlRow
{
background-color: #FFFFFF;
}
.SampleNamespace\.TSClientAPI .SampleControlHtmlTable_HtmlHeaderCell
{
text-align: center;
}
.SampleNamespace\.TSClientAPI .SampleControlHtmlTable_HtmlCell,
.SampleNamespace\.TSClientAPI .SampleControlHtmlTable_HtmlHeaderCell
{
border: 1px solid black;
padding-left: 3px;
padding-right: 3px;
}
.SampleNamespace\.TSClientAPI .SampleControlHtmlTable_HtmlHeaderCell
{
font-weight: bold;
font-size: 16px;
}
.SampleNamespace\.TSClientAPI .SampleControlHtmlTable_HtmlCell_Key
{
color: #1160B7;
}
.SampleNamespace\.TSClientAPI .SampleControlHtmlTable_HtmlCell_Value
{
color: #1160B7;
text-align: center;
}
.SampleNamespace\.TSClientAPI .SampleControlHtmlTable_ButtonClass
{
text-decoration: none;
display: inline-block;
font-size: 14px;
cursor: pointer;
color: #1160B7;
background-color: #FFFFFF;
border: 1px solid black;
padding: 5px;
text-align: center;
min-width: 300px;
margin-top: 10px;
margin-bottom: 5px;
display: block;
}
.SampleNamespace\.TSClientAPI .lookupObjectsResultDiv
{
color: #1160B7;
}
3. ターミナルより以下コマンドでビルドを実行。
npm run build
index.ts の編集
1. まずは import の追加と定数の定義。
import {IInputs, IOutputs} from "./generated/ManifestTypes";
2. クラスとプロパティの定義。
export class TSClientAPI implements ComponentFramework.StandardControl<IInputs, IOutputs>
{
    // コンテキスト
    private _context: ComponentFramework.Context<IInputs>;
    // コントロールをホストするコンテナ
    private _container: HTMLDivElement;
    // 画面がフルスクリーンか確認
    private _isFullScreen: boolean;
    // 結果表示用のテーブル
    private _tableElement: HTMLTableElement;
    // フルスクリーンボタン
    private _setFullScreenButton: HTMLButtonElement;
    // Lookup オブジェクトボタン
    private _lookupObjectsButton:HTMLButtonElement;
    // Lookup の結果領域
    private _lookupObjectsResultDiv: HTMLDivElement;
    // コントロール描写完了フラグ
    private _controlViewRendered: Boolean;
    // Lookup 結果グリッド用ラベル
    private LOOKUP_OBJECTS_RESULT_DIV_STRING: string = "Lookup で選択されたレコード: ";
    // ボタン用ラベル
    private BUTTON_LABEL_CLICK_STRING: string = "クリックして実行:";
    // メタデータを取得するエンティティの論理名
    private ENTITY_LOGICAL_NAME_FOR_METADATA_EXAMPLE = "account";
}
3. init 初期化メソッドを追加。
/**
* init メソッド
* @param context : 各種オブジェクトや API へのアクセスを提供するコンテキスト
* @param notifyOutputChanged : 出力変更通知のコールバック
* @param state : 前回保存したステート
* @param container : UI コントロールを保持するコンテナ
*/
public init(context: ComponentFramework.Context<IInputs>, notifyOutputChanged: () => void, state: ComponentFramework.Dictionary, container: HTMLDivElement) {
    this._isFullScreen = false;
    this._controlViewRendered = false;
    this._context = context;
    this._container = document.createElement("div");
    this._container.classList.add("TSTable_Container");
    container.appendChild(this._container);
}
4. PCF からの変更通知を処理する updateView メソッドを追加。
public updateView(context: ComponentFramework.Context<IInputs>): void {
    if (!this._controlViewRendered) {
        // Render and add HTMLTable to the custom control container element
        let tableElement: HTMLTableElement = this.createHTMLTableElement();
        this._container.appendChild(tableElement);
        // Render and add set full screen button to the custom control container element
        this._setFullScreenButton = this.createHTMLButtonElement(
            this.getSetFullScreenButtonLabel(!this._isFullScreen),
            this.onSetFullScreenButtonClick.bind(this),
            null);
        this._container.appendChild(this._setFullScreenButton);
        this._controlViewRendered = true;
    }
}
5. 各種エレメントの描写メソッドを追加。
- context.client でフォームファクターやクライアント情報を取得
- context.userSettings でユーザーの情報を取得
- context.formatting でフォーマット情報を取得
- context.utils でメタデータの取得や Lookup を実行
/**
* ボタンの作成
* @param buttonLabel : ラベル
* @param onClickHandler : クリックイベントハンドラー
* @param entityName : エンティティの論理名
*/
private createHTMLButtonElement(buttonLabel: string, onClickHandler: (event?: any) => void, entityName: string | null): HTMLButtonElement {
let button: HTMLButtonElement = document.createElement("button");
button.innerHTML = buttonLabel;
if (entityName != null) {
button.setAttribute("entityName", entityName);
}
button.classList.add("SampleControlHtmlTable_ButtonClass");
button.addEventListener("click", onClickHandler);
return button;
}
/**
* フルスクリーンボタンのラベルを返す
* @param isFullScreenVal : True if control is currently in 'full screen' mode
*/
private getSetFullScreenButtonLabel(isFullScreenVal: boolean): string {
return this.BUTTON_LABEL_CLICK_STRING + " setFullScreen(" + String(isFullScreenVal) + ")";
}
/**
* lookup ダイアログの作成
* @param entityName : name of entity that should be used by the lookup dialog
*/
private GenerateLookupObjectElements(entityName: string): void {
this._lookupObjectsButton = this.createHTMLButtonElement(
this.BUTTON_LABEL_CLICK_STRING + " lookupObjects(" + entityName + ")",
this.onLookupObjectsButtonClick.bind(this),
entityName);
this._container.appendChild(this._lookupObjectsButton);
this._lookupObjectsResultDiv = document.createElement("div");
this._lookupObjectsResultDiv.setAttribute("class", "lookupObjectsResultDiv");
let resultDivString: string = this.LOOKUP_OBJECTS_RESULT_DIV_STRING;
resultDivString += "<br />";
resultDivString += "none";
this._lookupObjectsResultDiv.innerHTML = resultDivString;
this._container.appendChild(this._lookupObjectsResultDiv);
}
/**
* ClientAPI の結果表示用テーブルの作成
*/
private createHTMLTableElement(): HTMLTableElement {
// テーブル作成
let tableElement: HTMLTableElement = document.createElement("table");
tableElement.setAttribute("class", "SampleControlHtmlTable_HtmlTable");
// ヘッダーの作成
let key: string = "メソッドの例";
let value: string = "結果";
tableElement.appendChild(this.createHTMLTableRowElement(key, value, true));
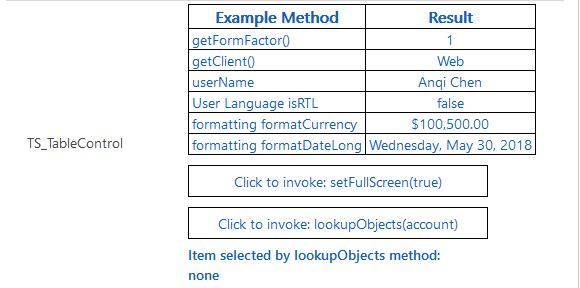
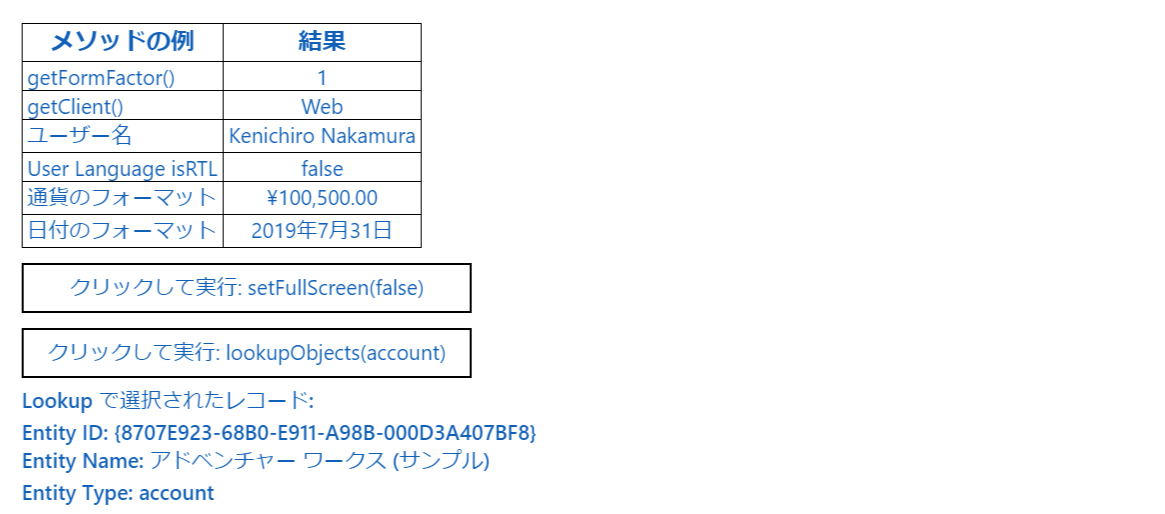
// getFormFactor()
key = "getFormFactor()";
value = String(this._context.client.getFormFactor());
tableElement.appendChild(this.createHTMLTableRowElement(key, value, false));
// getClient() クライアントのタイプ (phone / tablet/ web) を確認
key = "getClient()";
value = String(this._context.client.getClient());
tableElement.appendChild(this.createHTMLTableRowElement(key, value, false));
// ログインユーザー名の確認
key = "ユーザー名";
value = String(this._context.userSettings.userName);
tableElement.appendChild(this.createHTMLTableRowElement(key, value, false));
// ユーザー言語が RTL (Right to Left) か確認
key = "User Language isRTL";
value = String(this._context.userSettings.isRTL);
tableElement.appendChild(this.createHTMLTableRowElement(key, value, false));
// 数値のフォーマット形式
key = "通貨のフォーマット";
let numberFormattingInfo: ComponentFramework.UserSettingApi.NumberFormattingInfo =
this._context.userSettings.numberFormattingInfo;
let percision: number = numberFormattingInfo.currencyDecimalDigits;
let currencySymbol: string = numberFormattingInfo.currencySymbol;
value = this._context.formatting.formatCurrency(100500, percision, currencySymbol);
tableElement.appendChild(this.createHTMLTableRowElement(key, value, false));
// 日付のフォーマット形式
key = "日付のフォーマット";
value = this._context.formatting.formatDateLong(new Date());
tableElement.appendChild(this.createHTMLTableRowElement(key, value, false));
// エンティティのメタデータ
this._context.utils.getEntityMetadata(this.ENTITY_LOGICAL_NAME_FOR_METADATA_EXAMPLE).then
(
entityMetadata => {
// Lookup の作成
this.GenerateLookupObjectElements(this.ENTITY_LOGICAL_NAME_FOR_METADATA_EXAMPLE);
},
error => {
// エラーのハンドリング
}
);
return tableElement;
}
/**
* テーブルの行作成
*
* @param key : 列のキー
* @param value : 列の値
* @param isHeaderRow : ヘッダー行かどうかの指定
*/
private createHTMLTableRowElement(key: string, value: string, isHeaderRow: boolean): HTMLTableRowElement {
let keyCell: HTMLTableCellElement = this.createHTMLTableCellElement(key, "SampleControlHtmlTable_HtmlCell_Key", isHeaderRow);
let valueCell: HTMLTableCellElement = this.createHTMLTableCellElement(value, "SampleControlHtmlTable_HtmlCell_Value", isHeaderRow);
let rowElement: HTMLTableRowElement = document.createElement("tr");
rowElement.setAttribute("class", "SampleControlHtmlTable_HtmlRow");
rowElement.appendChild(keyCell);
rowElement.appendChild(valueCell);
return rowElement;
}
/**
* テーブルのセル作成
*
* @param cellValue :セルの値
* @param className : セルのクラス
* @param isHeaderRow : ヘッダー行かどうかの指定
*/
private createHTMLTableCellElement(cellValue: string, className: string, isHeaderRow: boolean): HTMLTableCellElement {
let cellElement: HTMLTableCellElement;
if (isHeaderRow) {
cellElement = document.createElement("th");
cellElement.setAttribute("class", "SampleControlHtmlTable_HtmlHeaderCell " + className);
}
else {
cellElement = document.createElement("td");
cellElement.setAttribute("class", "SampleControlHtmlTable_HtmlCell " + className);
}
let textElement: Text = document.createTextNode(cellValue);
cellElement.appendChild(textElement);
return cellElement;
}
6. ボタンのコールバックハンドラーメソッドを追加。
- context.mode でフルスクリーンの操作
- context.utils.lookupObjects で Lookup 実行
/**
* フルするクリーンのイベントハンドラー
* @param event : OnClick Event
*/
private onSetFullScreenButtonClick(event: Event): void {
    this._context.mode.setFullScreen(!this._isFullScreen);
    this._setFullScreenButton.innerHTML = this.getSetFullScreenButtonLabel((this._isFullScreen));
    this._isFullScreen = !this._isFullScreen;
}

/**
* lookup objects のイベントハンドラー
* @param event : OnClick Event
*/
private onLookupObjectsButtonClick(event: Event): void {
    // エンティティ名を取得
    let entityName: string = (event.srcElement! as Element)!.getAttribute("entityName")!;
    var lookUpOptions: any =
    {
        // 複数エンティティの場合 entityTypes: ["account", "contact"]
        entityTypes: [entityName]
    };
    var lookUpPromise: any = this._context.utils.lookupObjects(lookUpOptions);
    lookUpPromise.then
        (
            // 結果の取得と表示
            (data: any) => {
                if (data && data[0] && this._lookupObjectsResultDiv) {
                    let id: string = data[0].id;
                    let name: string = data[0].name;
                    let entityType: string = data[0].entityType;
                    let resultHTML: string = this.LOOKUP_OBJECTS_RESULT_DIV_STRING;
                    resultHTML += "<br/>";
                    resultHTML += "Entity ID: ";
                    resultHTML += id;
                    resultHTML += "<br/>";
                    resultHTML += "Entity Name: ";
                    resultHTML += name;
                    resultHTML += "<br/>";
                    resultHTML += "Entity Type: ";
                    resultHTML += entityType;
                    this._lookupObjectsResultDiv.innerHTML = resultHTML;
                }
            },
            (error: any) => {
                // エラーハンドリング
            }
        );
}
7. 必須である getOutputs と destroy メソッドを追加。
public getOutputs(): IOutputs {
    return {};
}

public destroy() {
}
コントロールのパッケージ化と配布
これまでと同じ方法でパッケージ化と配布を実行。
1. SampleSolution フォルダに移動し、以下のコマンドを実行。
pac solution add-reference --path ../ClientAPIControl
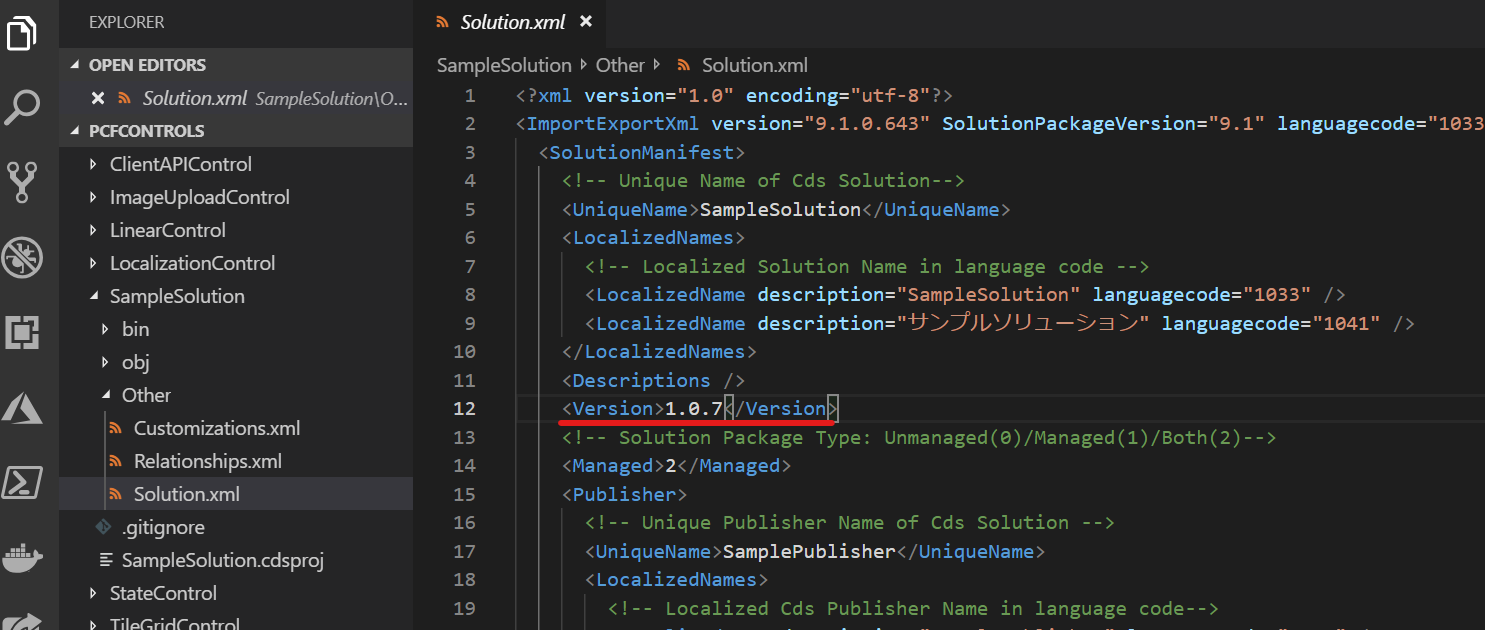
2. SampleSolution\Other\Solution.xml でバージョン情報を更新。
3. 以下コマンドでパッケージをビルド。
msbuild /restore
msbuild /p:configuration=Release
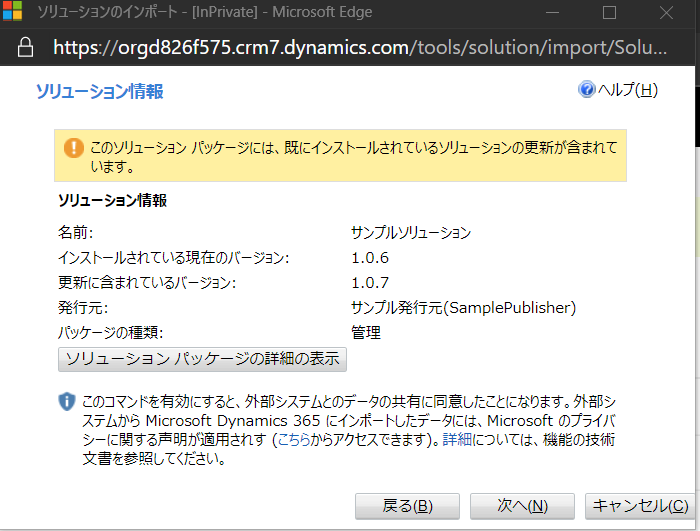
4. https://make.powerapps.com に接続。管理者権限でログイン。すでに SampleSolution を入れた環境で Solutions を選択し、Import をクリック。コンパイルした zip をインポート。インポート時にパッケージが更新される旨が表示されるので、そのまま次へ。
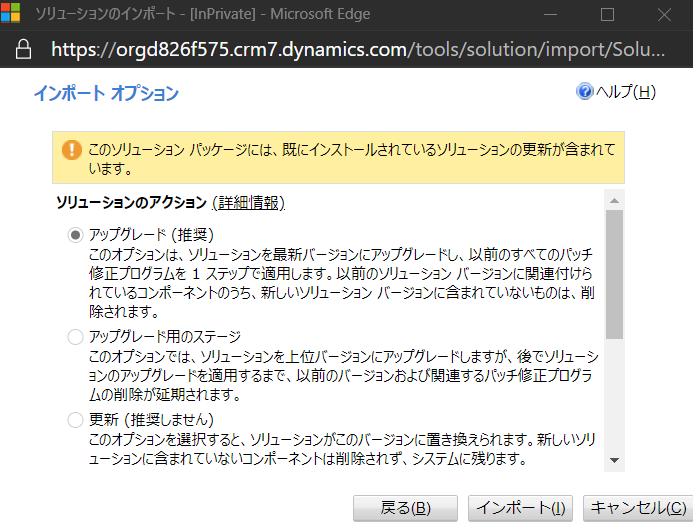
5. 次の画面も既定のまま「インポート」をクリック。
6. インポートが終わったら Data | Entities | 取引先企業 | Forms | 取引先企業フォームを開き、「Switch to classic」をクリック。
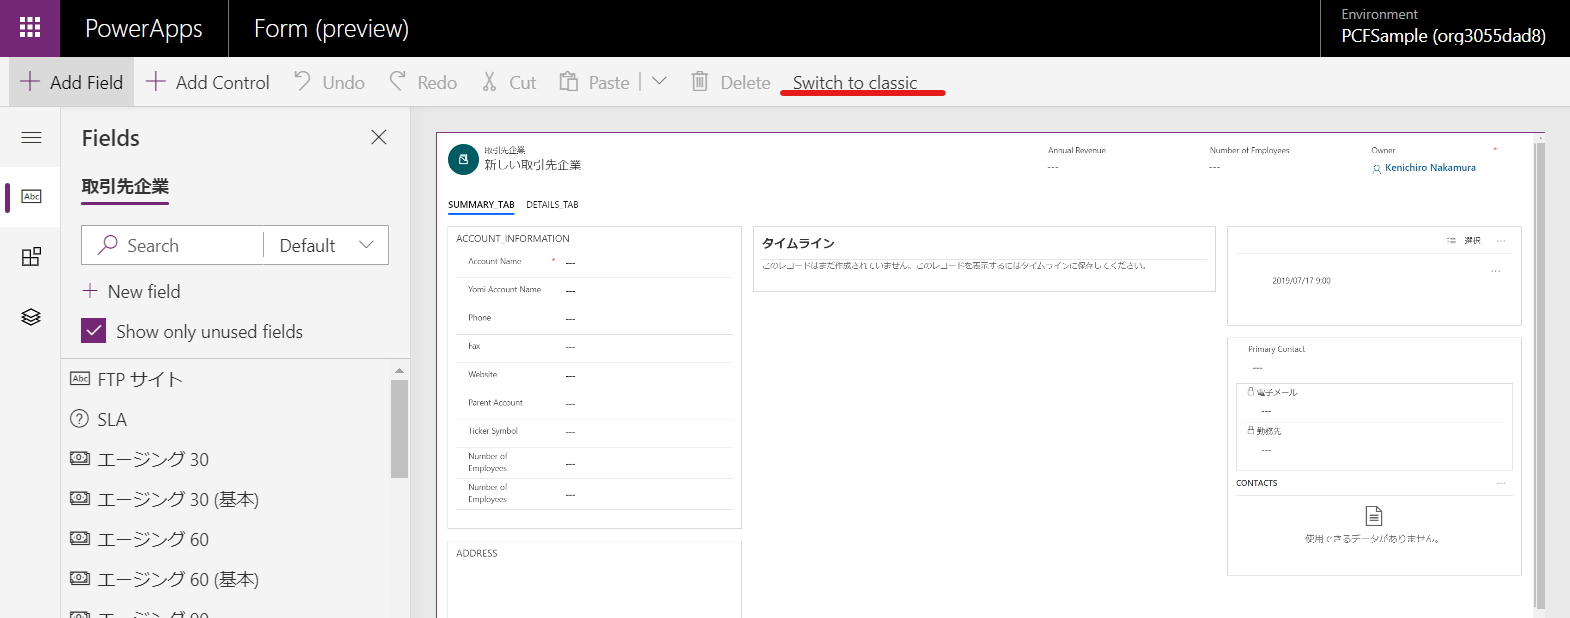
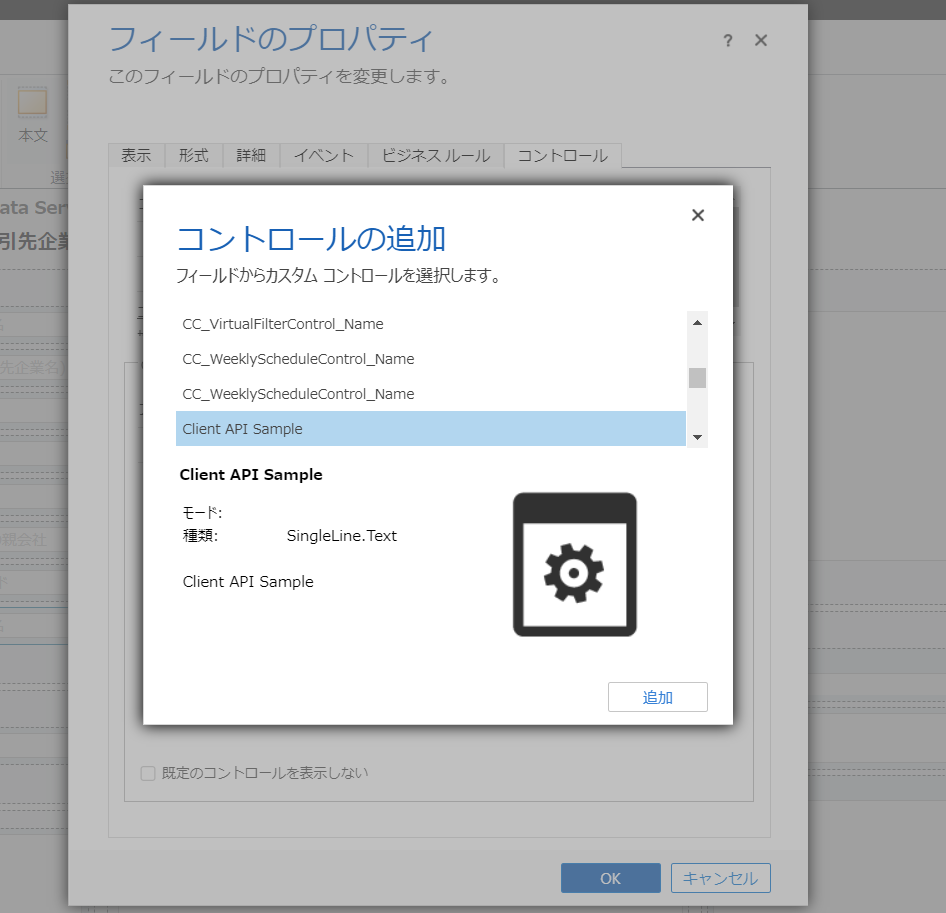
7. 任意の一行テキストフィールドに対してプロパティよりコントロールを選択し、開発したコントロールを追加。
8. すべての保存してフォームを公開。
動作確認
最後に動作を確認しましょう。
1. アプリより取引先企業のレコードを開き、開発したコントロールと各メソッドの結果を確認。
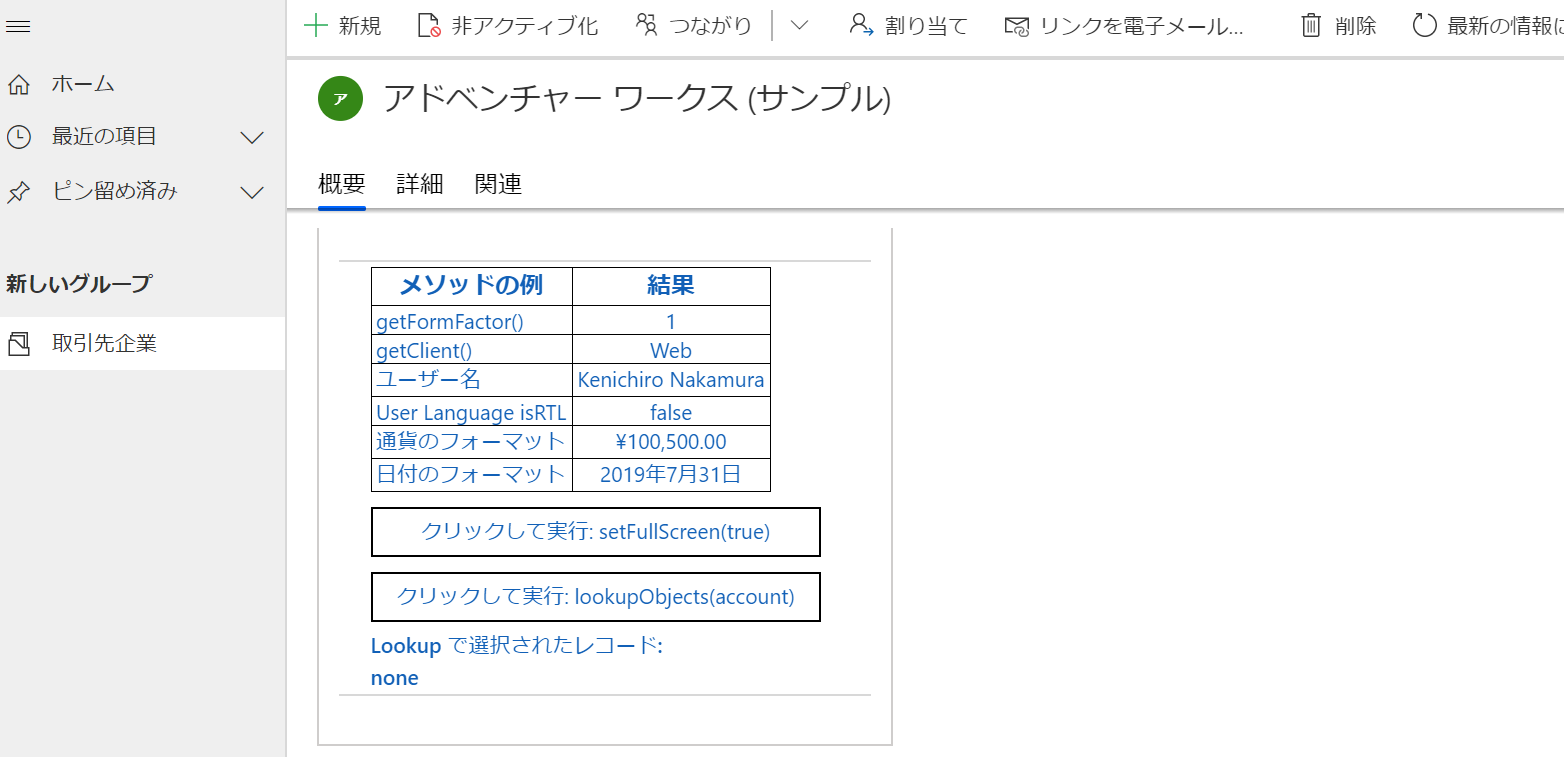
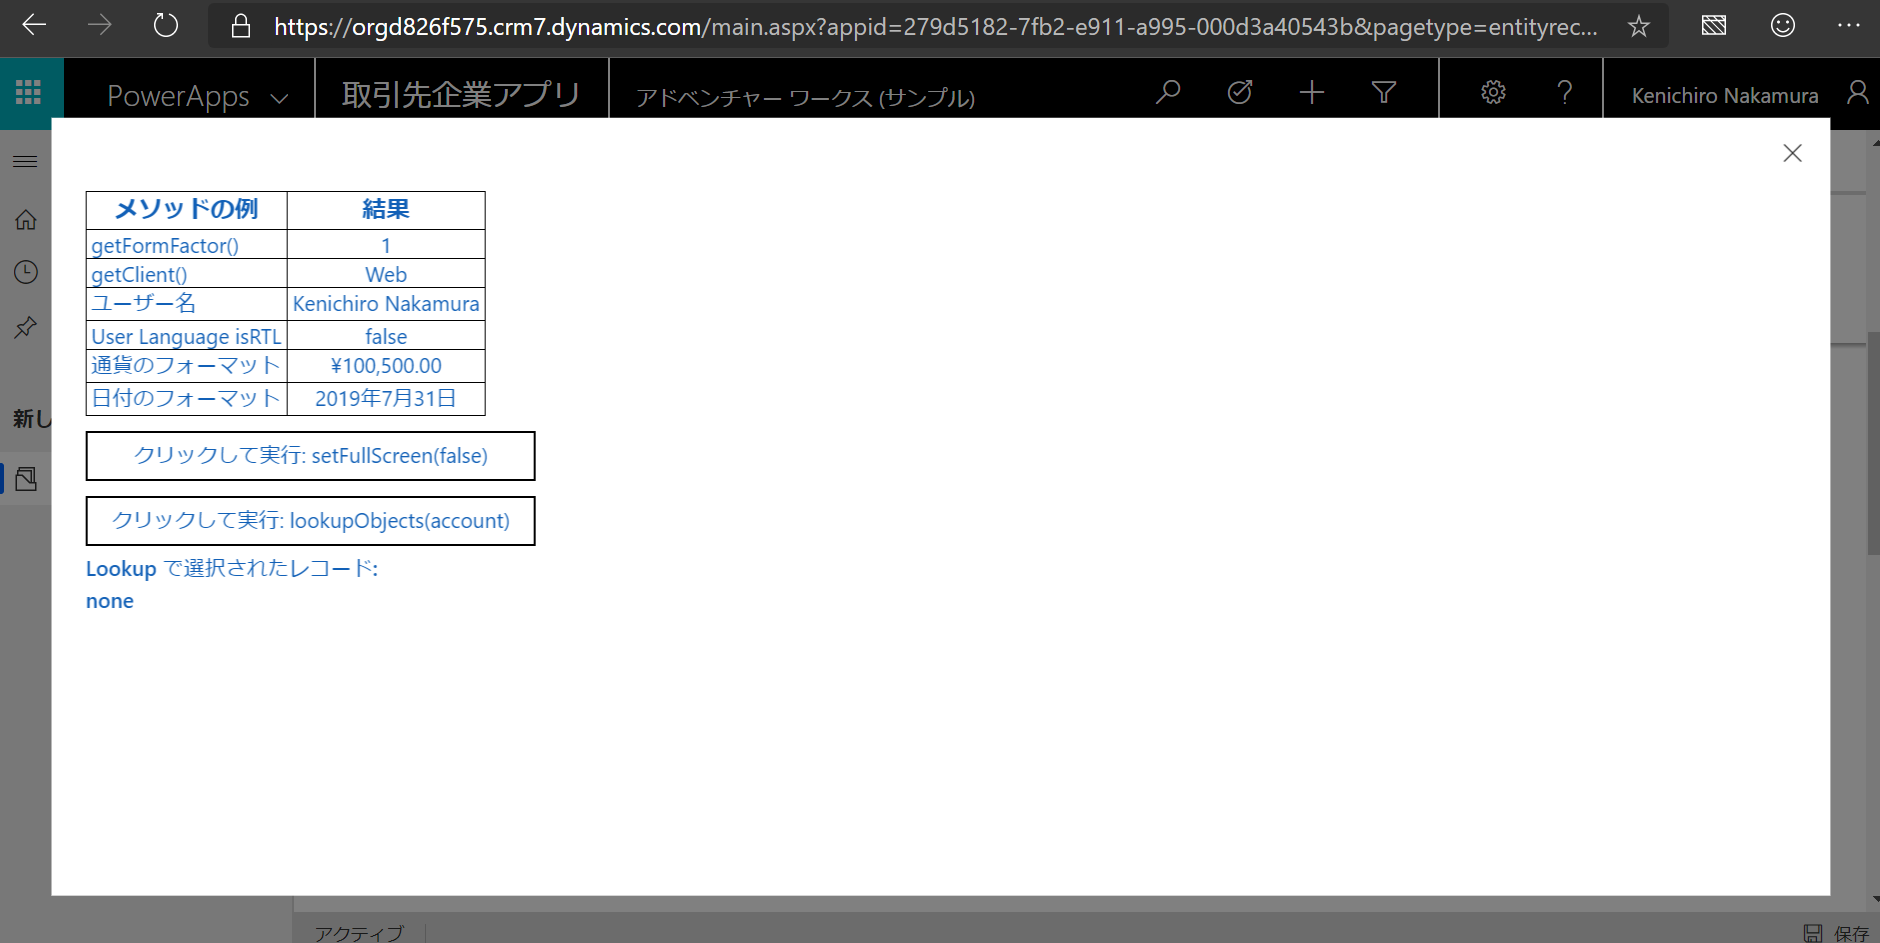
2.「クリックして実行: setFullScreen(true)」をクリックしてコントロールがフルスクリーンになることを確認。
3.「クリックして実行: lookupObject(account)」をクリックしてレコードの検索画面が出ることを確認。
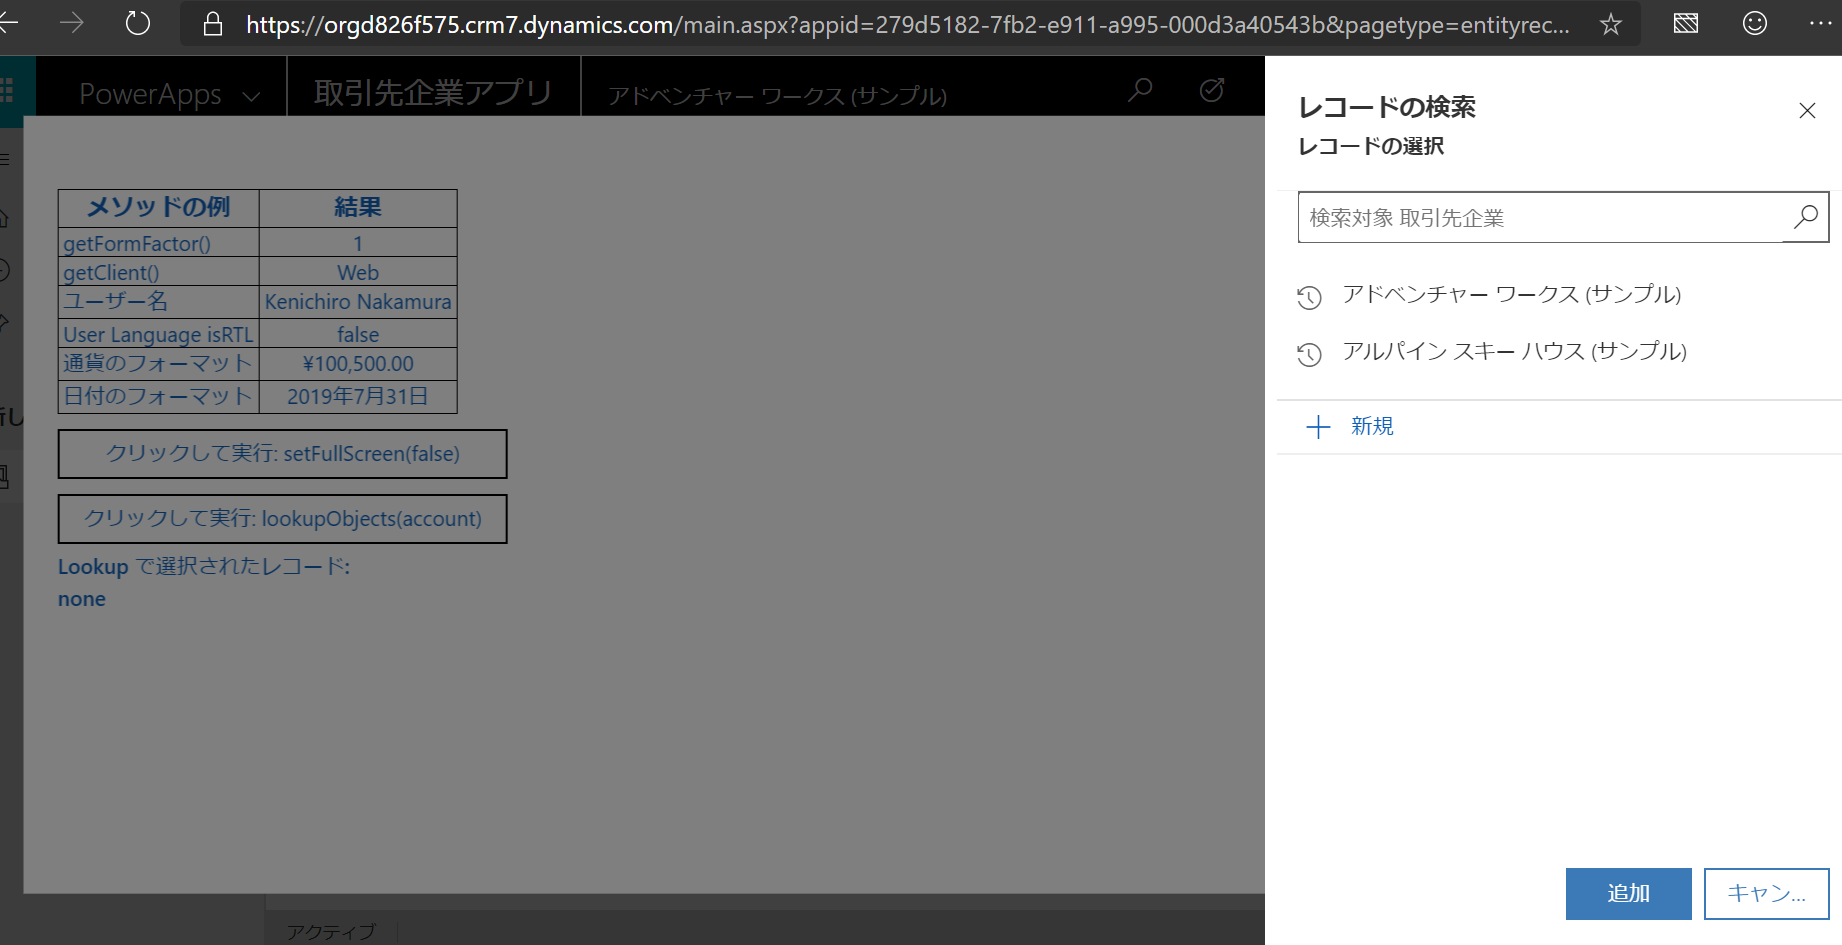
4. レコードを選択すると詳細が出ることを確認。
まとめ
Client API を利用するとクライアントの実行環境やログインユーザーの情報が取れるほか、画面サイズのコントロールもできるため、ある程度の領域が必要なコントロールの開発も容易になります。